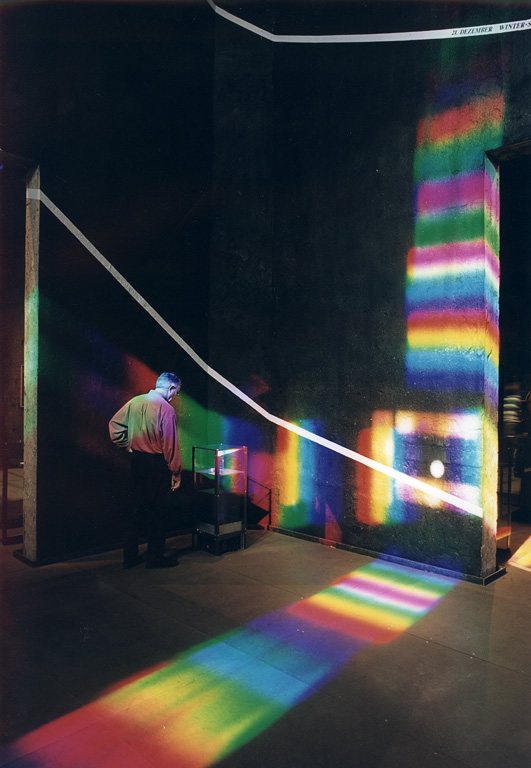
Spectrum of Time by Peter Erskine
Spectrum of Time is a rainbow sundial calendar installation permanently located at the Kokerei Zollverein, Germany that tells the astronomical time. Hours, months, spring equinox, summer solstice, autumn equinox, and winter solstice are all mapped and marked astronomical accurately on the walls and floor of the 40′ X 40′ X 40′ space. The rainbow sundial calendar is lighted up by sunlight through laser-cut cross prism. The ellipse in the middle of the rainbow will travel in the space through the painted lines that indicate the path of the Sun.
THREEJS with CSJ.js
For this week's assignment, I wanted to bring my experience of the first time me seeing the Pantheon in person--the rounded sunlight came through the hole in the middle of the dome, looks both organic and geometric at the same time. But to achieve this shape, I will need to do hollow shapes.

First, I tried with the easy way (which I think it might be easier), is to import a model.


I created a simple model with C4D, and couldn't figure out a way to import it to my local server. So I searched more on how to create hollow shapes with ThreeJS, and I found CSG. I first created a hollow sphere, then use the same method, I create a hole on the top of the dome. Although I am still not quite satisfied with the lighting, at leaset I figured out how to model a hollow shape. Below is another scene I created:

Experiencing with RunwayML
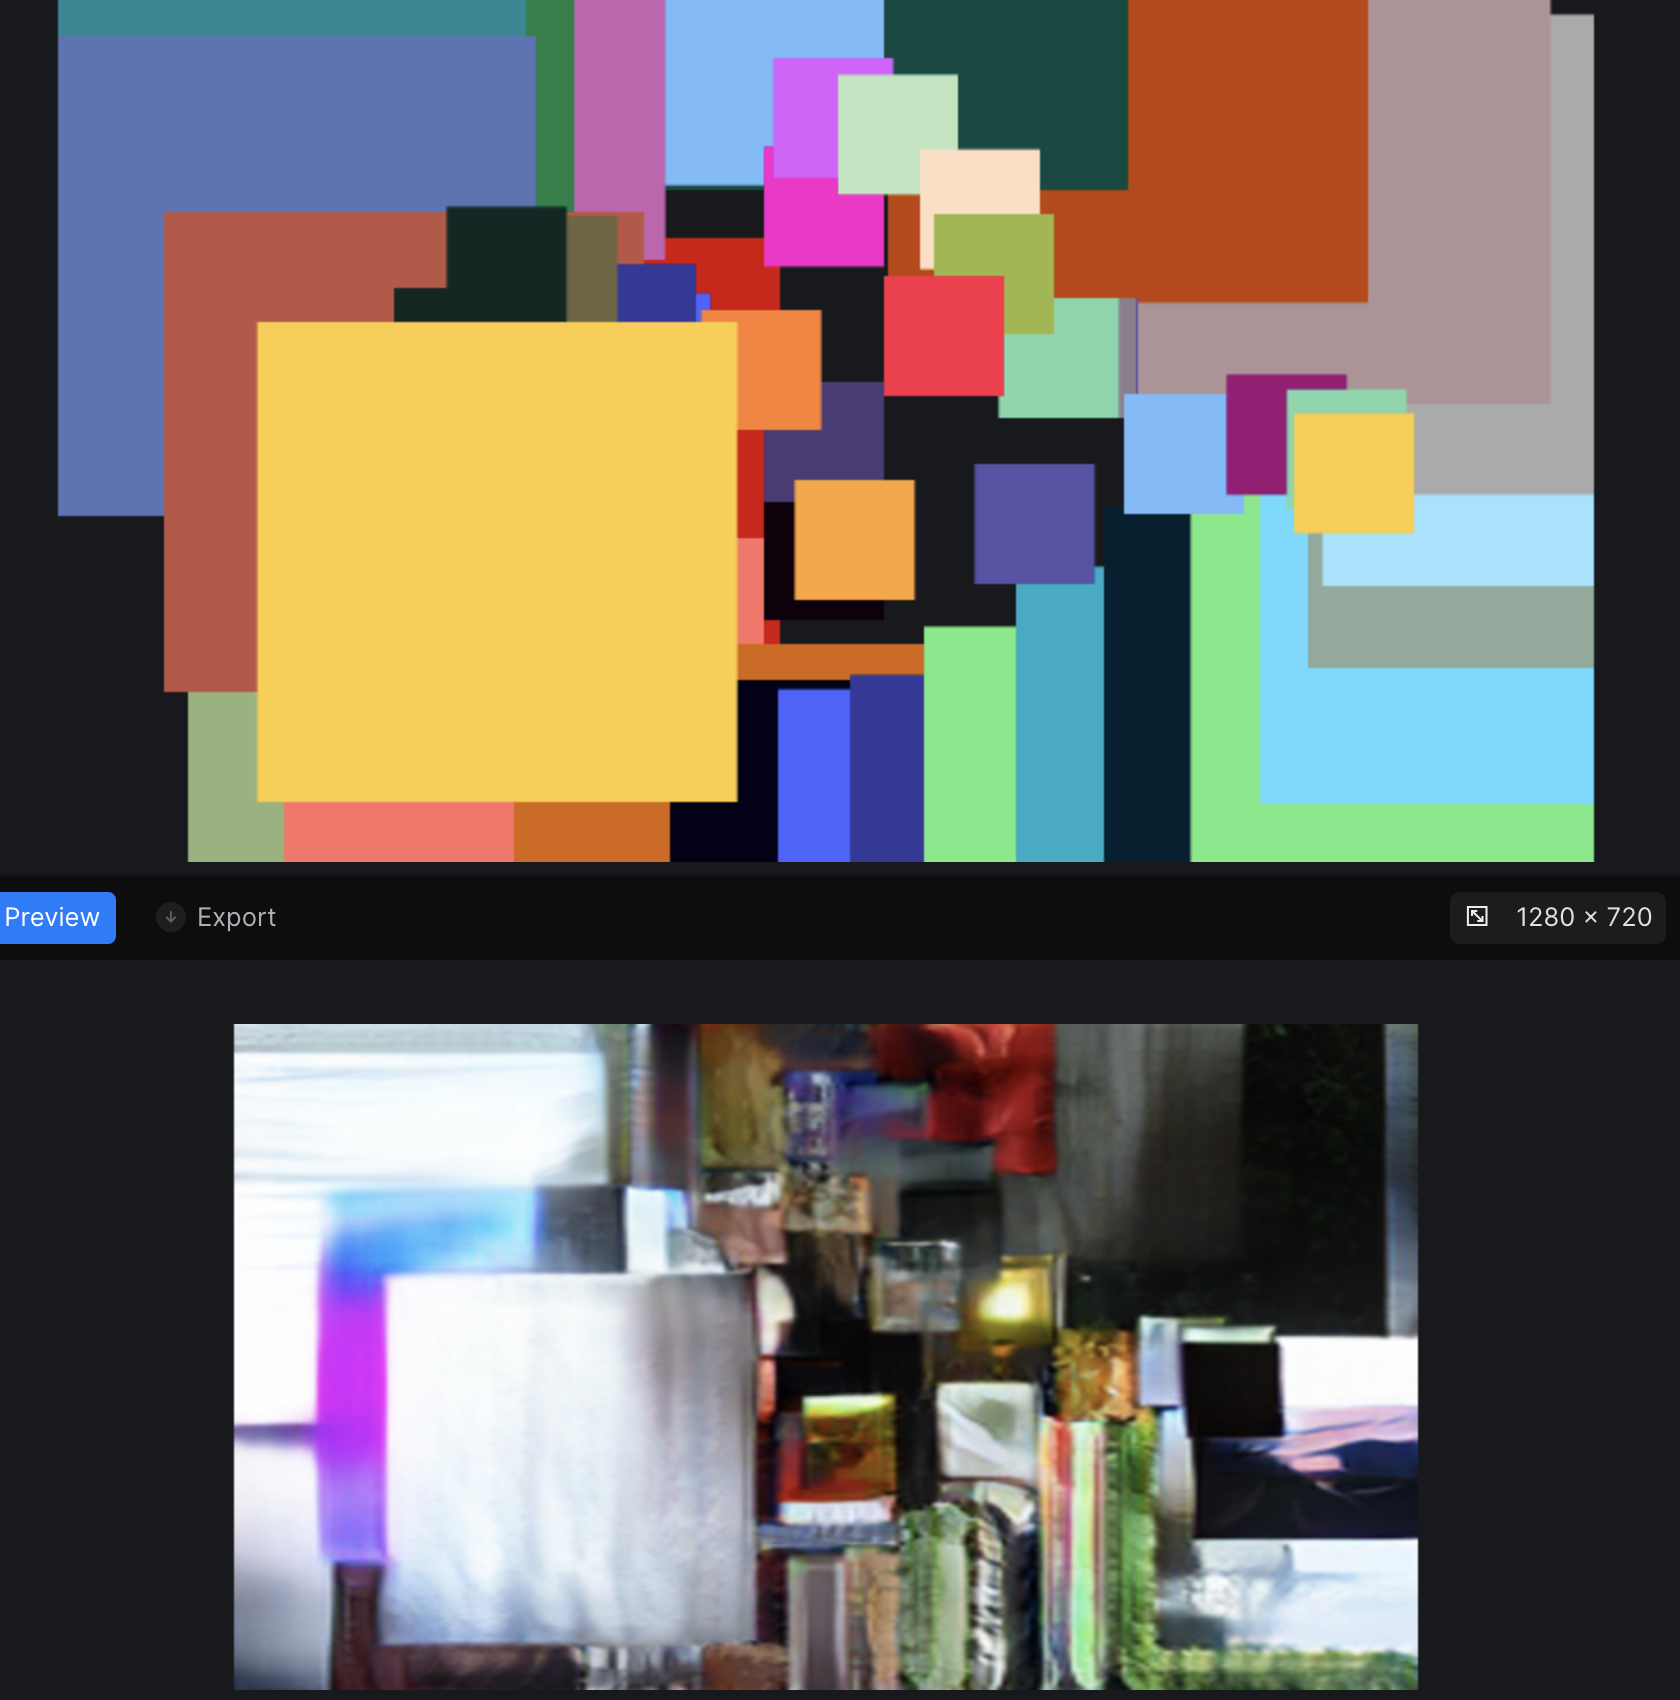
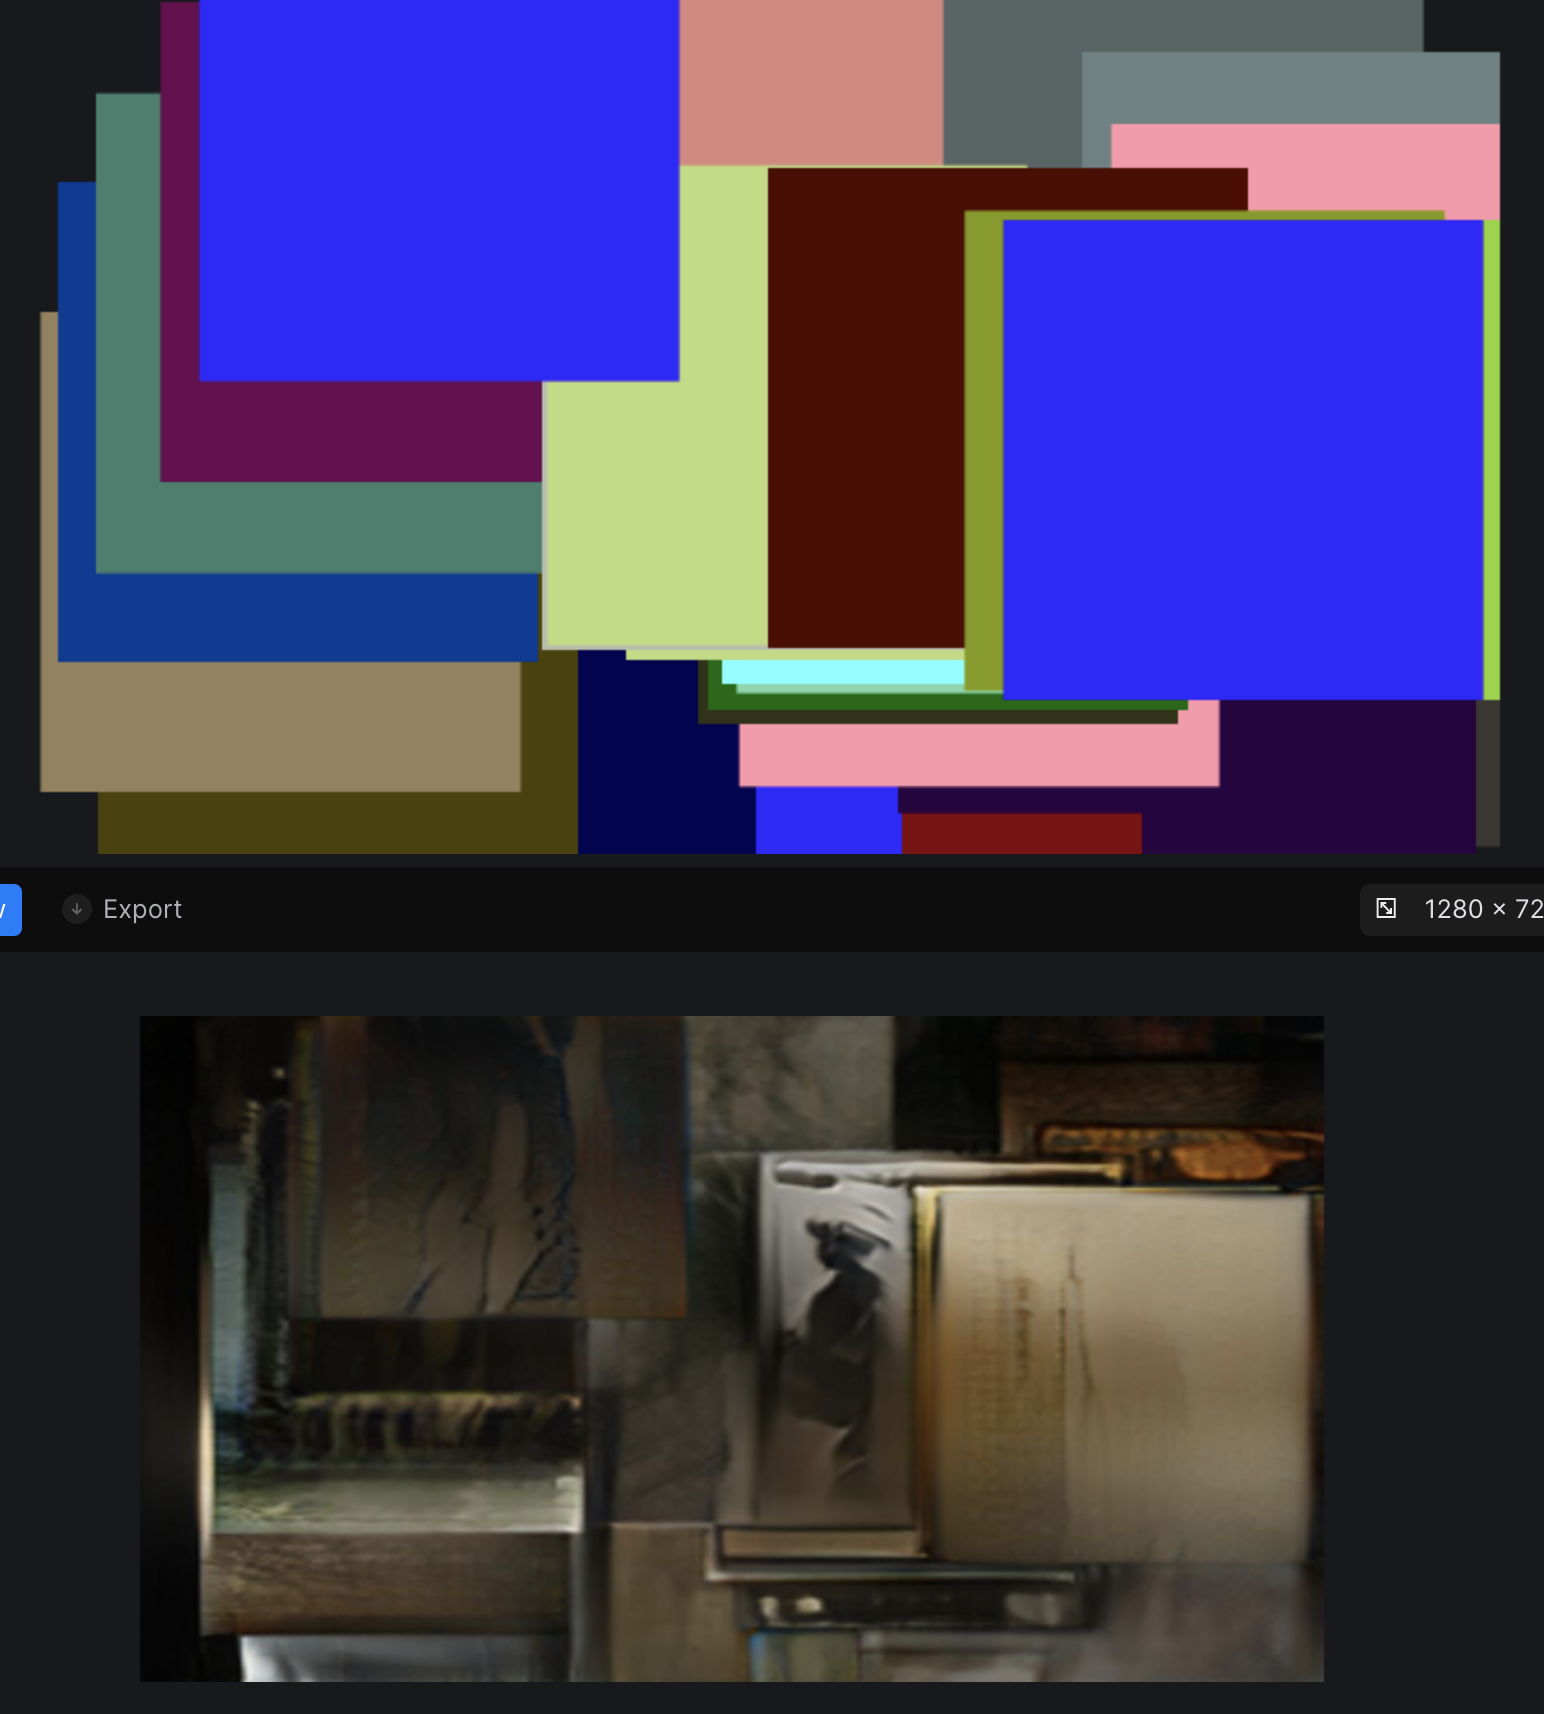
I experienced with SPADE COCO with a p5 sketch with draggable squares that has a random to all the color data that SPADE COCO carries and convert it in Runway And got some collage like below
Then experienced with First-Order-Motion-Model with both a human face and an anime face to see how well it tracks.
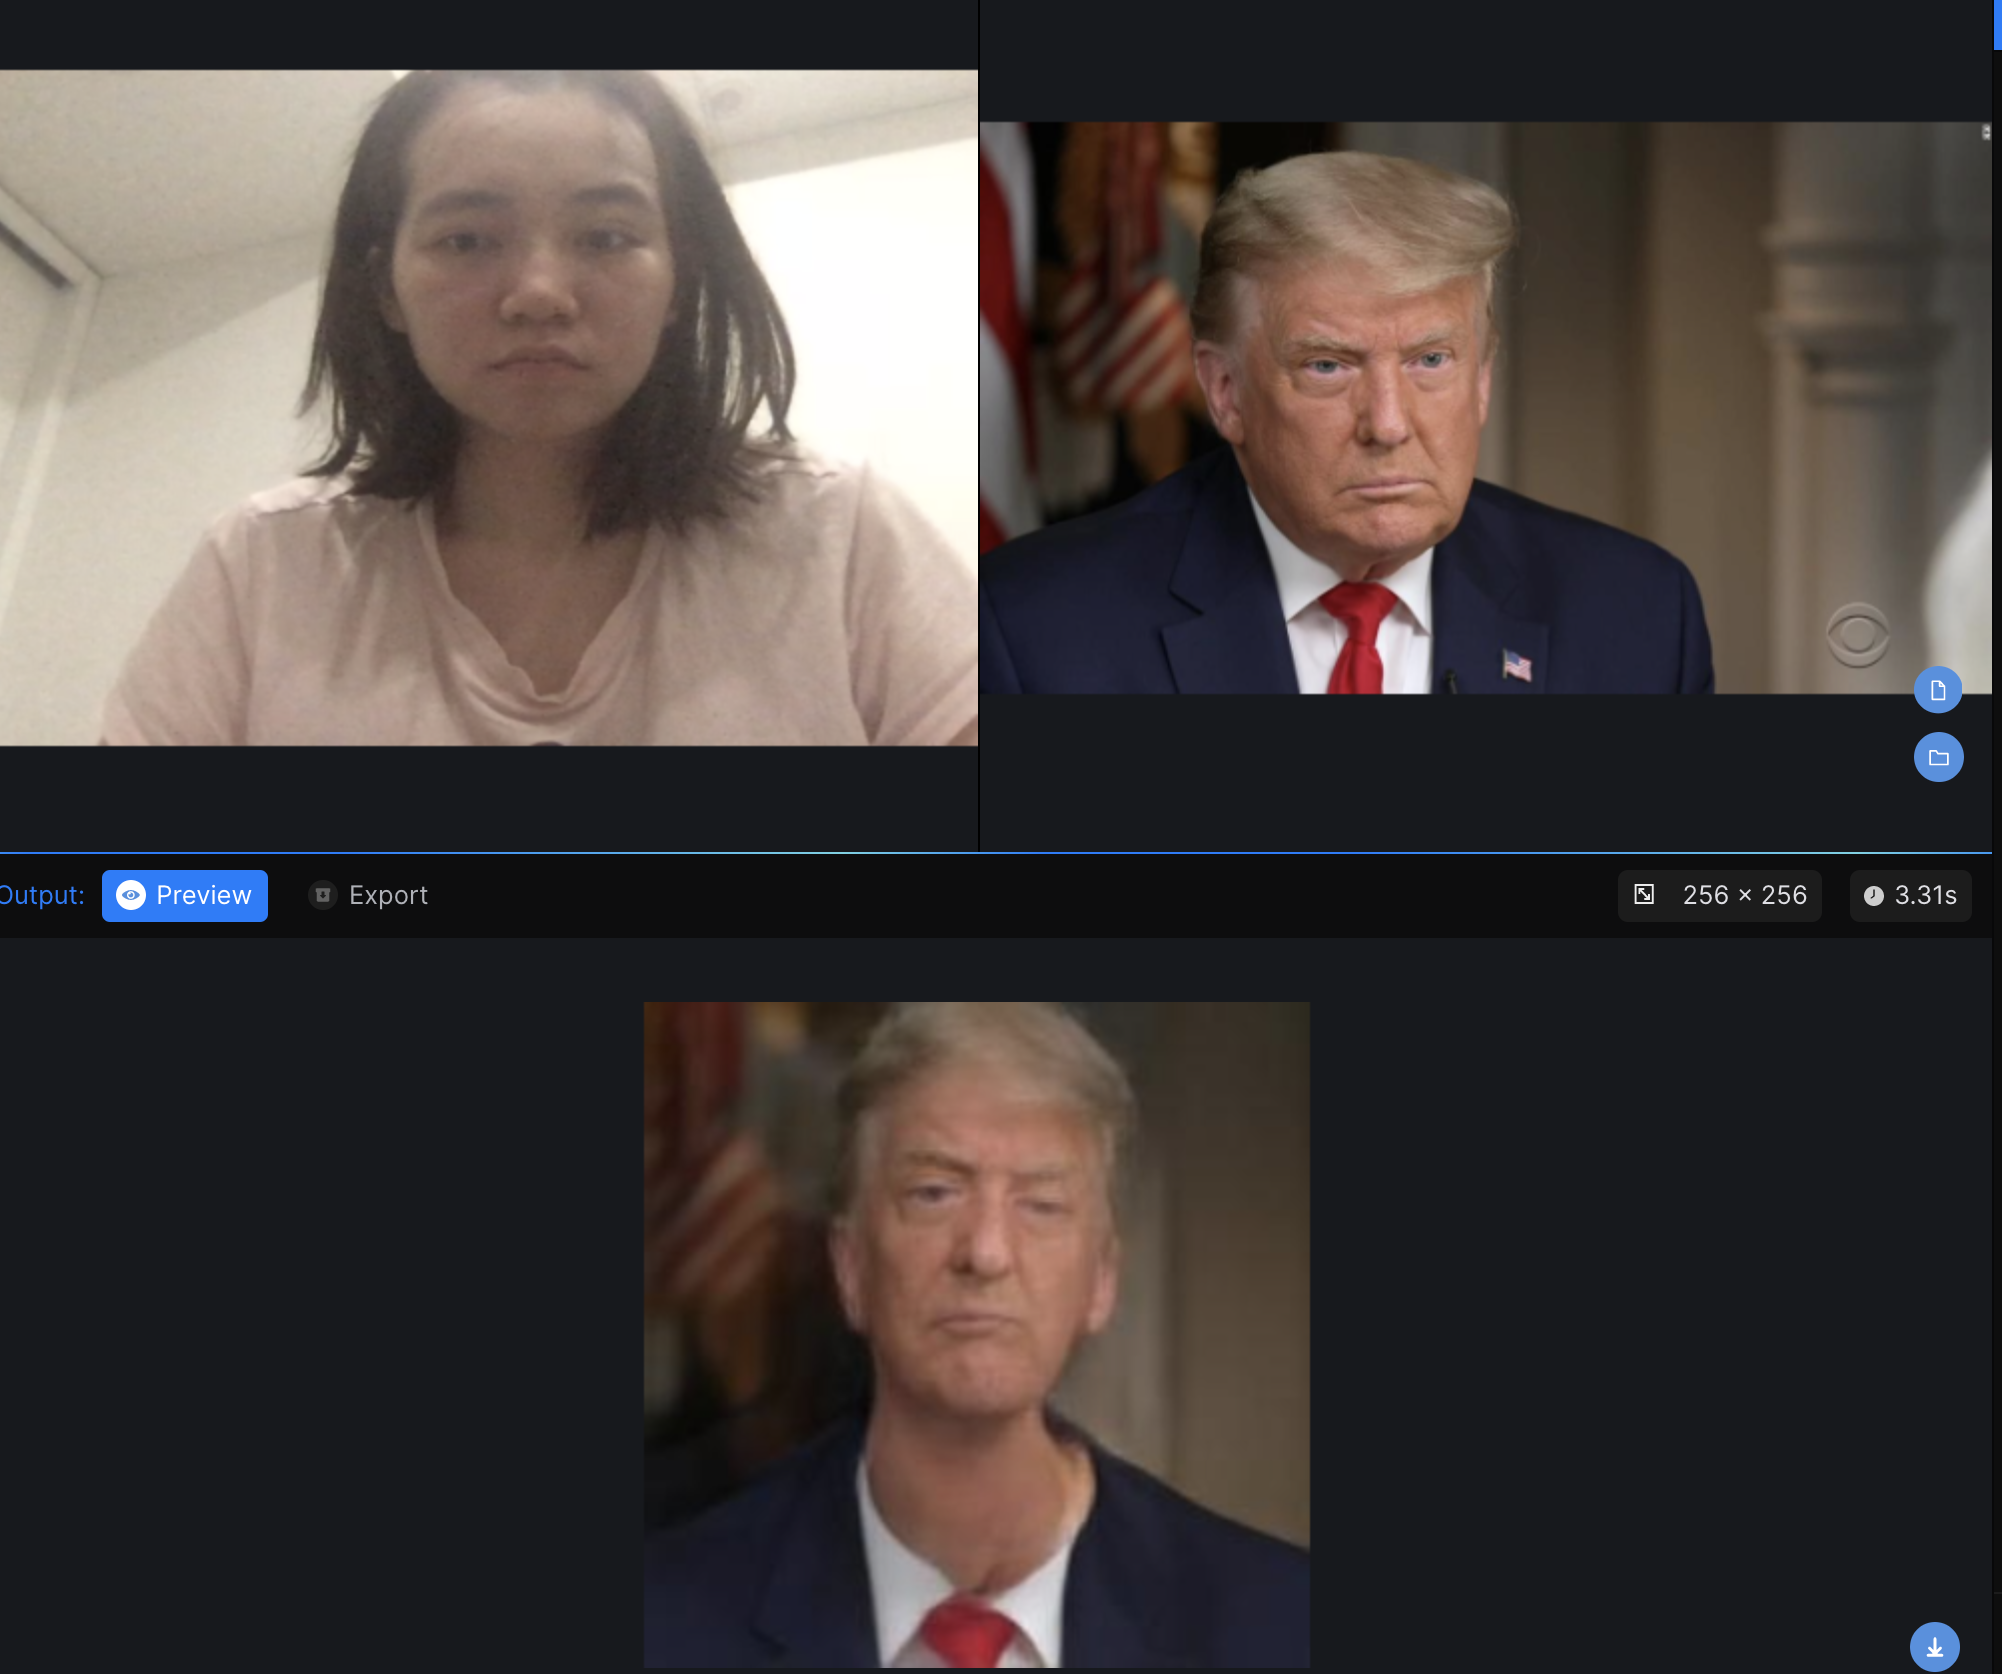

One that I really liked is HiDT that can blend a color theme to another image:

Harry Potter Spells with TM: p5
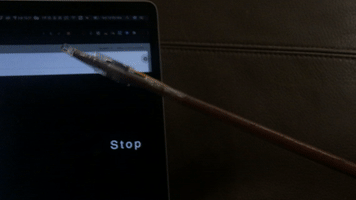
The first thing that came to my mind when I think about triggering something with sound is Magic Spell. And probably the most well-know spell of all would be Harry Potter's "Lumos" spell for light.
For this project, "Lumos" isn't a common word that will be easily recognized by the library so instead I used Teachable Machine to train specifically the word "Lumos" and also "Stop" to be the switch that triggers the LED.
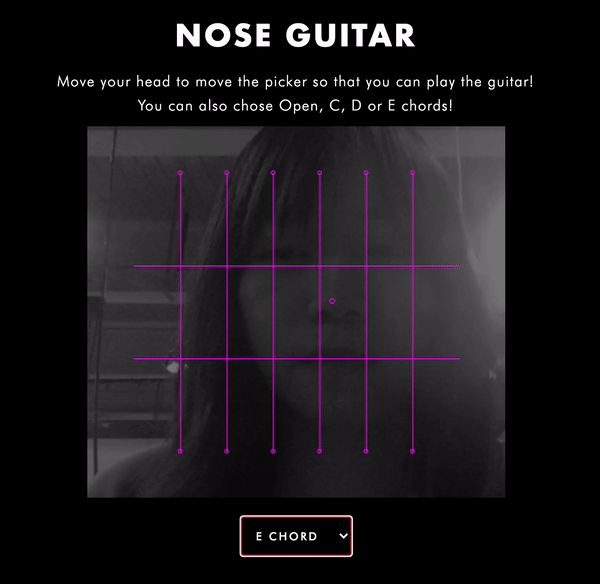
Nose Guitar: P5
This project is based off of my previous exploration with Tone.js, instead of interacting with the virtual guitar by using the cursor, in this project I want this virtual guitar to have more physical connection with the user.
In this project poseNet was used as the trigger.

Controlling the Ball: p5
Smile for a Selfie p5
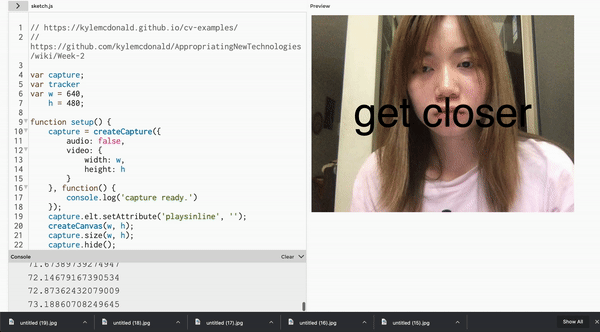
For this week, which is my last week for the summer intern, I am still getting familier with ML5's imageclassification. I have played with the DoodleNet demo and was thinking about to create something like the quick draw example, but didn't know how to call out the entire label database so that I can do a random function to it. So I used a computer vision face tracking example from Kyle Mcdonald and created a demo that captures when it detechs a smile.
DEMO
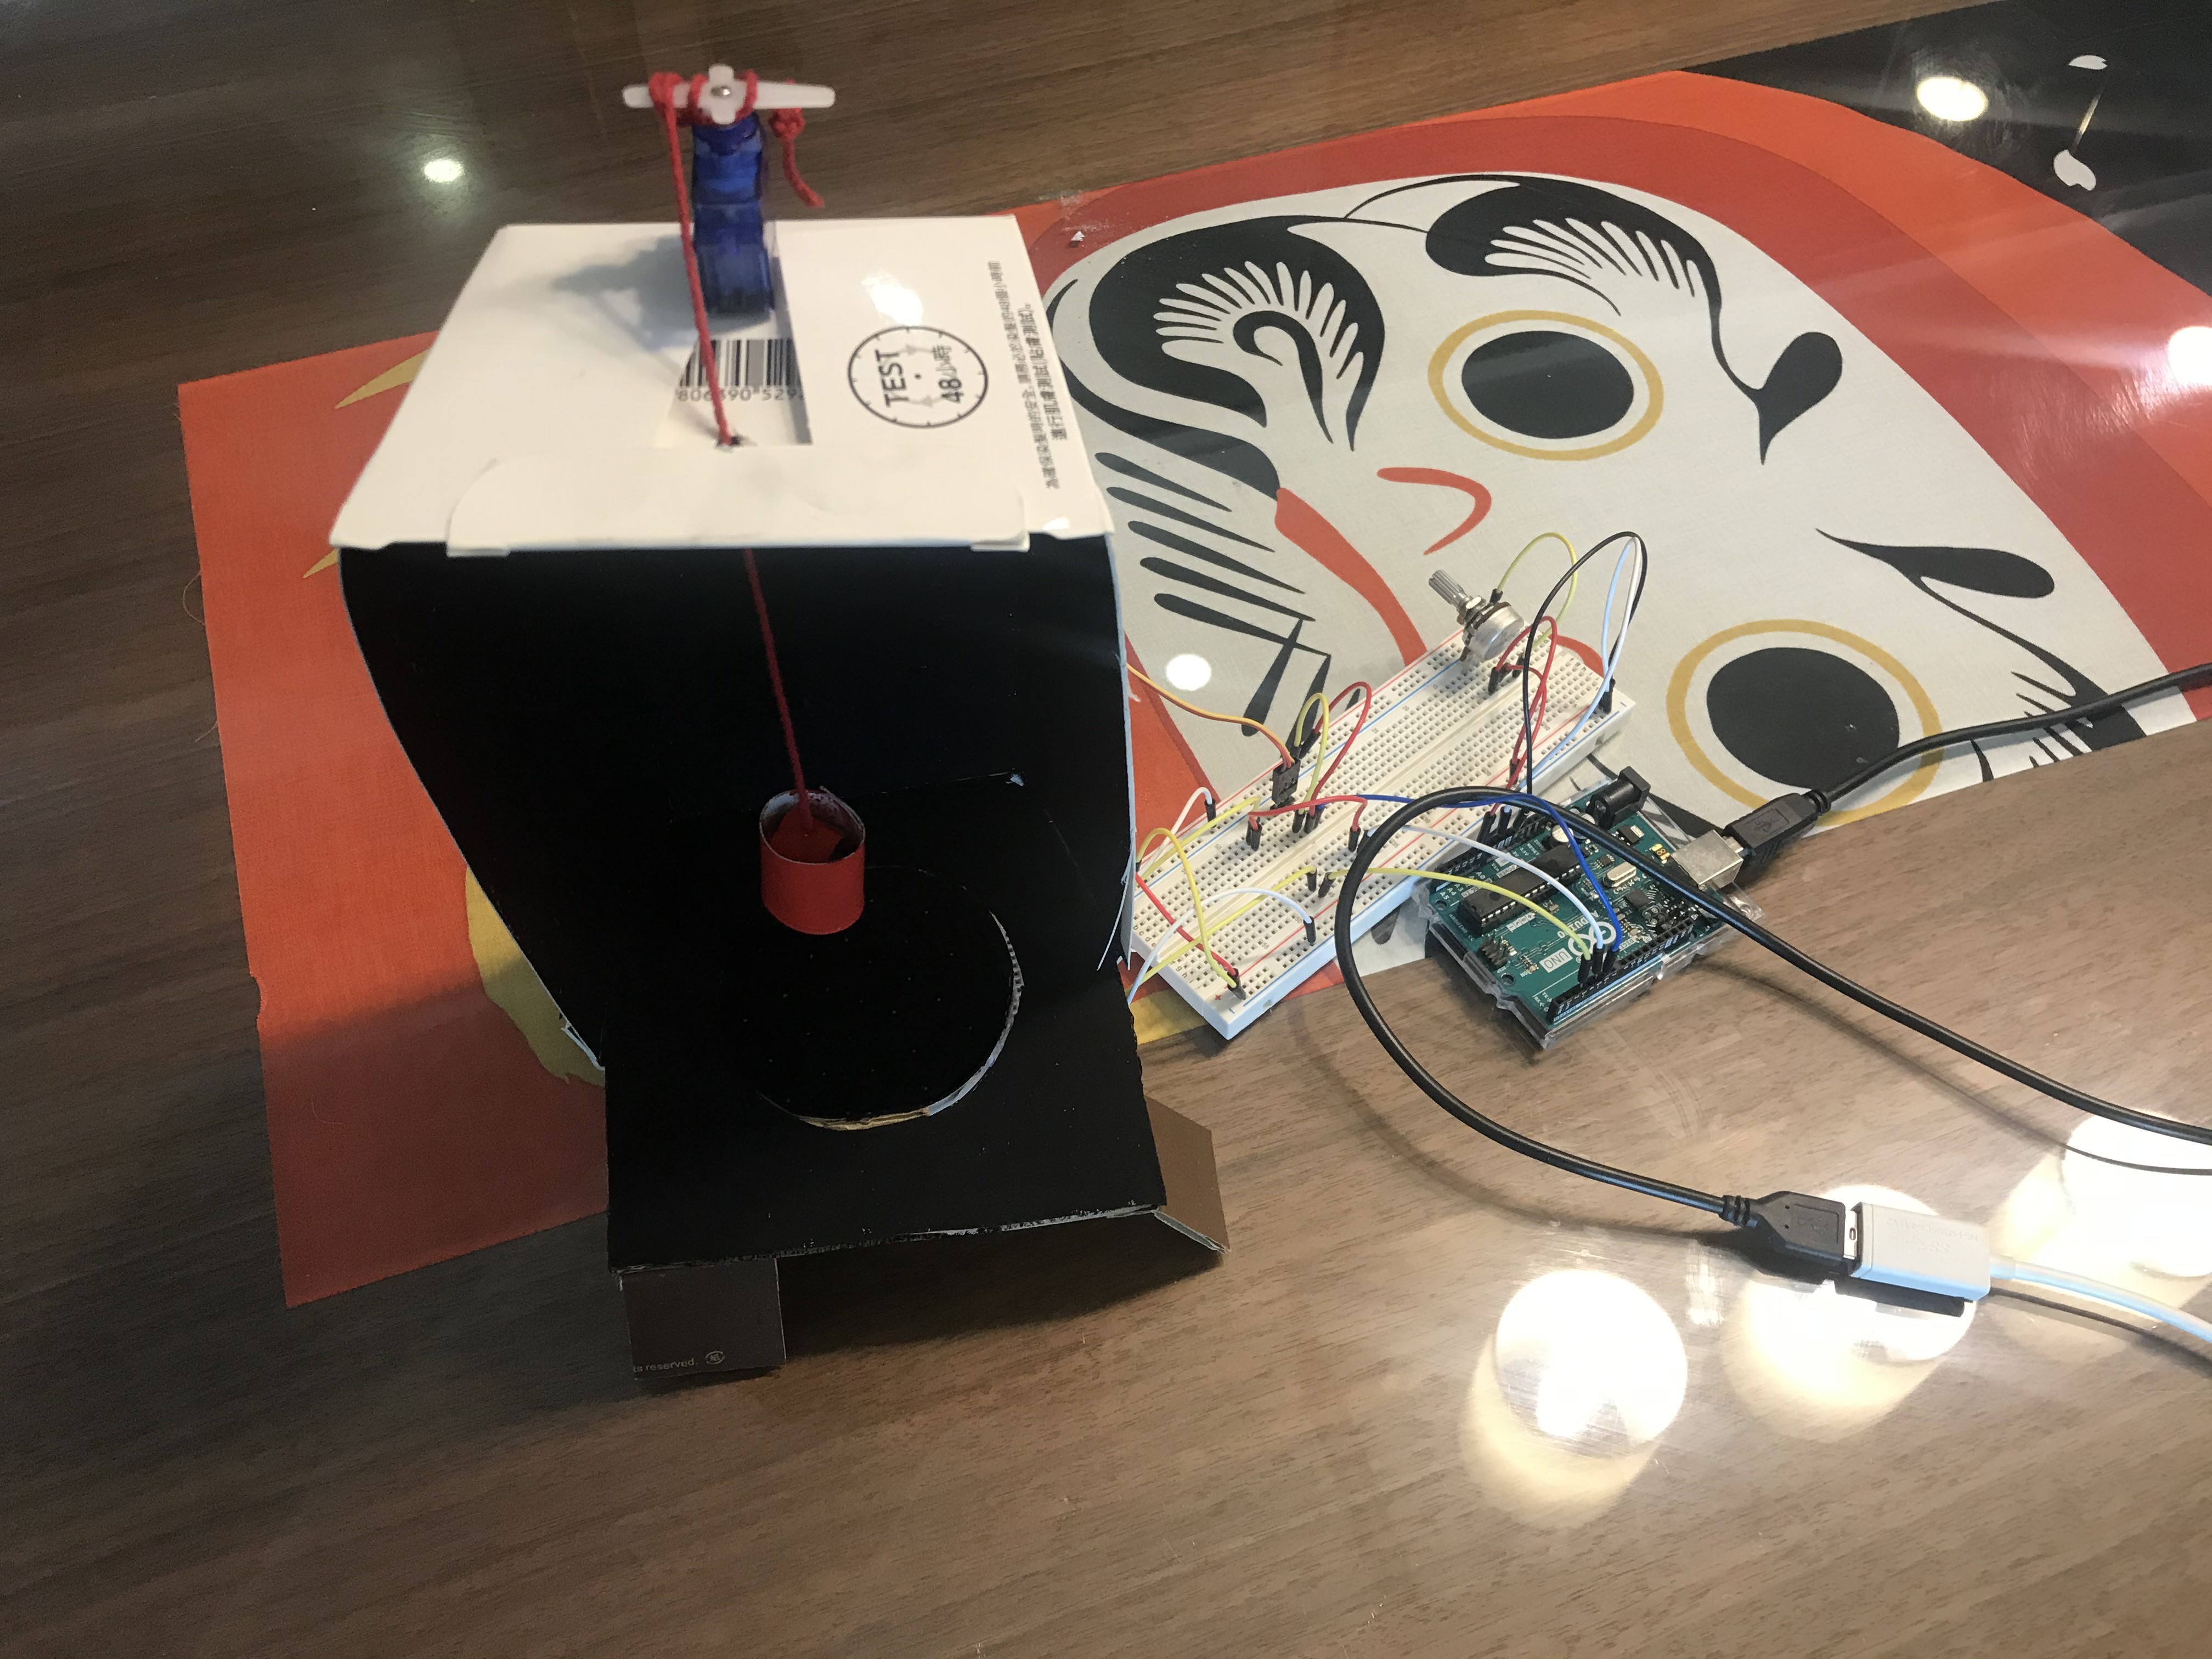
Final Project: Technical Prototype
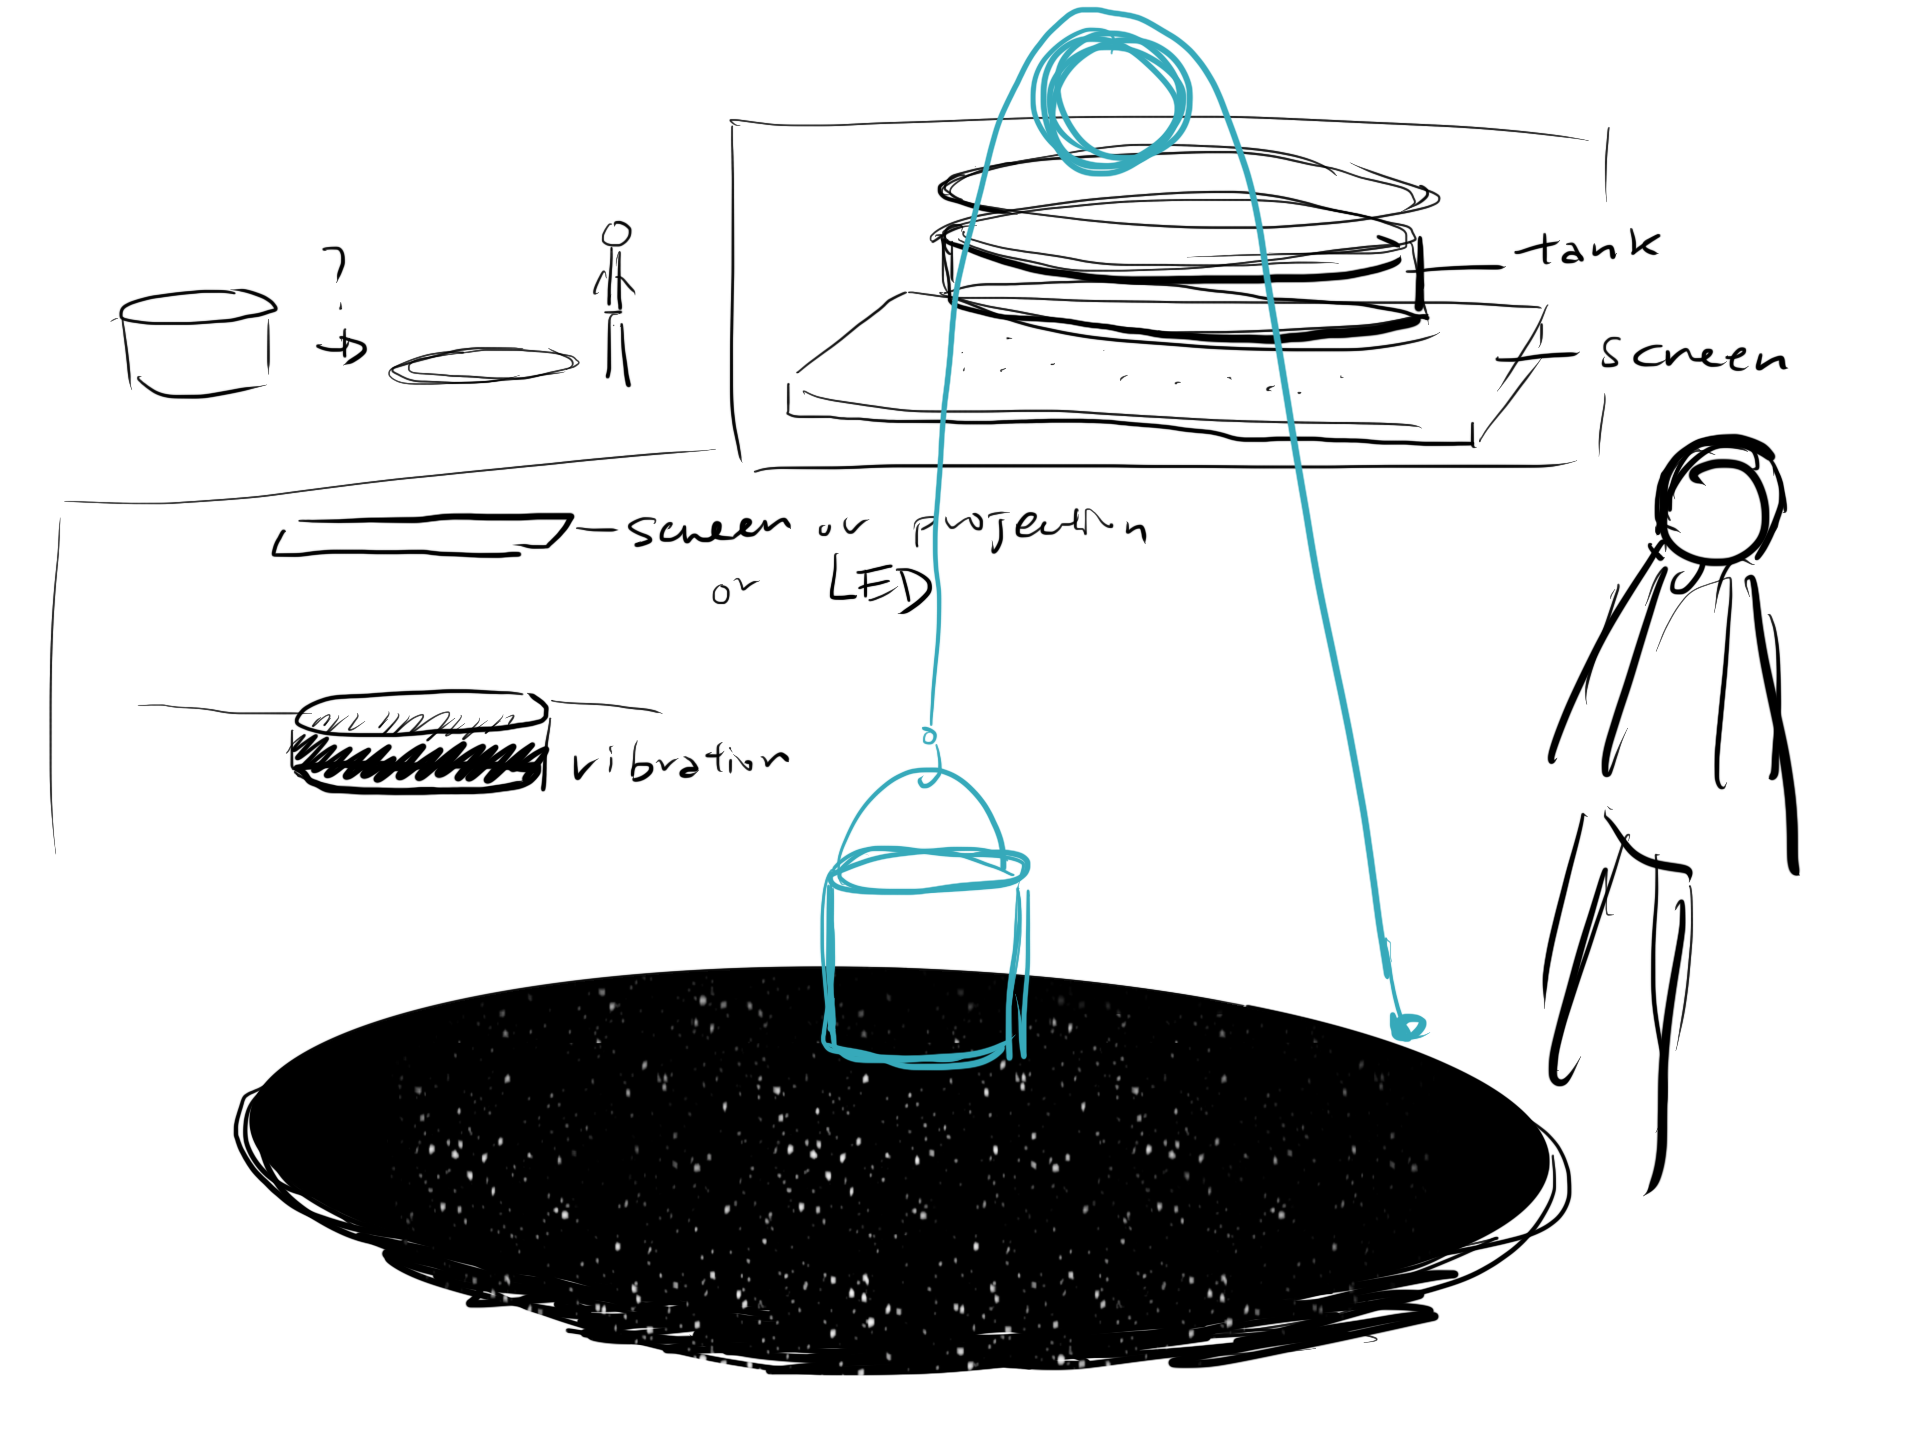
This is a mini size of the installation. The interaction will be turning a rolling handle. The initial state will be the brightness of stars under light pollution and rolling the handle will allow the viewers to see the actual brightness of the stars.
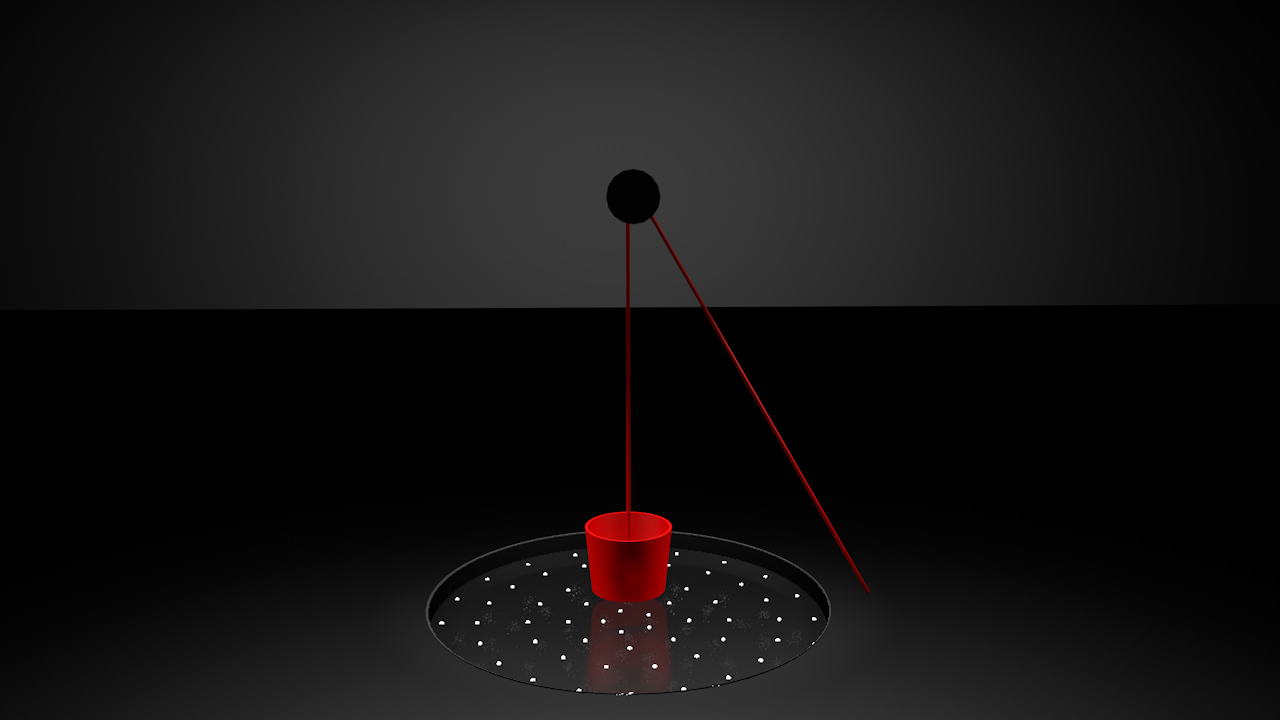
Final Project: Visual Prototype
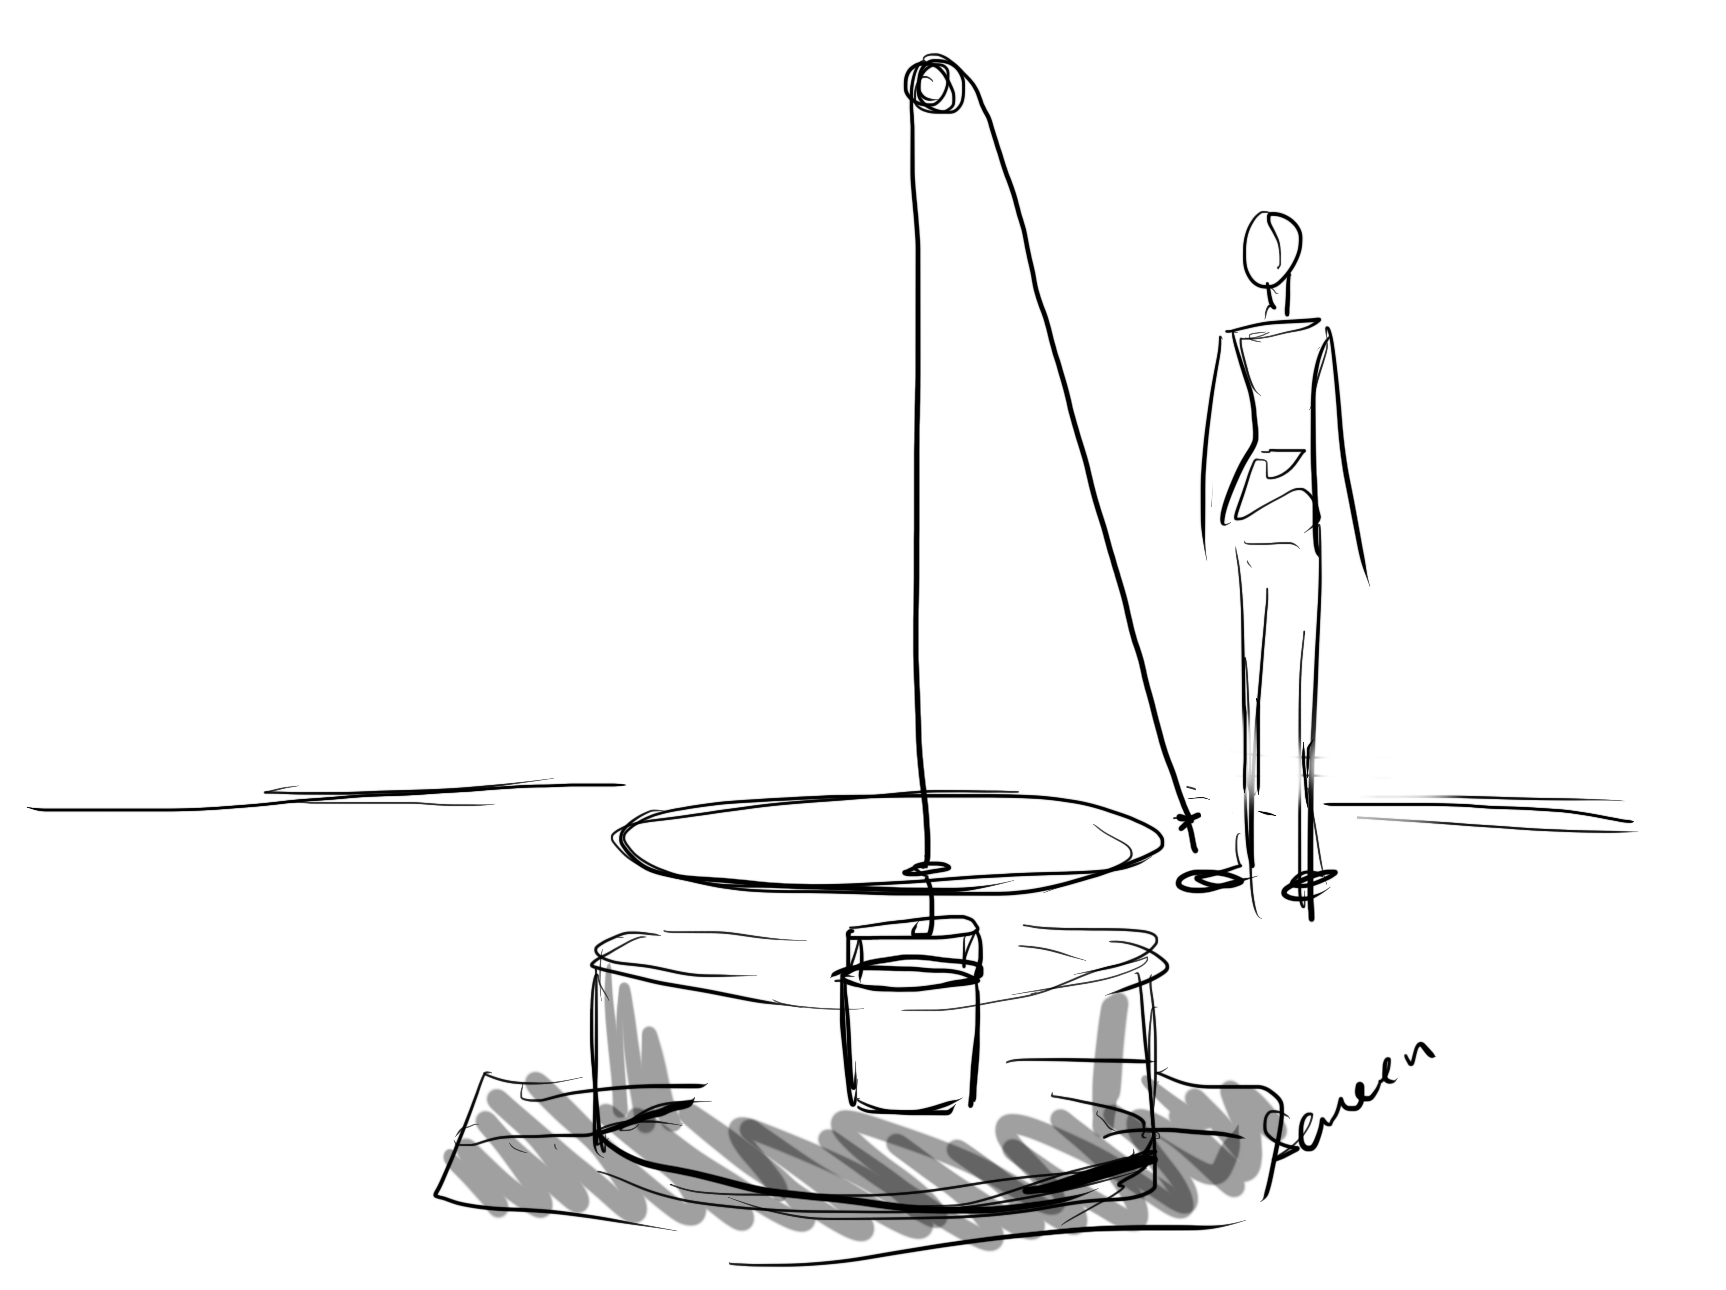
From my (very few) experience in 3D modeling, fo me, I think C4D can do a rendering that has the closest material feeling to the actual one. But I am still very bad at using it, so the light of the space is still weird. I haven't thought about the color and the material for the bucket, but for now I use red since it is always a good color to go with black.
Curious Cube - Music Cube with p5
Ideas for Final
I am not sure what I want to do and what I can do. I might be starting to improve on my midterm if I still cannot came up with an idea. I somehow want to make a face filter, but haven't tought of the content yet. I just want to make something that I will be using.
p5 with Teachable Machine and Sketch for Final
I create a p5 sketch with Teachable Machine using the image recognition. It is a little tricky to use when I was trying to use it in p5 since the webcam for teachbale machine is square size and webcams are in rects. Thus, the sensing is a little jumpy (hard to know which part of the screen it is sensing though in the example it drew a square box) when it is in p5, but when in the Teachable page it worked fine:
Sketches FOR FINAL
At first I am thinking for two directions: A portable one and a large size installation.Star Visiualization Fish Tank
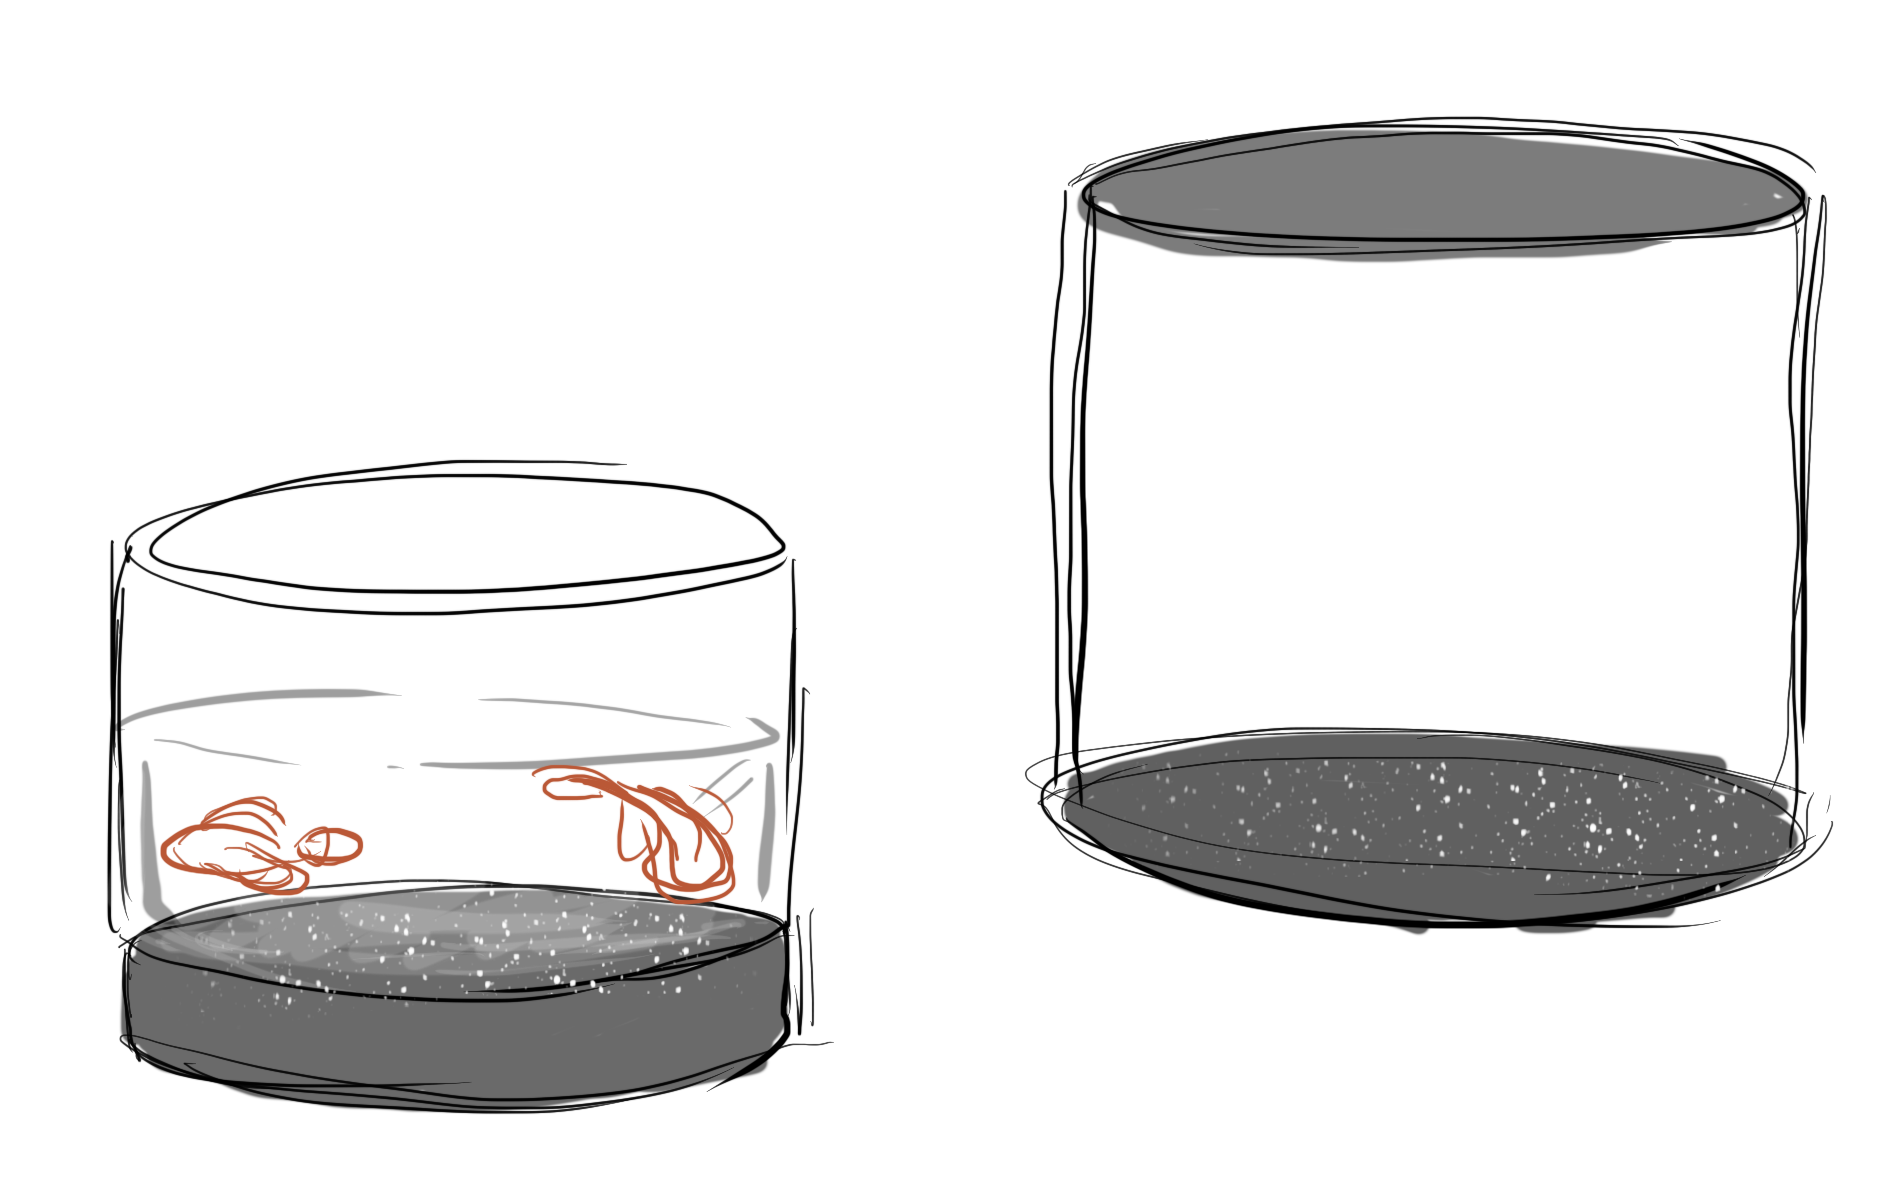
Star Visiualization Pond
However, I think it is still lack of impact, which both the Starfield and the Descension really build the sensation, and lack the peotic part that I originally wanted to convey inspired by that poem (also thinking about the 'story' part that Yeseul mentioned in the feedback). I looked into some APIs, and is still searching for a data I think is better to use with this. But I came up with the following idea.
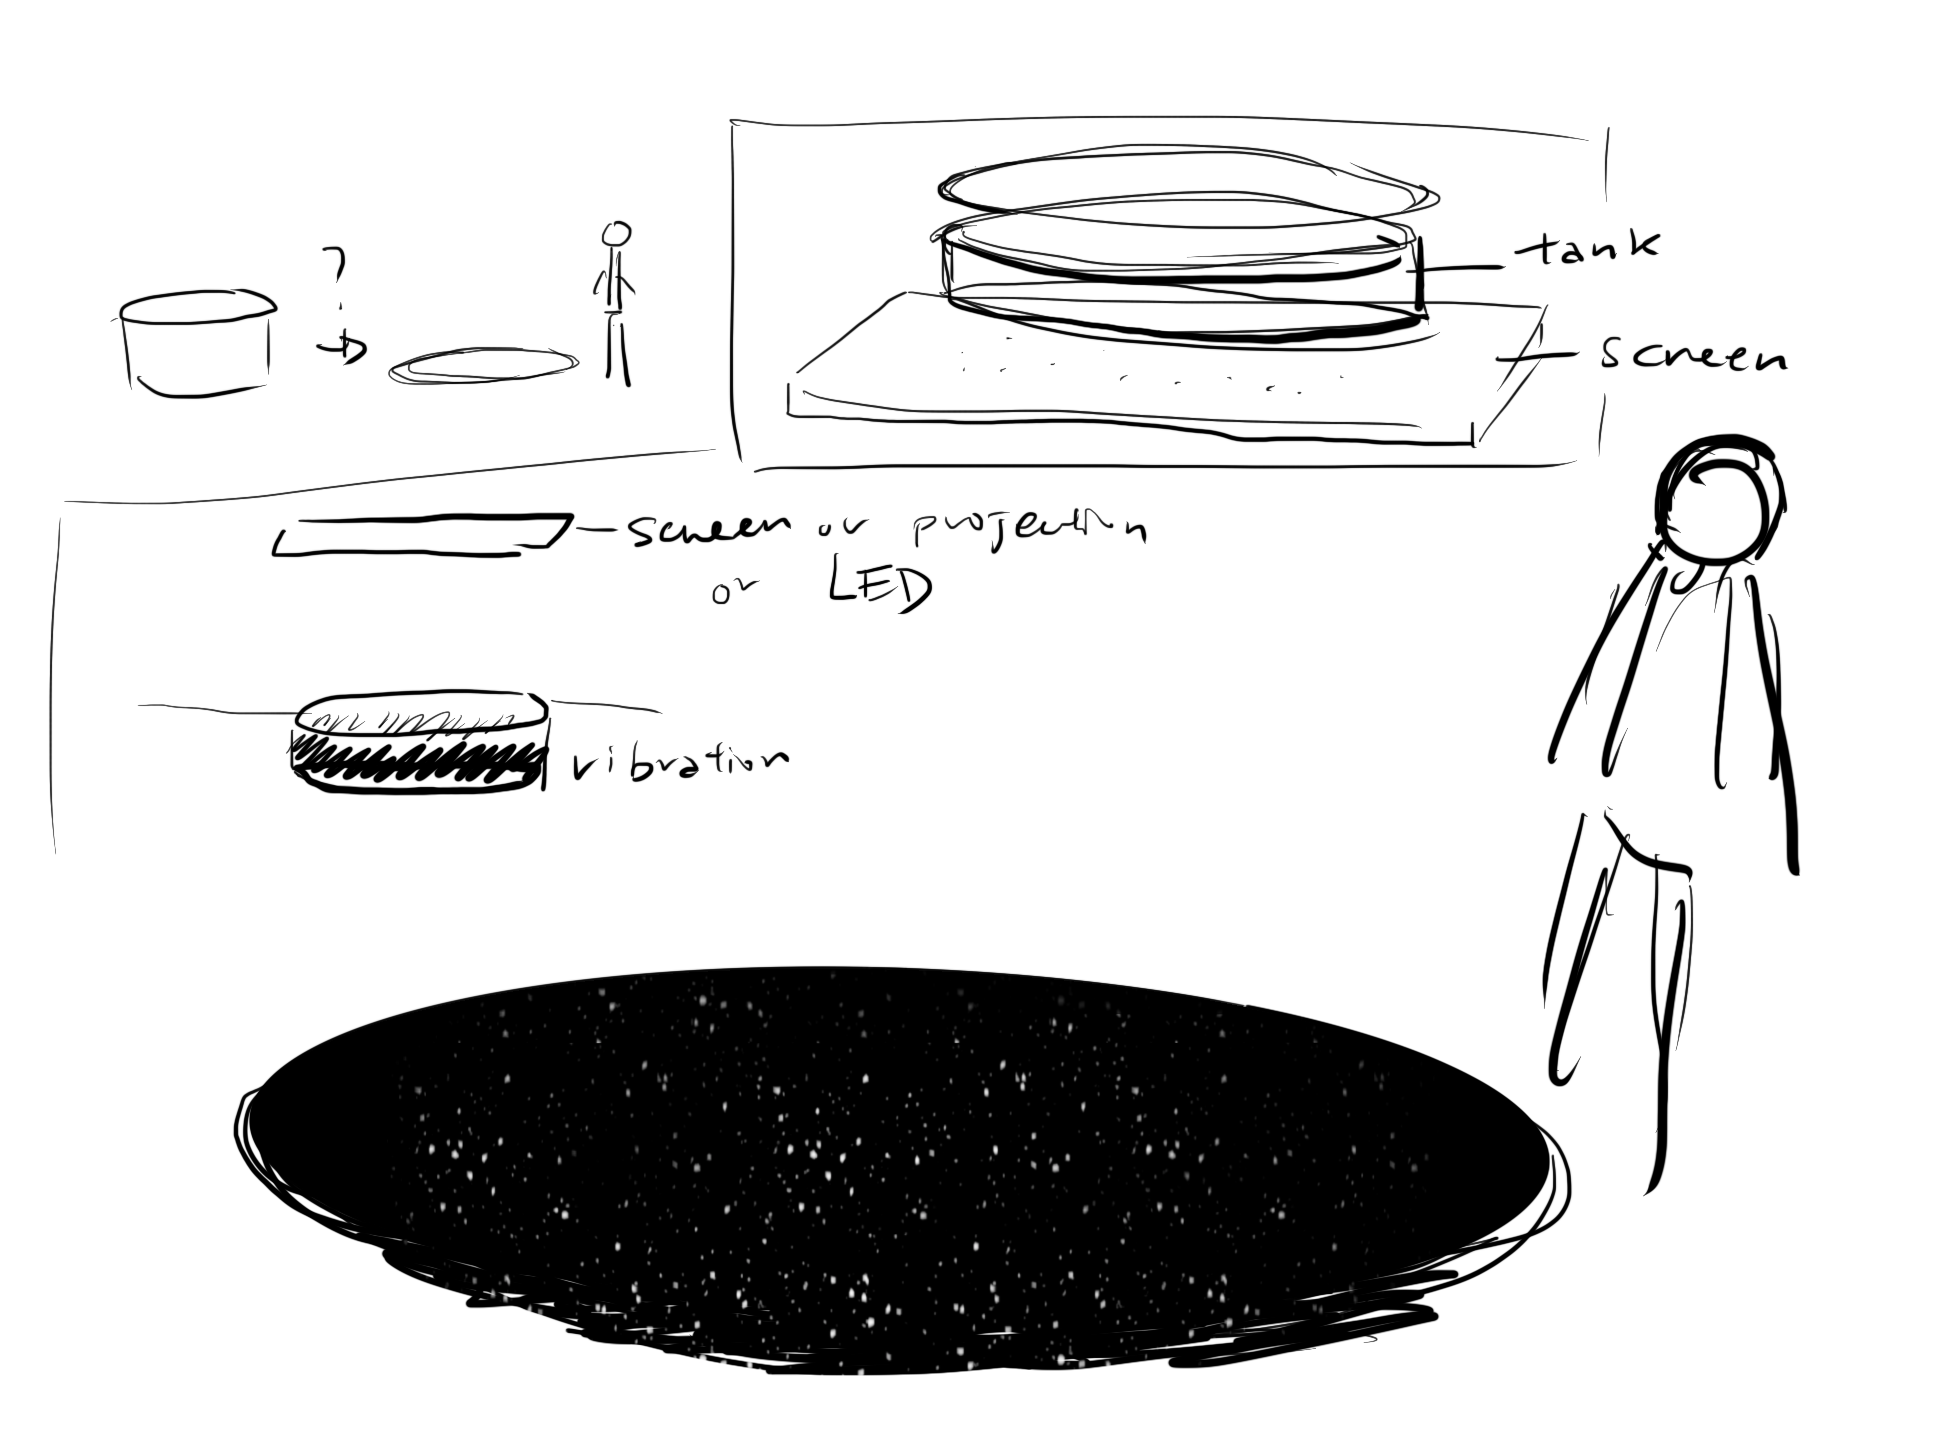
This is to add the bucket, and make it interactive:
Initial State - no stars
Pull the String - stars started to show
The 'fake weight' of the bucket - more friction when pull when there are more 'stars'
Possible Data that I'll be using: CO2, or Light Pollution? I don't know if it counts...
Final Look might be something like this:
I'm also still struggling about if I want to do a real reflection or a fake one. But, thanks for all the great directions and inspirations, Yeseul!
OpenCV w/ P5, Processing Issue and Ideas for Final
This is my first time trying to use processing, and I couldn't fixed the issue that it might have for my verison of MacOS for Processing Video. I guess it is something to do with the Camera Access, but it didn't have any popup window for this nor it didn't show up in the privacy setting. So I googled... and found this page that seam to be working > Video capture not working in Mac OS Catalina
And here's my long journey to the unknown (the feeling of I might broke my computer)
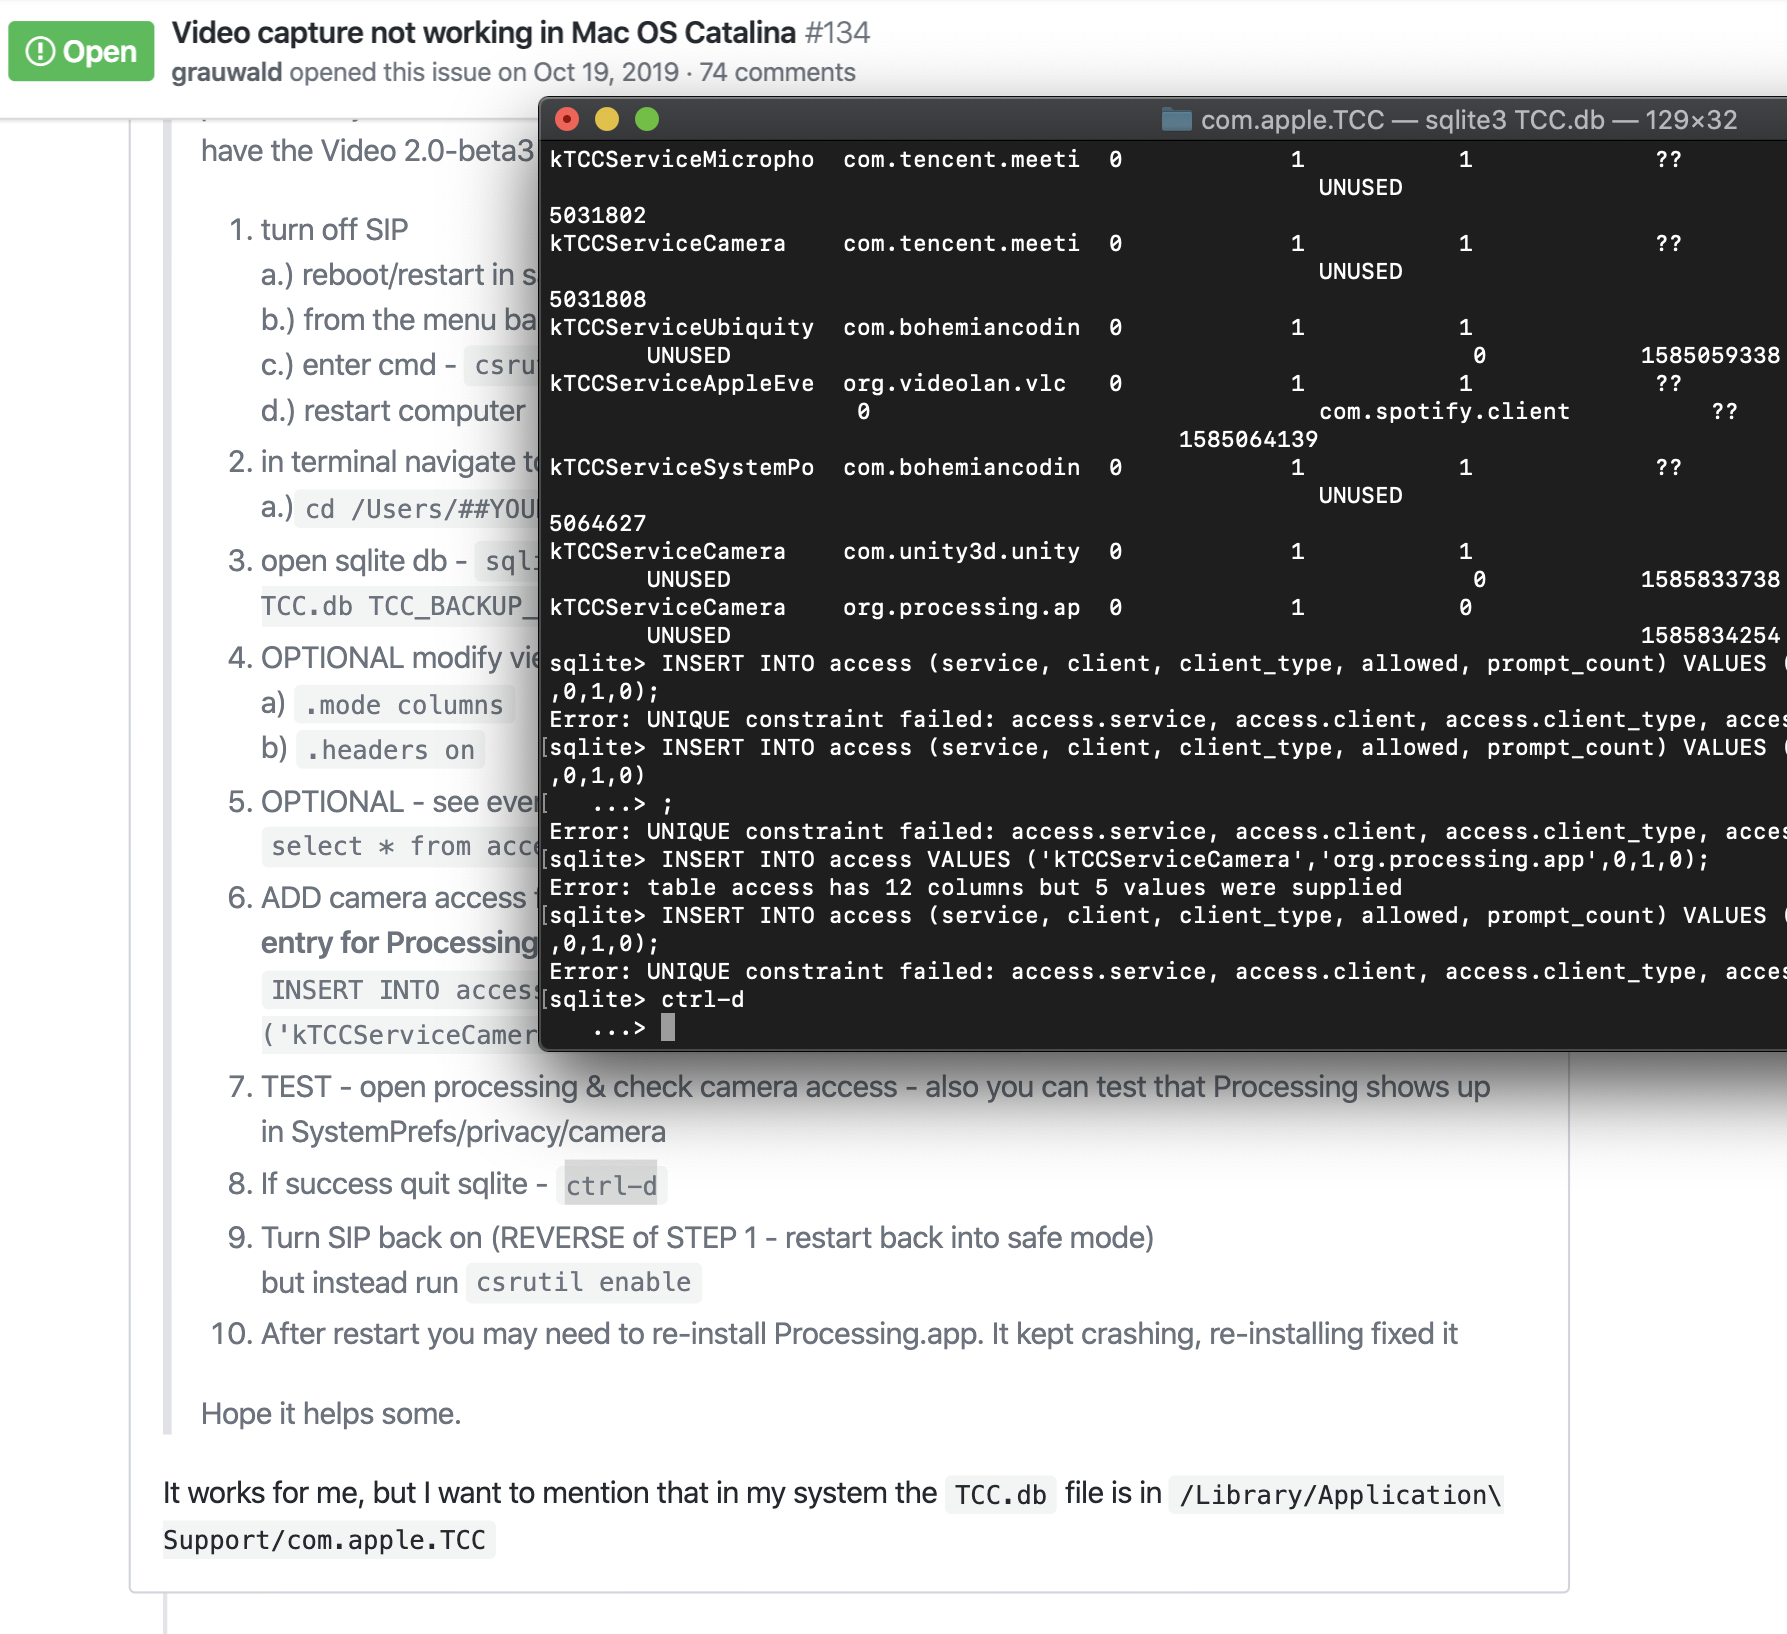
Gladly I got it to be shown in the Camera Access
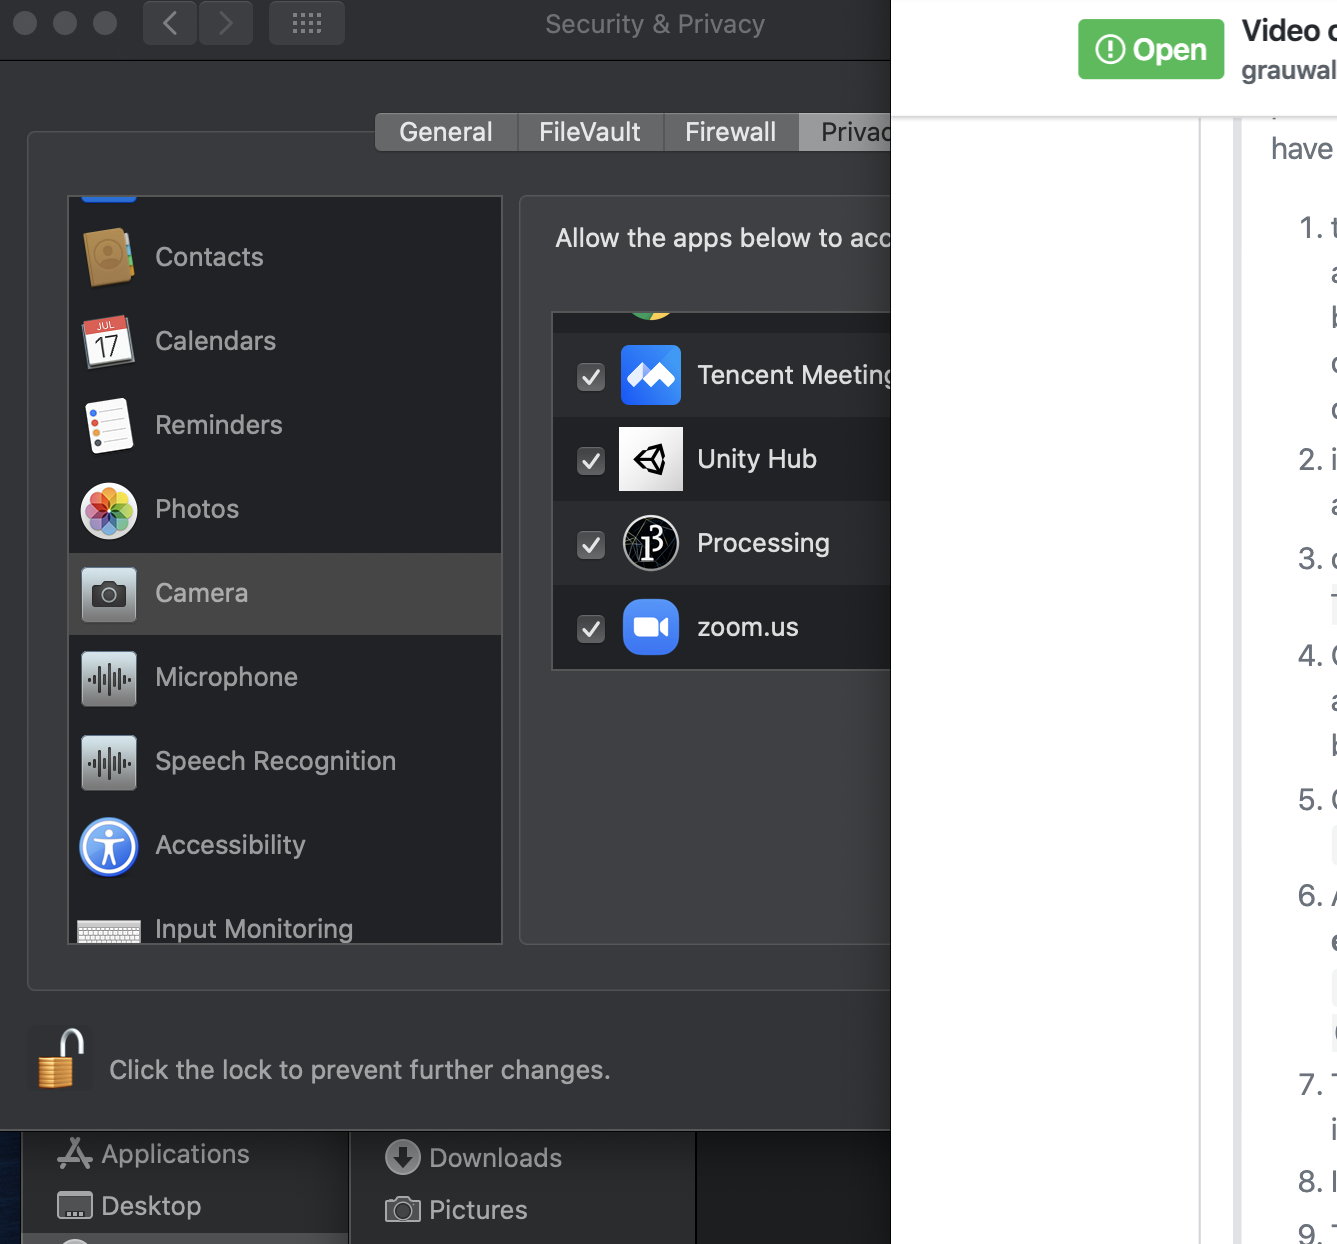
HOWEVER
So, I could only give up and move back to p5, and created this little smile application with the face tracking example from Kyle Mcdonald. The way the 'Smile' is recognized in this code is by the distance of the two end of the mouth:
var smile = mouthLeft.dist(mouthRight);
IDEAS FOR FINAL
To be honest, I don't have a sound idea now. I have a 'visual' that I always wanted to do, but I'm not sure how to. That is, a well. Inspired by a poem, which is by a Korean poet, called Blue Night (I read the Chinese translation that I think might be more accurate than this). I think the action of getting water and the reflection of stars in the water in the bucket is very beautiful and inspiring. I think it can somehow related to the enviornment too. I might use this visual of "reflection in the water of a well bucket" to create a data physicallization piece with some data that is realted to the the air polution (visibility of the stars at night), or maybe more direct, data that is related to water or rain.Midterm - AR Cutting Board: Cooking Assistant
A cutting board. A product for people who cook.
Never need to worry about dirty hands--easy and intagible interaction for people who like to watch a cooking tutorial when cooking. Also, a more visual way of measuring the amount for each ingredients, inspired by:

At first, I was thinking to have a cooking station that has embeded AR system in it.
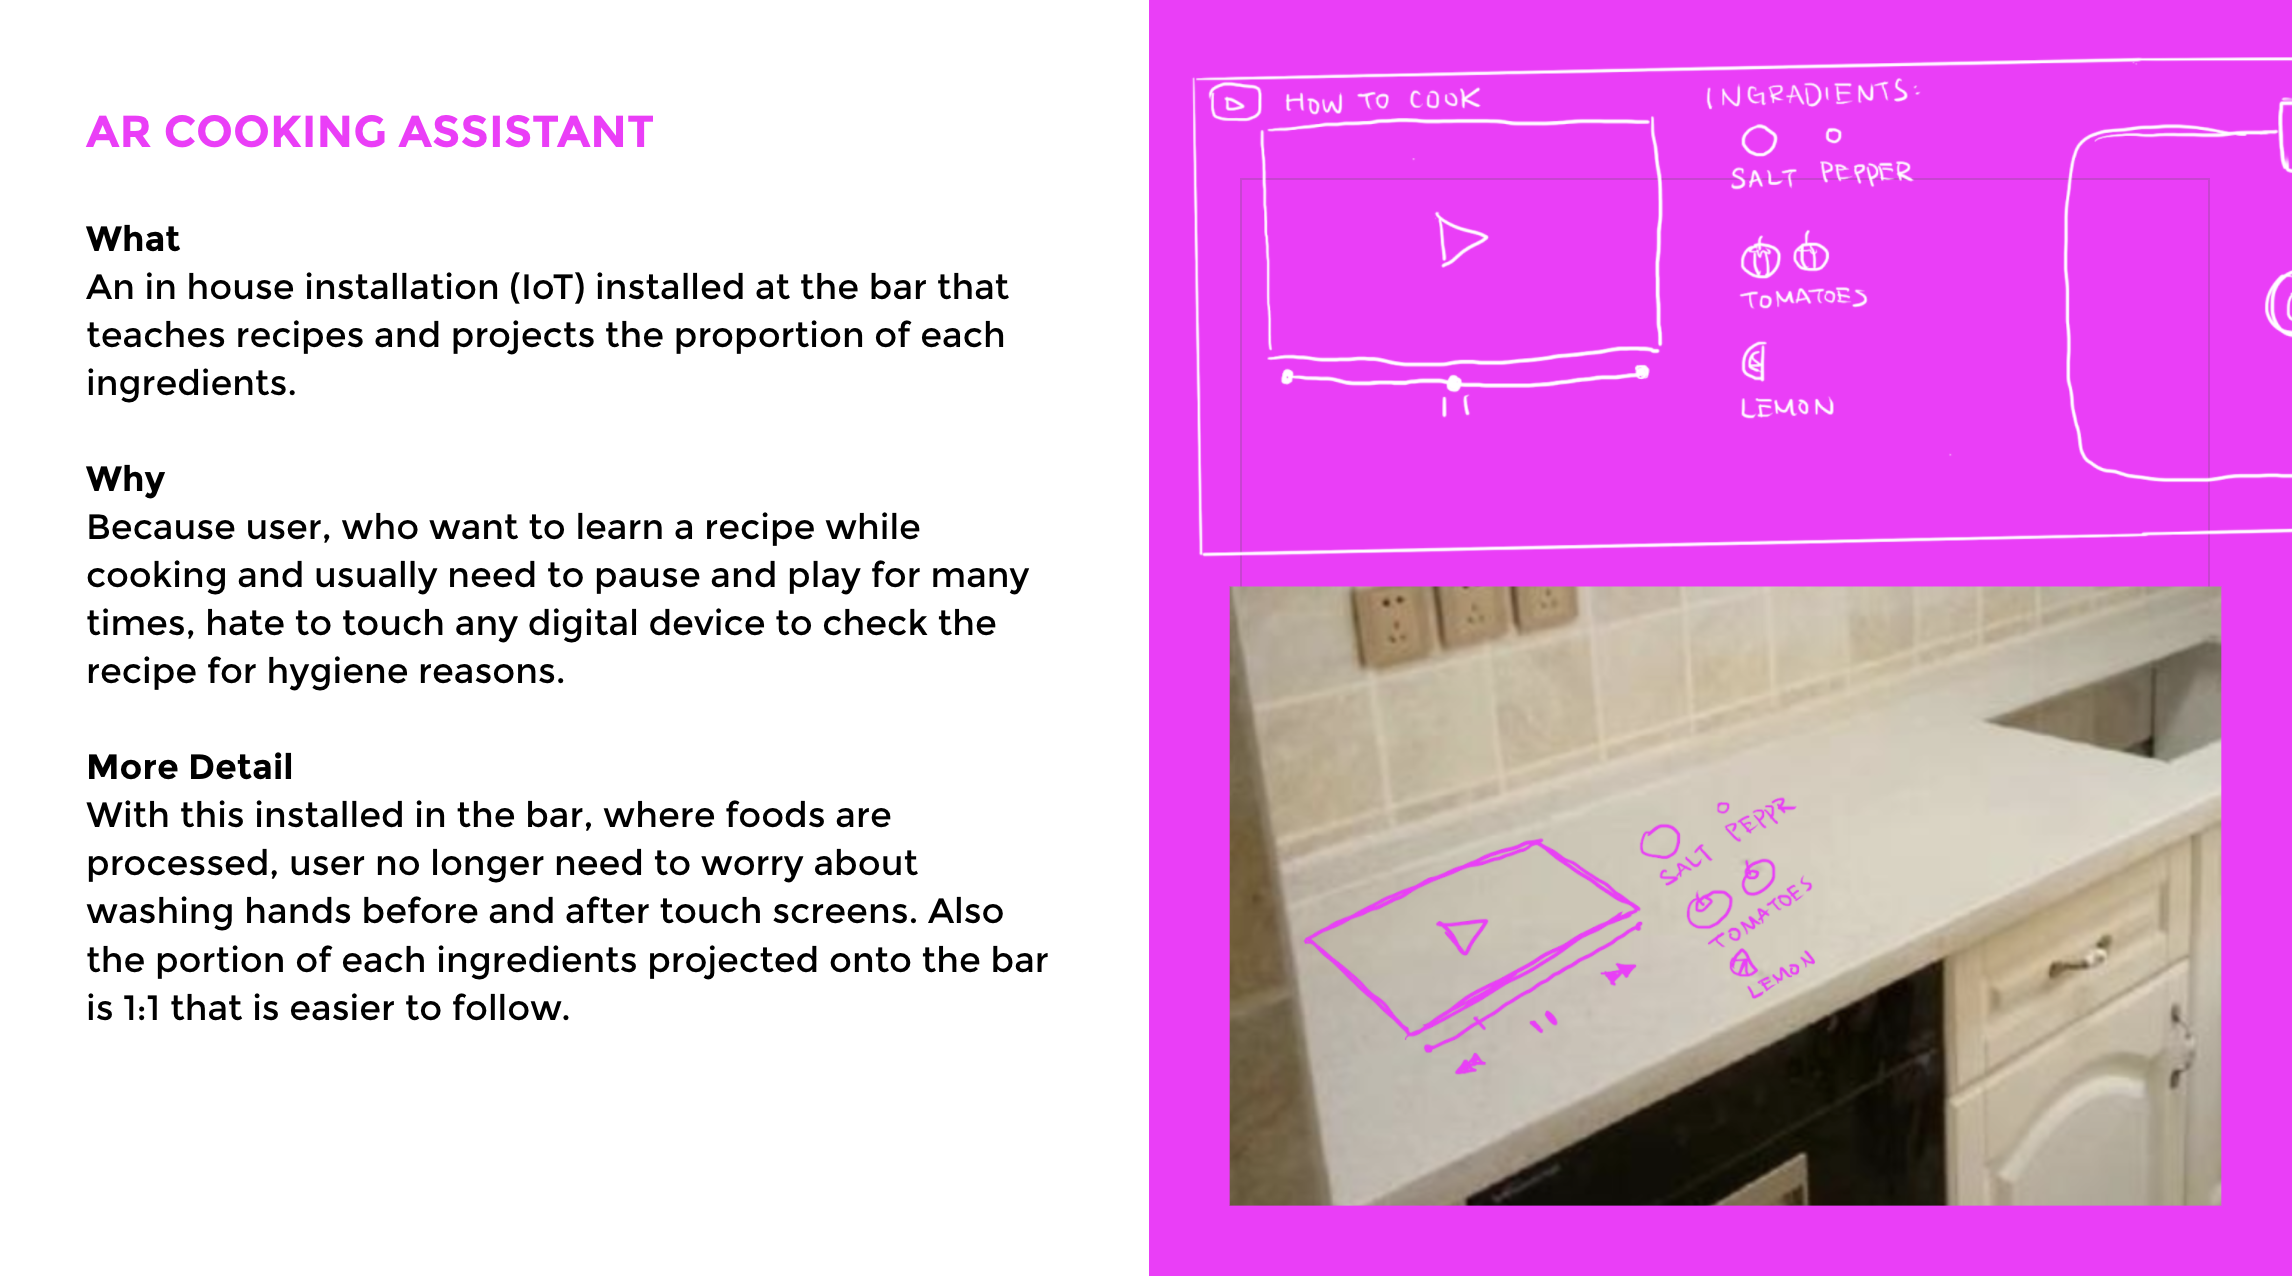
However, it will increase the price and also when there are some technical issue, it will be harder to fix it.
So instead, why not make it something that's portable and affordable? So I came up with a better solution, which is a cutting board, that works better and make much more sense.
New stuff that I learn from this project is virtual button. I first learn from a tutorial:
Then, I need to trigger video using the virtual button, I coded (acutally combining two scripts) the following:
using System;
using System.Collections;
using System.Collections.Generic;
using UnityEngine;
using UnityEngine.Video;
using Vuforia;
public class vb_anim : MonoBehaviour, IVirtualButtonEventHandler {
public GameObject vbBtnObj;
public GameObject video;
void Start () {
vbBtnObj = GameObject.Find("playVid");
video = GameObject.Find("videoYeah");
vbBtnObj.GetComponent
And got the result:
Problem with the current version: virtual button might not be the best solution for this, which I think the condition for it to be trigger is when it detects shadow? without know ing the depth of the element that covered it. As shown at the end of the video, angle and depth problem still need to be solved. (Also, ideally it shouldn't be my ipad, and I should be cutting on it. But I need an affordable tracker that I can reach for quarantine lives)
WEEK7 - Video Prototype: Cooking assistant
The concept I chose for prototyping for this assignment was the IoT cooking assistant AR.
Google Slide - Spark AR
User Test
User: MonniIt took some time for the viewer to understand the concept, but eventually she got the idea. Yes, she said it looks handy. What happened to the video? It looks like it's in my way. I want it to be somewhere else (she didn't get the tutorial video part, it should be adjustable). Even though it is just a prototype, I figure that it stills need to be as close to the real view as possible.
WEEK 6 - Prototypes: Design and Tech
Design
To test out the best size to interact with, I cut out two models (but it was stupid, I will mention later...)A 5 inch and a 6 inch:
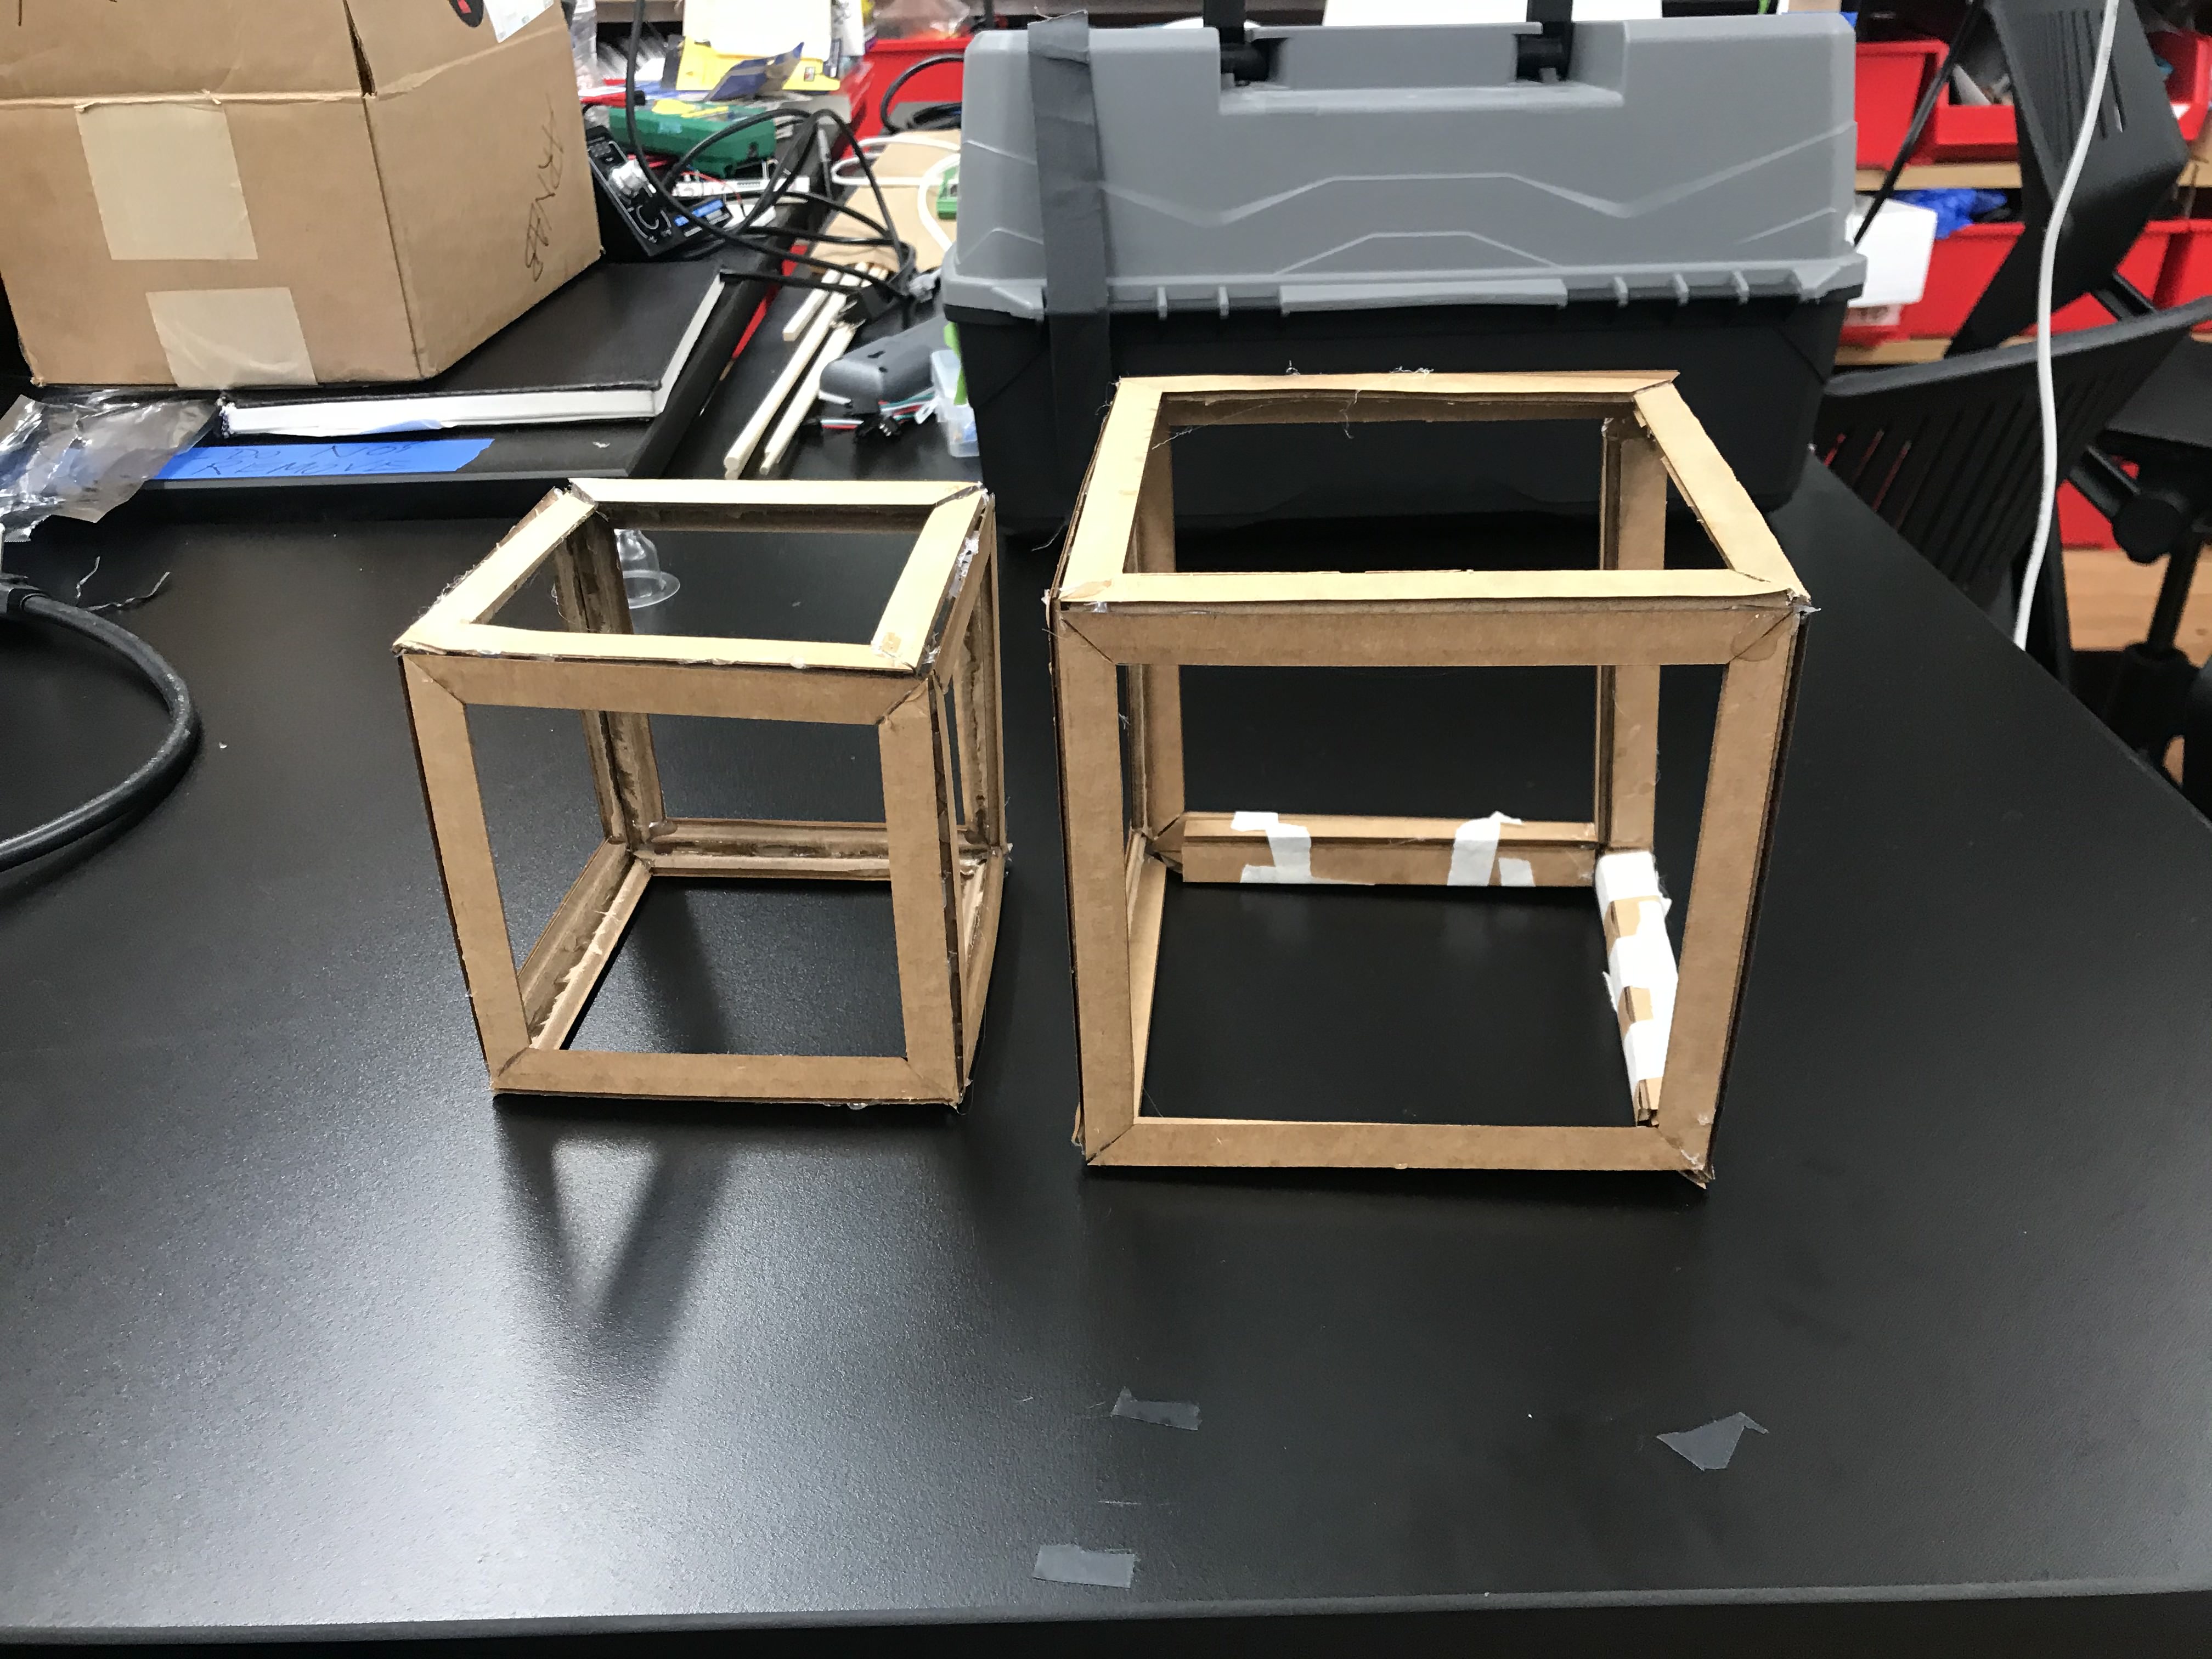
The fitting for 5 inch:
The fitting for 6 inch:

So... What I've done really stupid was, you might have noticed, I cut the 6 square in to pieces, and though I was a genius to figure out this pattern:

and do the inner part.
MY BRAIN:

Tech Testing
References I've read: IR Emitter and Detector Connecting TutorialI did a several tests with the IR Emittor and Detector. First I want to know how far it can go. My testing result was that, different with the beam breaker that gives 1s and 0s, this detector gives very specific numbers that goes all the way to 1023 and is very sensitive to light. Like the test I did below with flash light:
I sort of observed the difference of it when triggered, the difference is about 6-9ish. and the noise / jumping numbers are within 3 numbers. There might be a way for me to use it if I set it to be triggered when it sense 6-9 difference in number. But it feels a little unstable.
Next, I played with neopixels (with the detector ) that I borrowed from Rae, to get ready when my LEDs arrived.
Trigger different colors:
Trigger on and off:
And last but not least, I connected to my previous p5 project for Luisa's class > Line 1.0 and mocked up this virtual guitar experience:Line with Arduino
WEEK5 - Figma Prototype & User Research
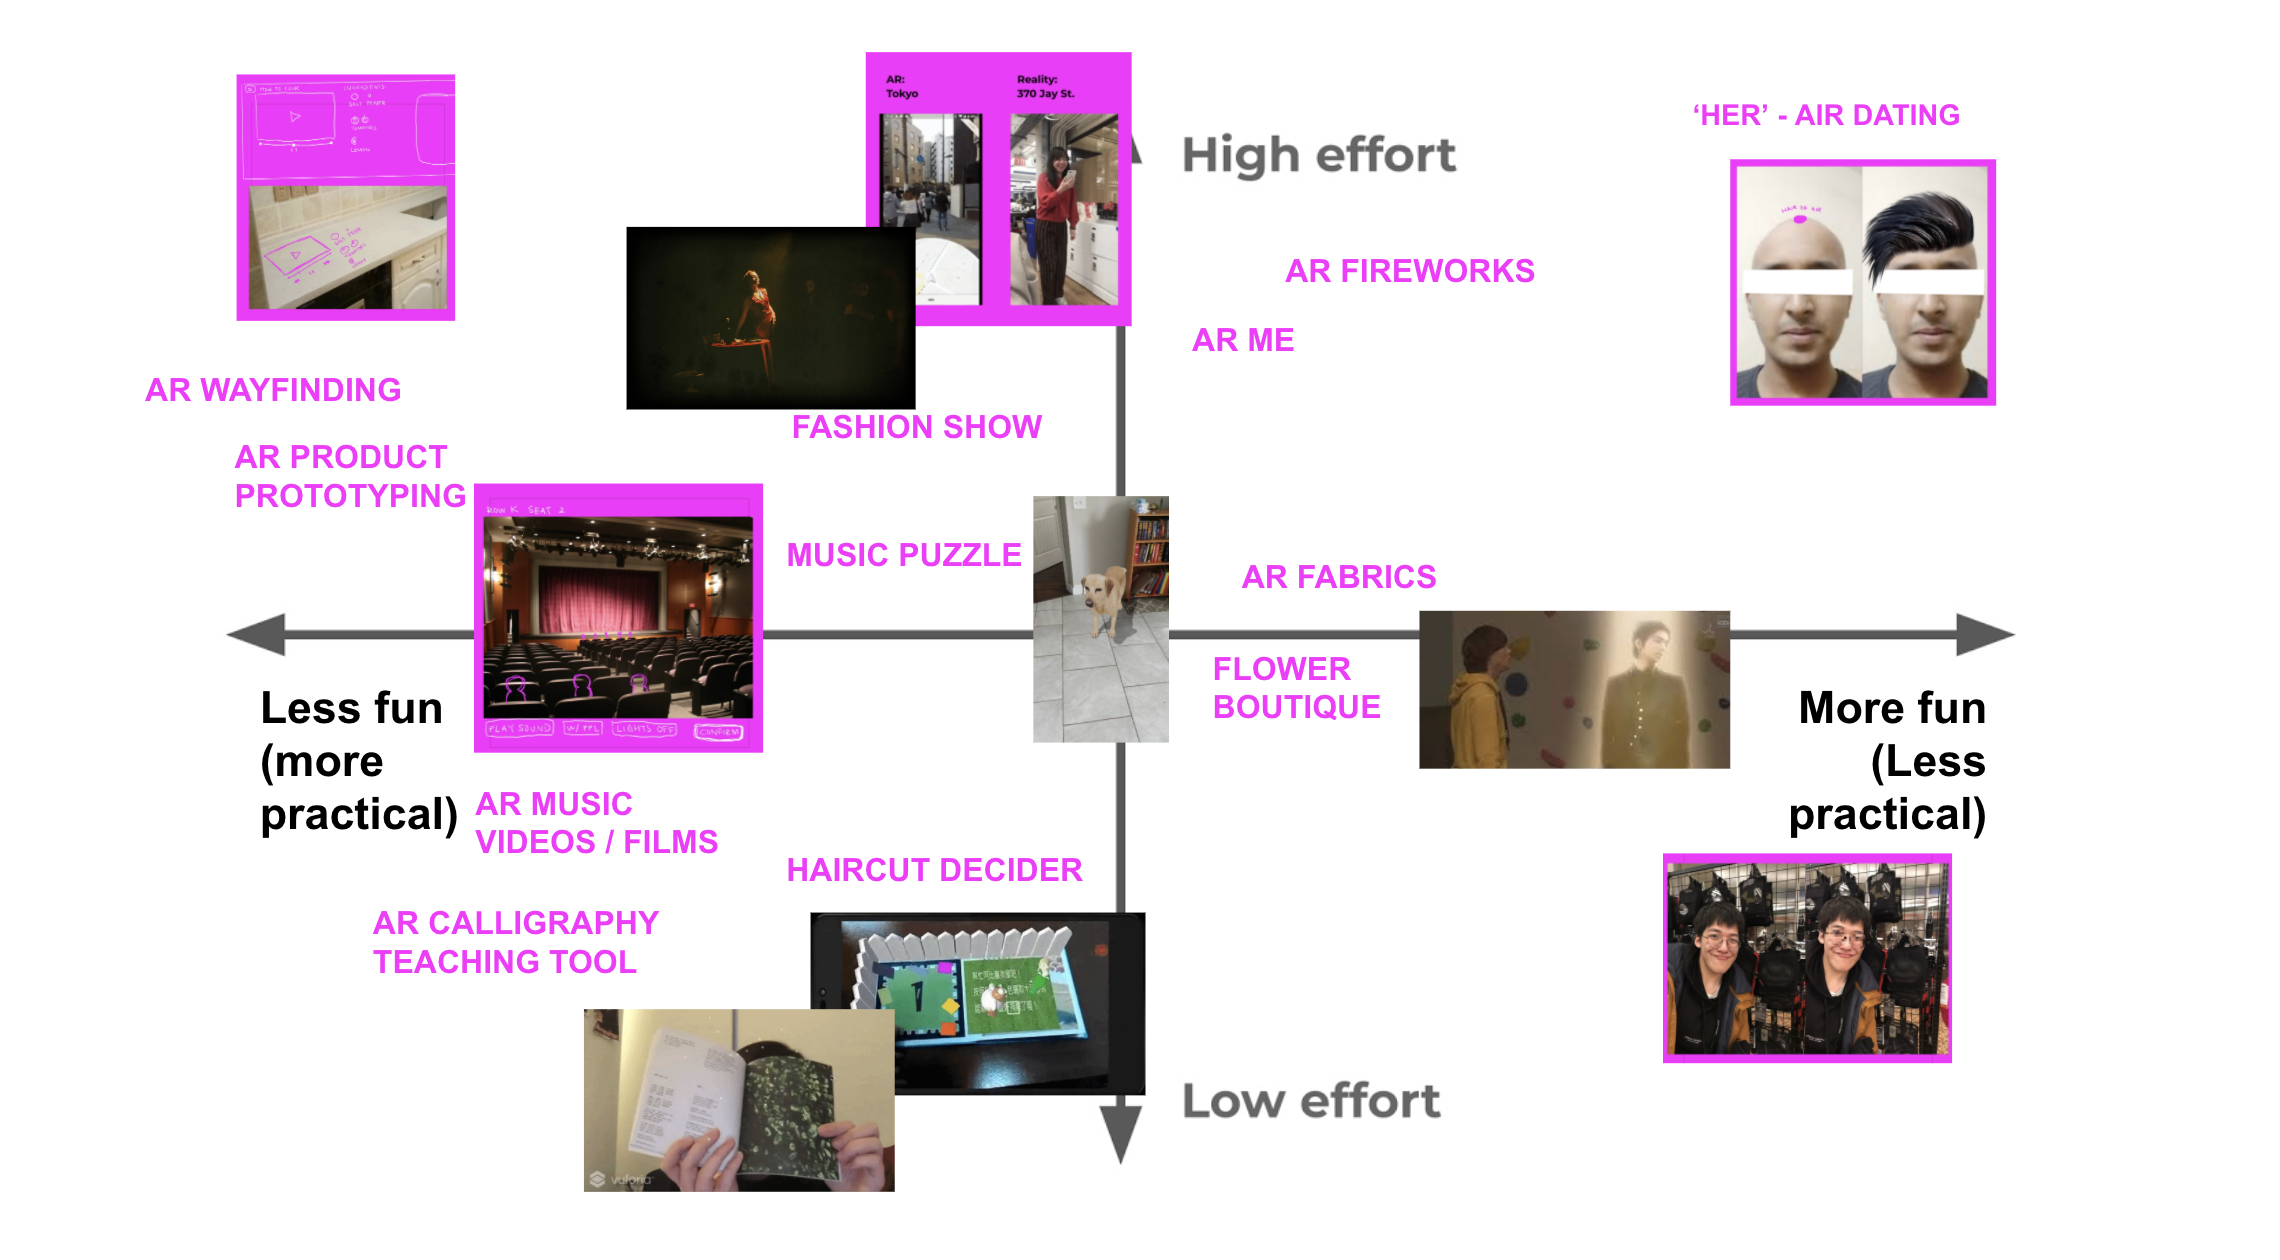
The concept I chose for prototyping is the ticketing app that sits on the left handside of the graph, that means, to be more practical and not too difficult to impliment.
Google Slide - Spark AR
User Test
User: ZoeThe user understand the idea of it, “Yes, a ticketing app”. The user think this AR experience is compelling and would love to have one when the are buying tickets for the concert. The user didn’t understand why every step has a link to the AR, she get fastrated. User think that the audio really works well, this is definitely a feature that’s needed for this kind of experience. User felt repetitive when they see AR view multiple times, even though I was thinking since it is the main feature of this app, so I want to promote this more.
WEEK5 - Research, Diagram, BOM & Prototype
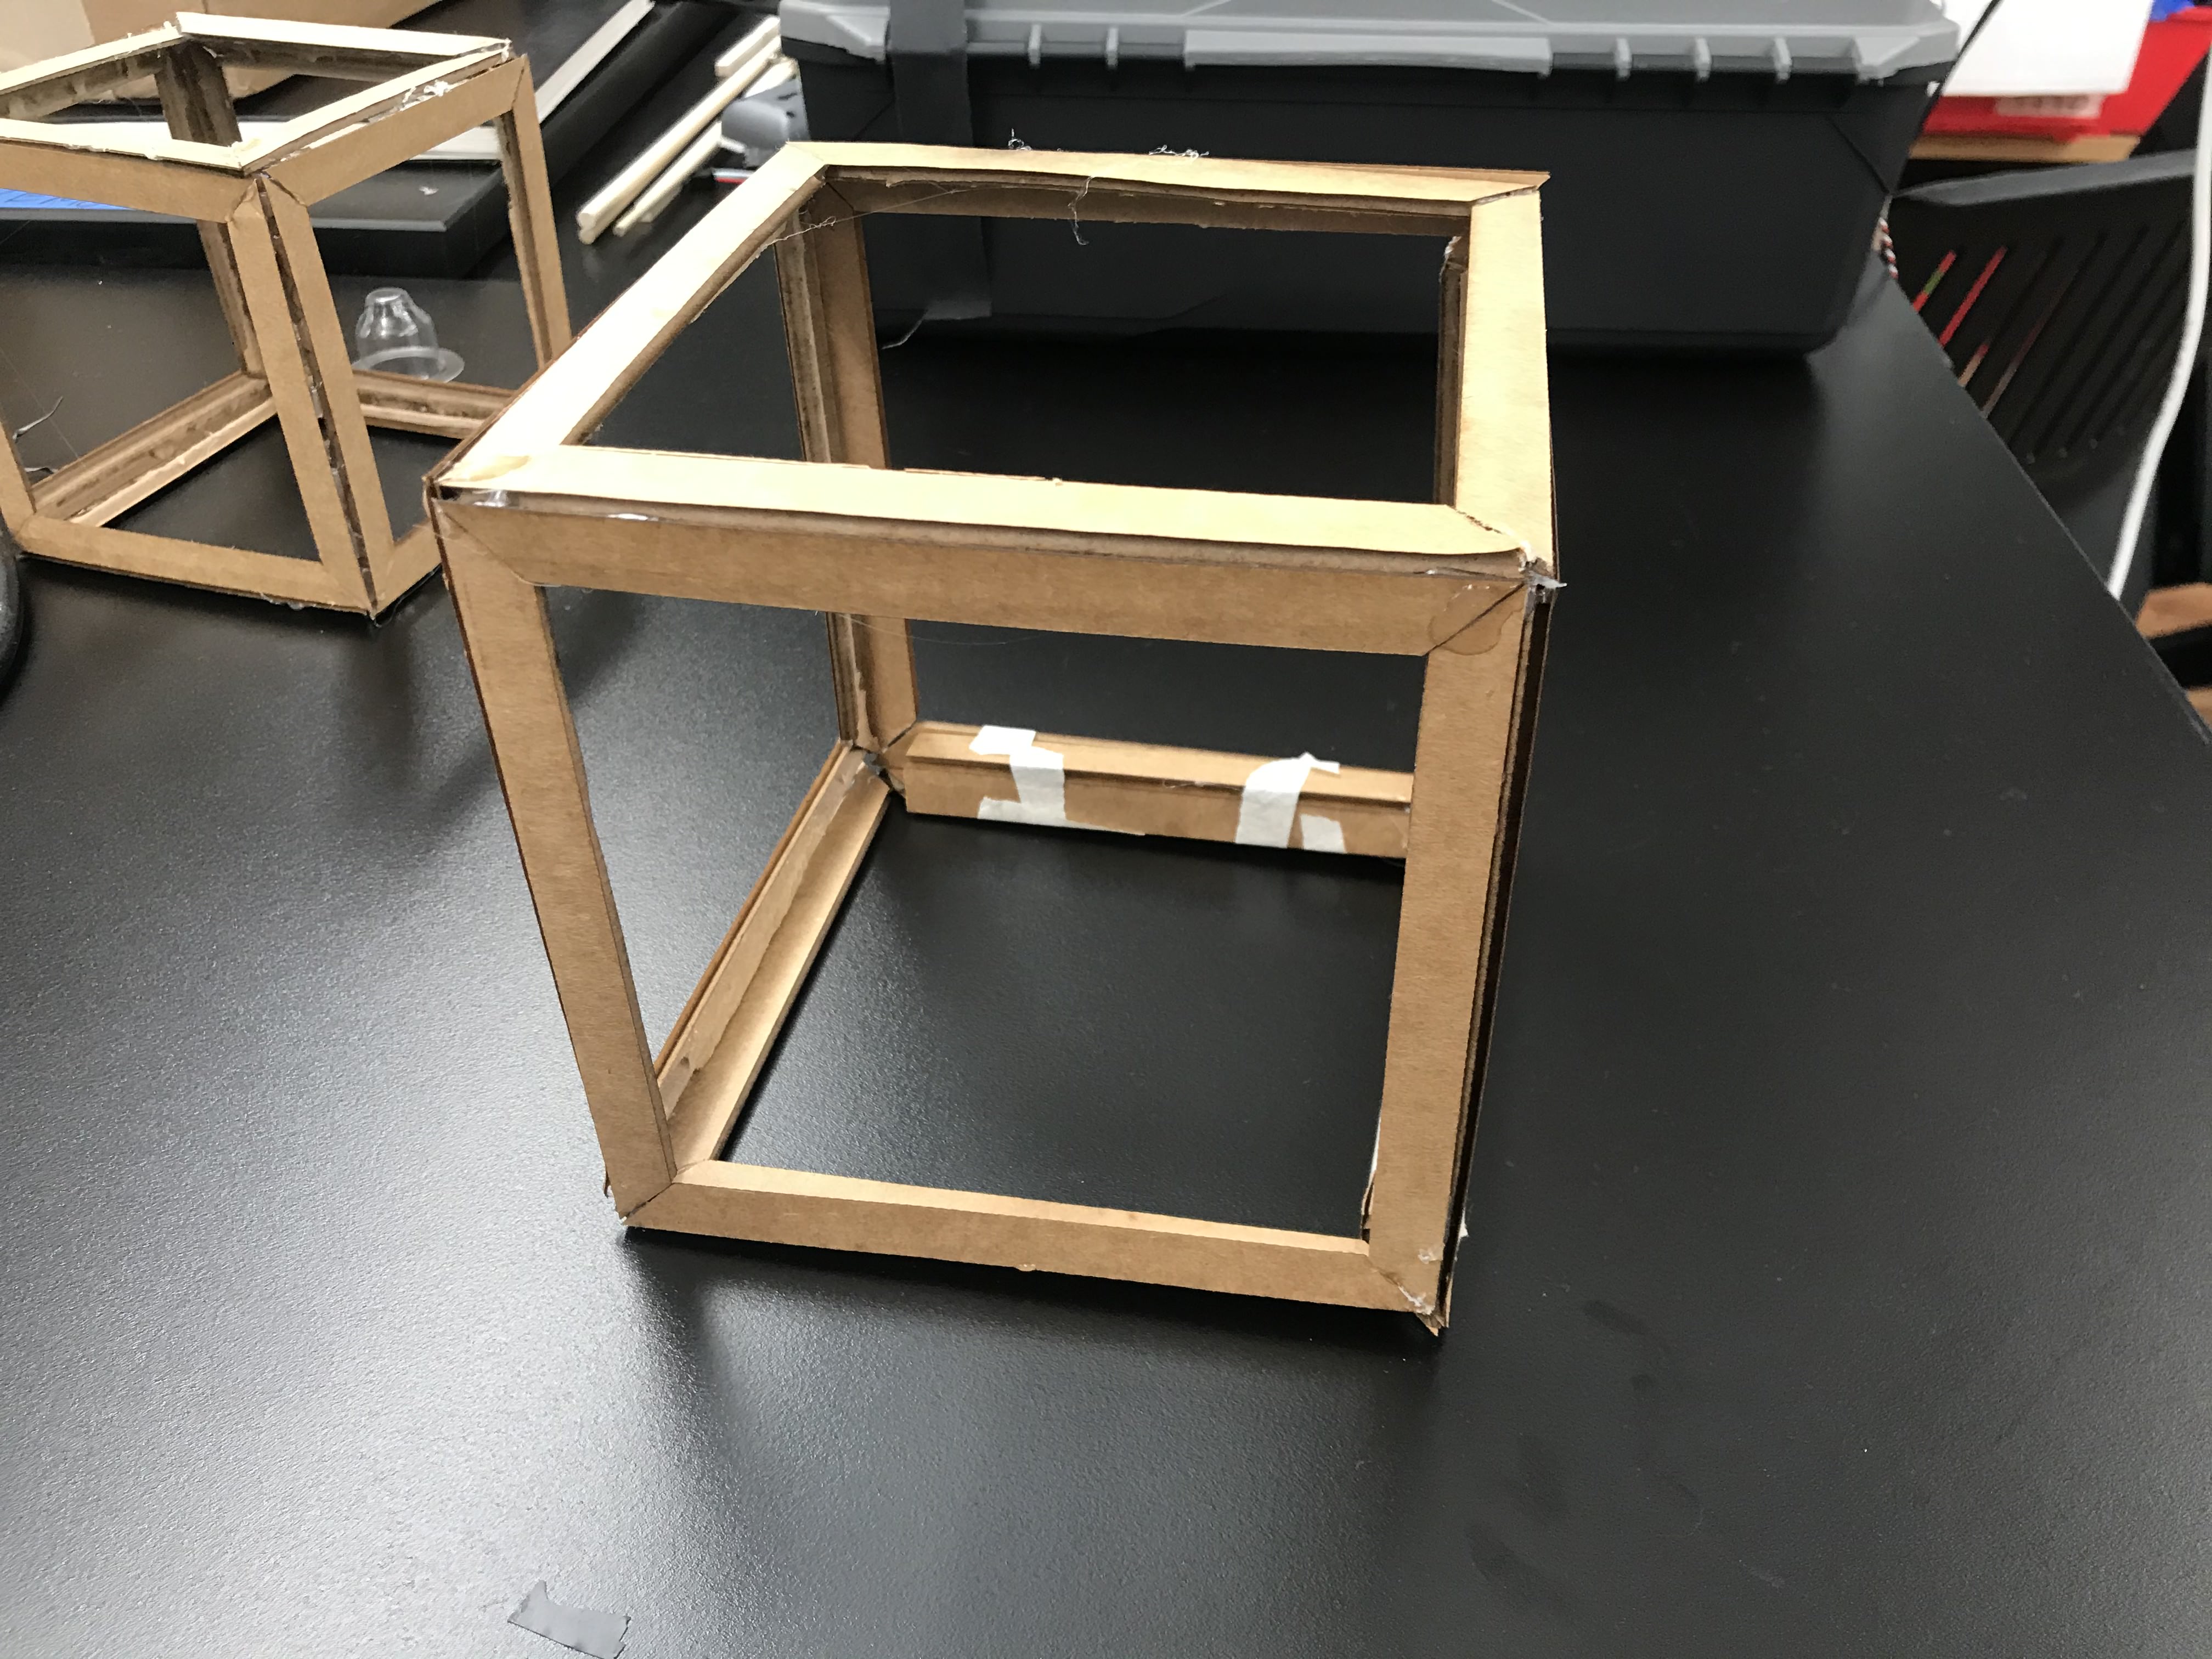
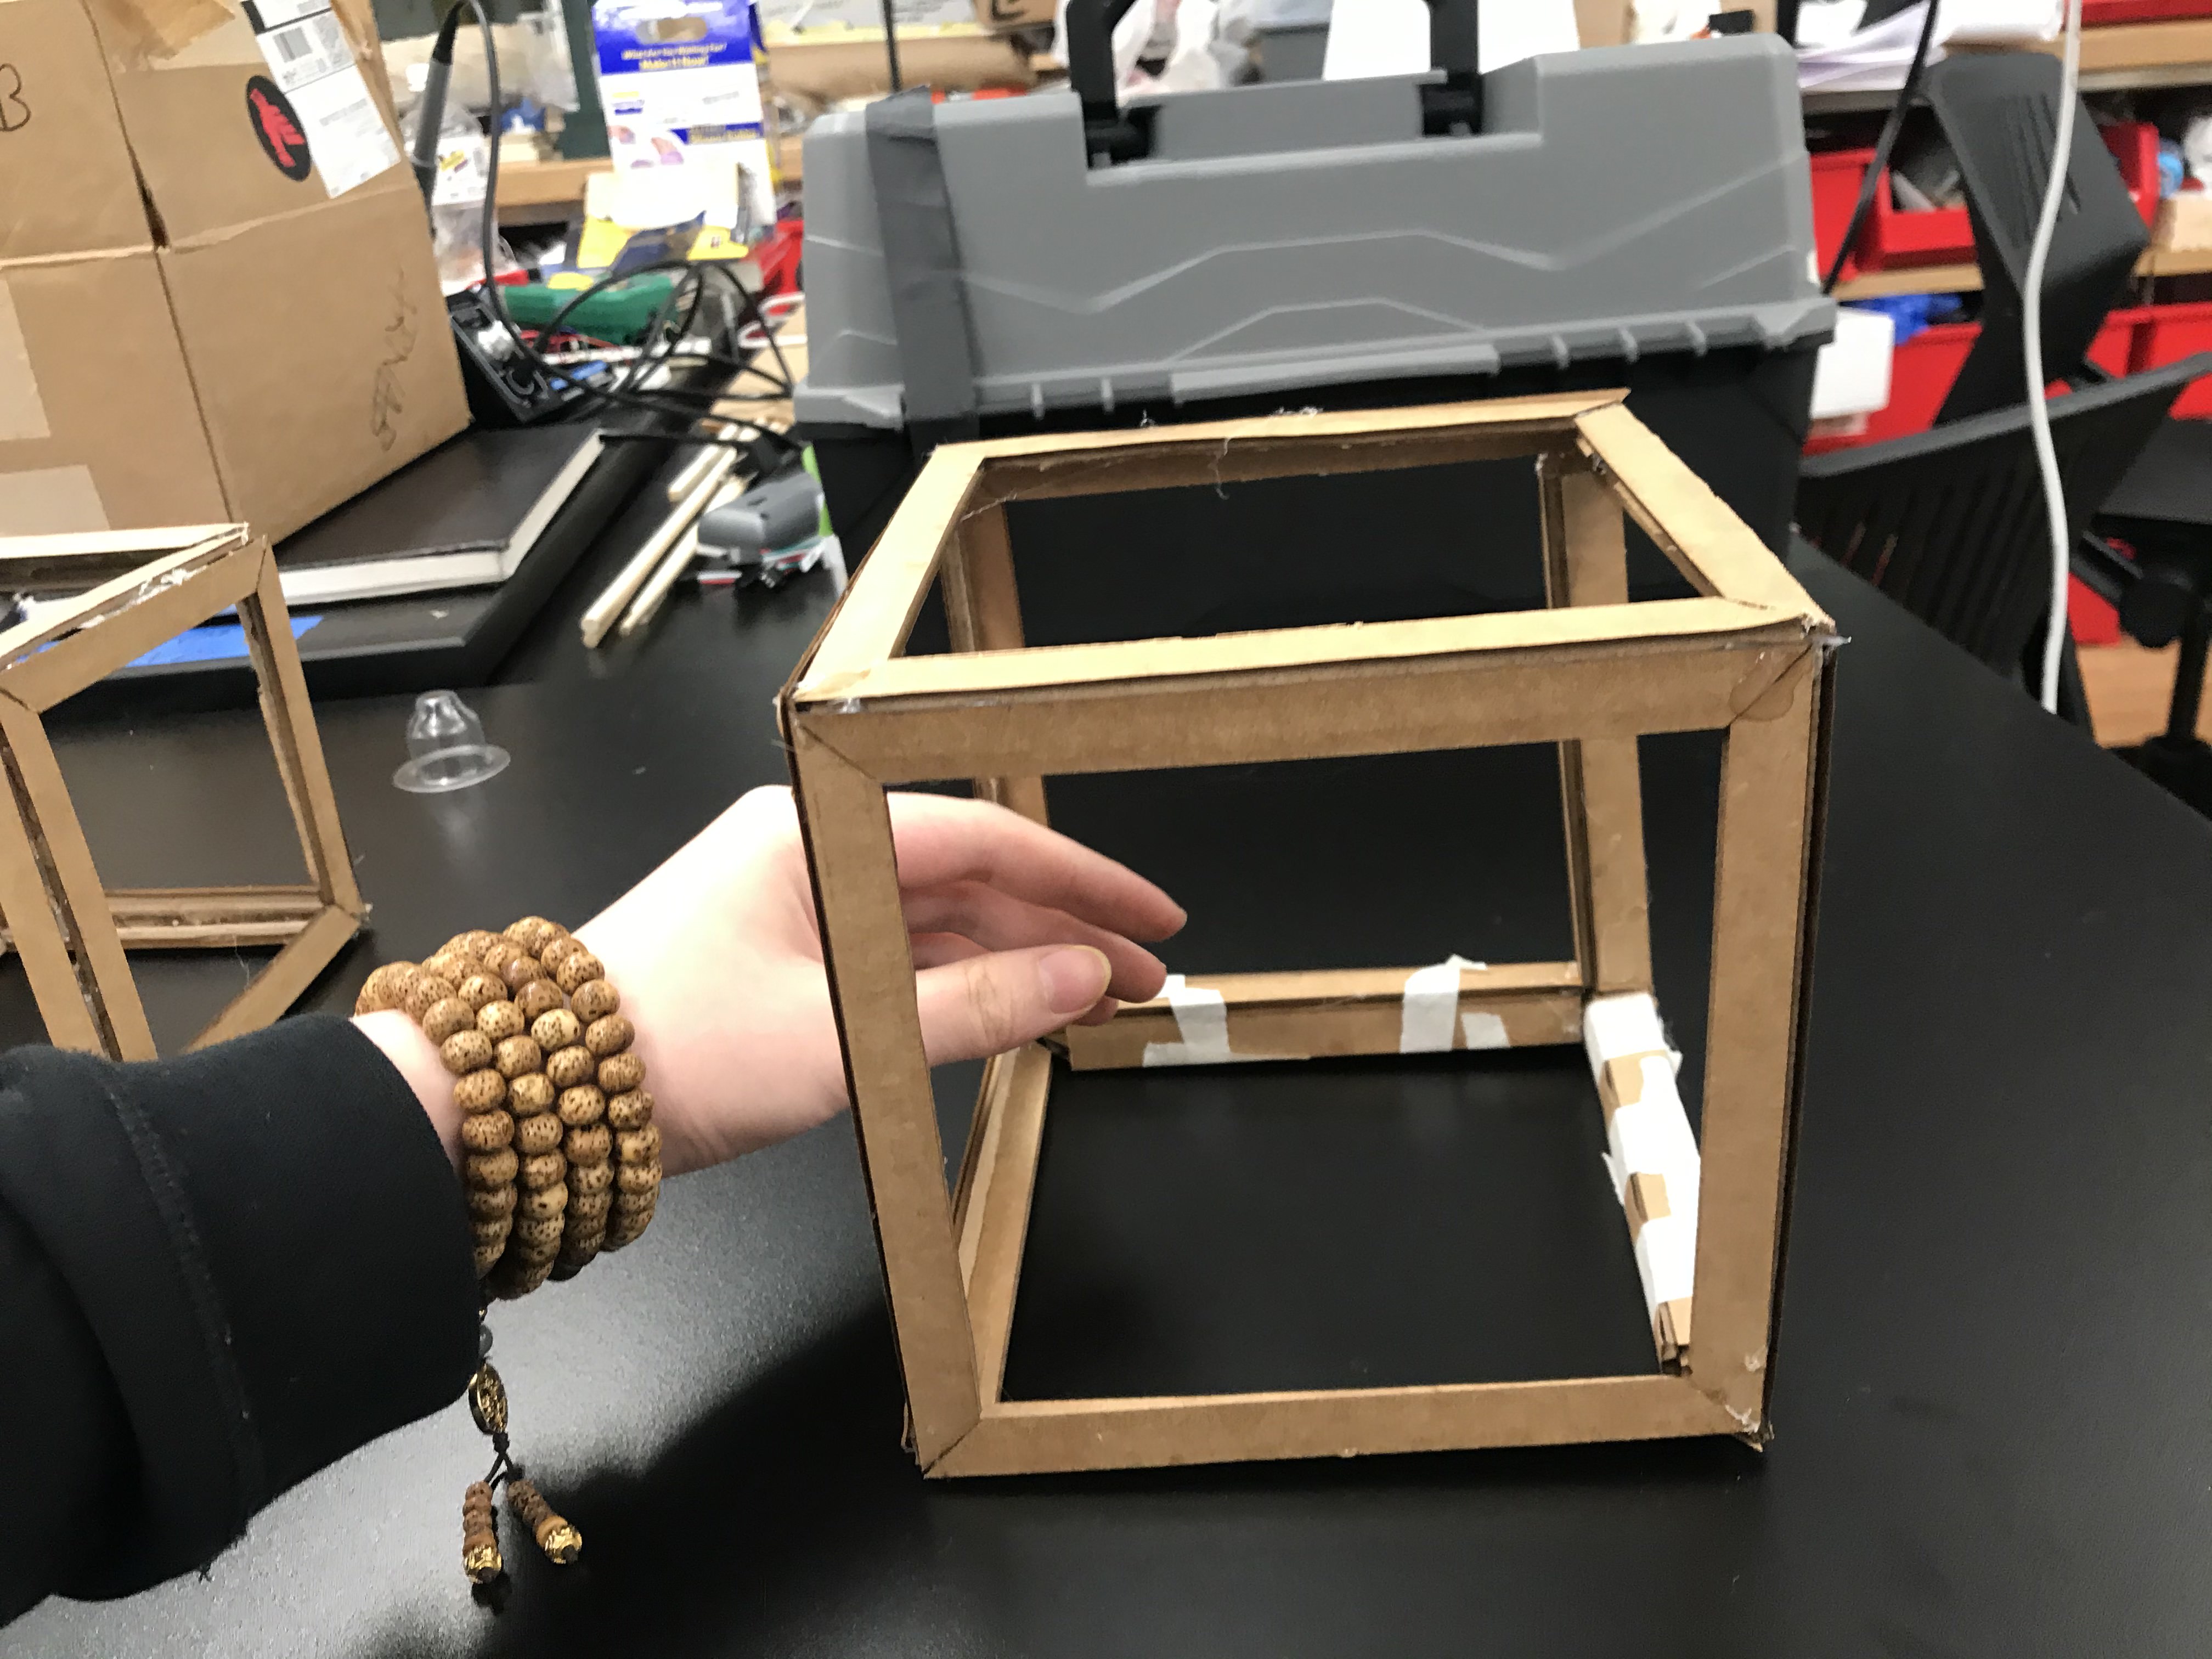
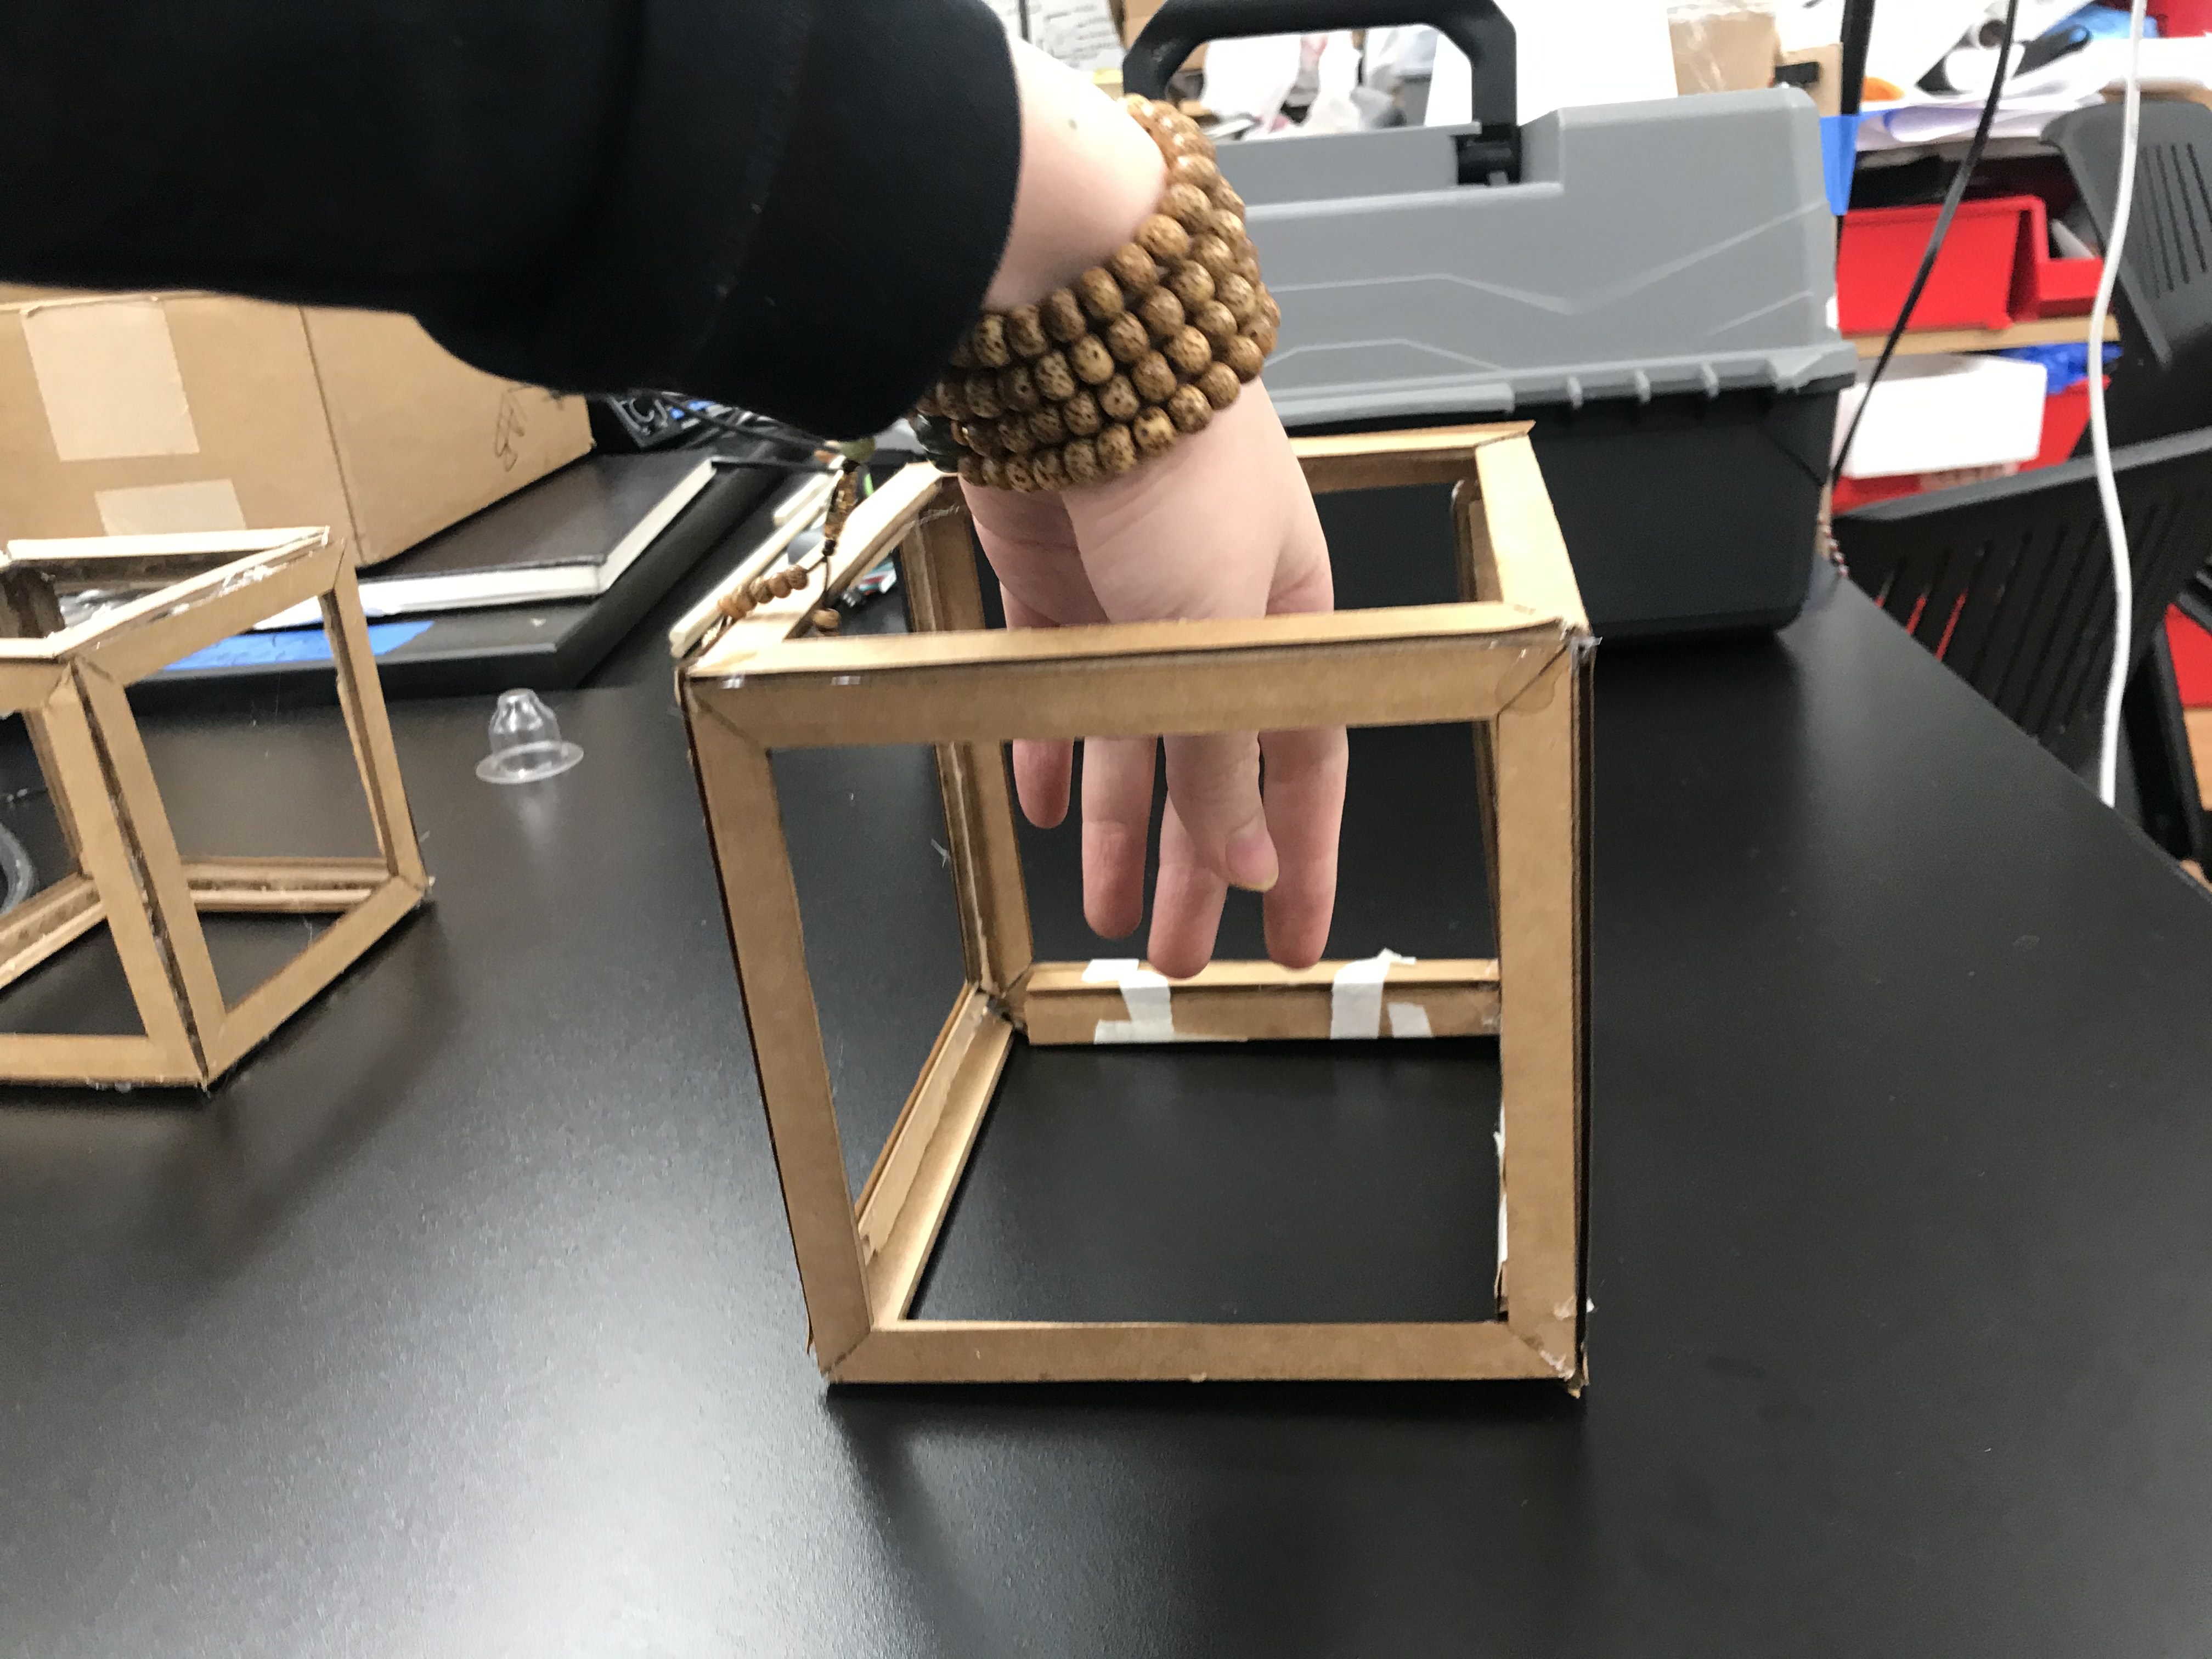
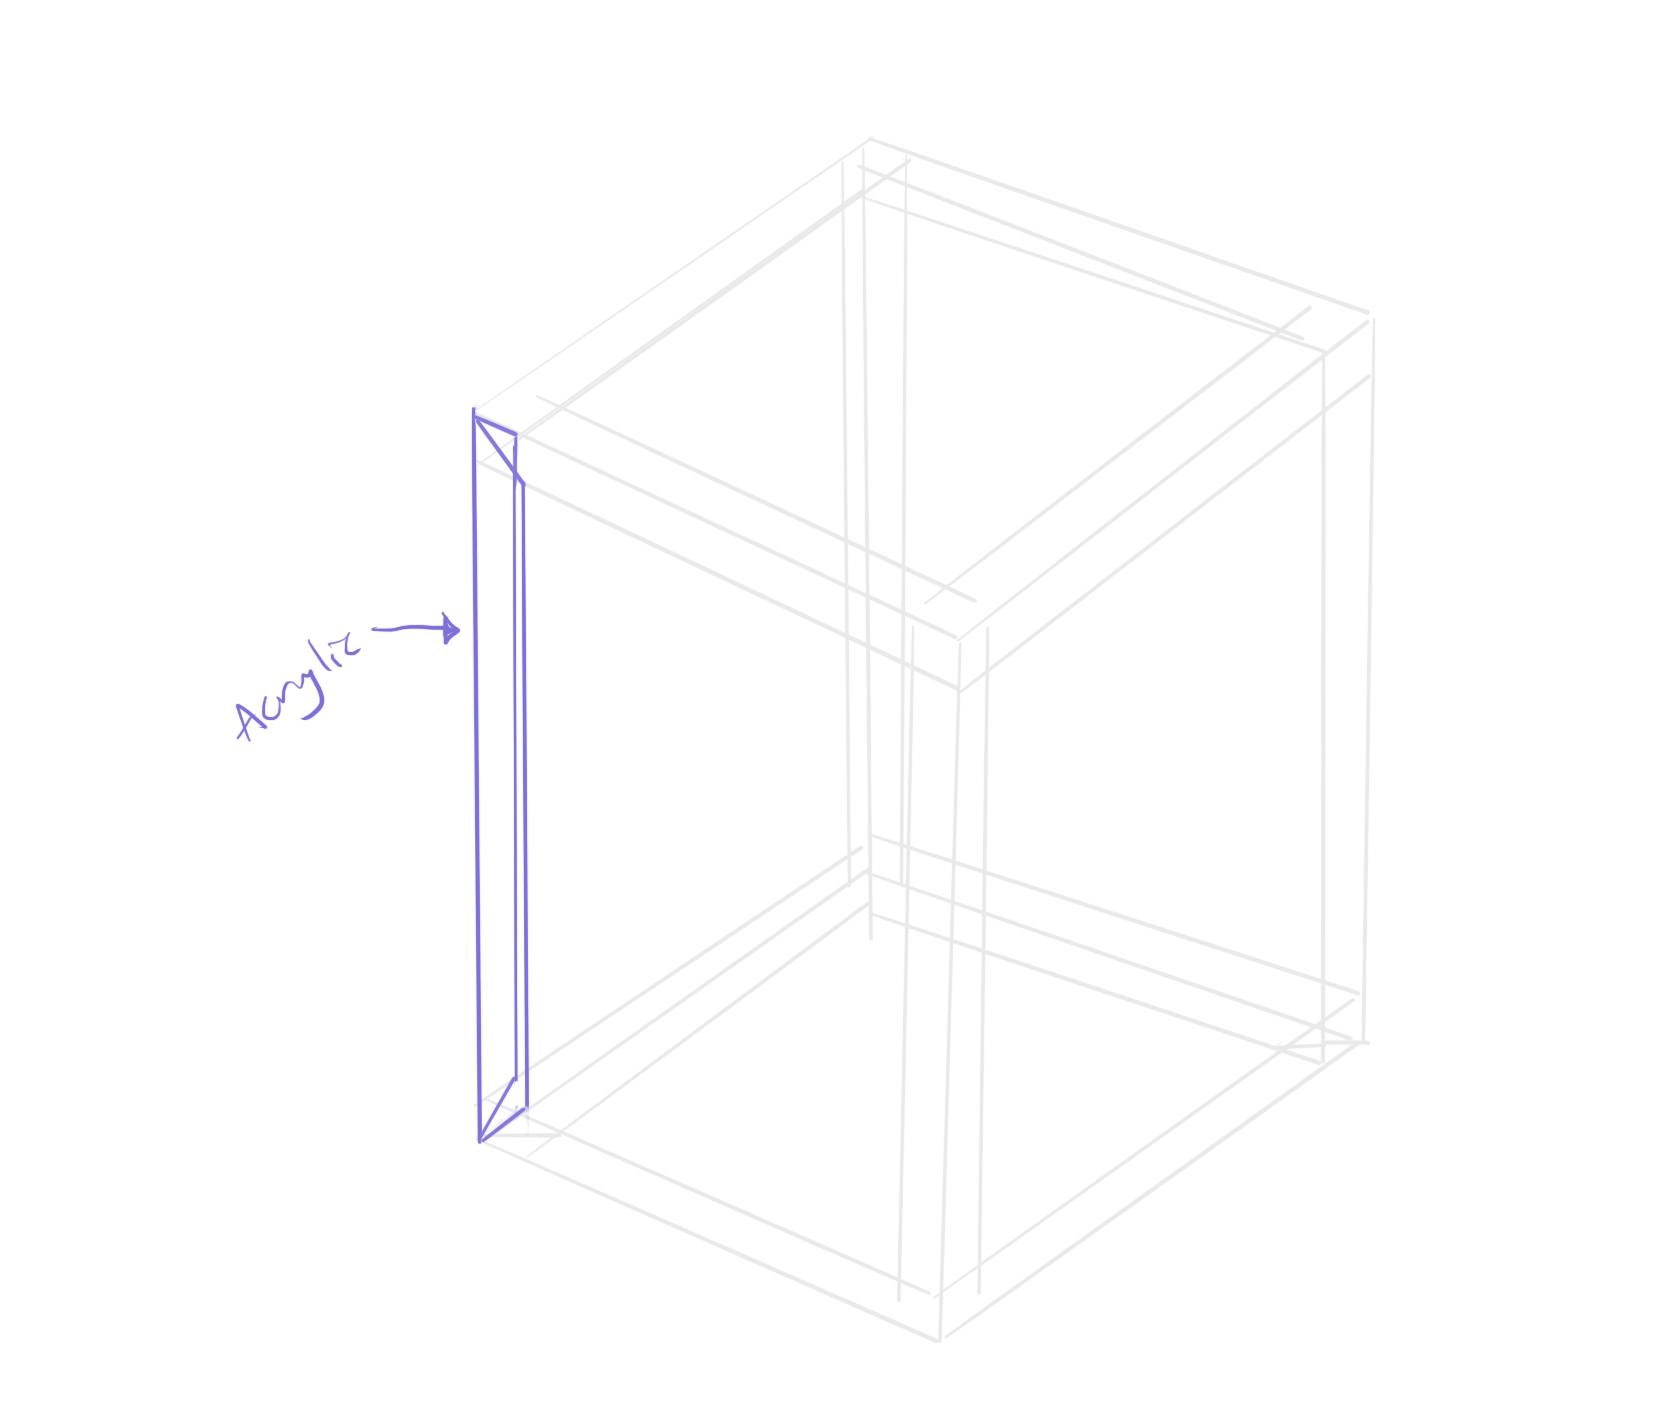
After struggling between the Cat Cube and the Music Cube, I chose the Music Cube for document purpose.
I am also adding LED to it to make it more interactive.
Research & Diagram
References I've read: Audio Tutorial / LED Strip / LED Strip SolderingReferences saved for later: Wireless
It will be a hollow, semi-transparent cube with LEDs. This will be my first time playing with better quality audio and LED strip with Arduino. For prototyping, I just used low quality frequencies. I looked up this board from Adafruit and looks handy, but I will continue searching on it. Also, I am not sure Below is the initial planning for the logic:
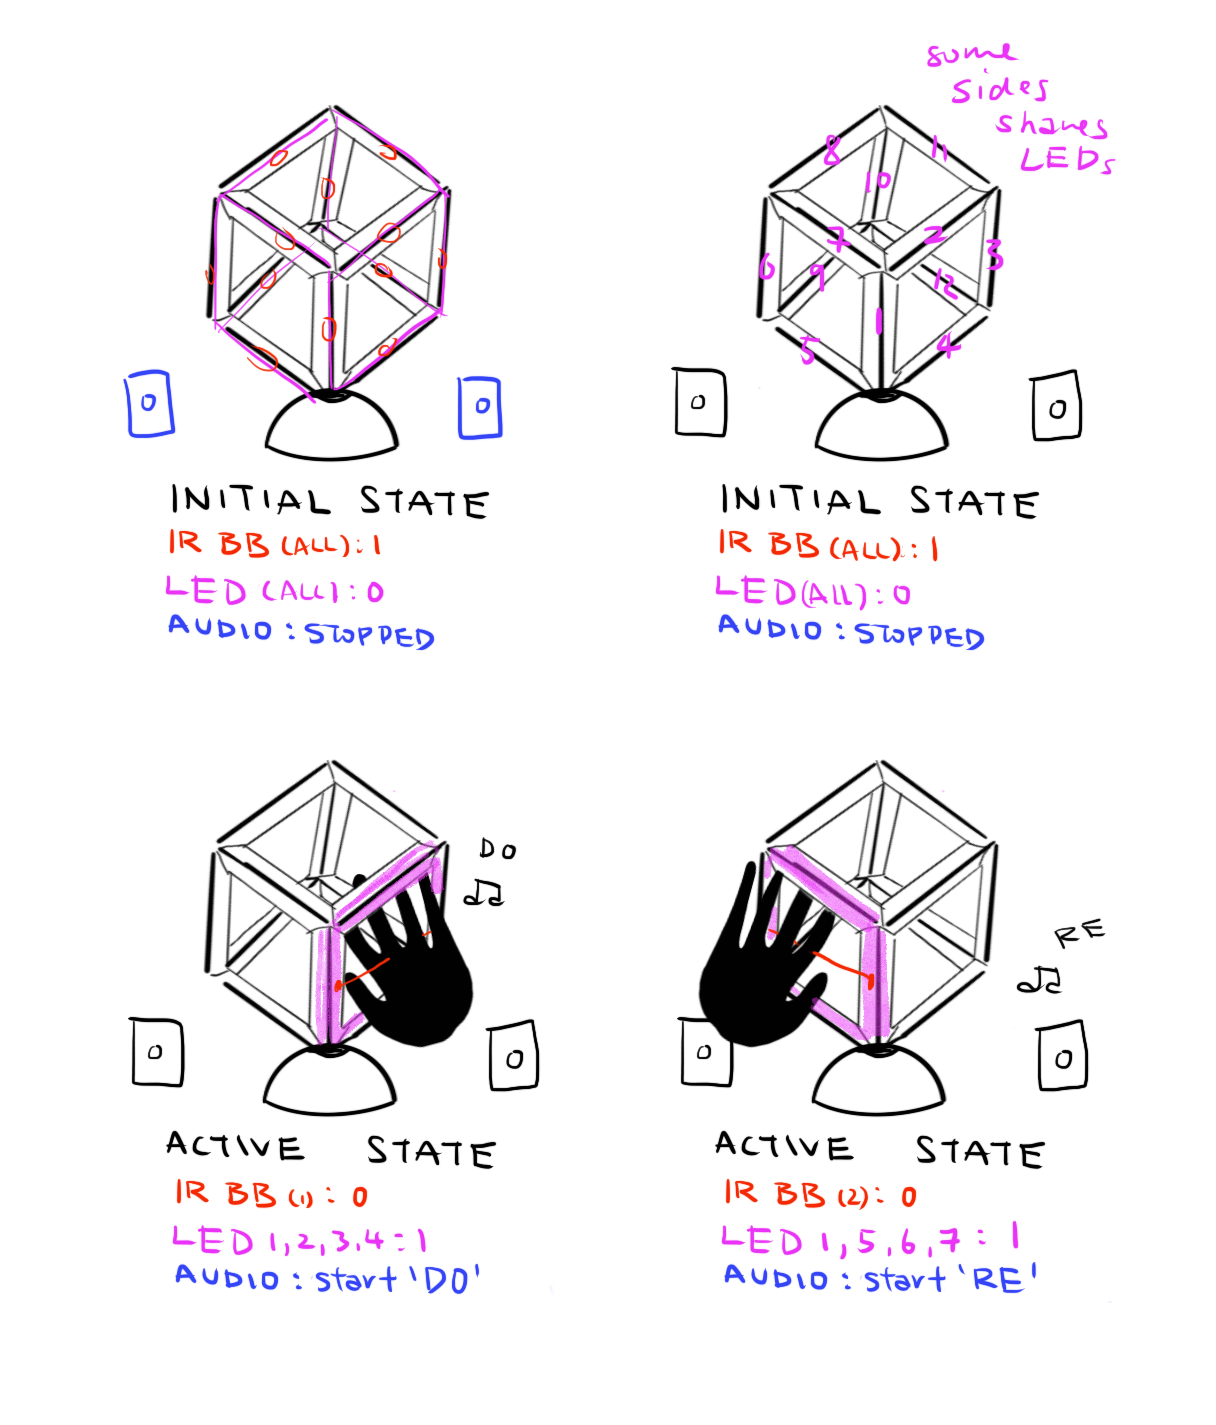
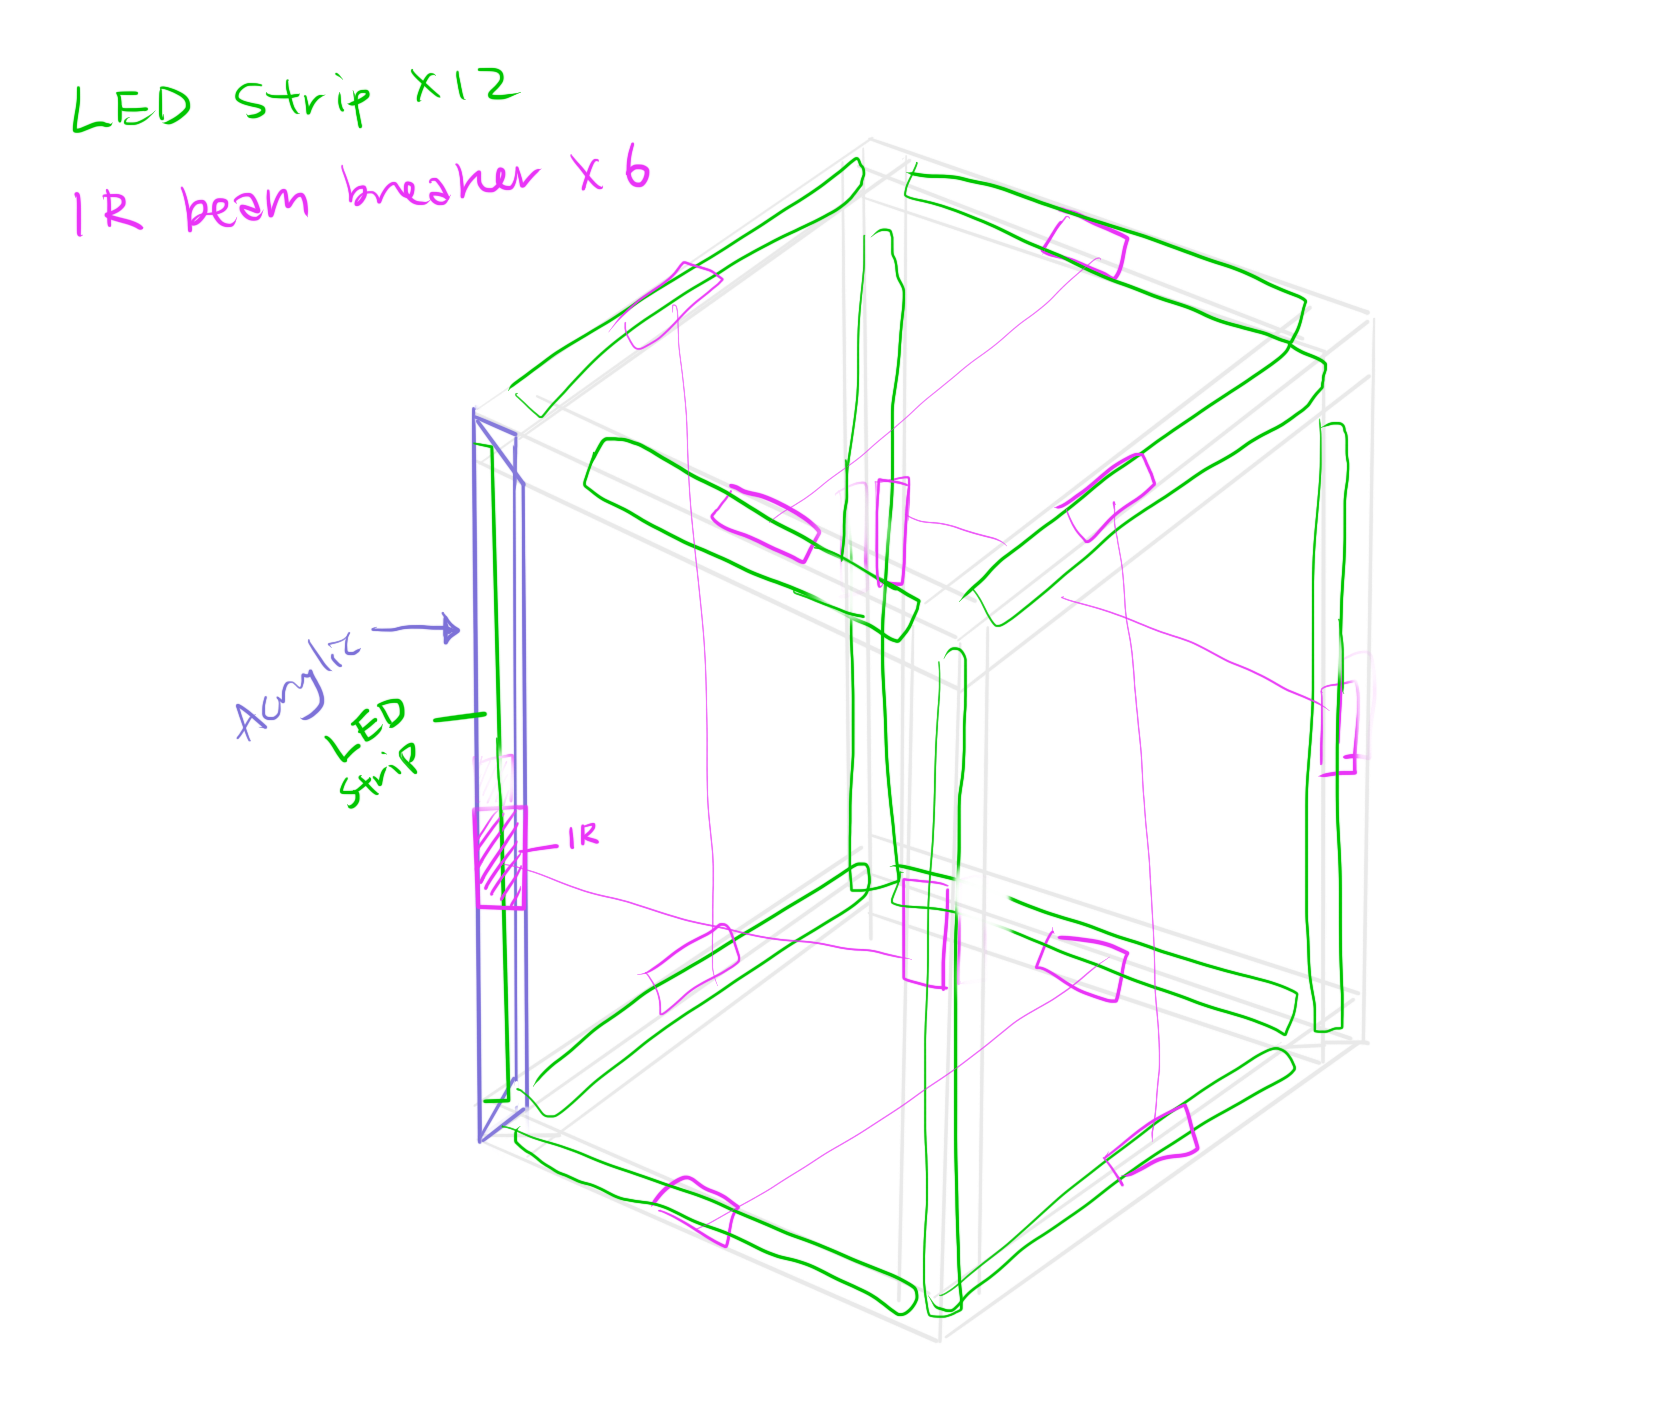
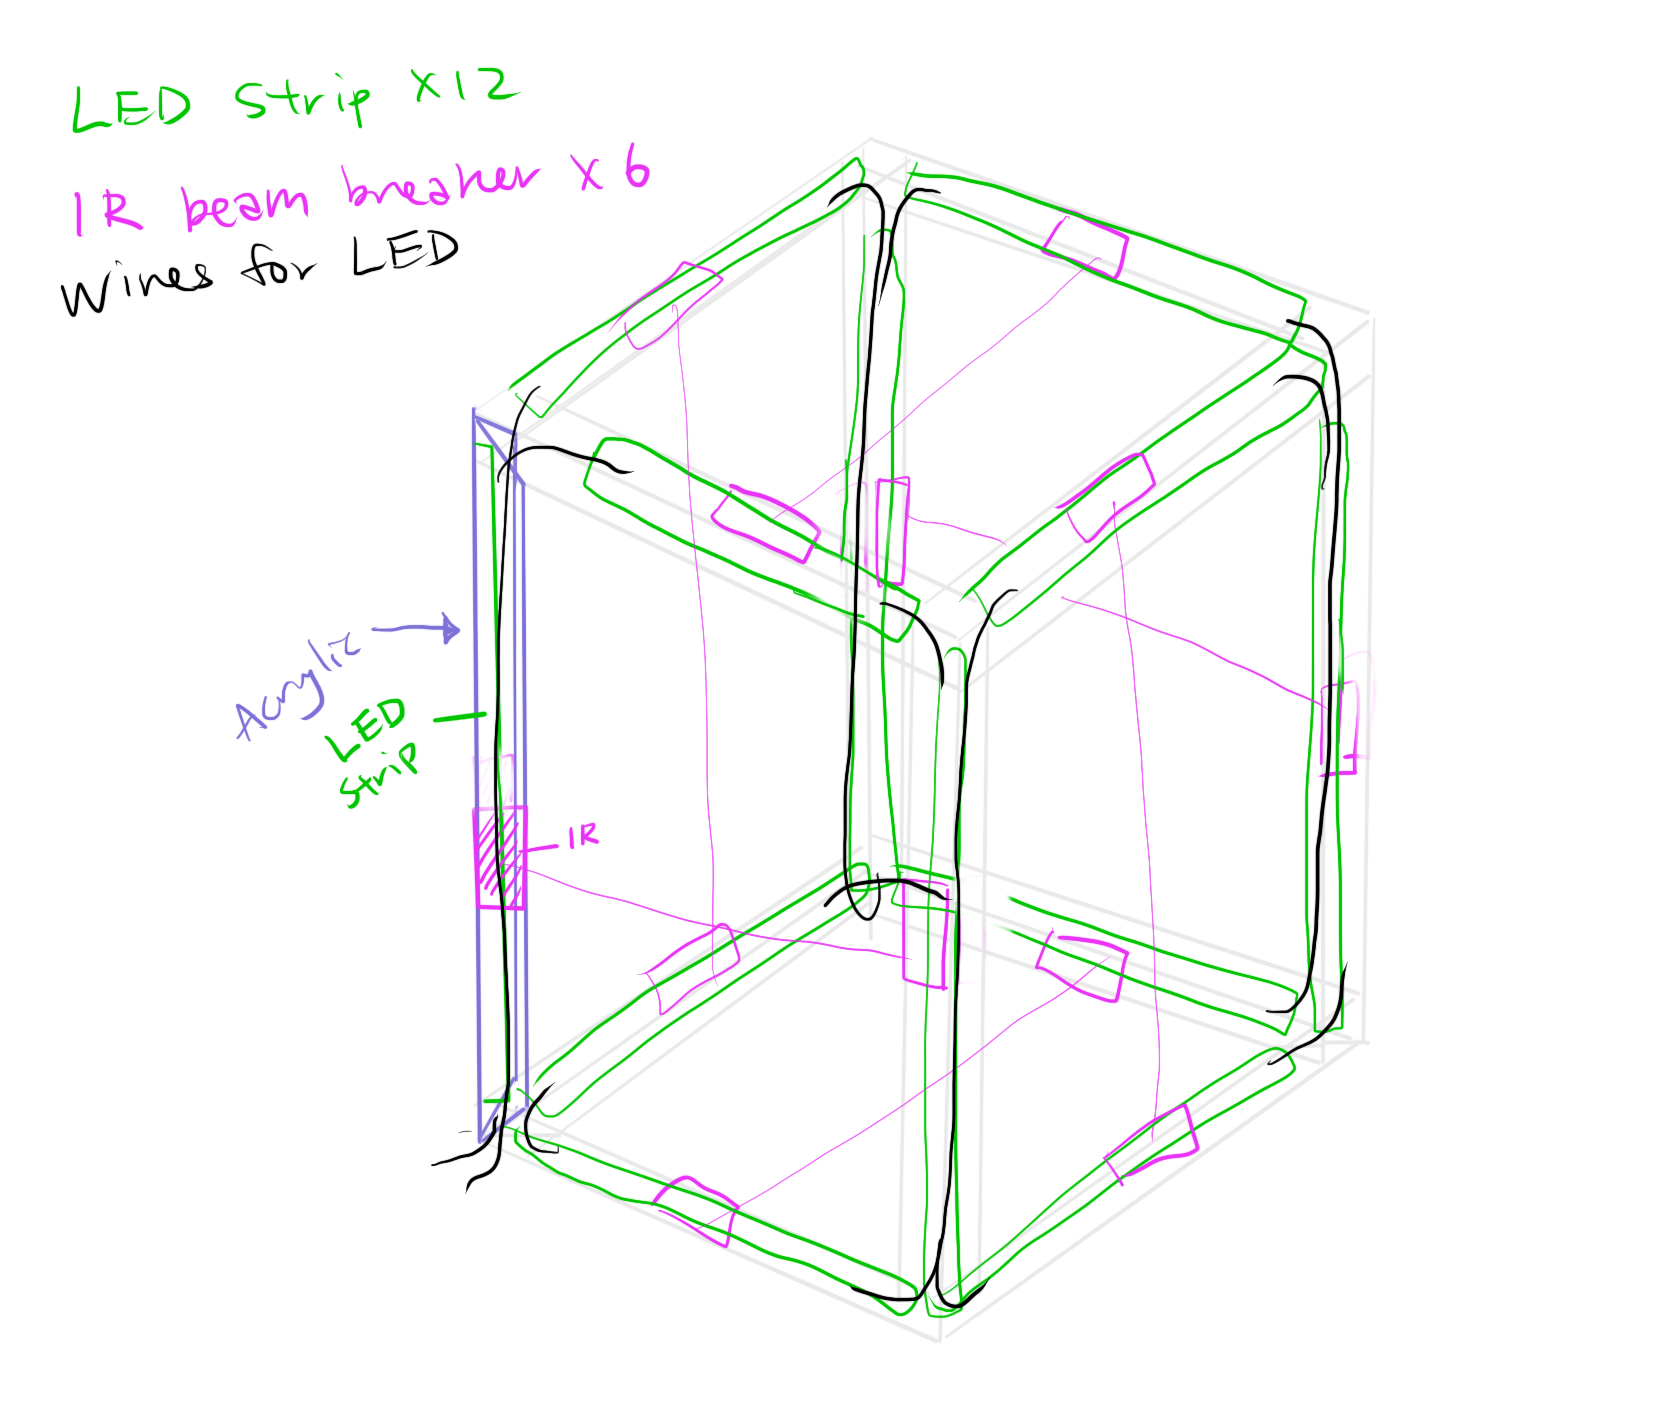
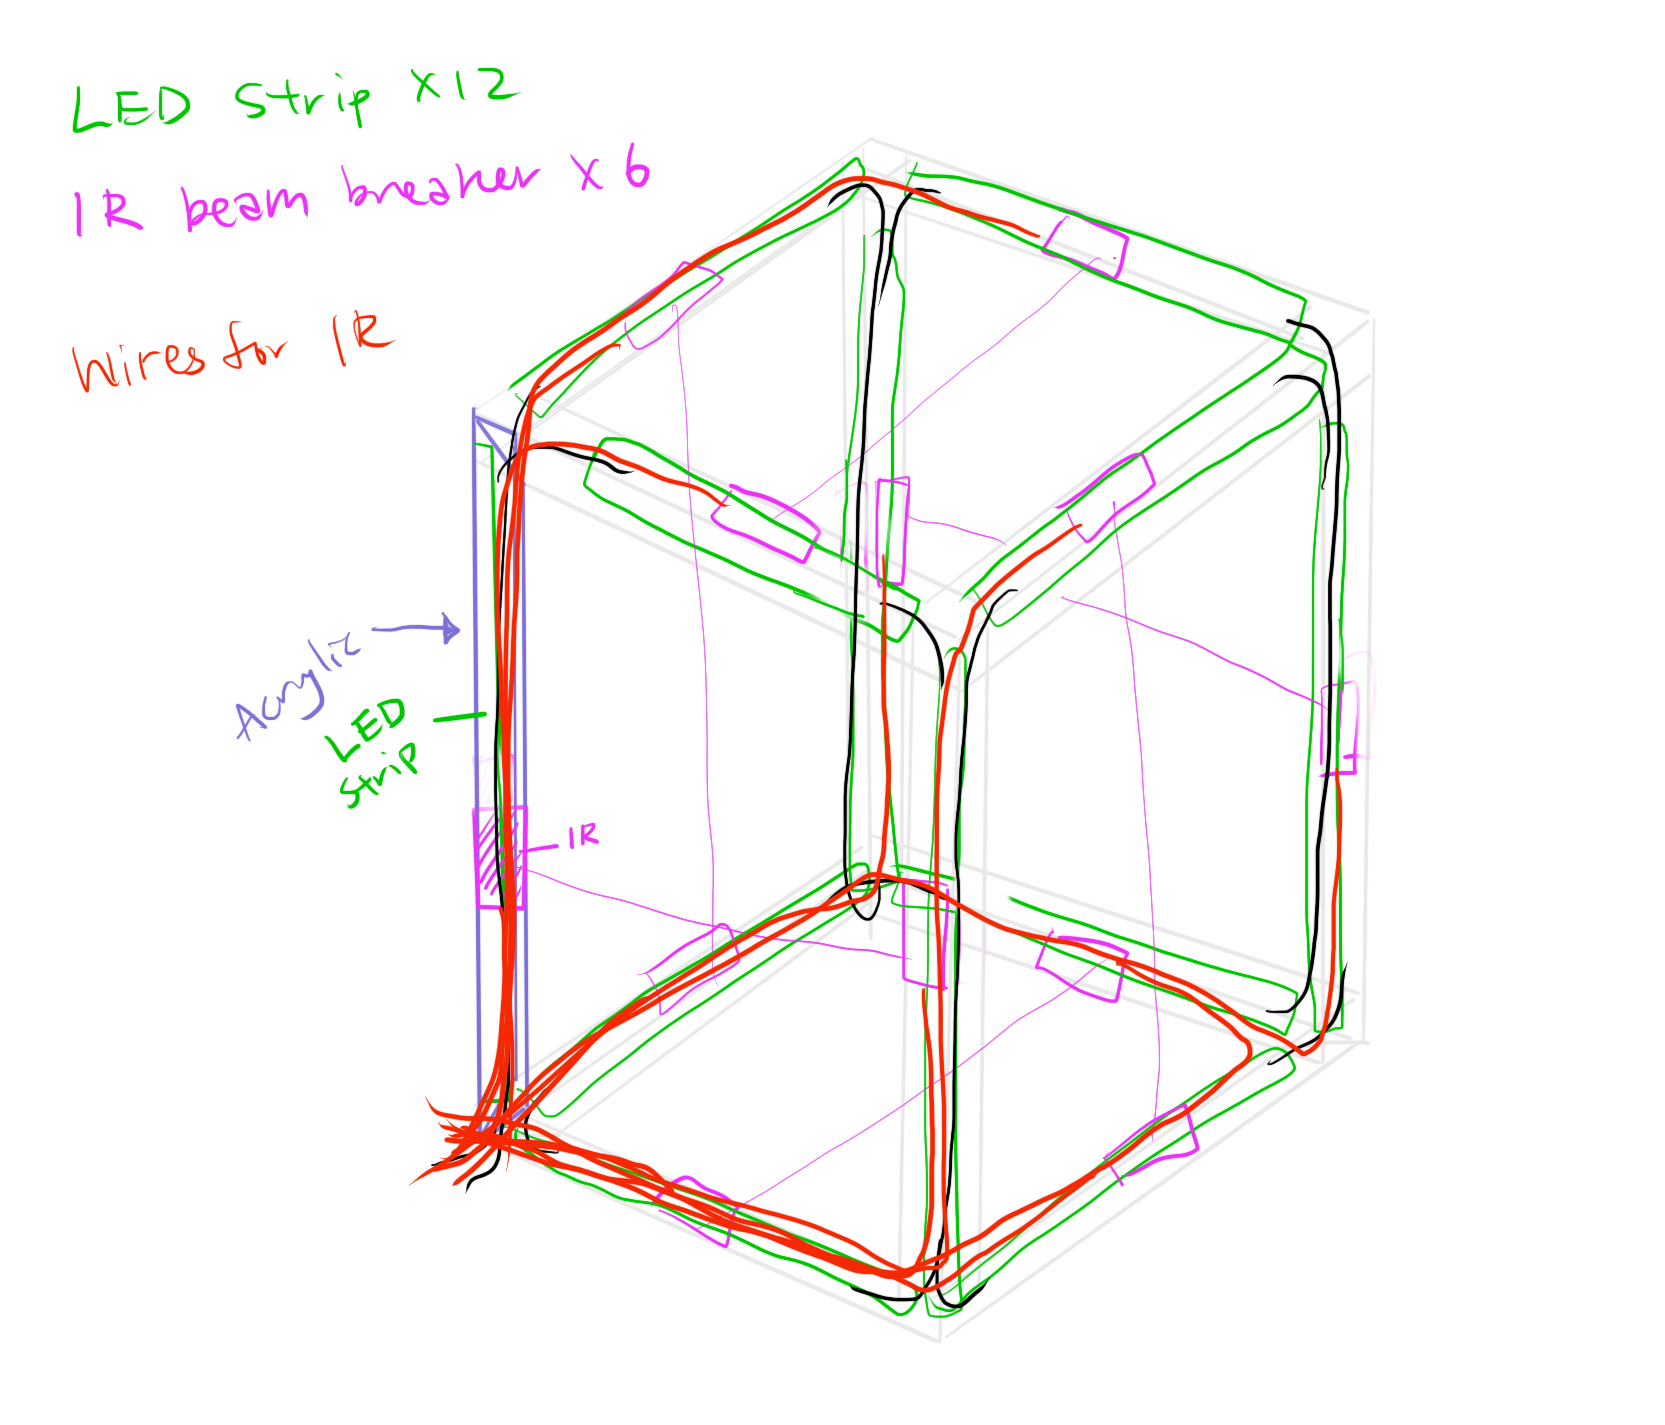
Prototype
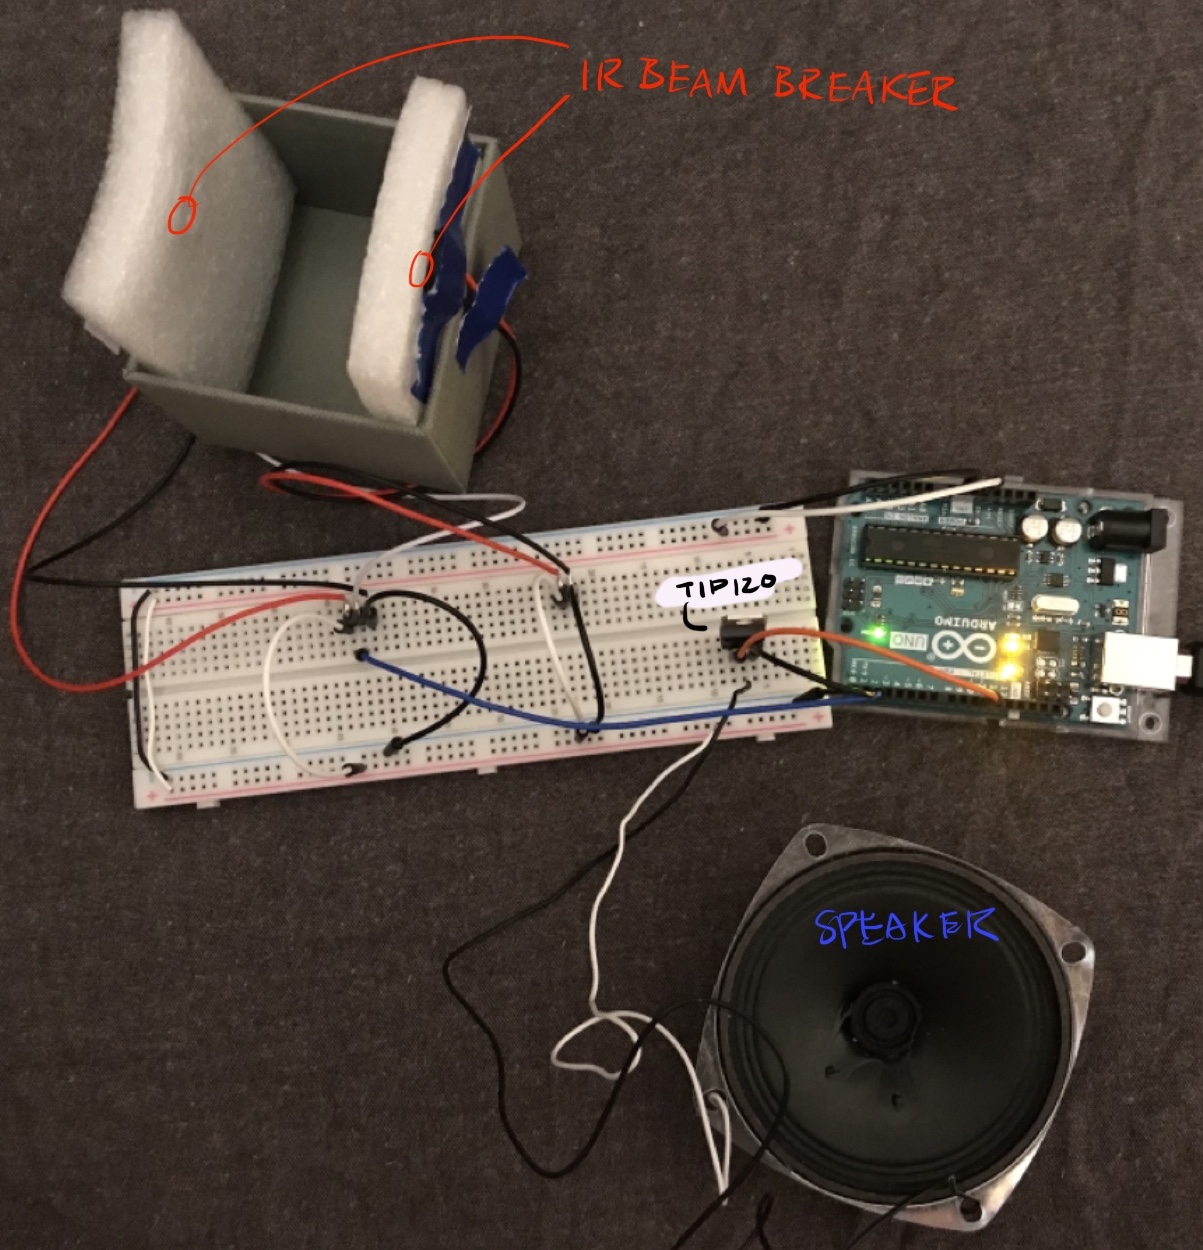
APDS9960's Gesture Function: with P5
The first thing I was thinking was to create a drawing tool on p5 using the gesture and color detection of APDS9960, however, I figured the serial communication of more than one value is a little tricky, so I only did up until a rolling ball. I will continue working on this tiny project.
P.S. the webcam in the video is mirror so it was opposite from my gesture.
AR CASE Study on NYT's Article on THAI CAVE
It is a web-based AR article that tell a story of a rescue happened in Thailand. The story that they want to delivery through AR is the scale of the caves—to emphasized the crucial situation—what makes the rescue difficult. New York Times had always did a cool job on immersive story telling for articles (eg. The well know “Snow Fall”) and they even step a foot into the AR/VR world.

I looked at a lot of cool AR projects but decided to pick this project because I think it is not using AR as something crazy, but something supporting the article. The purpose of this interaction is very simple—to give the reader another dimension of the story, but at the same time it also attracts readers who has no interest in this topic or even don’t know about this.


This is also a very exclusive experience that only people who go through that process will know how tough it is. I think it is very smart that they chose the scale as the main for this experience following along with the path that the rescue team goes.
Things that I think it can improve on is to deliver two other dimensions for this rescue, which it mentioned in the article through text, the visibility and the water level. The visibility in the cave is very poor entirely, no matter the darkness or under the muddy water, I think this experience can be brought into AR by having an option for the user to select to be under the “rescuer’s mode”— when the only source of light is the one on your helmet—that only the spot of the sight the reader is facing is visible, everywhere else should be dark. It might also be for immersive if there is a scale of the water level in the cave to give the reader an idea of what makes the rescue even more tough.
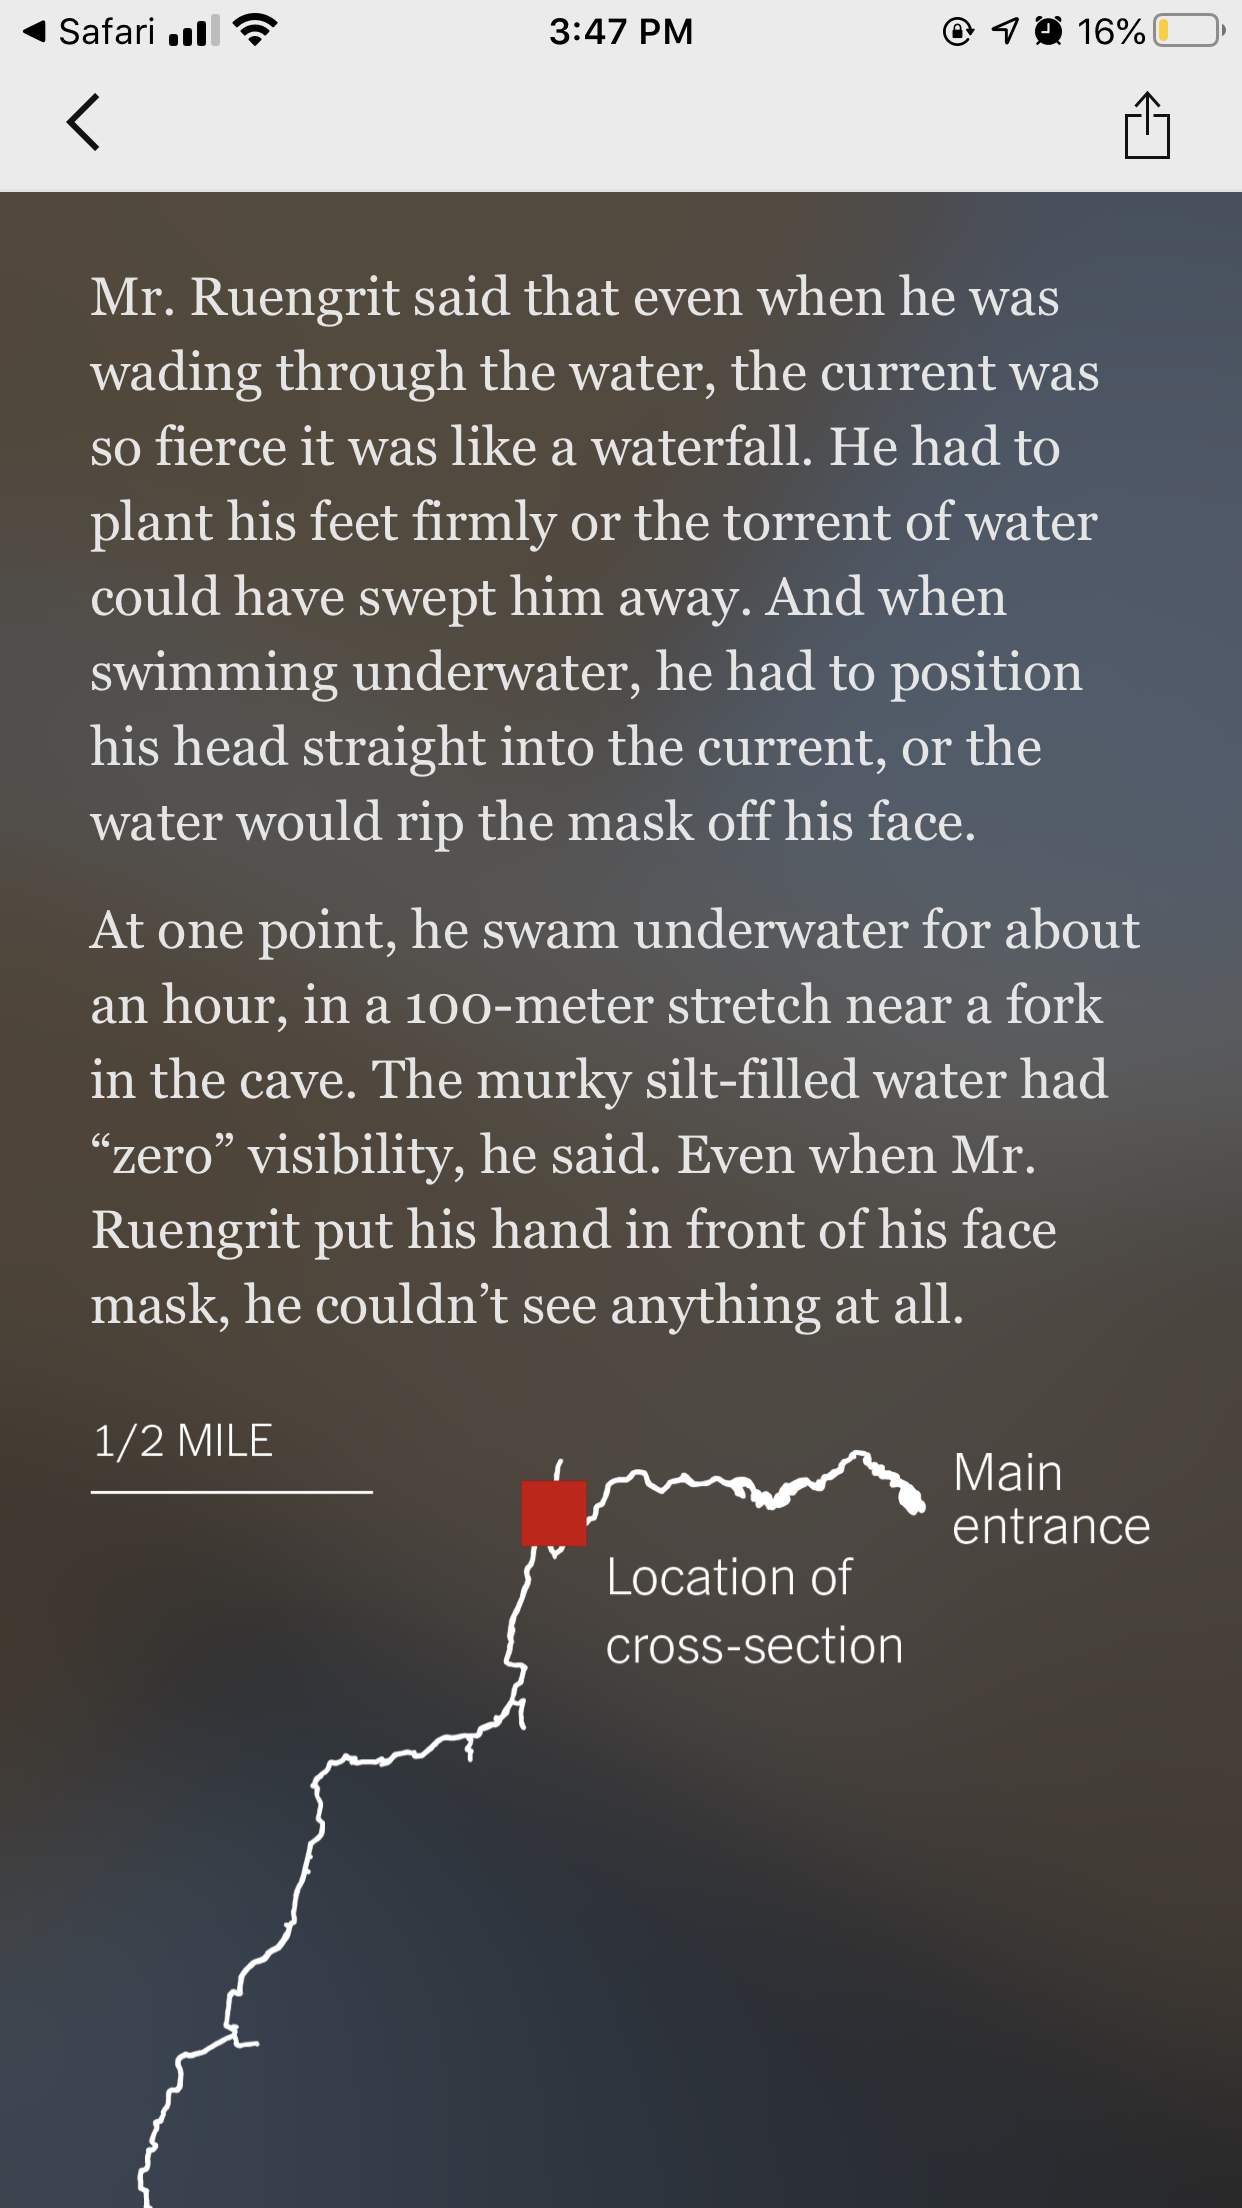

I think what impressed me is that (even though I’ve never been to the cave) the scale seemed to be very accurate when using the AR even when I walk up close. Having my body going near to the cave gives ideas of the scale scale by comparing it to my own body instead of a human male figure thats normally used for inforgraphy for this purposes.
Visualizing Story: The Ape Lady In Retirement
Week 3: Ideas For Final Project
Idea #1: Agar Related Bio Packaging
I want to continue research on the bio materials for packaging focusing on it's special texture / form / color / taste and etc that can give the user a new type of experience.Idea #2: Space Dining Experience
The second research area I am thinking of will be a new way to eat or new way to pack the food in zero-gravity space.To Pack: The biodegradable package haven't being used for space traveling dining since it expires too soon for long term traveling in space. But waste is one of the things that space traveling need to take care of too. I am thinking of either biodegradable by using agar / corn starch or seed planting packaging like the ones that Mainichi Newspaper did, so that astrunauts can possibly grew some fast grown vegies themselves:
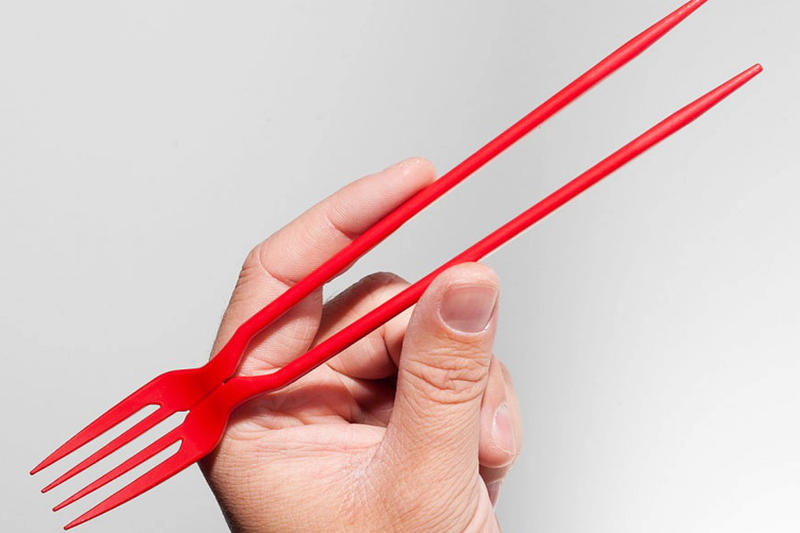
To Eat: Discovering a new type of eating experience. Maybe forks don't look like forks anymore? Scissors is the main utensil that astronauts had been using, what if we rethink about the 'need' in the zero-gravity experience and create new untensil for that environment?
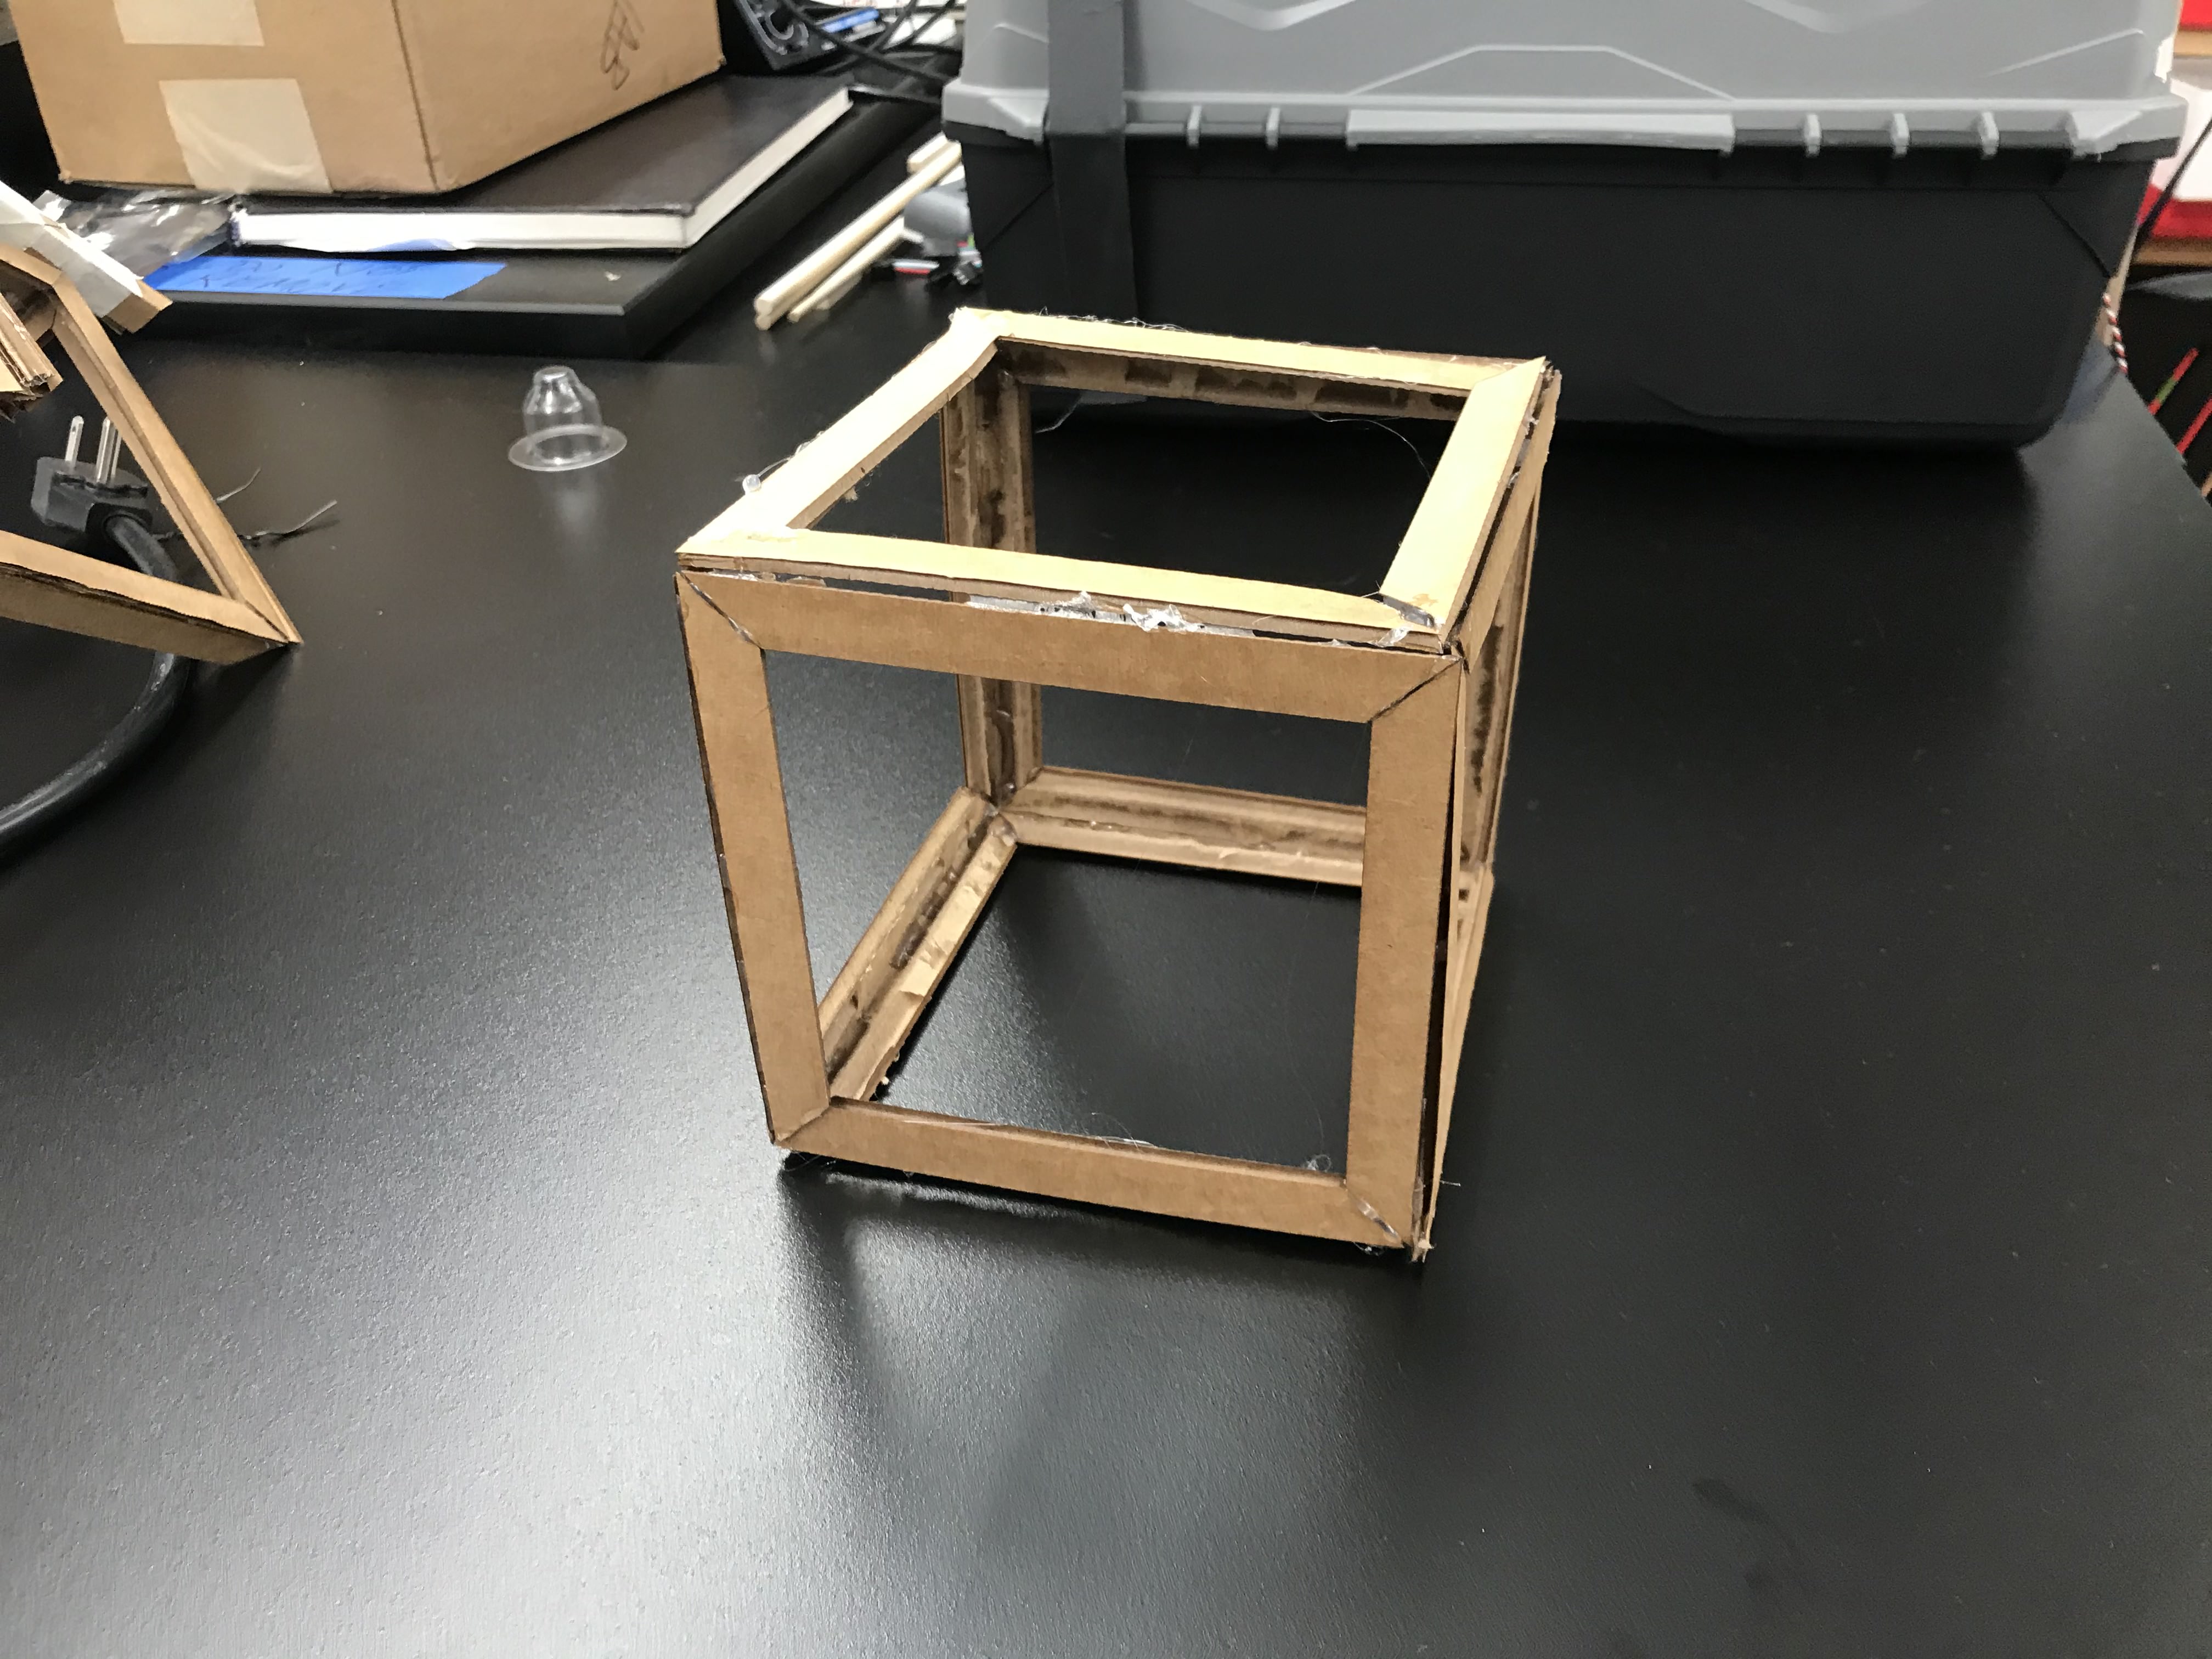
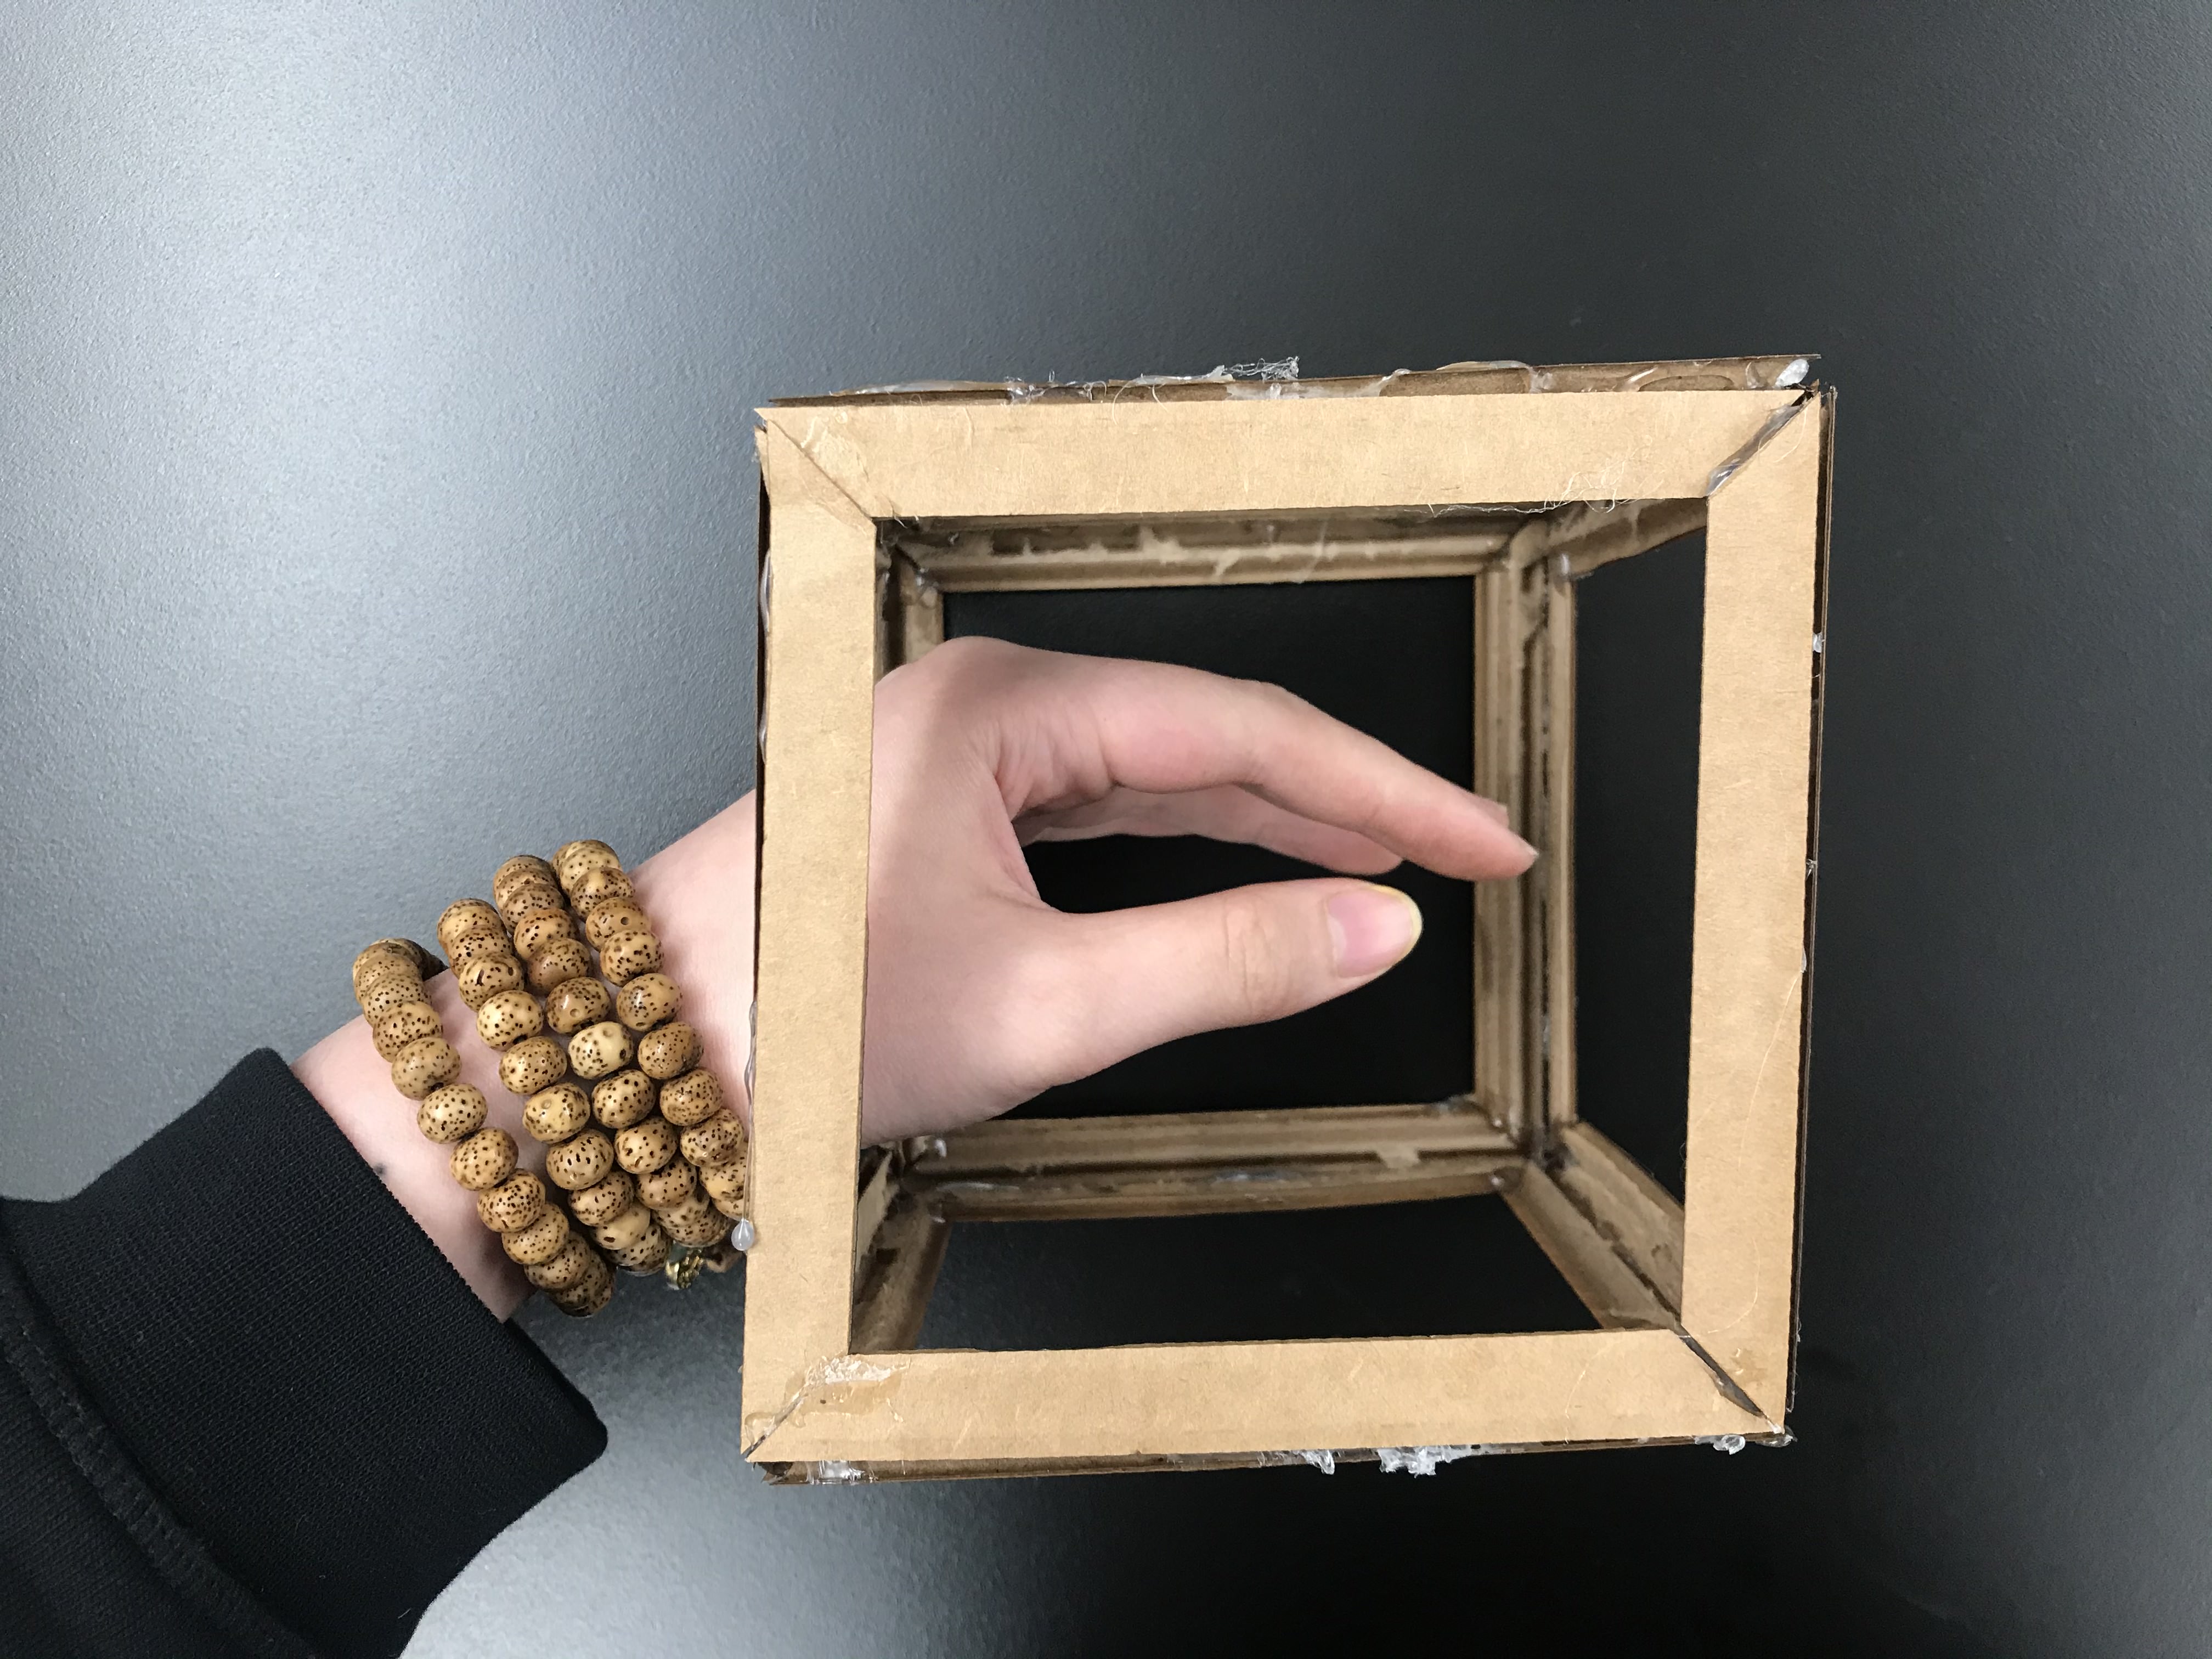
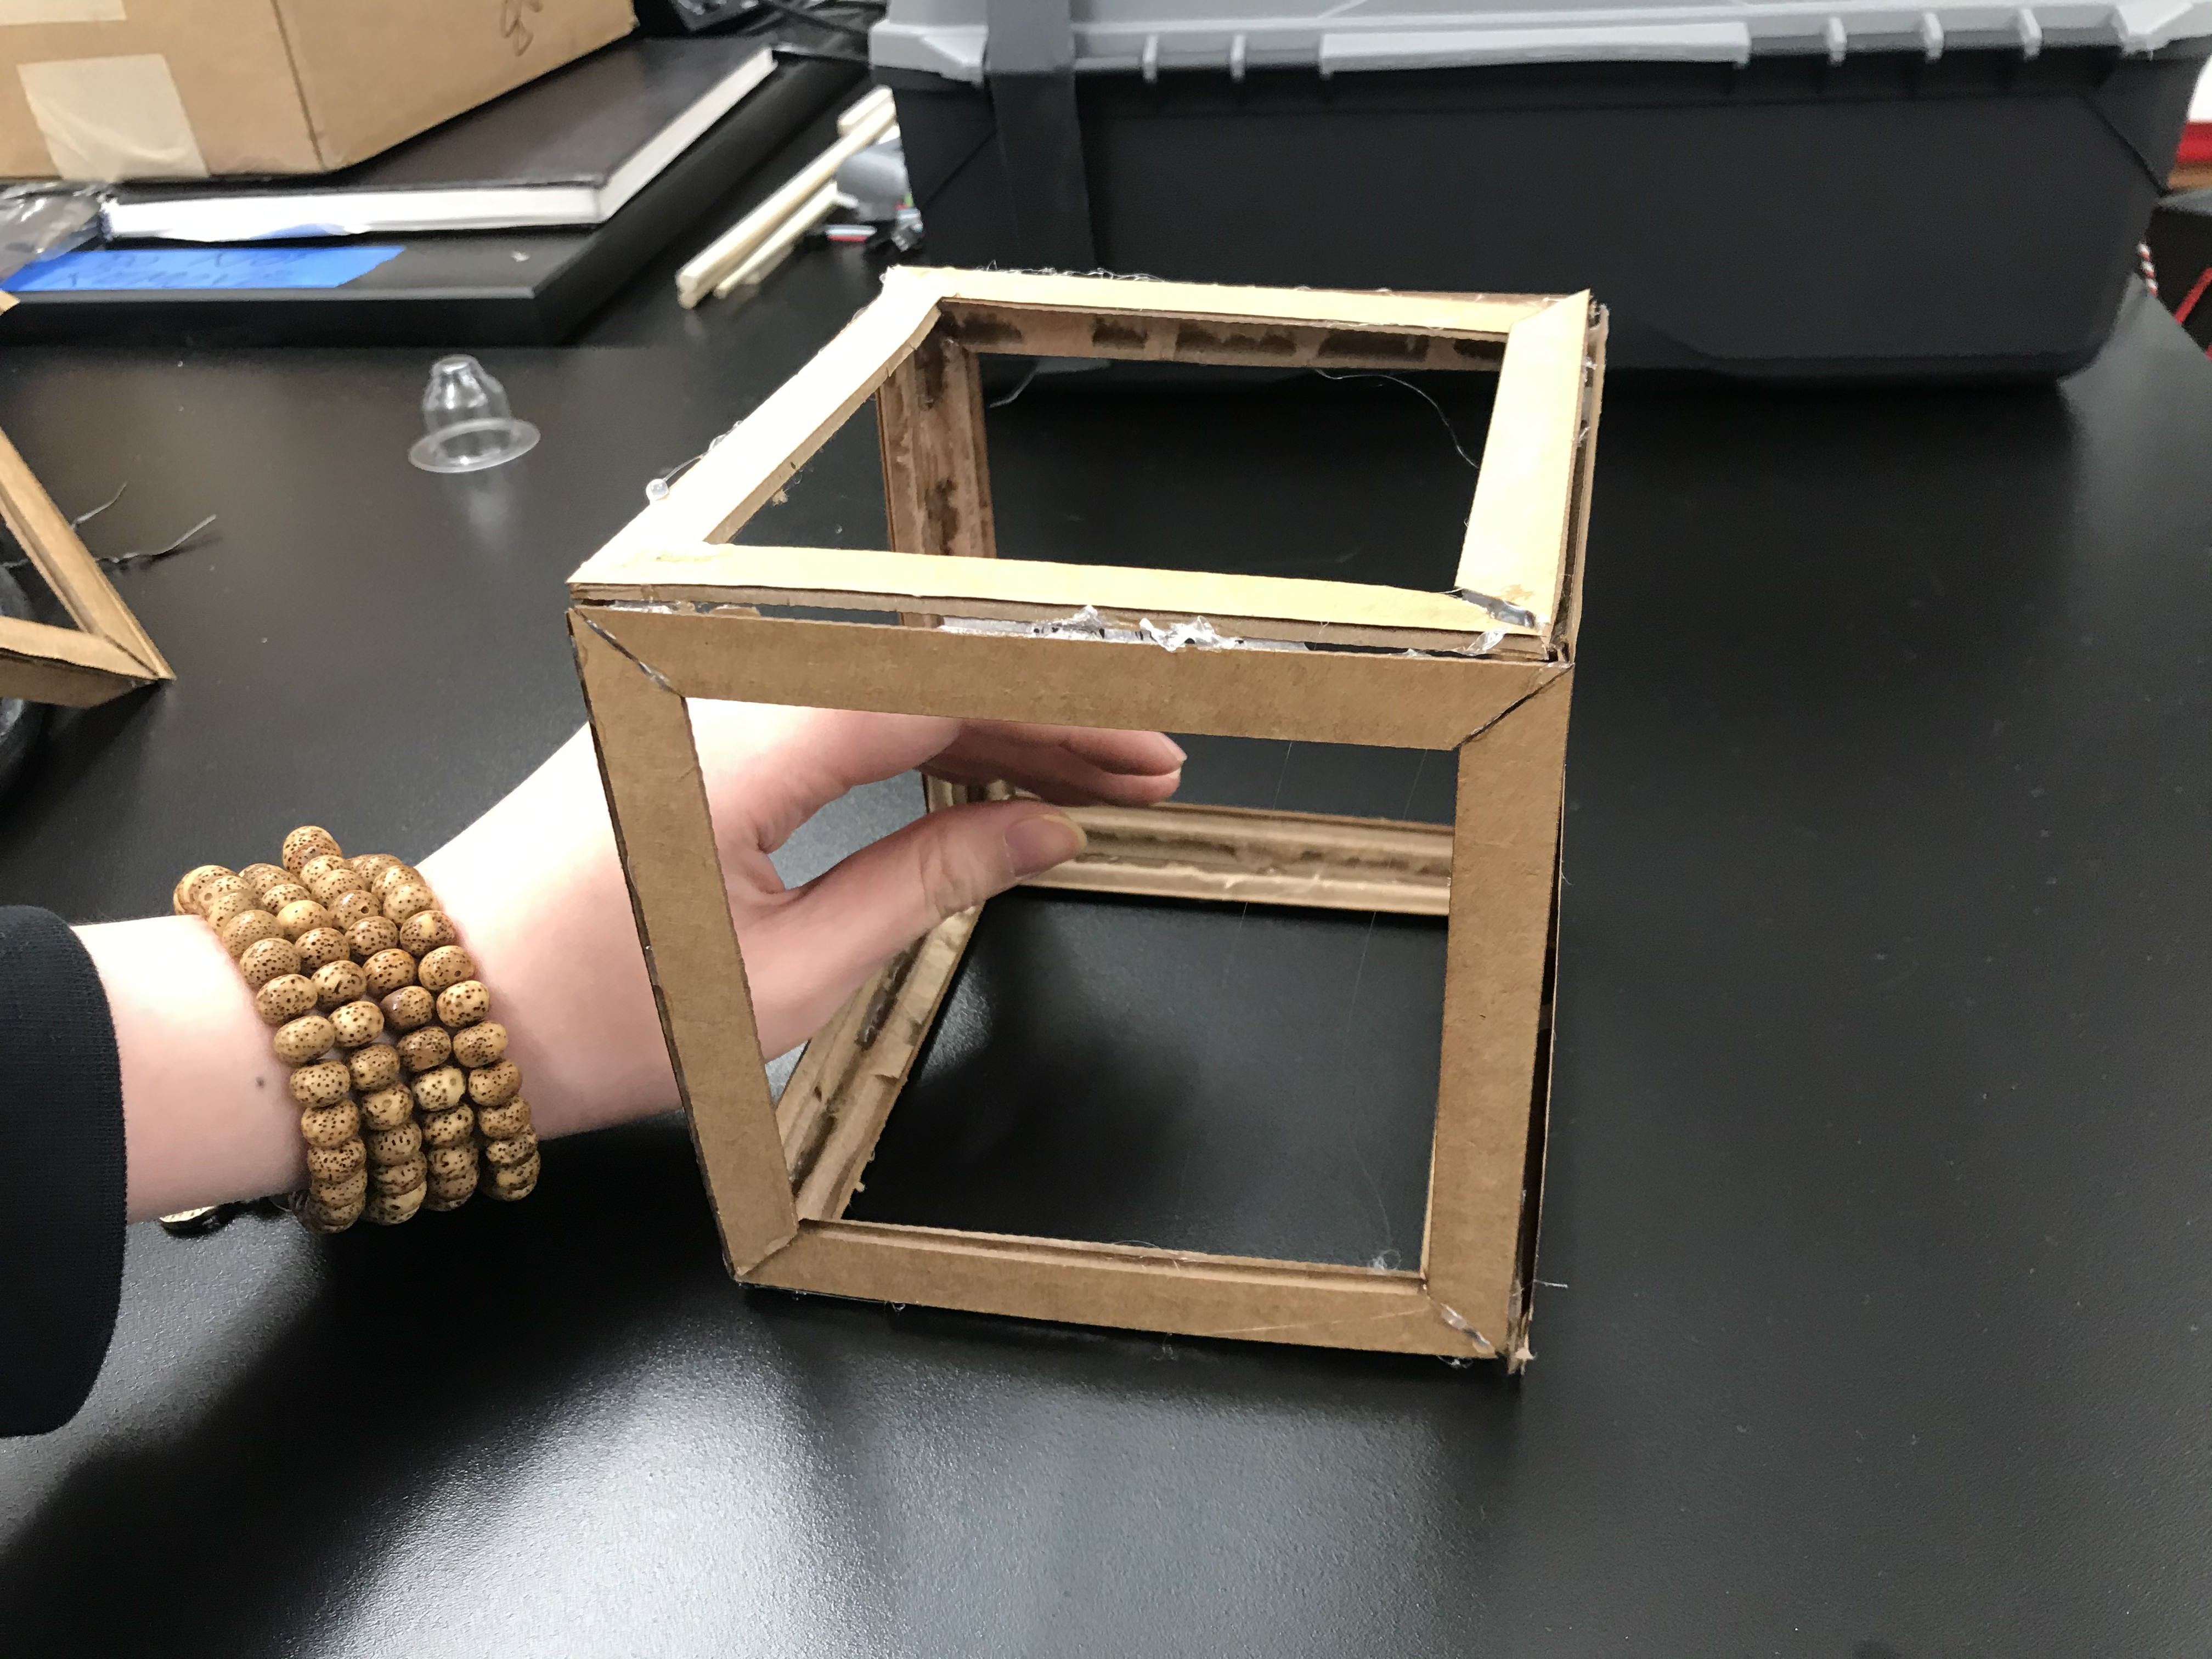
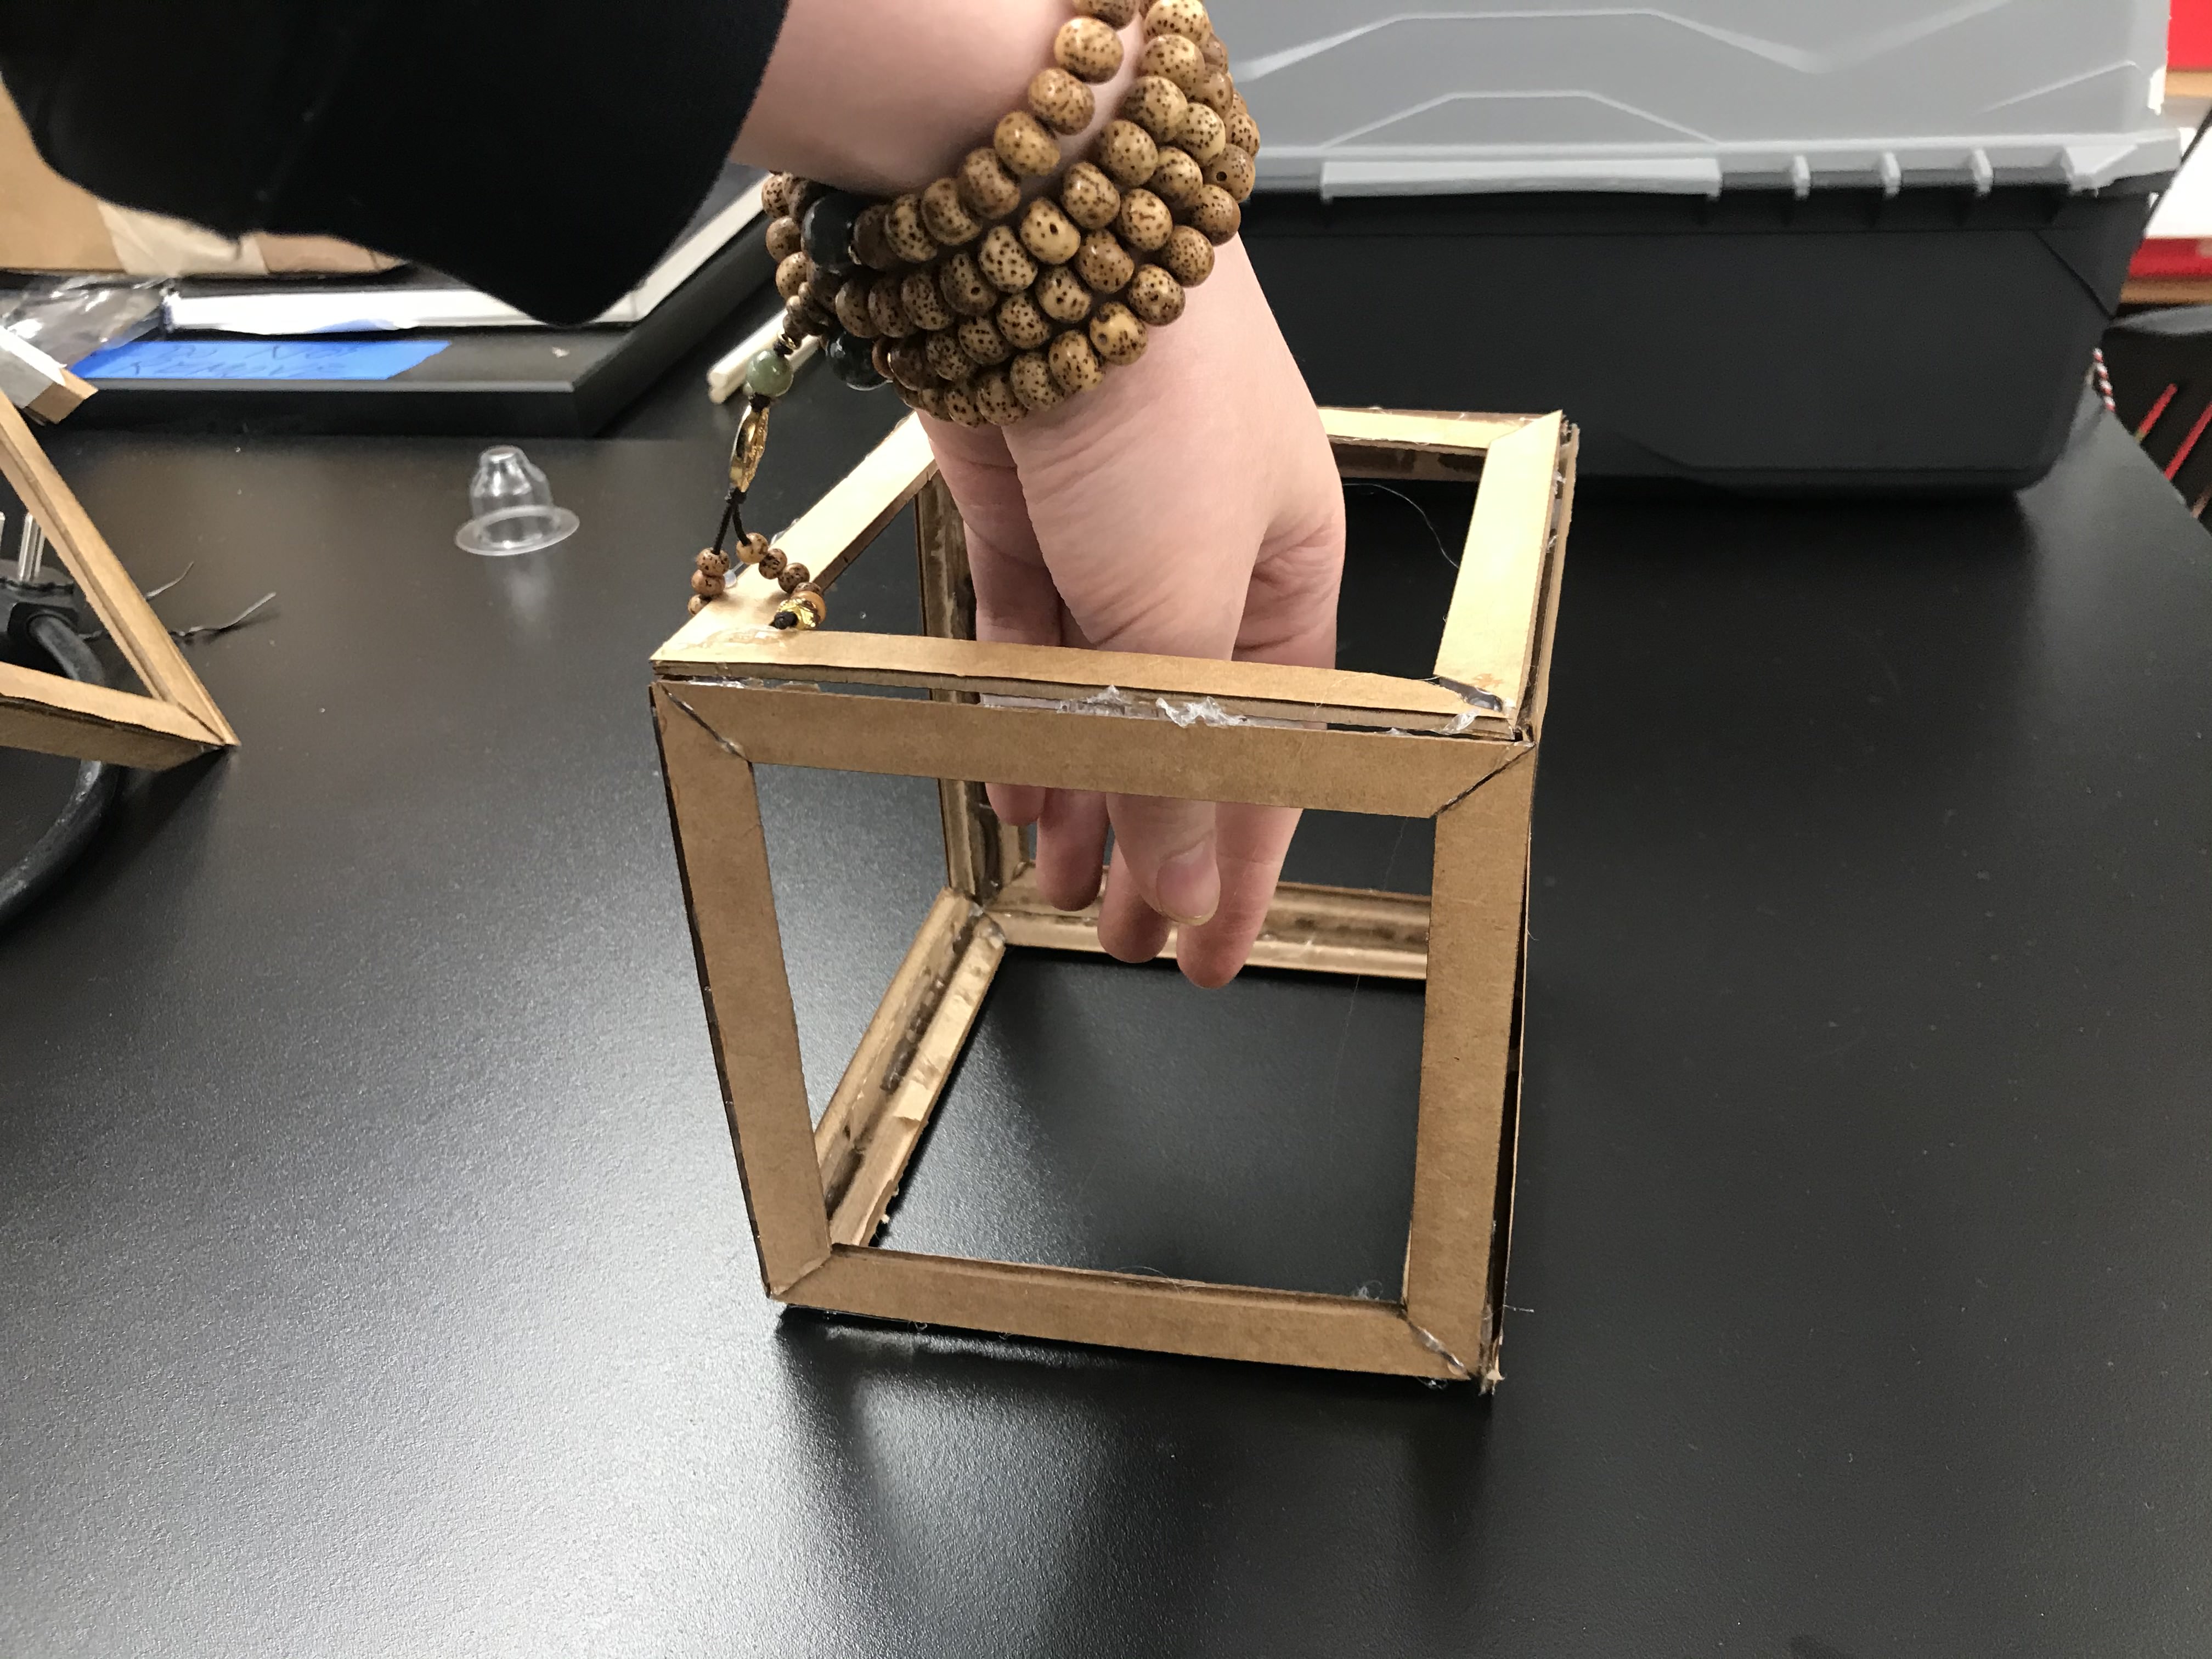
Project#2: Curious Cube
Idea #1: Schrodinger's Cat
A fun decision making helper that is inspired by the Schrodinger's Cat.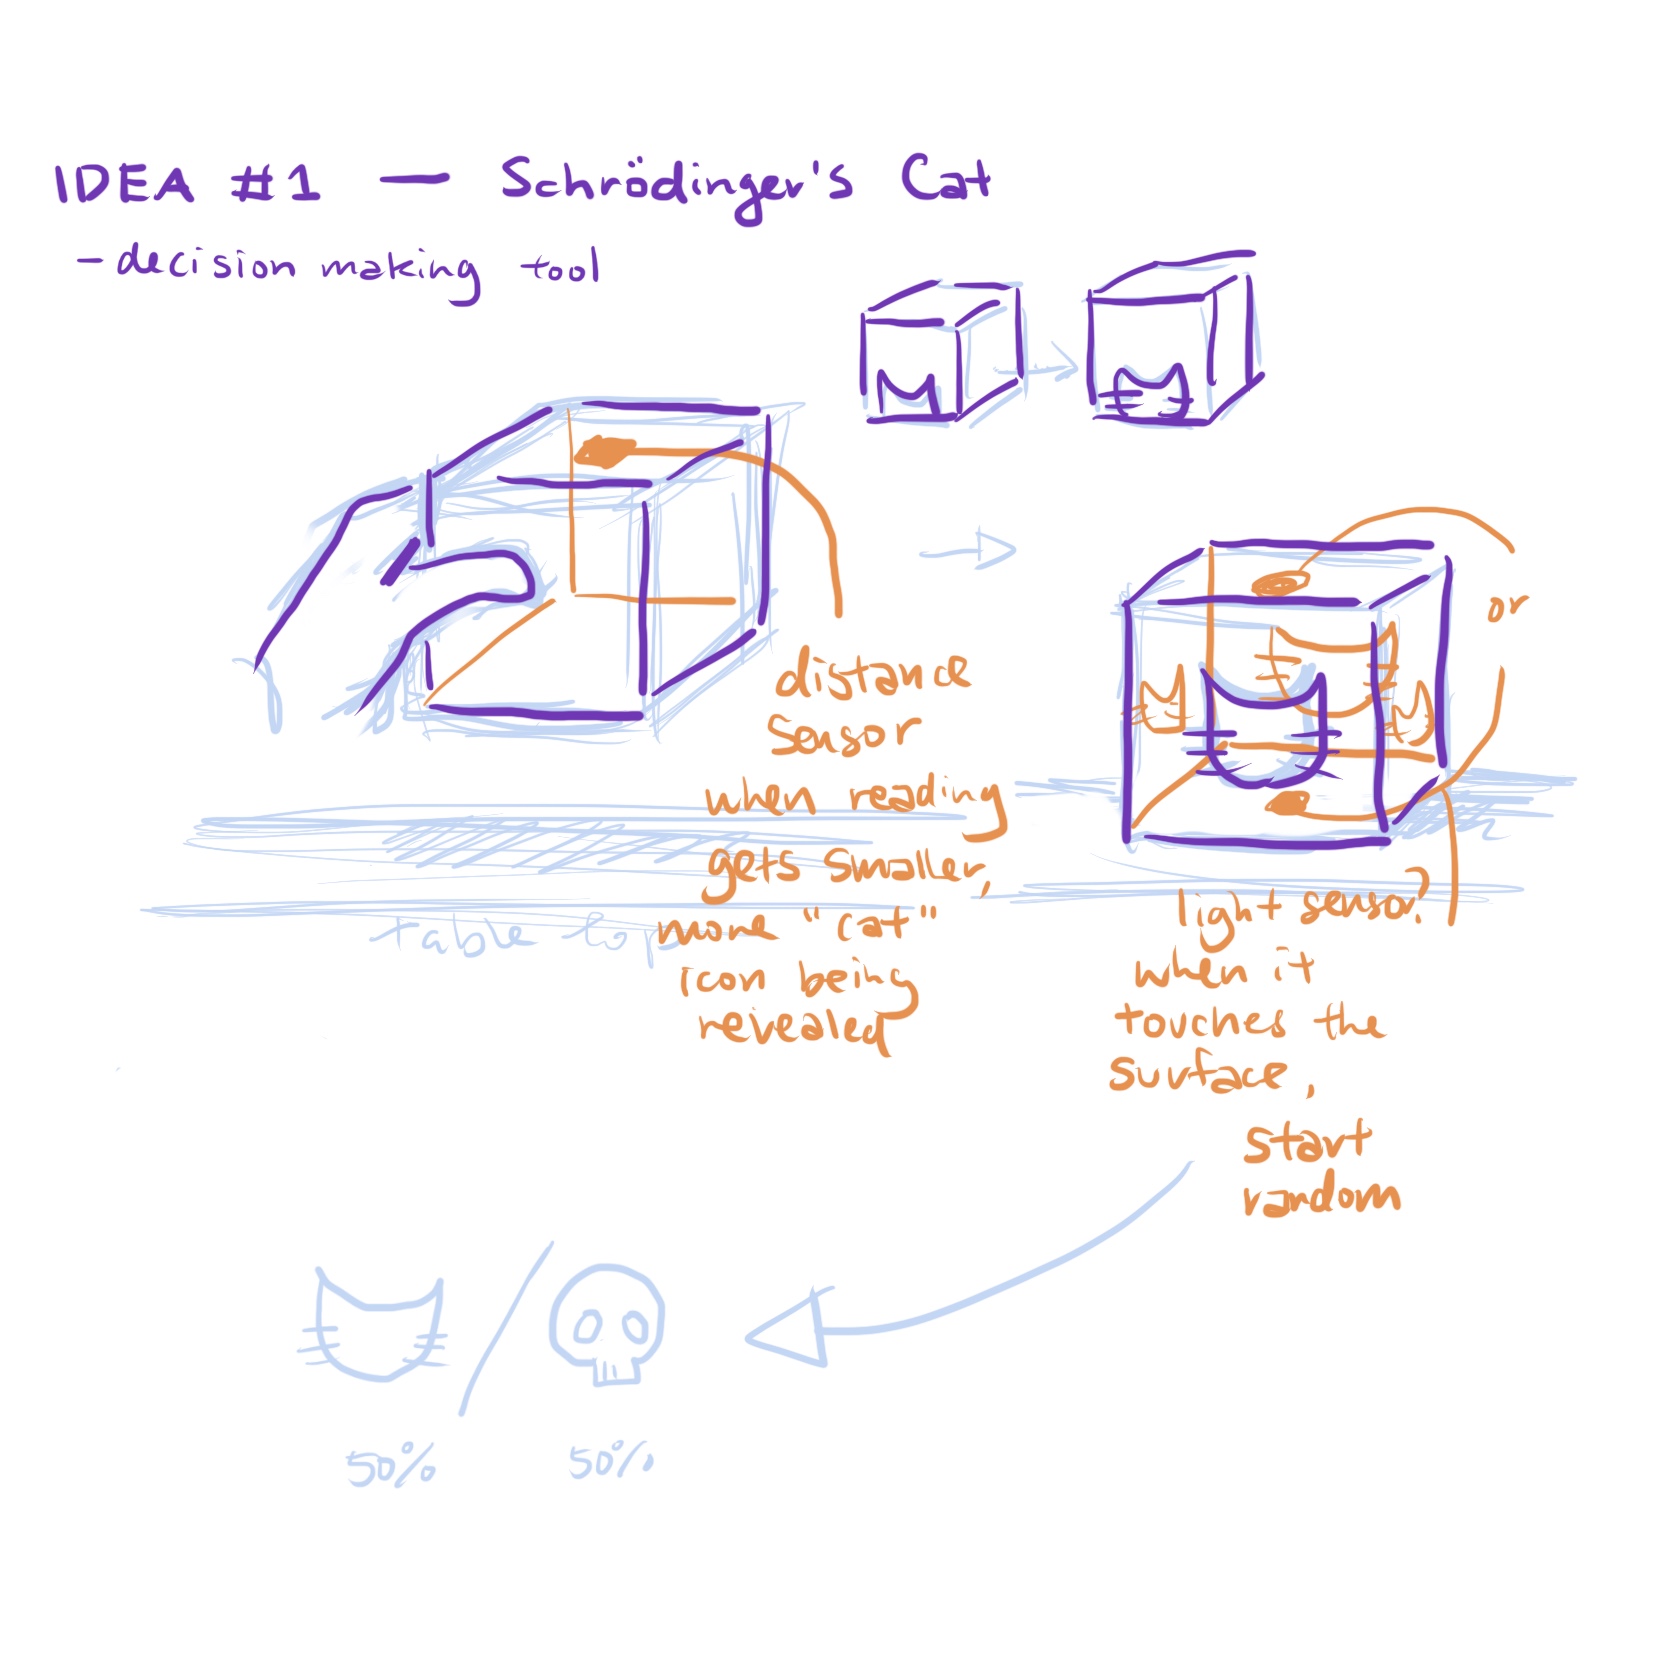
Idea #2: Musical Box
A hollow cube structure that makes sound when you stick your hand into it.
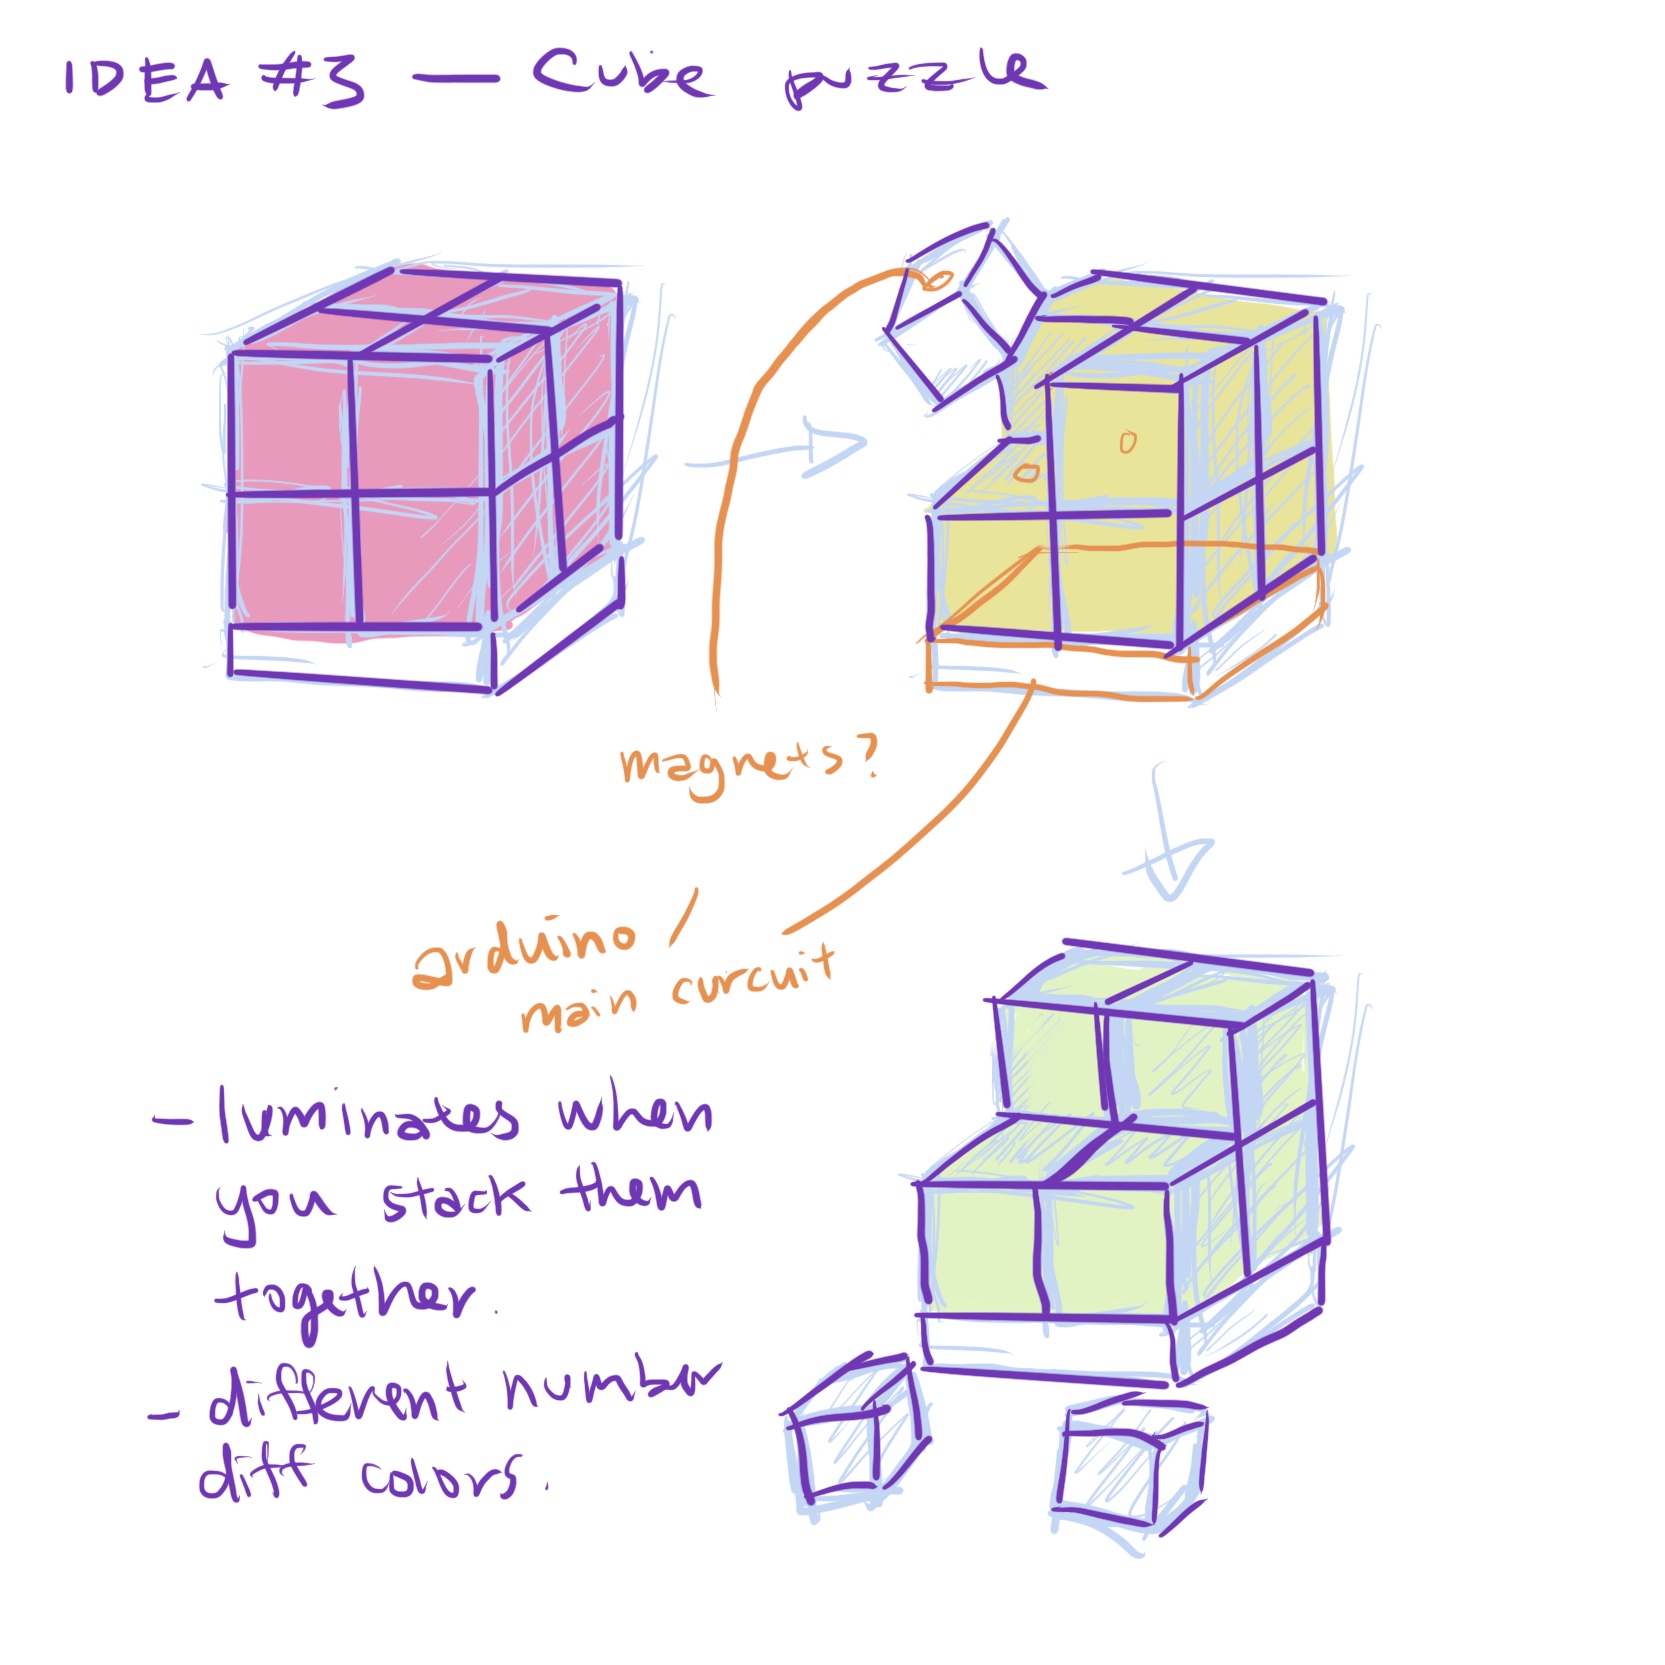
Idea #3: LuminoCube Puzzle
A light puzzle that luminates when cubes are connected to the plate, and to each other. The color of the light changes when the number of cubes is different.
Project#1: Redesigning Interaction
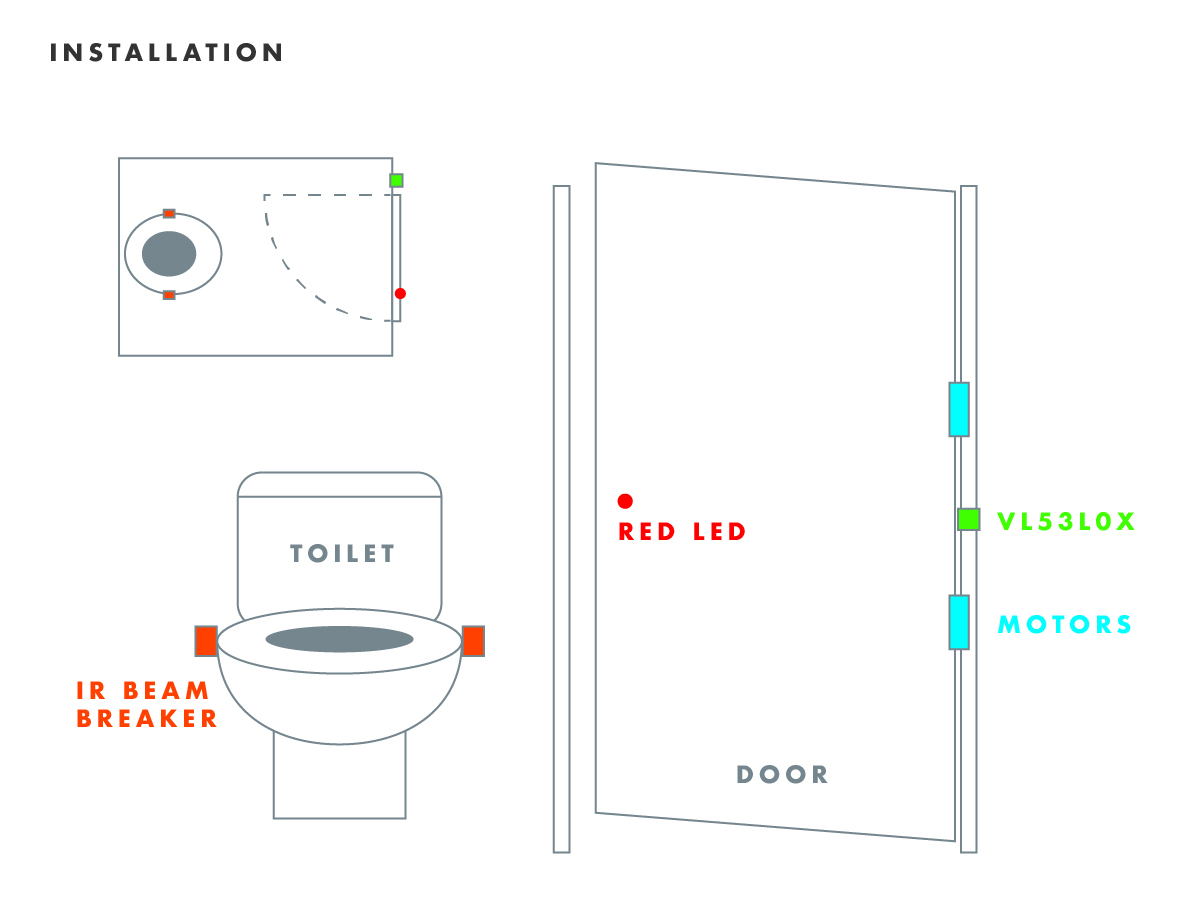
Based on the previous week's analysis, we decided to work on the part that was interactive: the toilet doors.
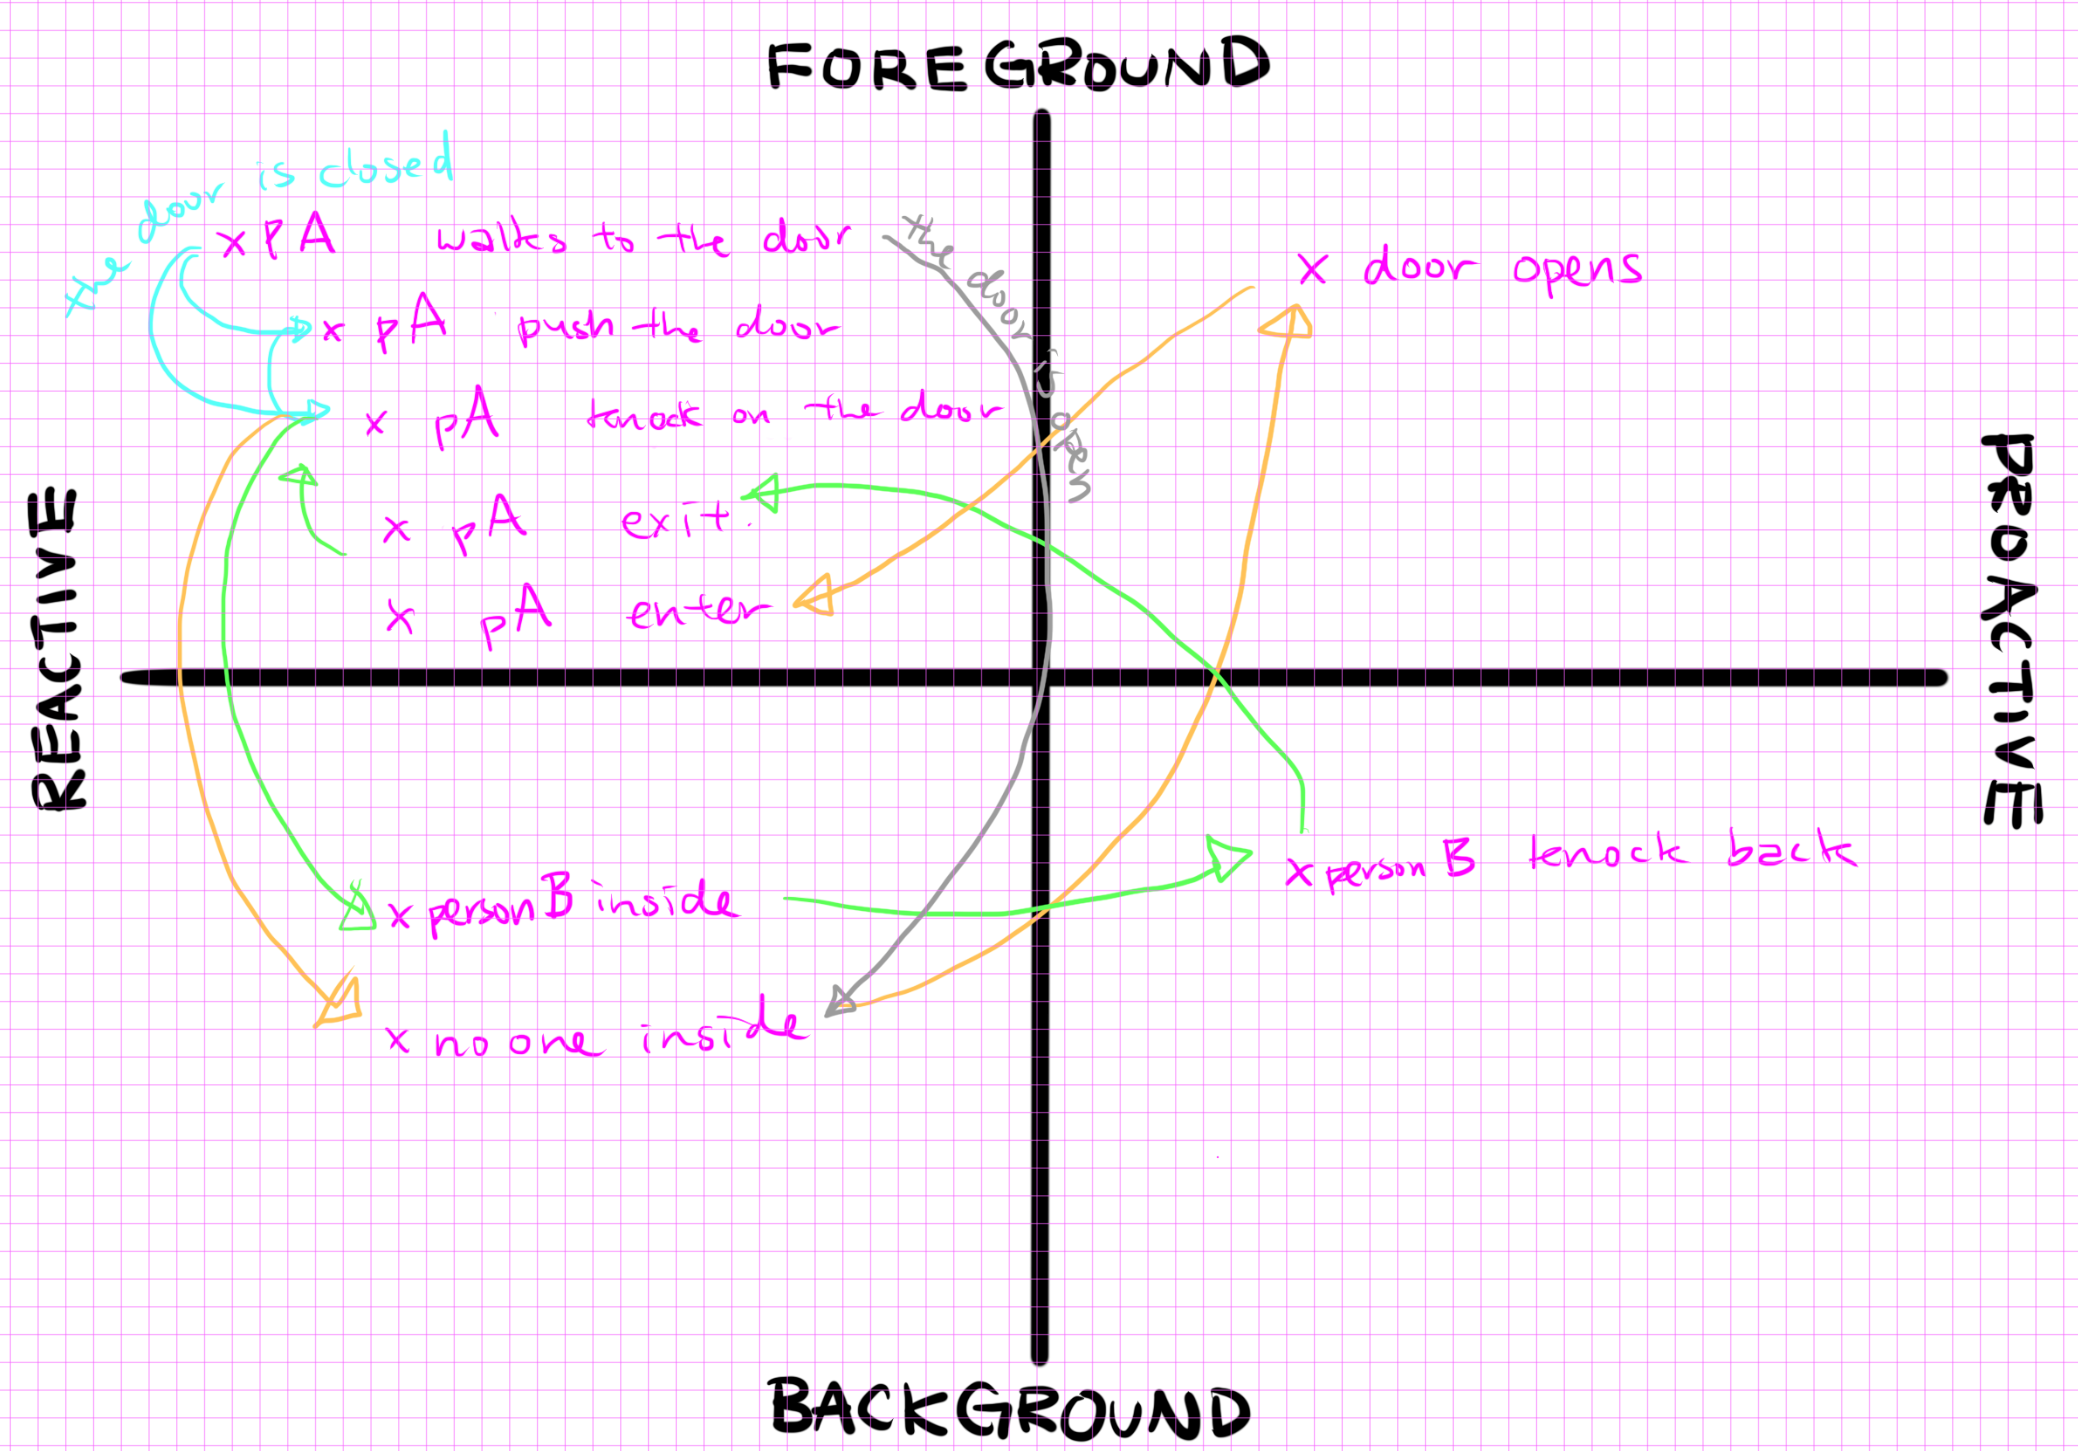
The main two state of the interactive door will be, occupied and vacant outputs.
The two sensors that we are using are the IR Beam Breaker and the VL53L0X.
To improve the experience, the first thing to eliminate is 'pushing' the door, which VL53L0X will be the right fit for this, by connecting it to a motor, when VL53L0X detects anyone happen to be in the distance, the door opens automatically.
Another sensor: IR BEAM BREAKER will be detecting if there's anyone inside. And this will have an output (only when VL53L0X detects) to be informing that it is vacant to the user outside of the door and the the motor won't be moving.
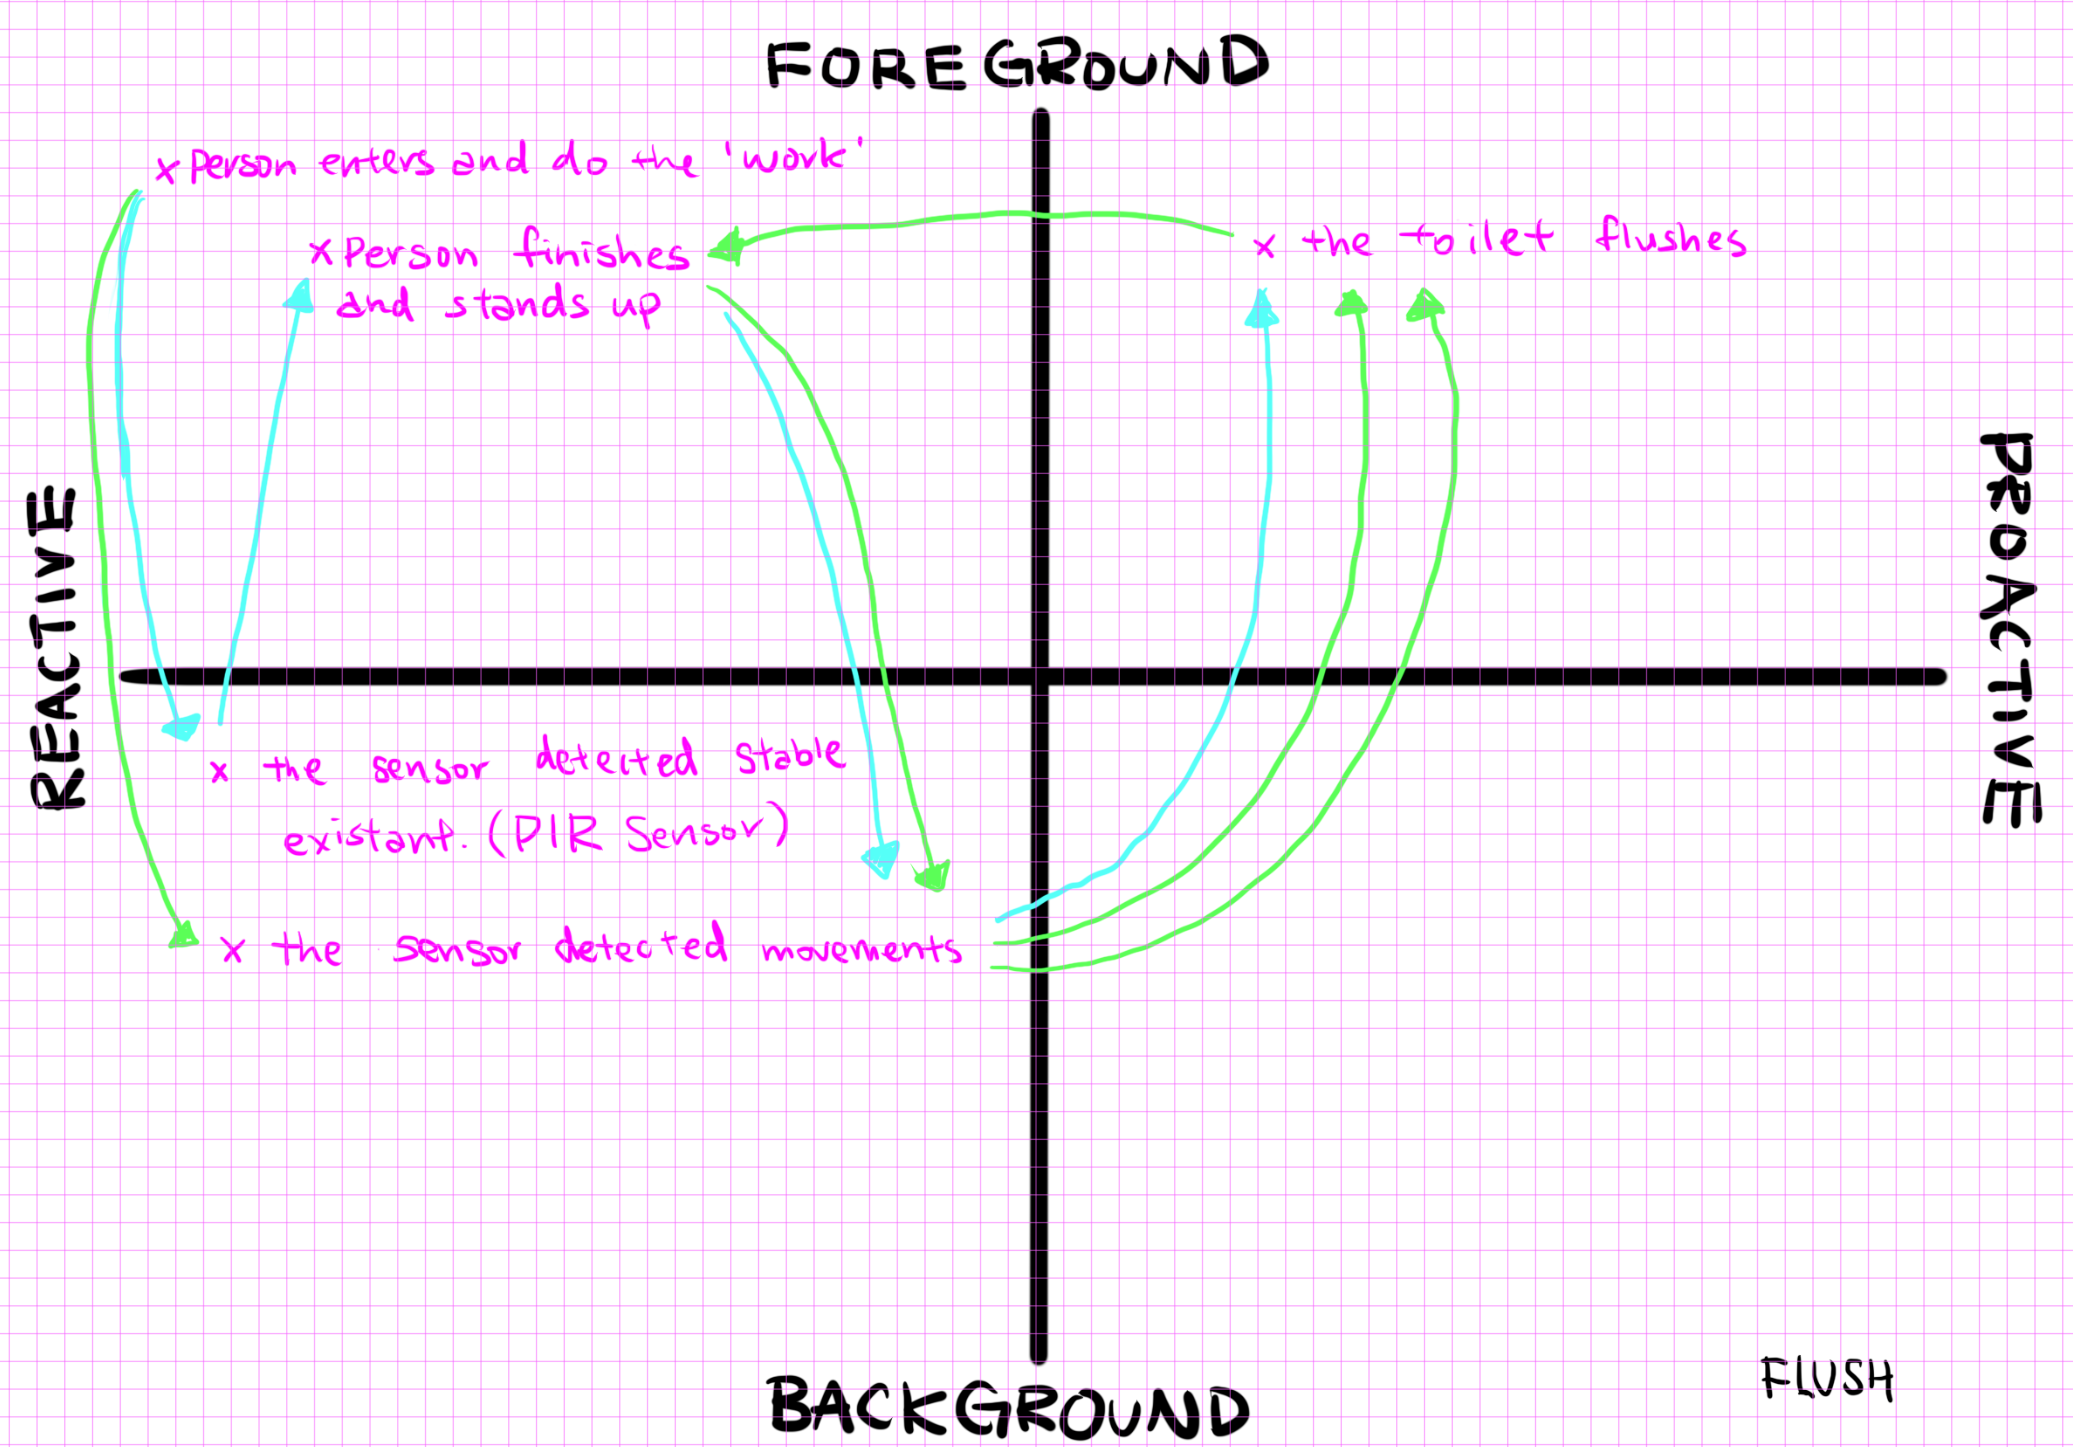
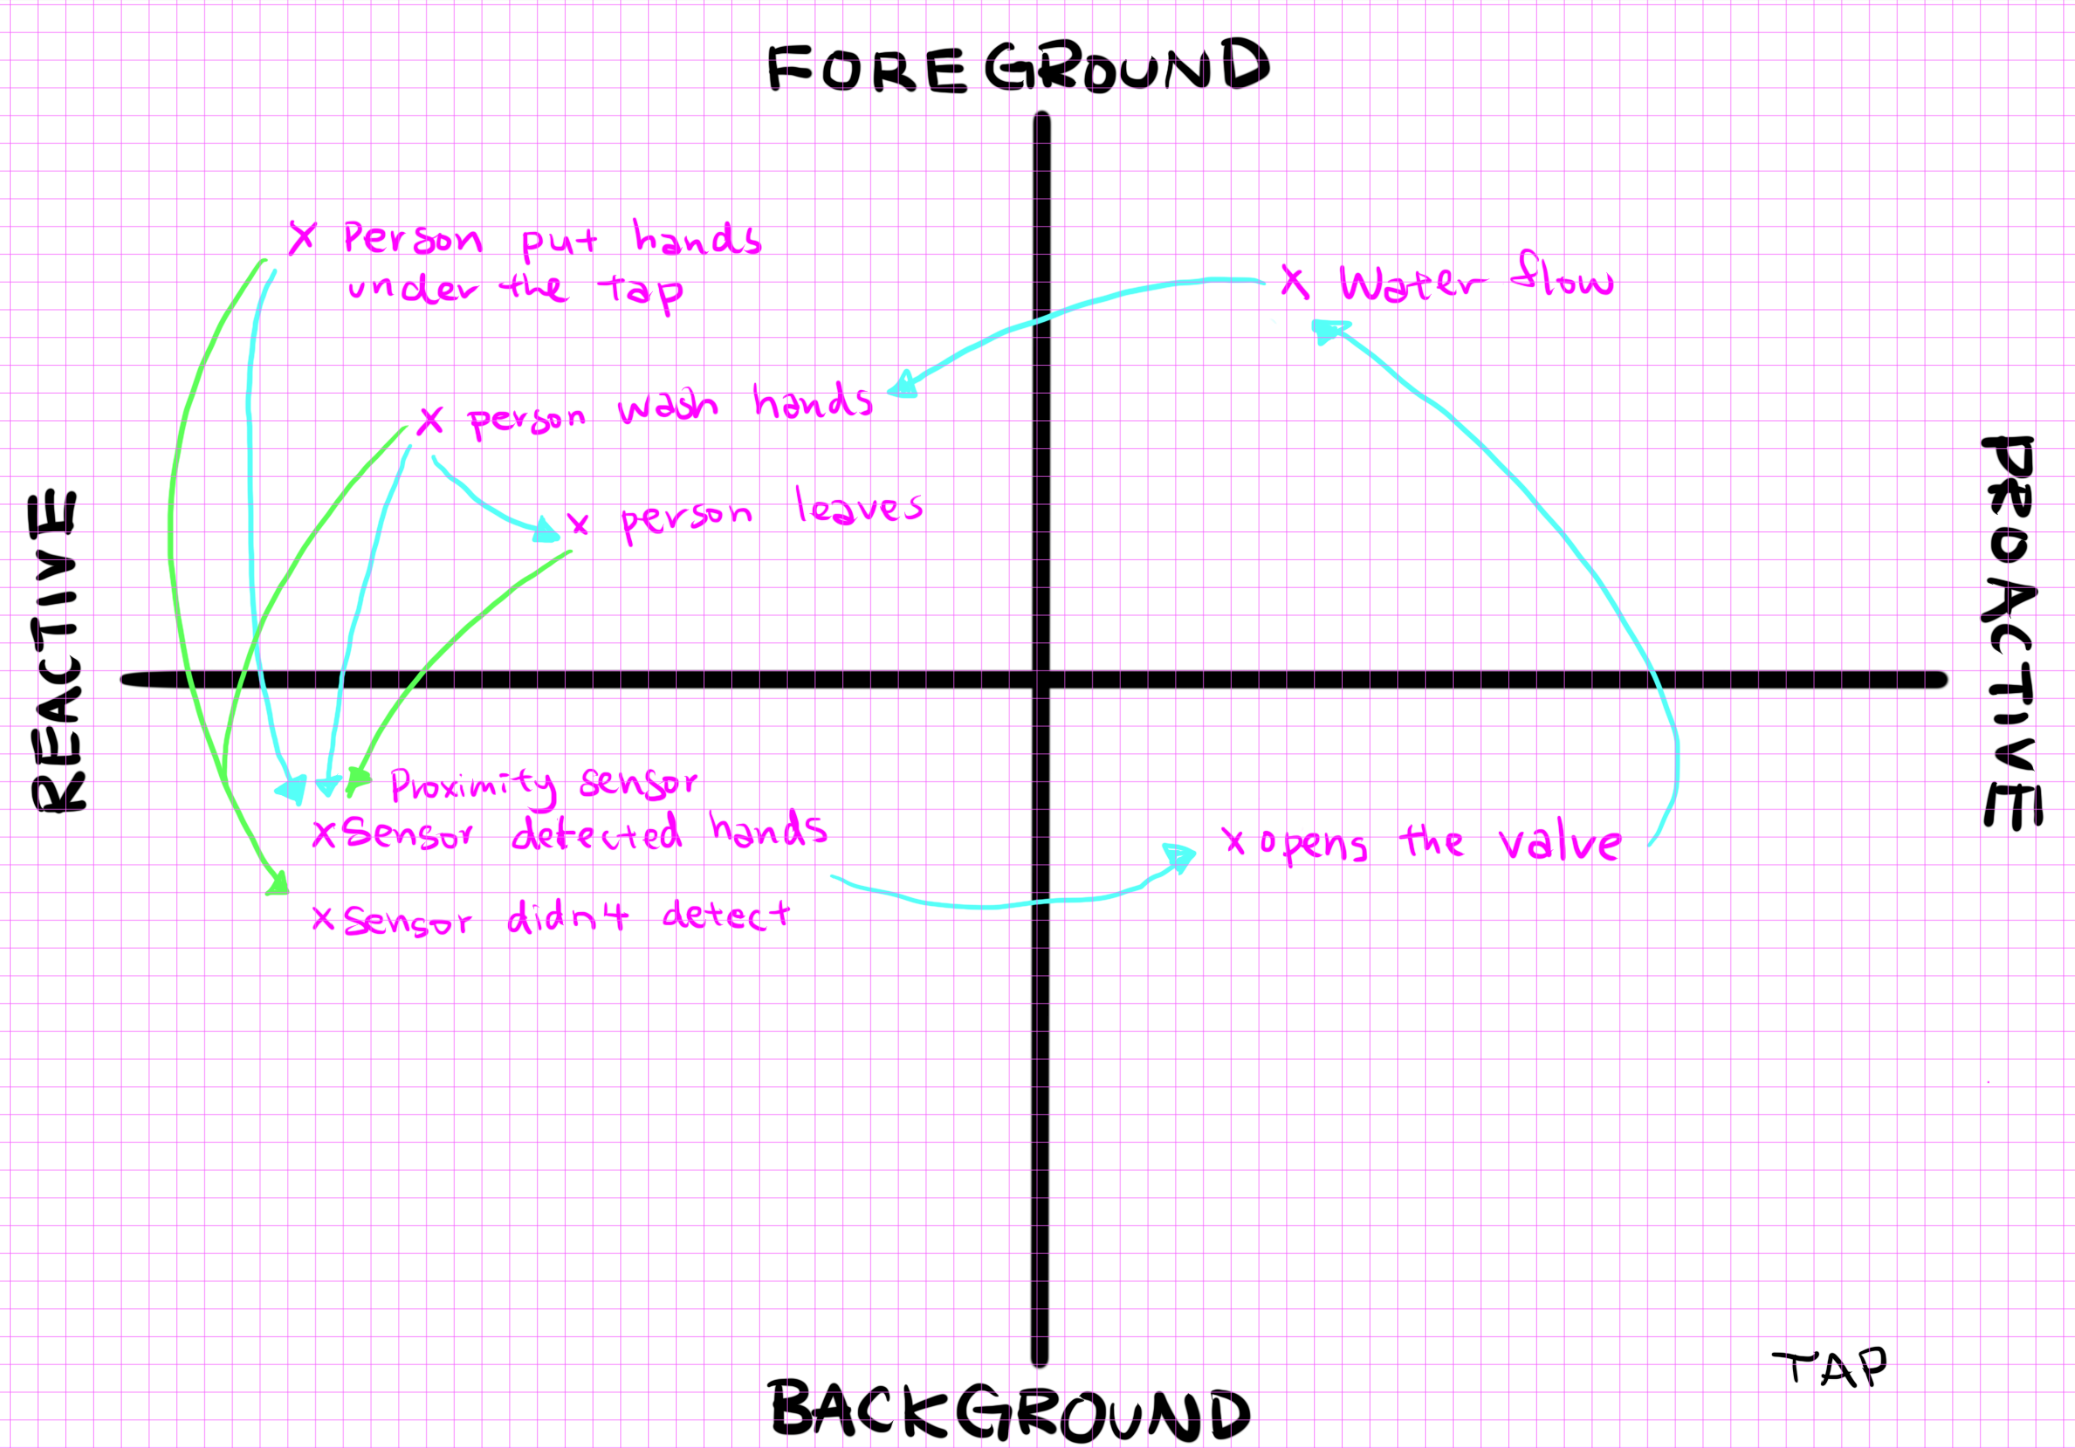
Below is the Flow Diagram of the logic:
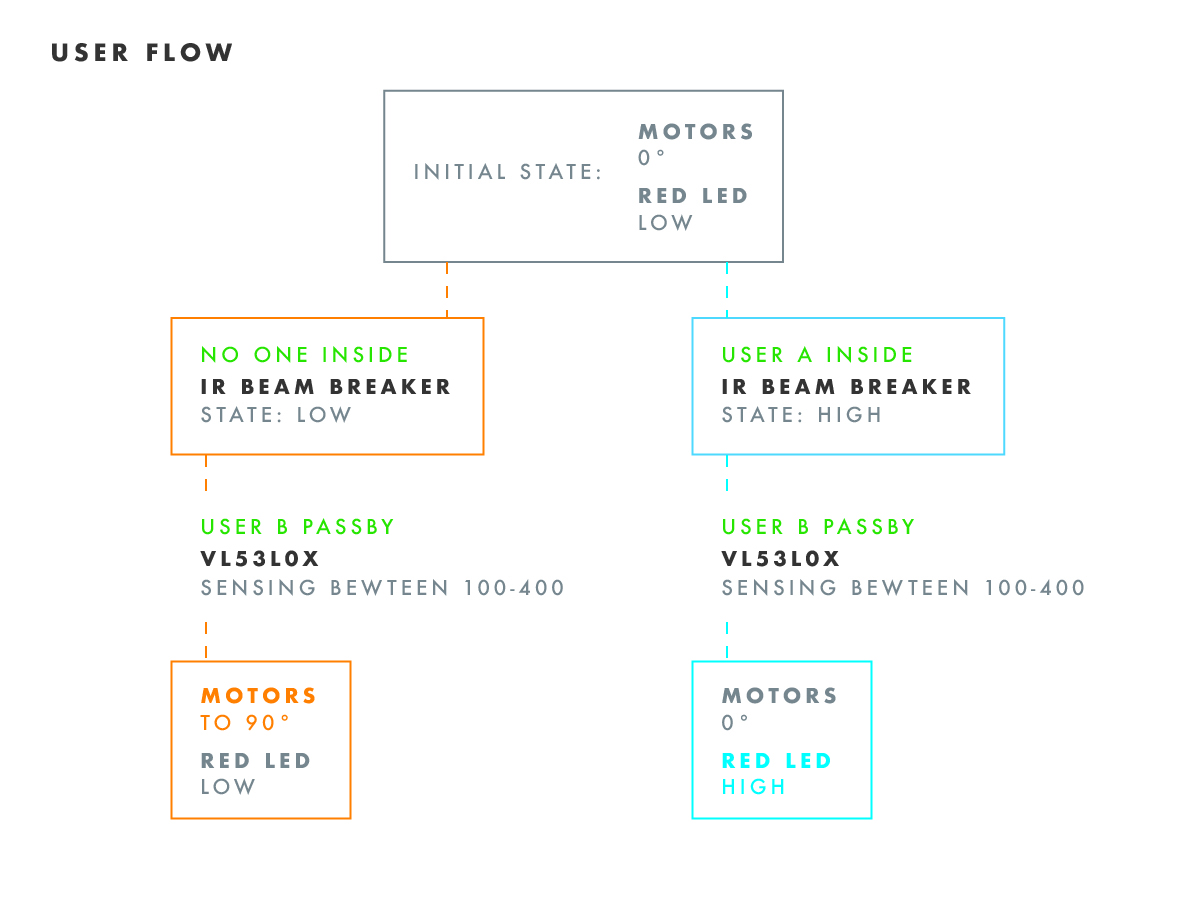
And the Installation Diagram:
WEEK 2: Words & Imagery
to be updated
WEEK 1: observation
WEEK 1 - 2: Reading and lecture
Week 1 Reading
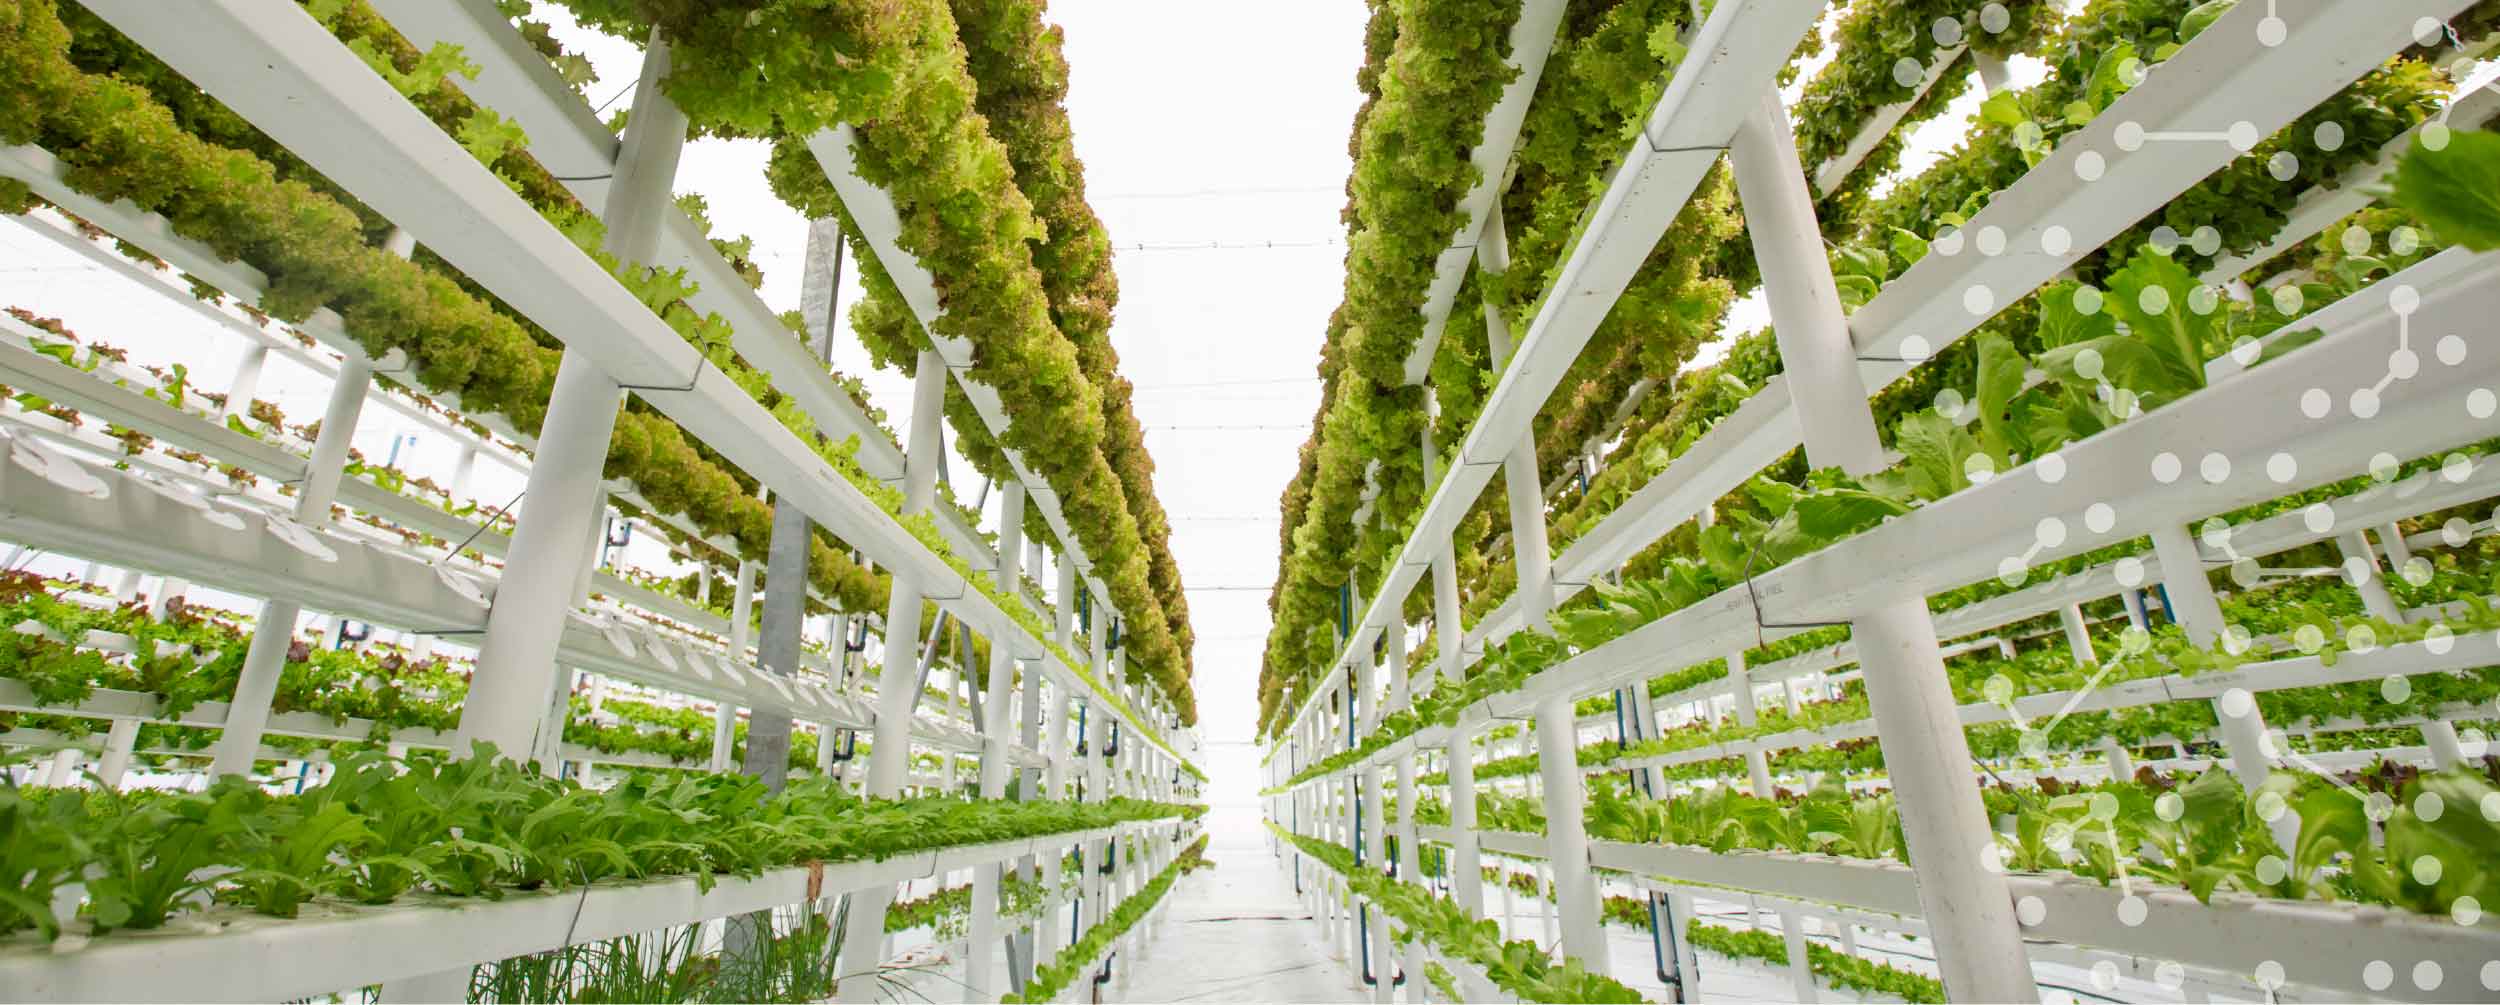
Reading last week’s assigned articles, I had an overview not only on what I will be taking away from this class but also, what I should be always keep in mind as a designer and a human.Global warming and climate change had always been “the topic” for the past 2 decades (at least for all my student life) to a point that people start to question about whether or not it is “a fact” or nothing to worry about. Probably because from all of the relevant facts that had been brought up before doesn’t seemed to be as resonant. The fact that greenhouse gas has serious impact on the quality of our food, which the higher the CO2 the higher the sugar level, even been used as a “benefit” of having getting sweeter foods. From this, we can see the lack of awareness of getting bad nutritions is a siren of shorten the average lives of human.
It is very interesting (sad) on how not only climate change affecting our food system but our way of doing agriculture, food demand and food waste are also producing carbon food prints, that creates this vicious cycle.
Verticals farming seemed to be an interesting direction for a lot of future designs: architecture, product, interior and probably no more packages for grocery (at least for veggies). But for now it still need to be refined for publicizing.
Lecture with Maggie + this week’s reading
It was really inspiring to see all different possibilities that’s now happening on design for space experience.From both the reading and Maggie’s lecture, I see how there is so many potential for new user experience on dining, but also the “ritual” on dining make astronauts still want to have similar experiences on earth to be in the micro-gravity space. I think this could be two different research area. Though I think most astronauts might want the earth experience more but as a designer I would like to think outside of the “earth” to see a different experience for novel design opportunities.
I researched on a little about 3D printed food, and knowing the need of longer journey is to have food that can stay longer, I think “farming” and “cooking” in space ships is definitely necessary to be continued researching on.
Below is the in-class brainstorm exercise I did:

I’m so glad that we had Maggie for lecture, it was so inspiring.
Final Week: Unity - 'The World' Music Pattern
AR Project with Unity
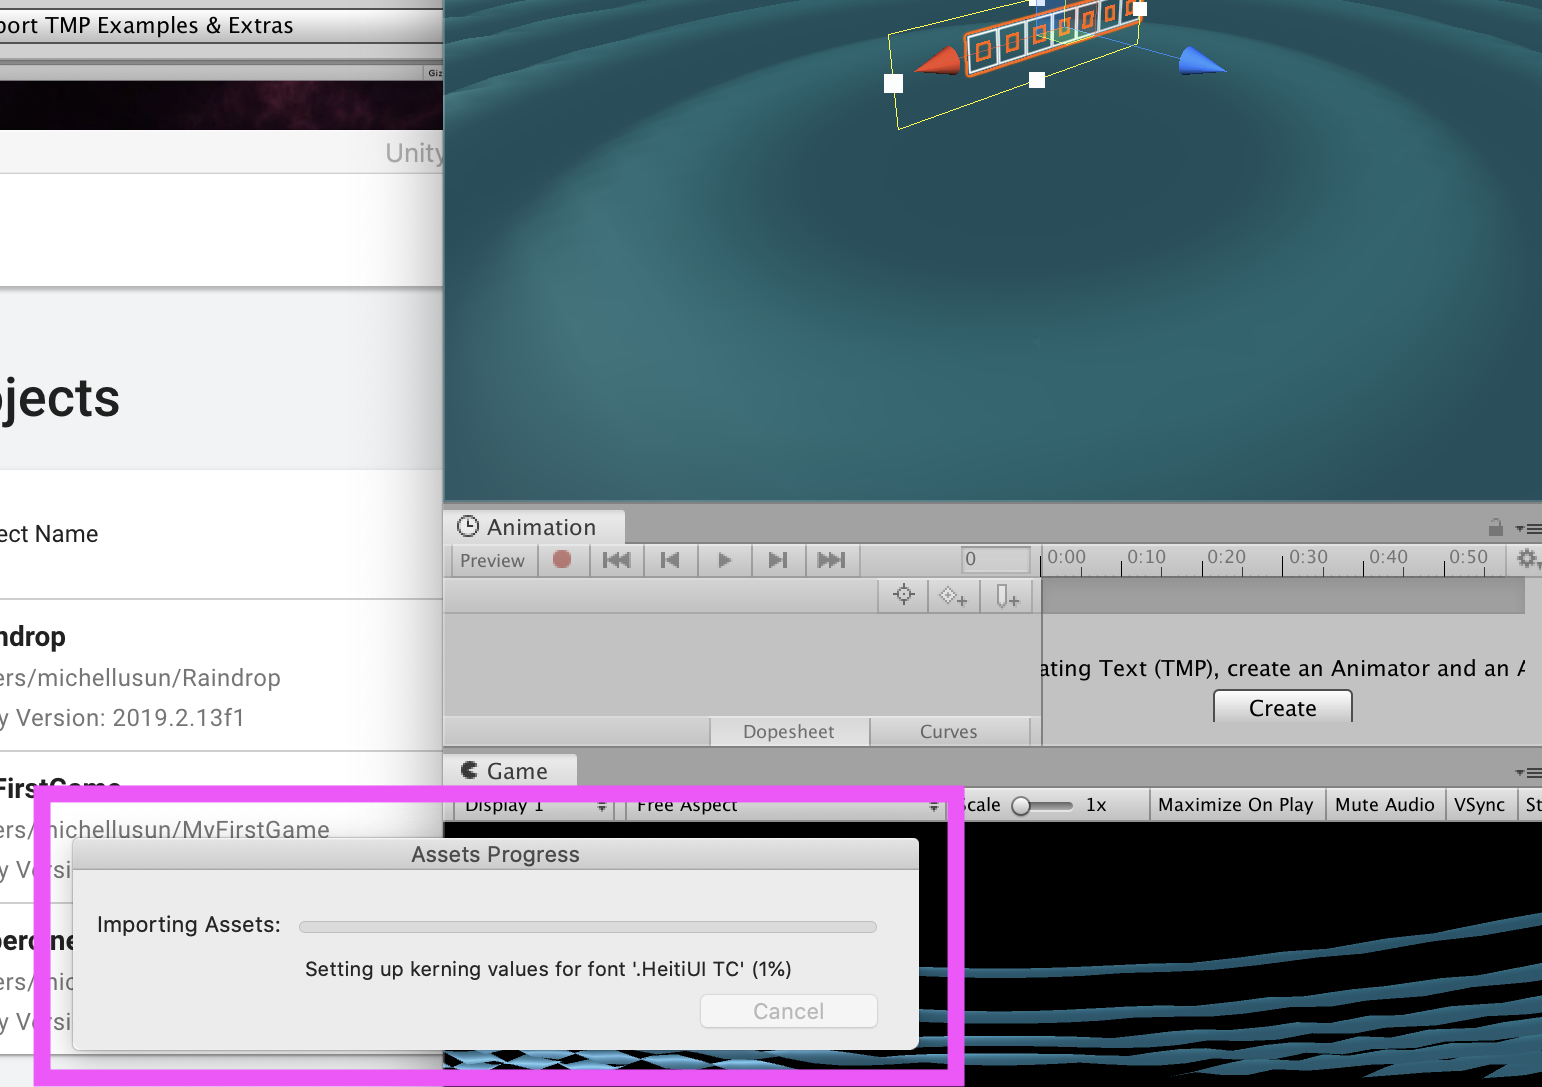
I am very inspired by the examples of Foo/Skou that Gabe showed us in class with sound and viusal. I see opportunities of this physicallity and digital world by this "visual to music" concept. This also has always been what I am interested in (I made a simple project for a class 'Code of Music', which sort of demonstrates what I want to focus on > Drawing Beats). And from this I see a lot of opportunities for music industry or even music educations. First I was playing with the concept of visualizing lyrics. I use the lyric booklet of one of my favorite Taiwanese Band's album as a tracking target, and create some different scenes to specific songs:At first, I wanted to track the lyrics instead of the photography, however... there were no stars on the lyric part... (and I tried to use the zero star ones to track... of course I failed) I wanted to add runing texts of the lyrics (like Kareokes) but importing CHinese characters seem to be way more difficult than I imagined, and I accidentally droped a font file into the assets folder that made me restart my entire project. I call it 'the most regretful thing Michelle had ever done in 2019':
Also, my shader and model building skills aren't good enough to support me building this 'beautifully'. I tried to follow a tutorial on making water ripple effect to mimic ocean, which been mentioned in the lyrics, to create a visual scenary of the song. The second scenary is inspired by the vocalist's talk during concert while singing this song--"take our your phone, call someone that you want the person to listen this song with you", at the time there was no smart phones, which the screen of phone was bright and tiny, creates a illustion of being surrounded by stars. I tried playing with particles in this scenary, but I figured that it is hard to play with physics with image tracking targets. The code I was learning from a tutorial didn't work in this environment.
When I was doing this, I thoug about this being a new form of music videos (I don't know if this awesome idea has already been done or not) But from this I see how AR is different from VR or other technologies. It supports the physical object while being support by it. Nowadays, due to the conviniency of just downloading a song through spotify/apple music, physical cd album is slowly dying (though, also due to eco-system issues). AR can bring the experience of owning a physical piece more magical. Unlike any other possible technologies, AR make the user feels like the digital elements stays with the physical object, which is physically own by the user, that feels very personal and one-and-only.
Then I thought about, what if when you are playing some sort of puzzle, and it will come up with different pattern of beats or melodies?
So first designed some simple patterns:


Idealy, the application can track each icon and generate music when it sees a pattern. However, zero stars again...
So, I made some trick to pretend that it is doing the smart job by using the stupid method... I create all the possible pattern (Not all apply yet, I'm still building this 'for loop').


and four small animation to show which is now active.
The video doesn't have sound, but I assign each possible pattern to a certain related ASMR sound. Now this doesn't work as a running music piece, but ideally, when the user changes the order of the icons, the order of the elements changes.
Week 3-4: Collage Animation "Dreamwalk" & Mirrorworld
AE Collage Animation
My group member and I want to play with mainly collage and greenscreen. Having a collage landscape and a character moving inside a fictional environment. After disscussing the entire mood of the cilp we wnat to convey, since we have a lot of stuff going on in the collage, we came up with a detailed storyboard with the assets we want to use and transitions between scenes beforehand so that we can save time.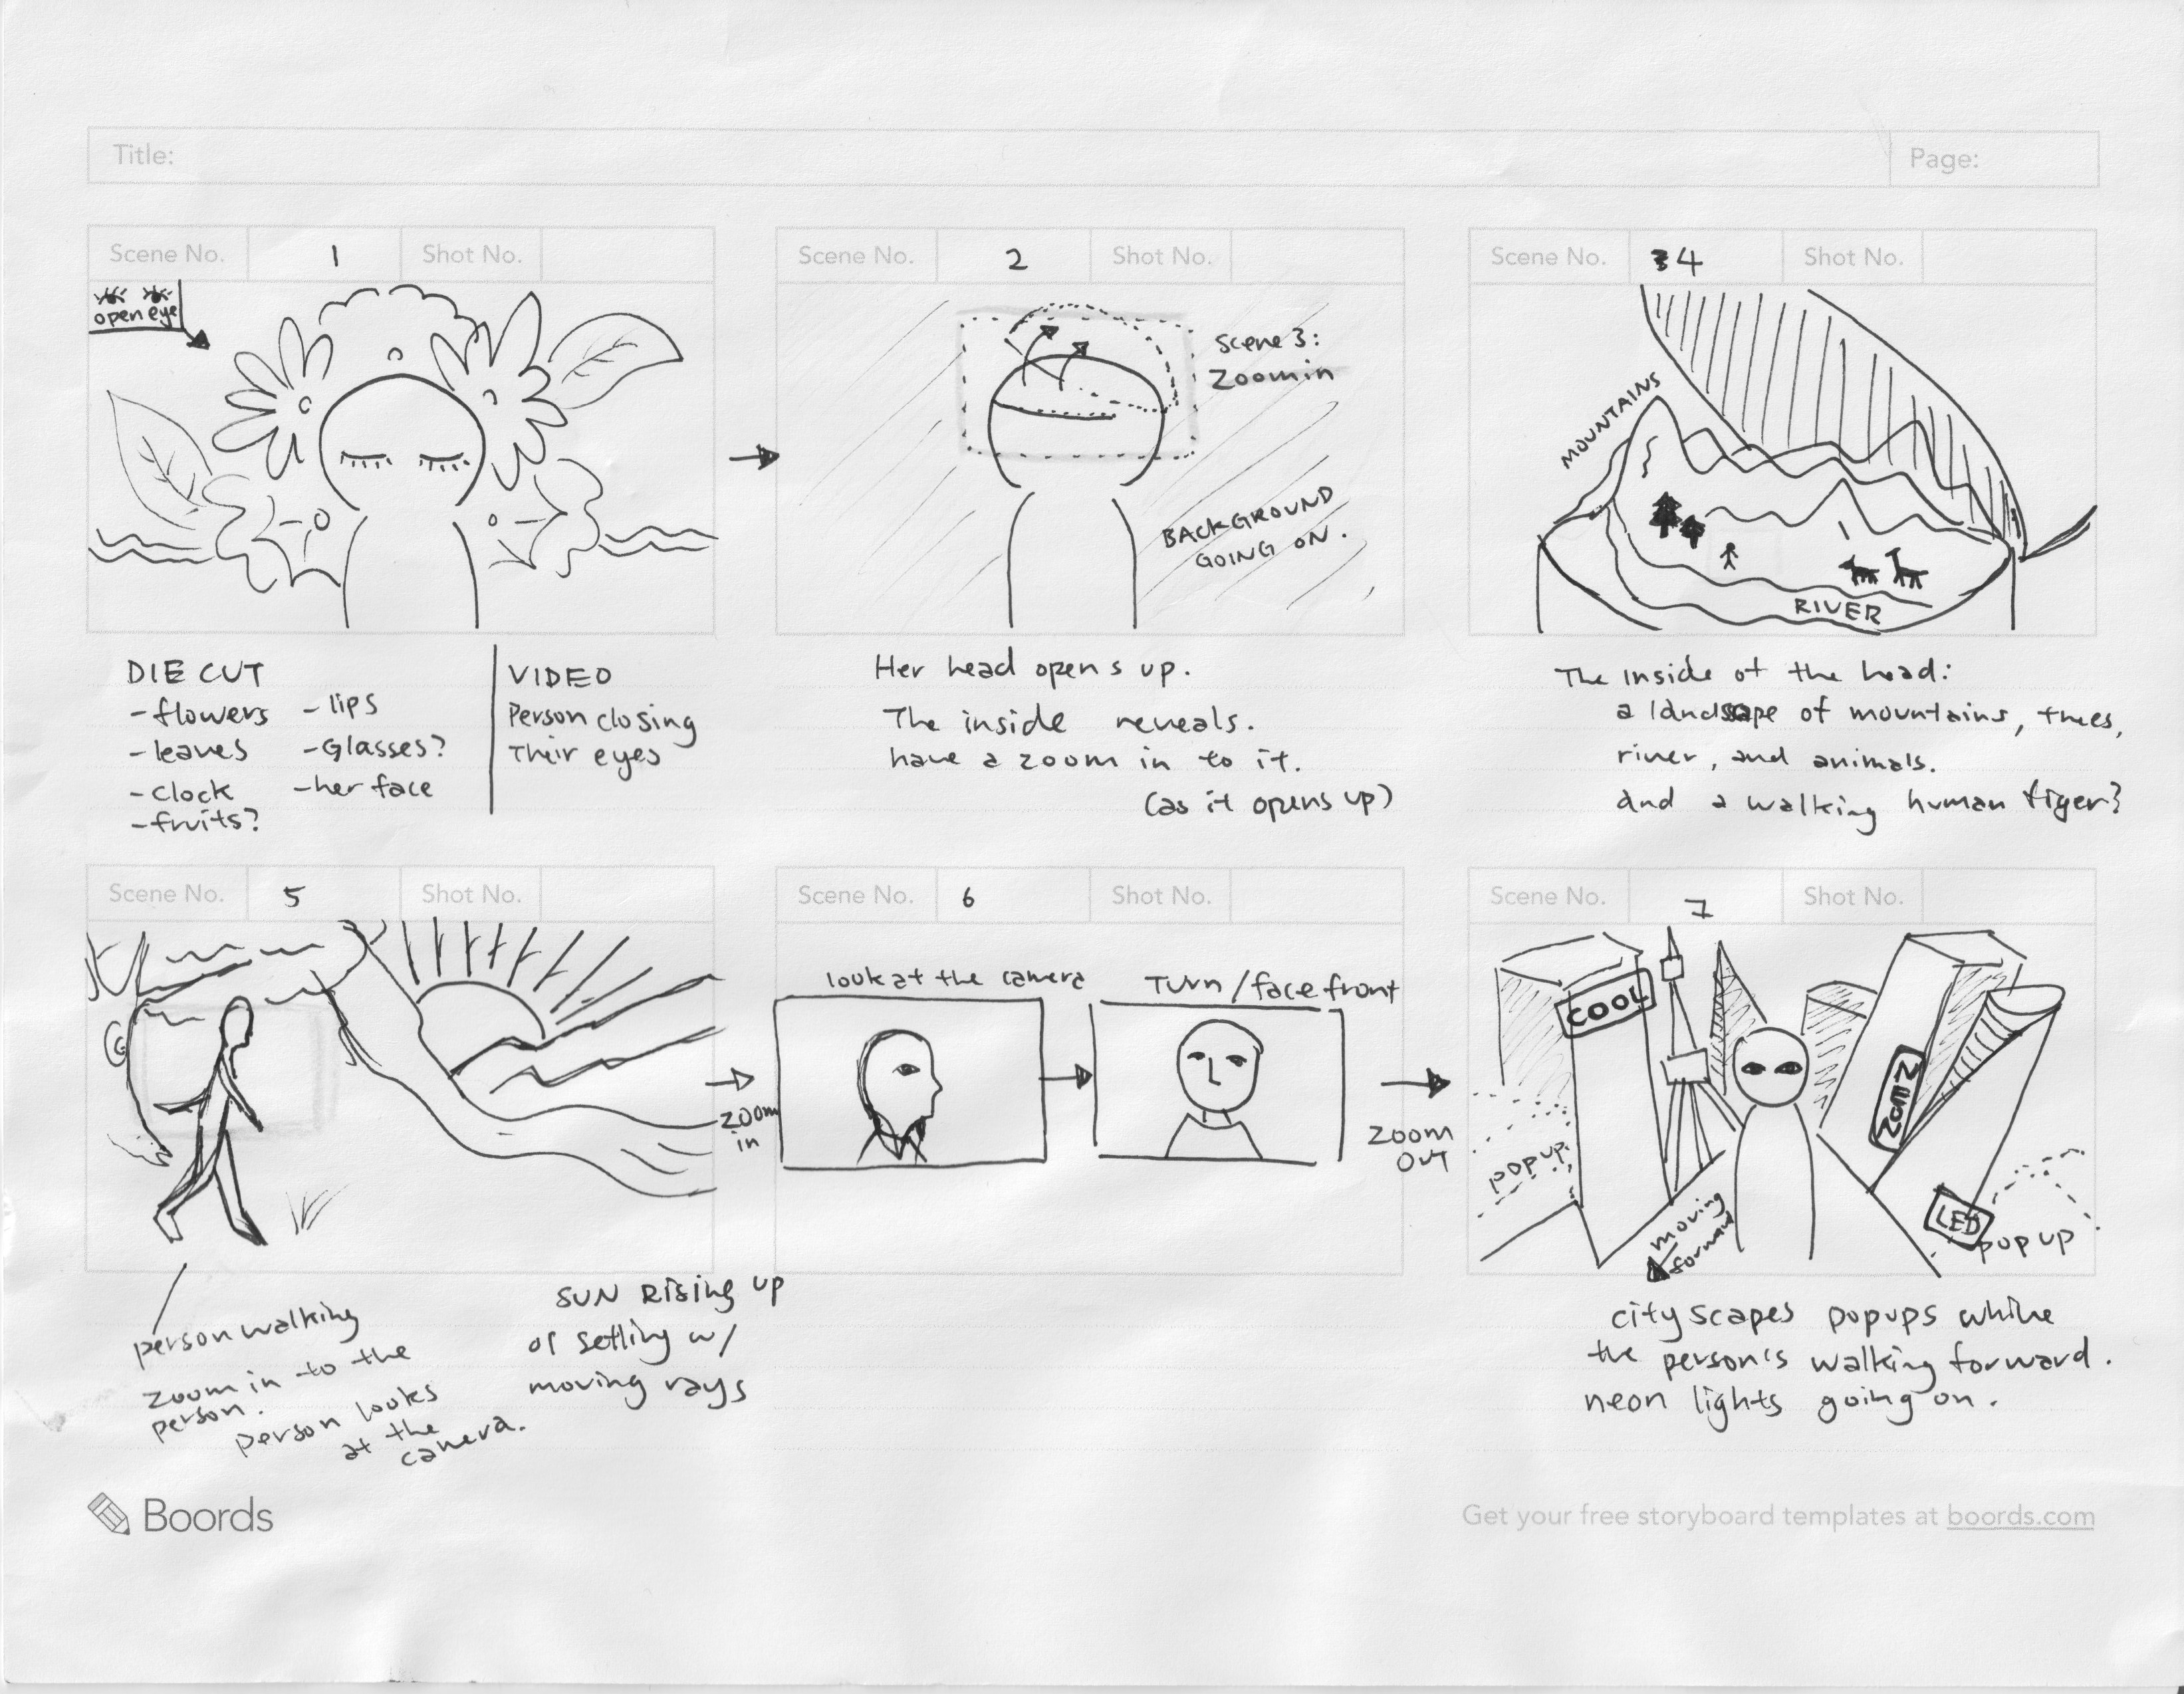
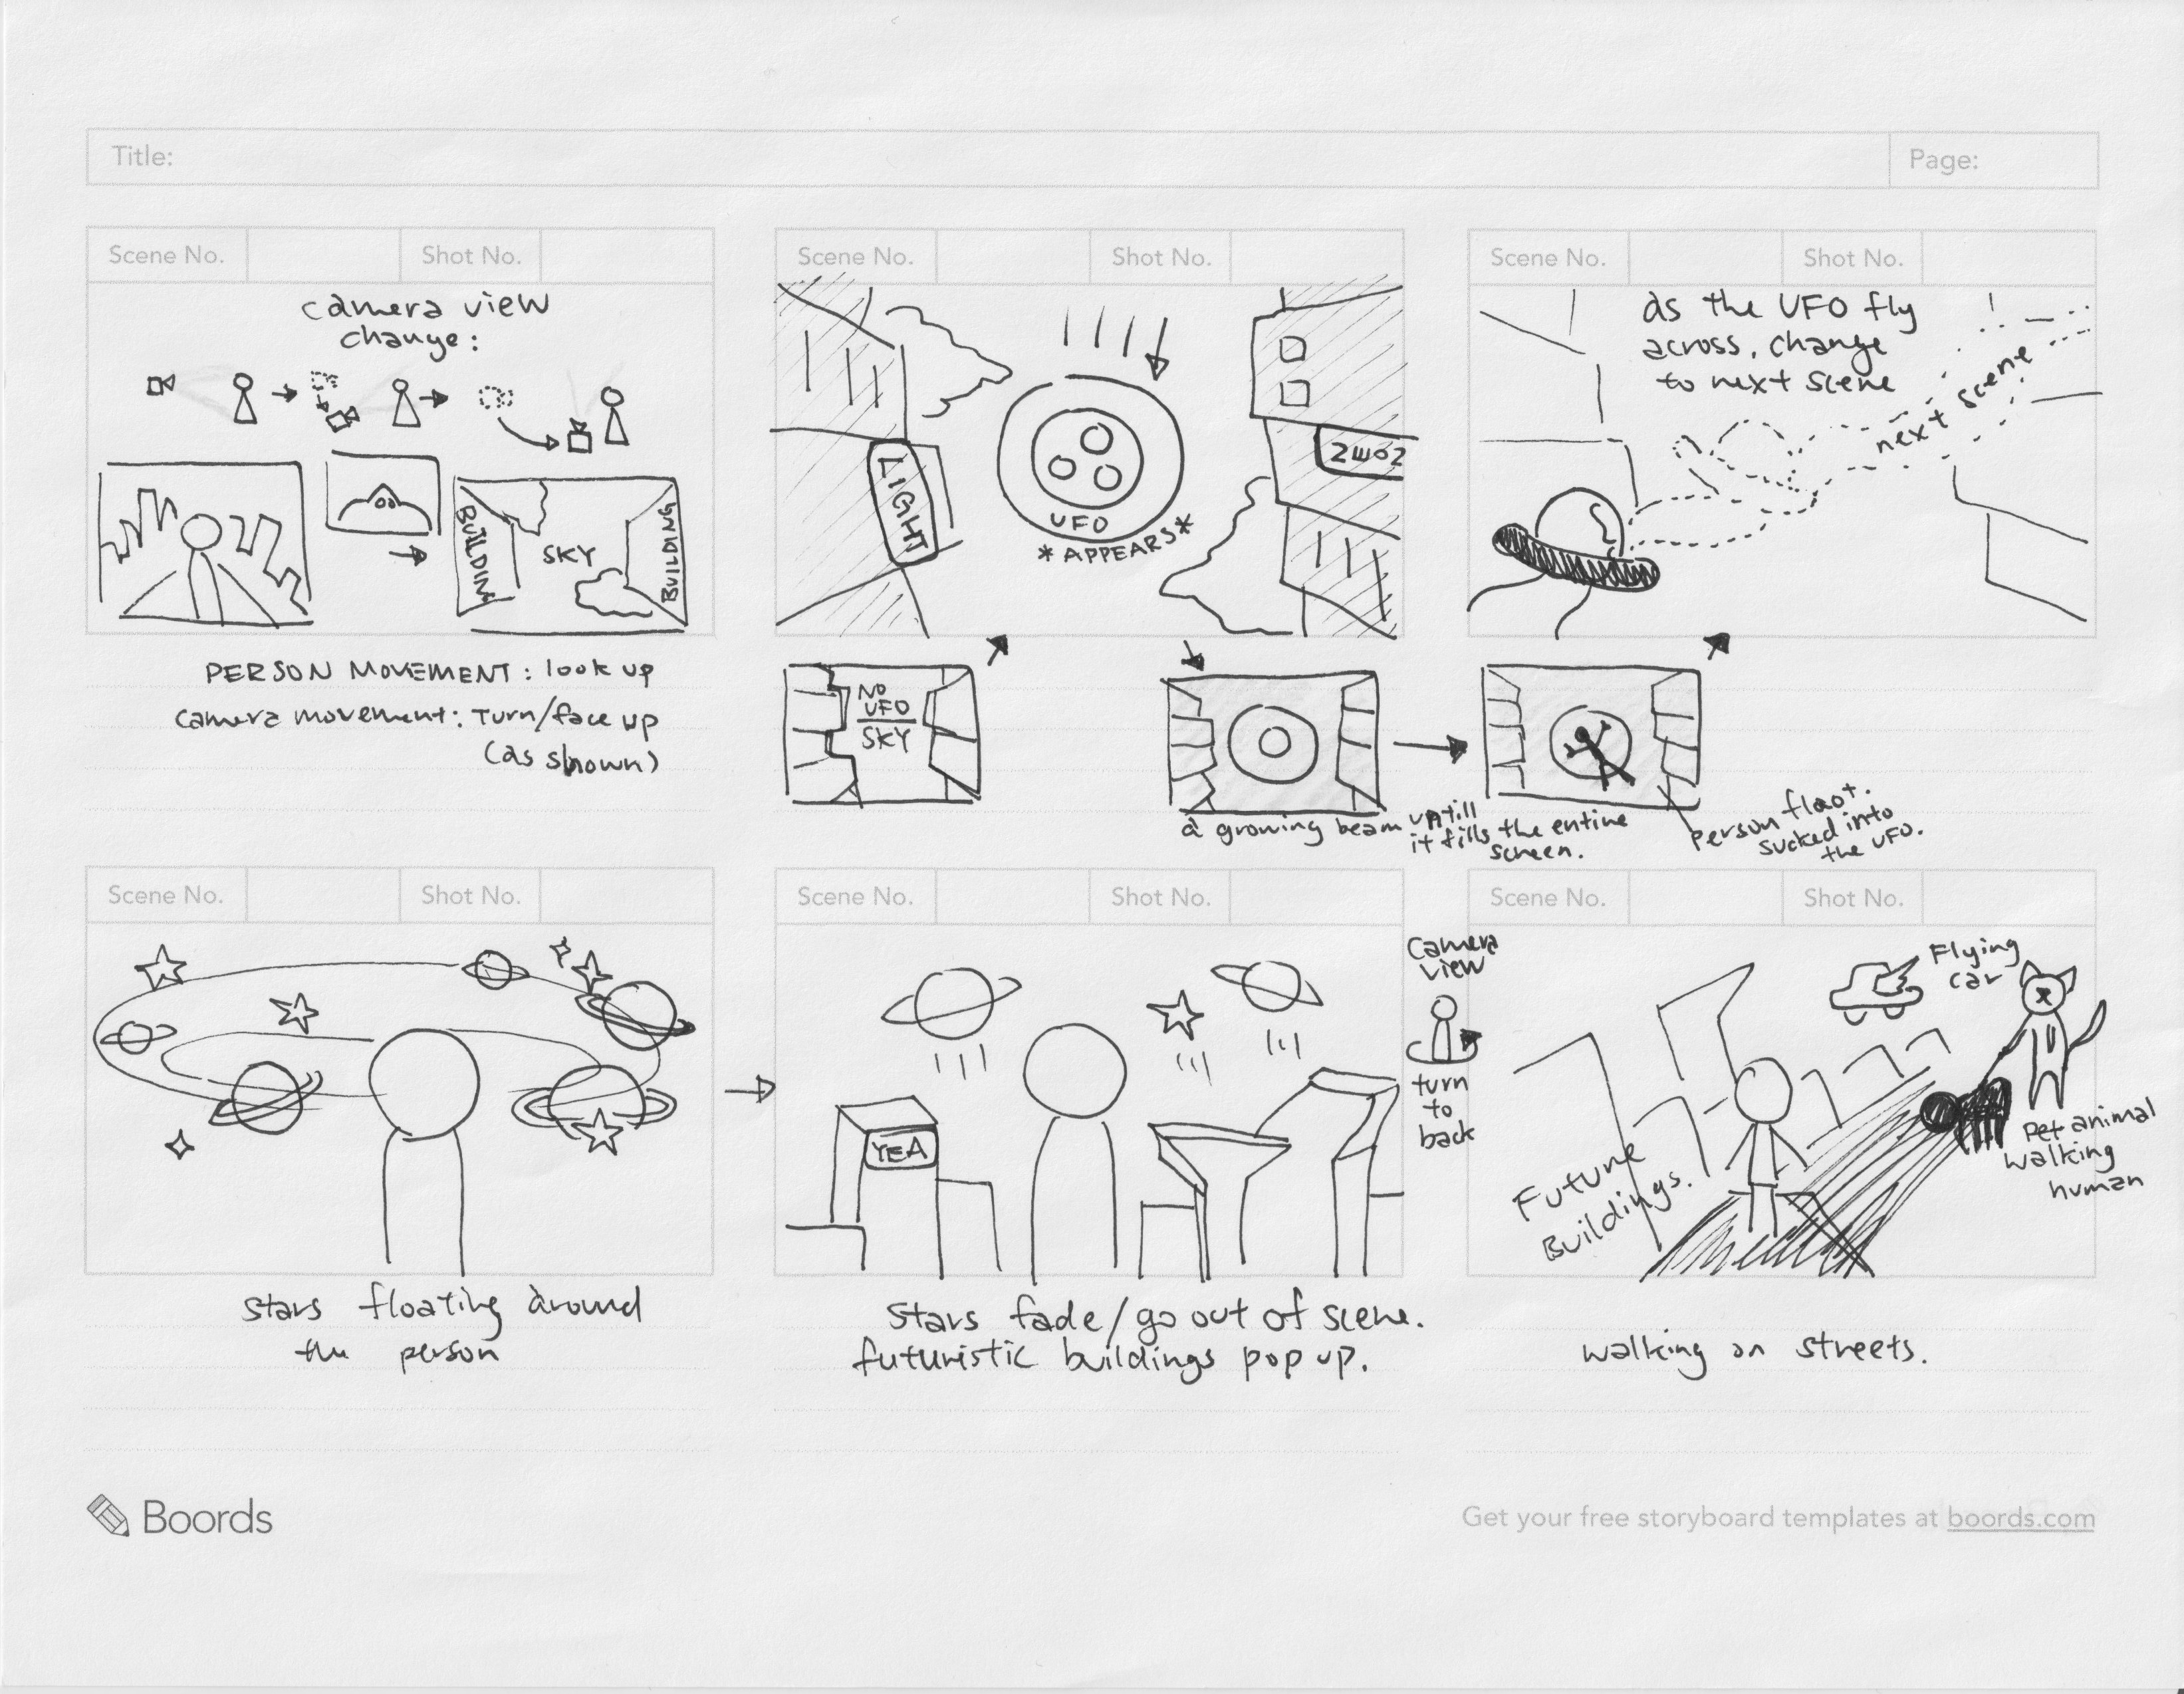
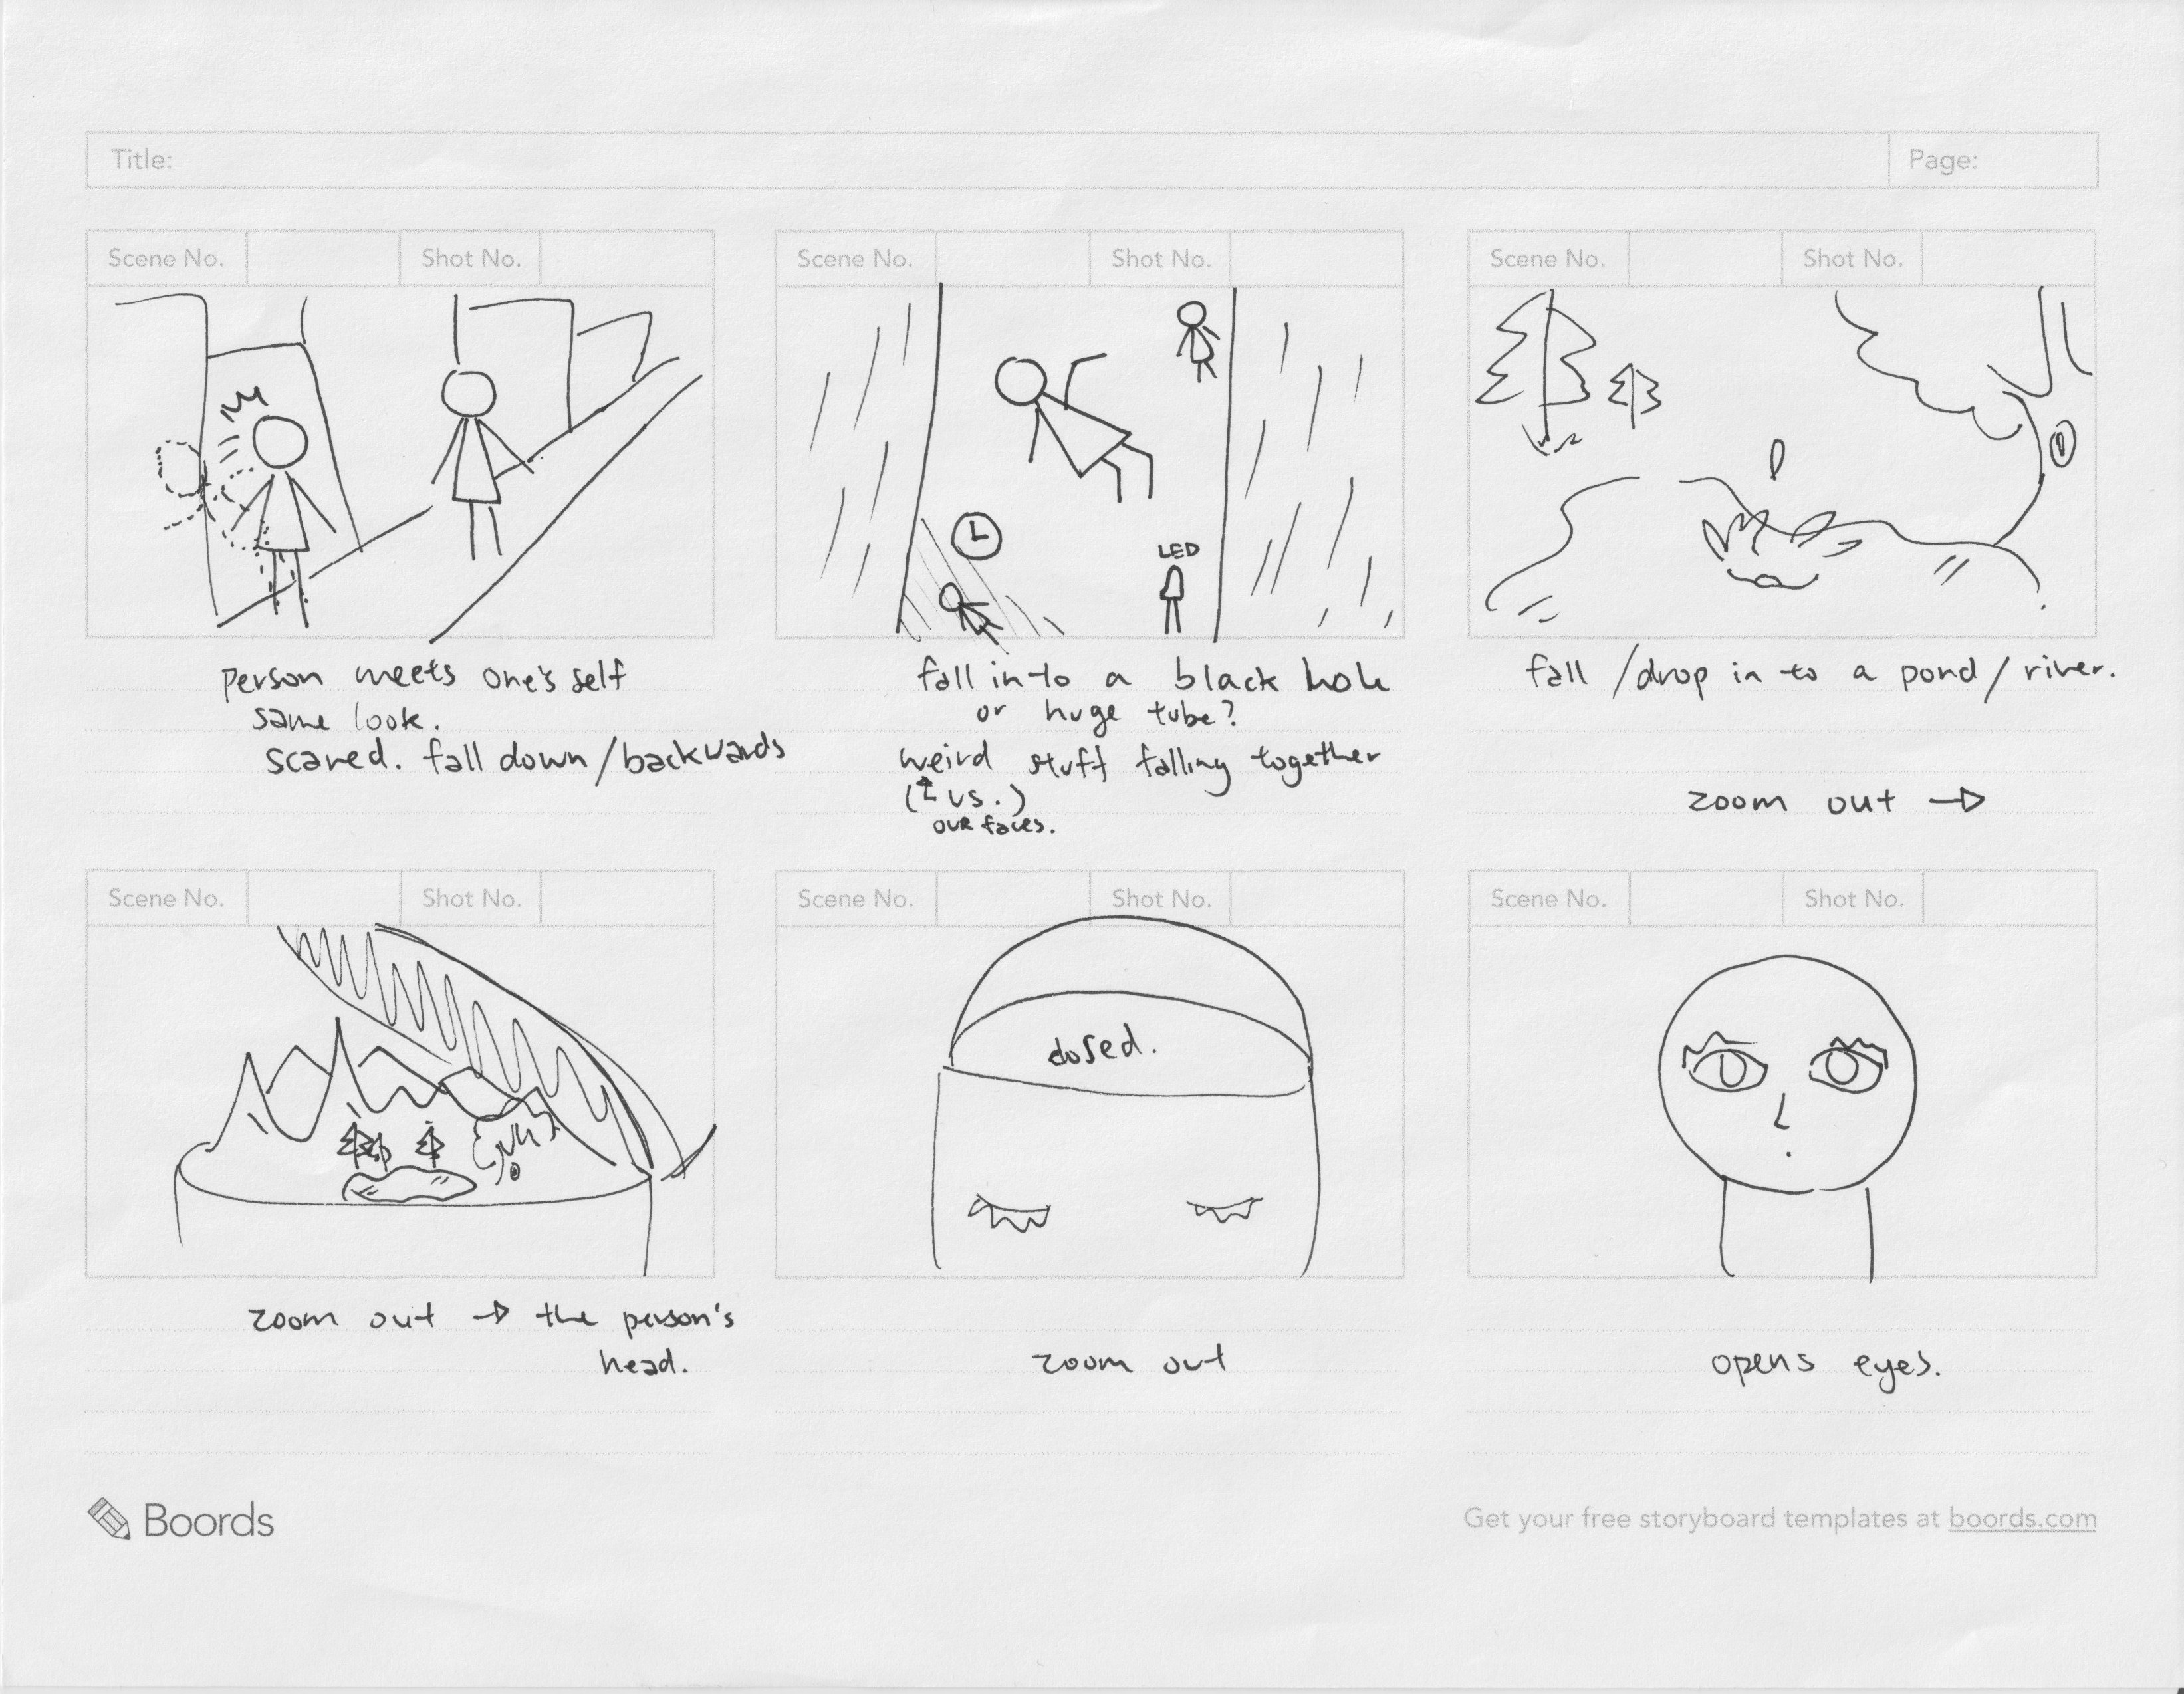
We split up the work into three parts and set up a moodboard so that we work with the same style. And I am incharge of the first part. Until the person starts to walk in the long landscape.
For this specific project, we are relying on the music very much, so as I animates the assets, I first listen to the whole track and mark the beats, climax and attributes that happened in time.

The function that I like the most in AE is parenting. Most of the assets in my work perform well only if it is parent to another main body. However, for the head opening part, I figured that parent is only good for still images but not working as well for the footage. So I tried using the tracking function, but it never worked for my computer...

Fortunatly, this zoomin & opening up part isn't long so I can just manually fix the positioning of the landscape in the brain and the opened cap.
I really enjoyed making the landscape in the brain by creating a seperate composition and have muiltiple characters moving in the same frame. But the opening music isn't long enough so I can really have a long scene on this part.

And personally, my favorite scene that I've created is this scene of the earth in the univers with a red door sitting on it.

I think what can be improved next time is the way we work as a group. Eventhough we've talked through the storyboard many times, and looking at the mood of the collage that we want to carry together, some of us have the assigned part done the last minute and we didn't have time to go through the final piece together as a team and give each other feedback and help. Everyone had different experiences in AE, so we need to know who needs more time to figure out the time schedule and way to teach each other.
AR Will Spark the Next Big Tech Platform — Call It Mirrorworld
In the article by Kevin Kelly, talked about the two parallel world -- the real world and the digital world -- intersects, which driven by the augmented reality, as called the Mirrorworld. This article is really interesting and also he introduced a lot of existing projects. And really make me think about as a designer or artist or even just a consumer, what is the purpose of using AR and how far it can go.The concept of "two parallel world in AR" make me think about, why would people want something digital to appear on a physical real world (in a digital device)? I think it has a great opportunity to become a prototyping tool for designers to cut down wastes and budget. For example, for architect, they can adjust the design in the program, to put it at the actual space they will be building it. Also for fashion designers, before production, dripping, pattern making, fitting can all be down in AR before the real production. Even for designs that required digital printing, can be applyed directly on to it. New job opportunities will be available (to create libraries): AR civil engineerer, AR pattern maker, AR fabric/textile designer and etc.
If possible, the customer end should also work like this: fitting using AR and adjust sizes in the program --> data sent to the factory --> ordermade tailoring, no premade and stock so no waste. Also as a customer, it will be a great opportunity for furniture companies to have a interior design AR app online, after the customer designed with the AR furnitures, they can order directly from the app.
Week 1-2: Stop Motion Animation "Love Cut" & Reading Response
Stop Motion Animation
For this week's project, we went through a lot of ideas and stories, and had a 3 mintue long story, which is already a simplified version of the actual story and we think that it will lose its meaning if we simplify it even more, so we instead, inspired by the materials we got: some colorful wools--maybe some hair story?As we started making the characters, we build up the plot for them. I'm very into photography and always wanted to try doing some cinematography for a short story. Inspired by Toy Story 4 I feel like not only how the entire enviornment for the character feels real or not, but using similar cinematography that's used for actual movie/videos will also help building the characters more. Through this project, I feel strongly that this is sort of where my passion is and also my focus point when watching a anime film (other than the plot).
Also, we do not want to give to much identity to the characters, so we kept them without speaking any lines by only making some emotional sounds, just like Minions.
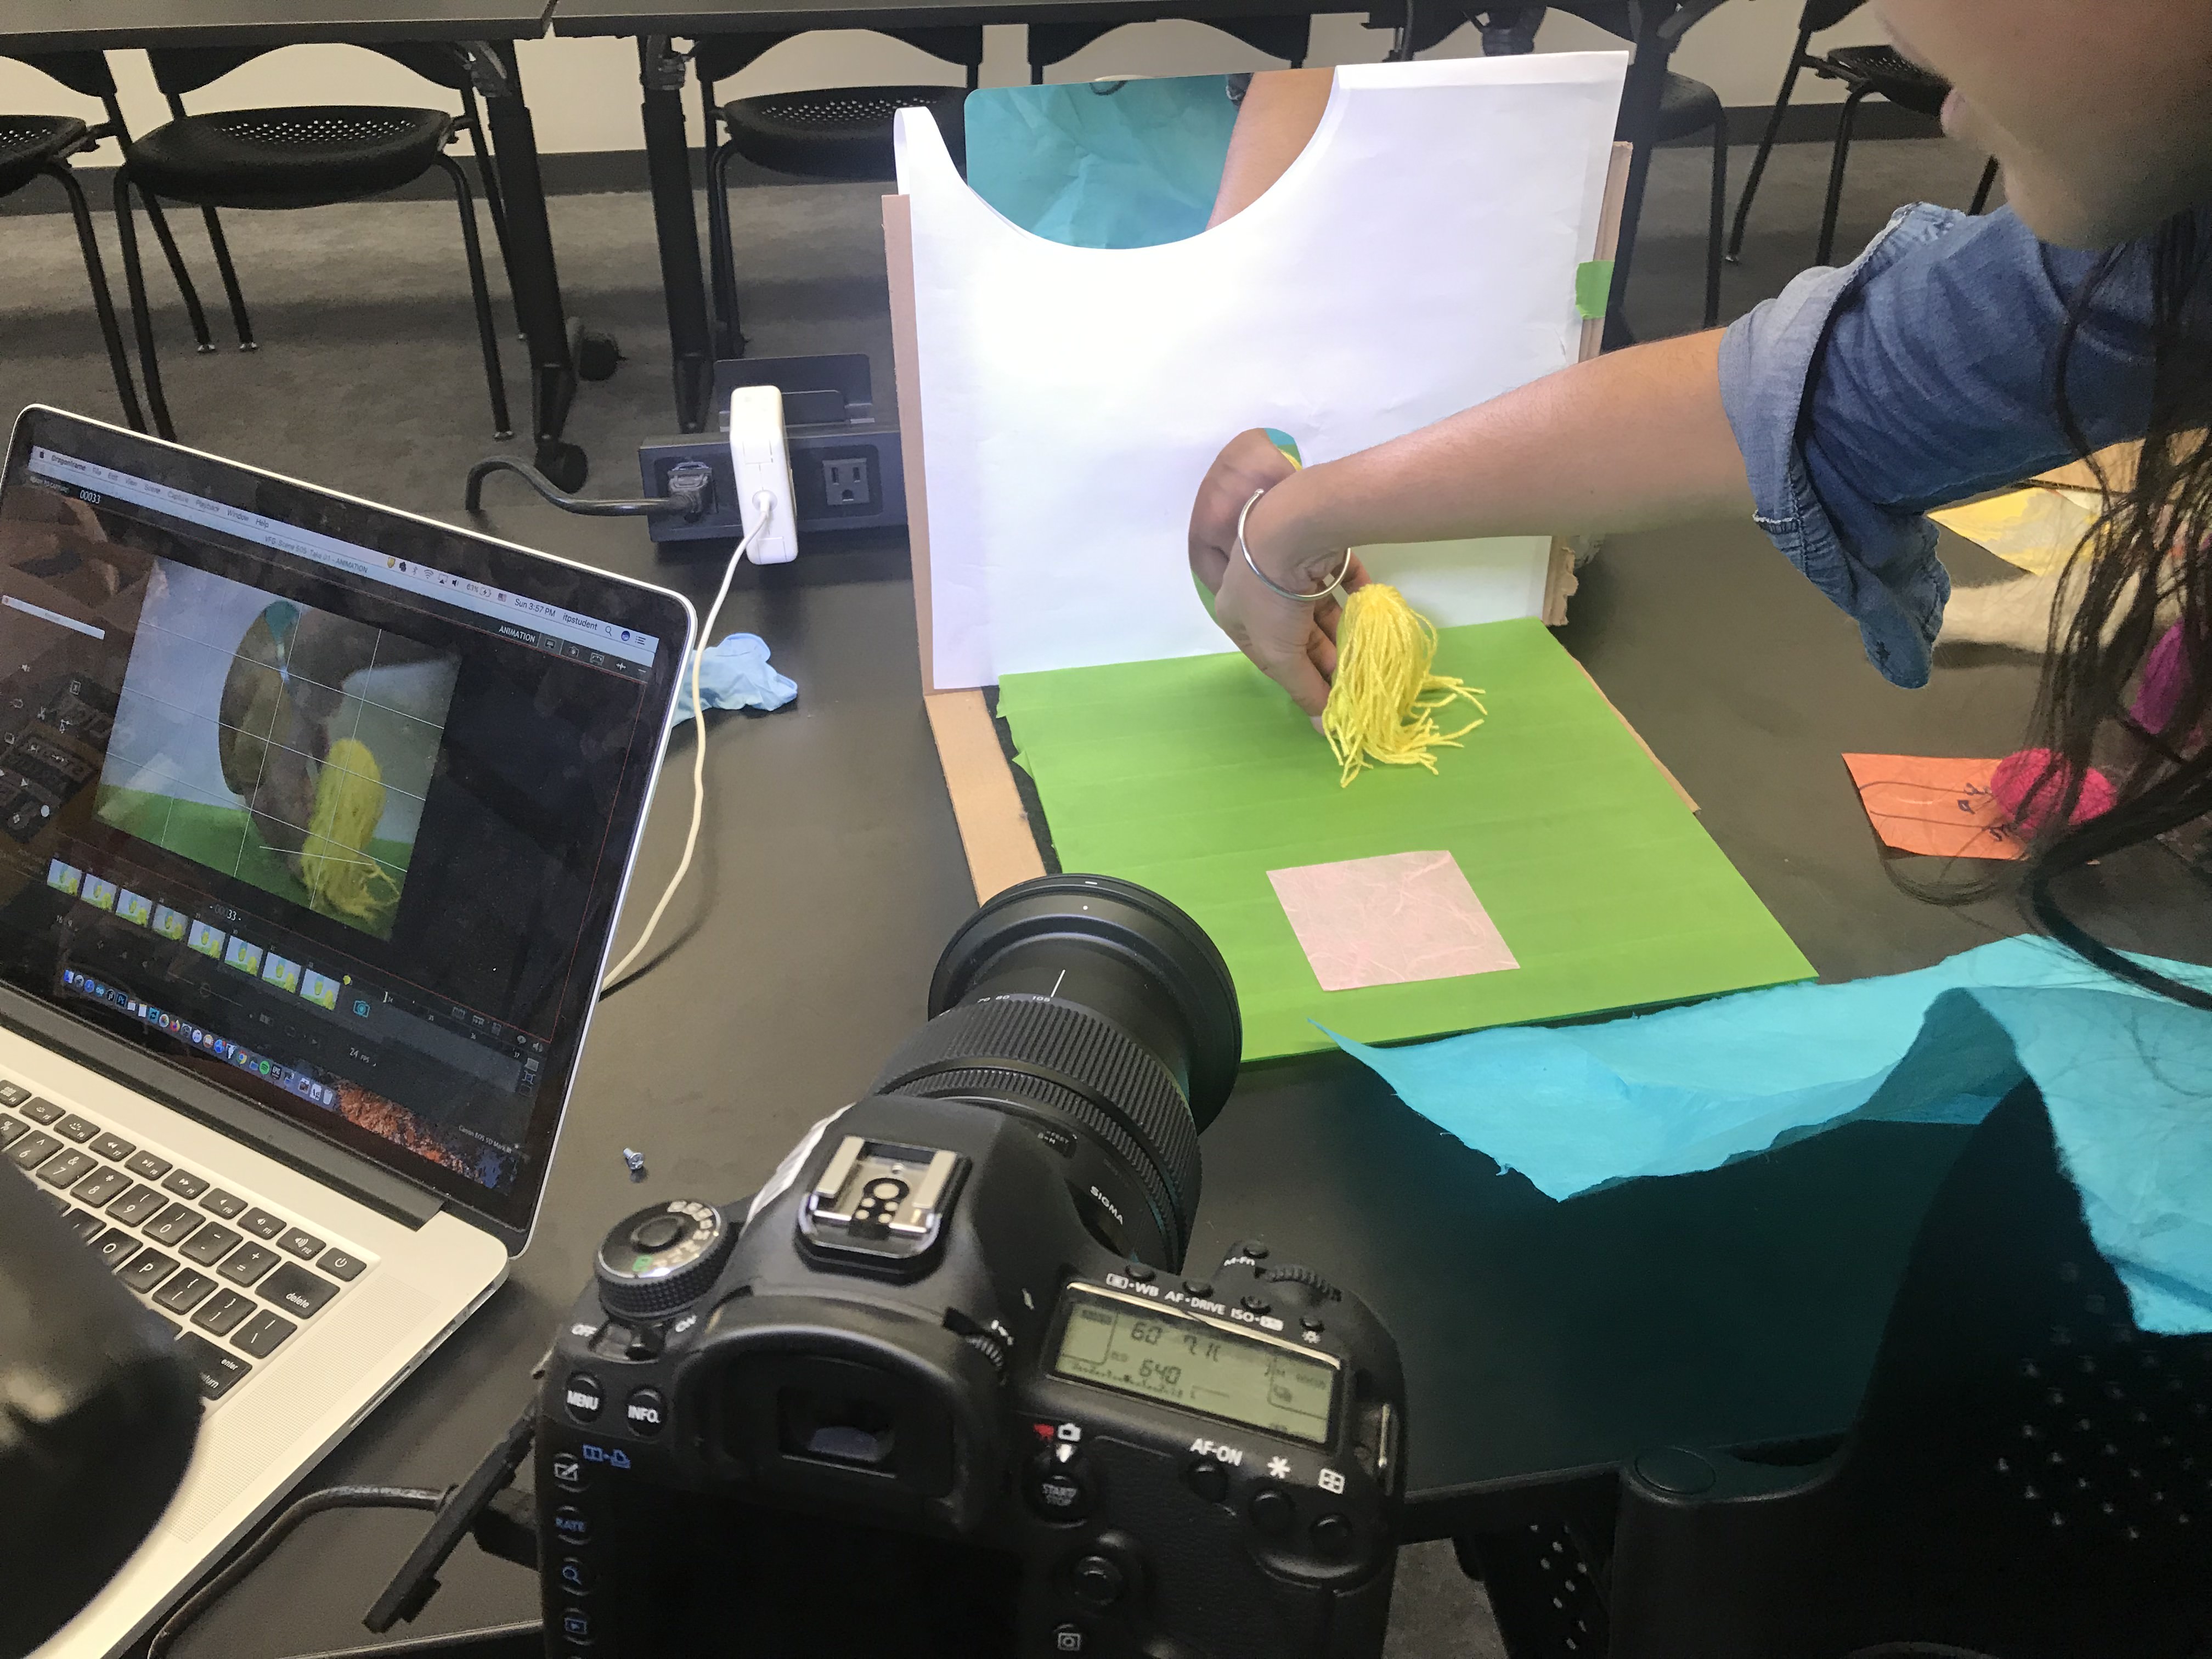
Even though I feel anxious when I was doing the project, but mostly enjoying it alot. The most struggling part for this project will be using Dragonframe is still kind of unfamiliar for us. We only realized (or remembered) that the 'zoom in' only works as a preview but not a crop until we export the video...
Understanding Comics: The Invisible Art
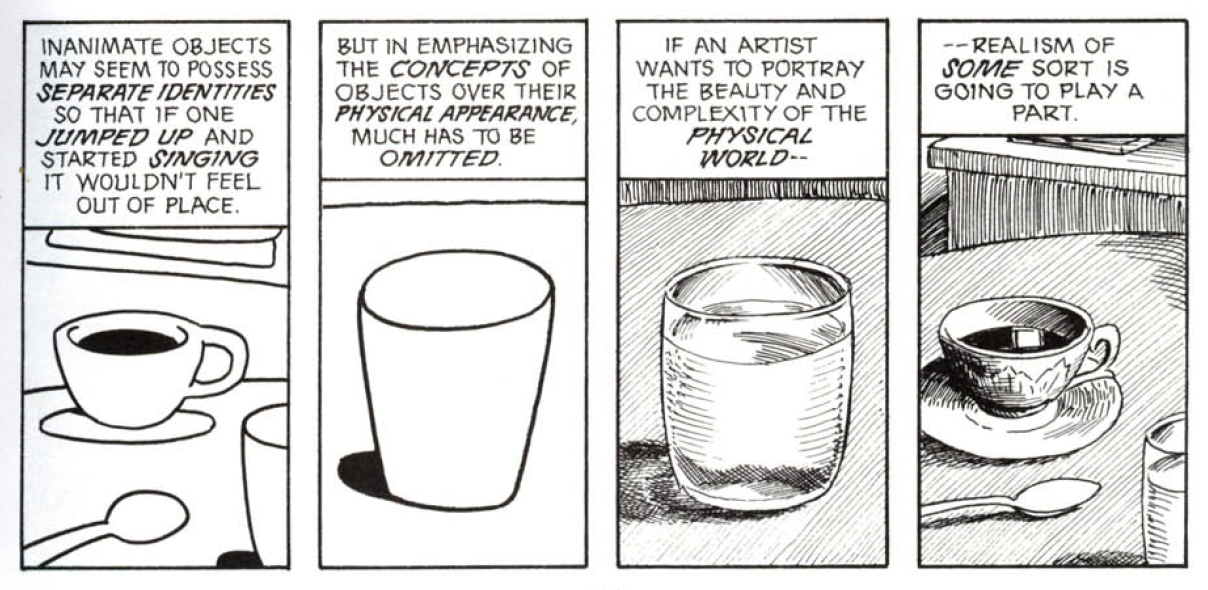
This is a very interesting but at the same time a difficult comic book to me. The words are simple but the it makes me read twice in order to understand concepts. Scott Mccloud starting from definding what exactly is comic as an art form, a medium of expression an idea, the 'closure' (design kid happy to see the old friend mentioned here) happened in the gutters, the time and space and etc... We might see similar concepts in other form of arts but all of them can only happen in comics. I'm a comic person, specially I read a lot of mangas. Though, like he mentioned early in the book, there are still a lot of people think it is a "cheap, disposable, kiddie fare". But like books and movies, there are already a lot of people inspired by comics, or experienced some sort of life that they never get to experienced. There are even educational Mangas with proffessional terminology that introduced some occupation, which is not as popular, and increased the interest of public towards that occupation. This I think also proved Mcclound's point on the readers tend to put themselves in the characters.Below are some parts that I feel really interesting and could be used for other fields
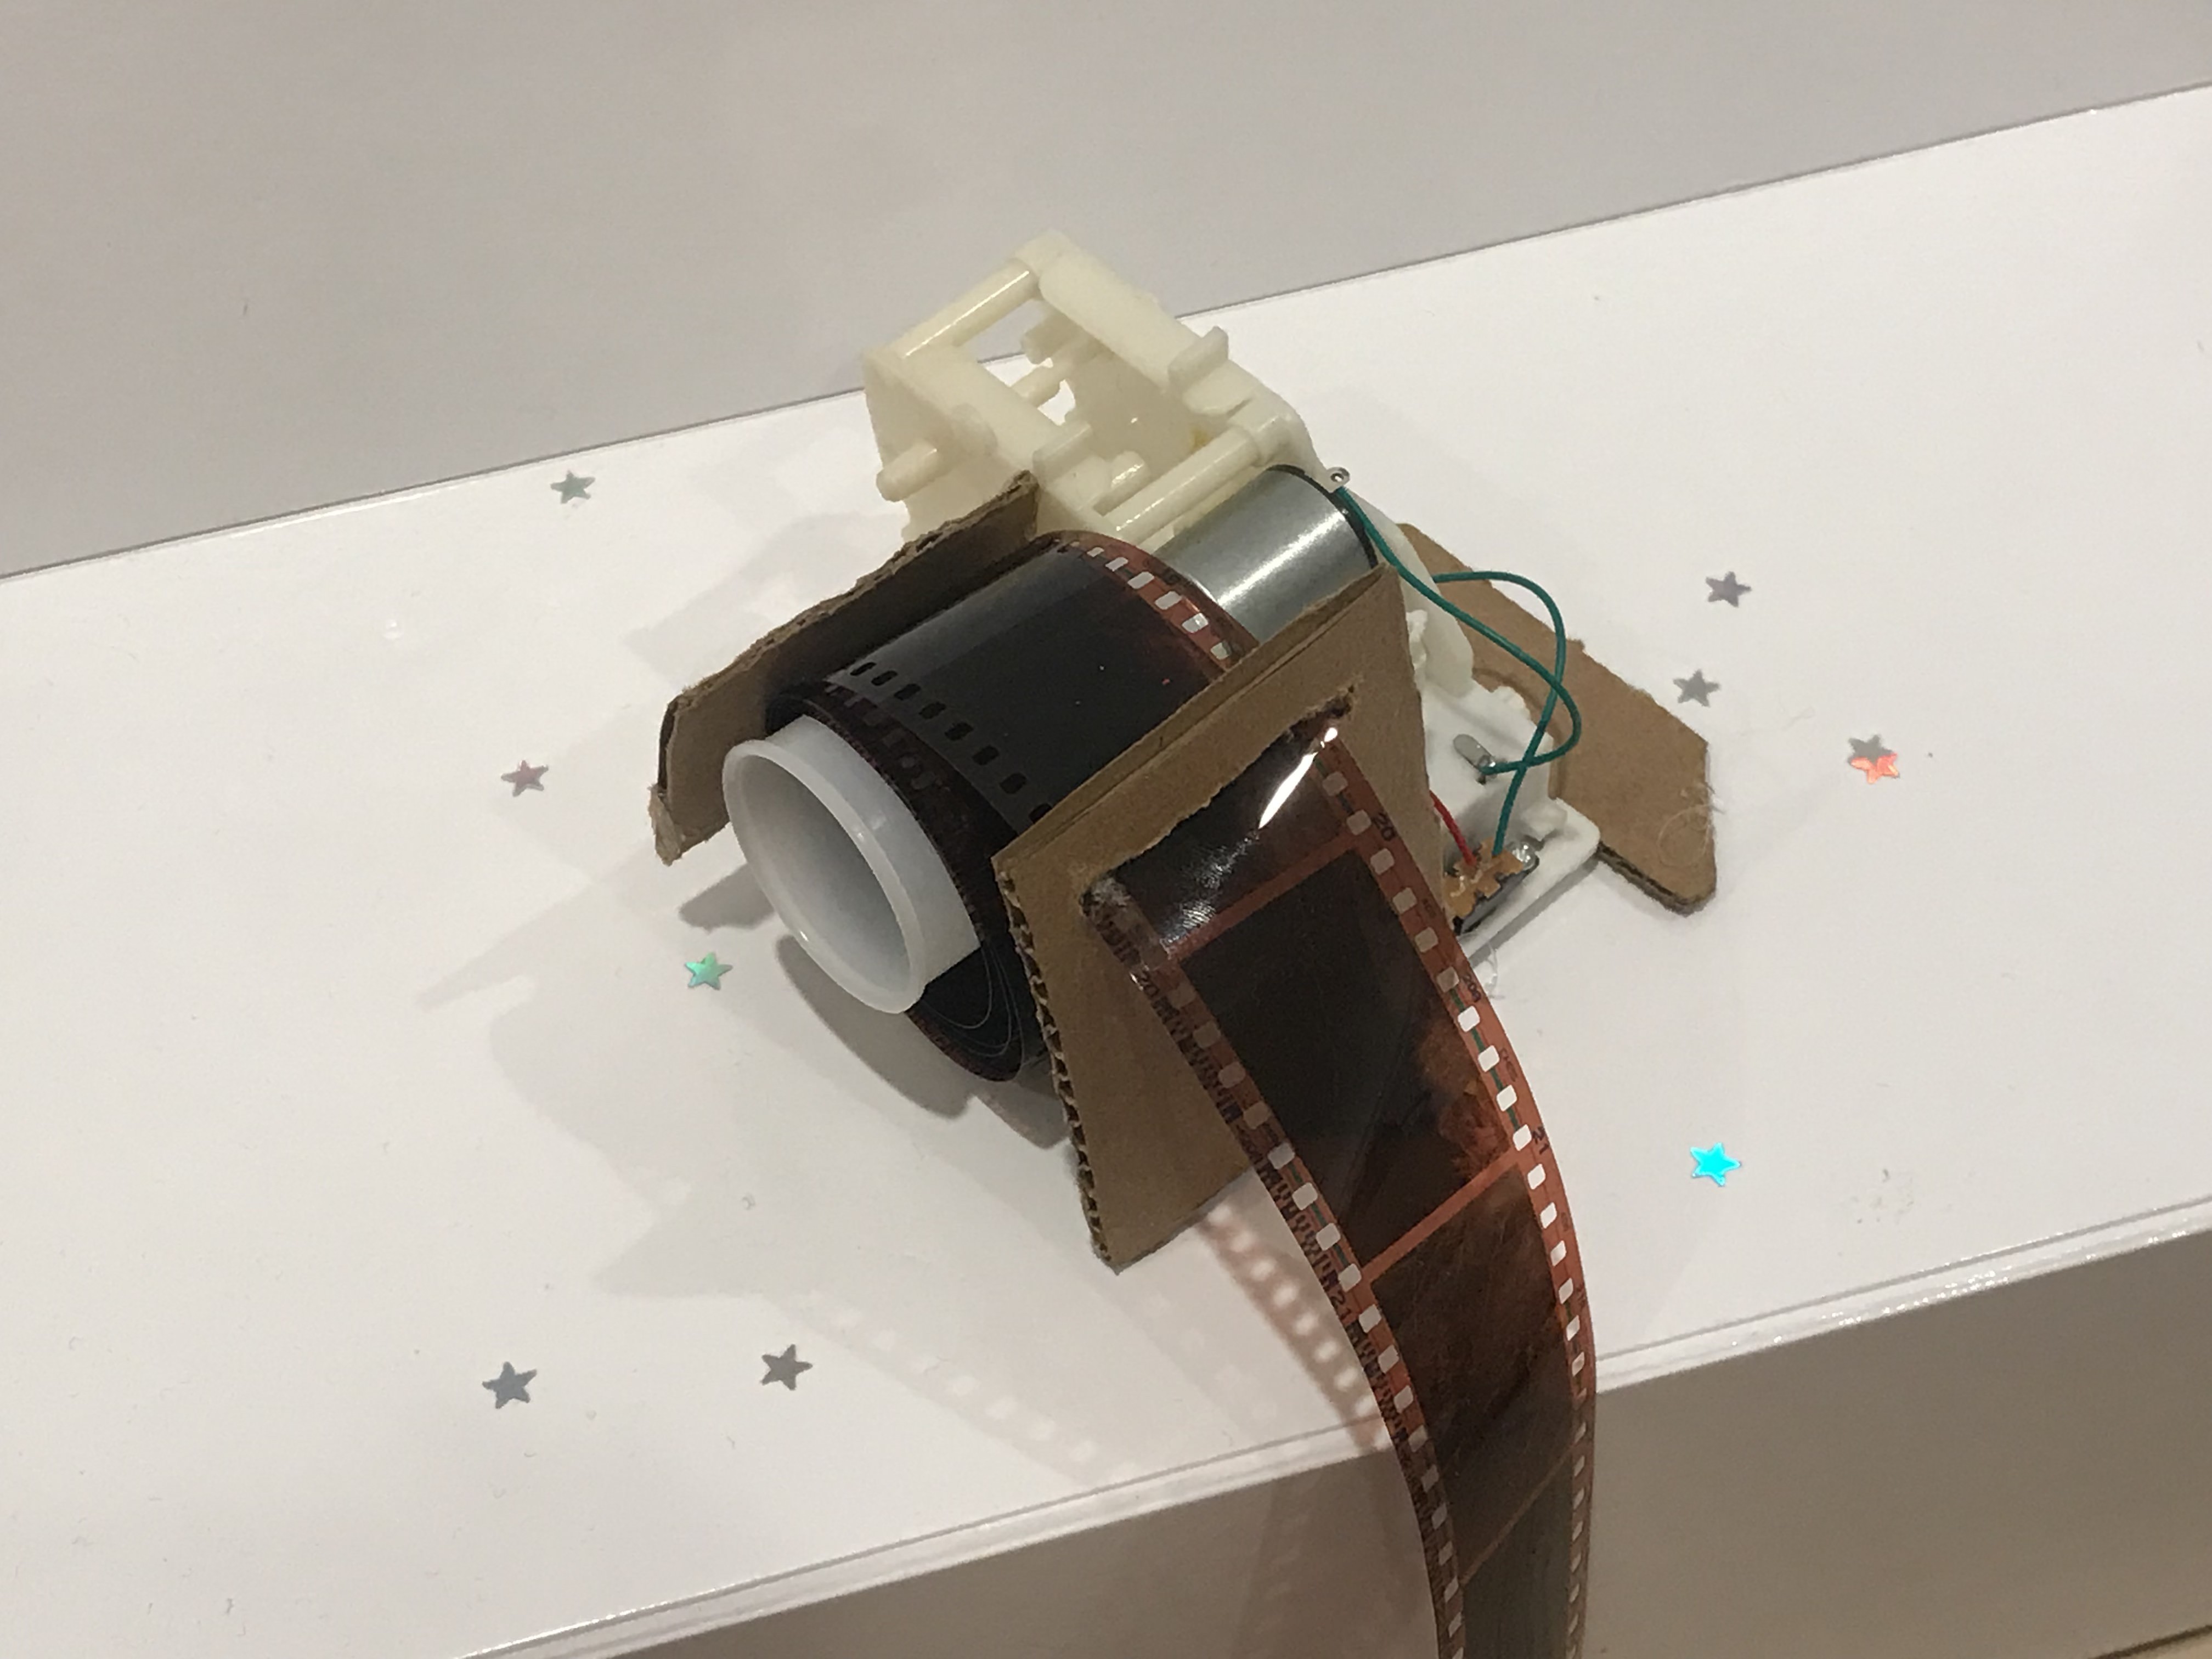
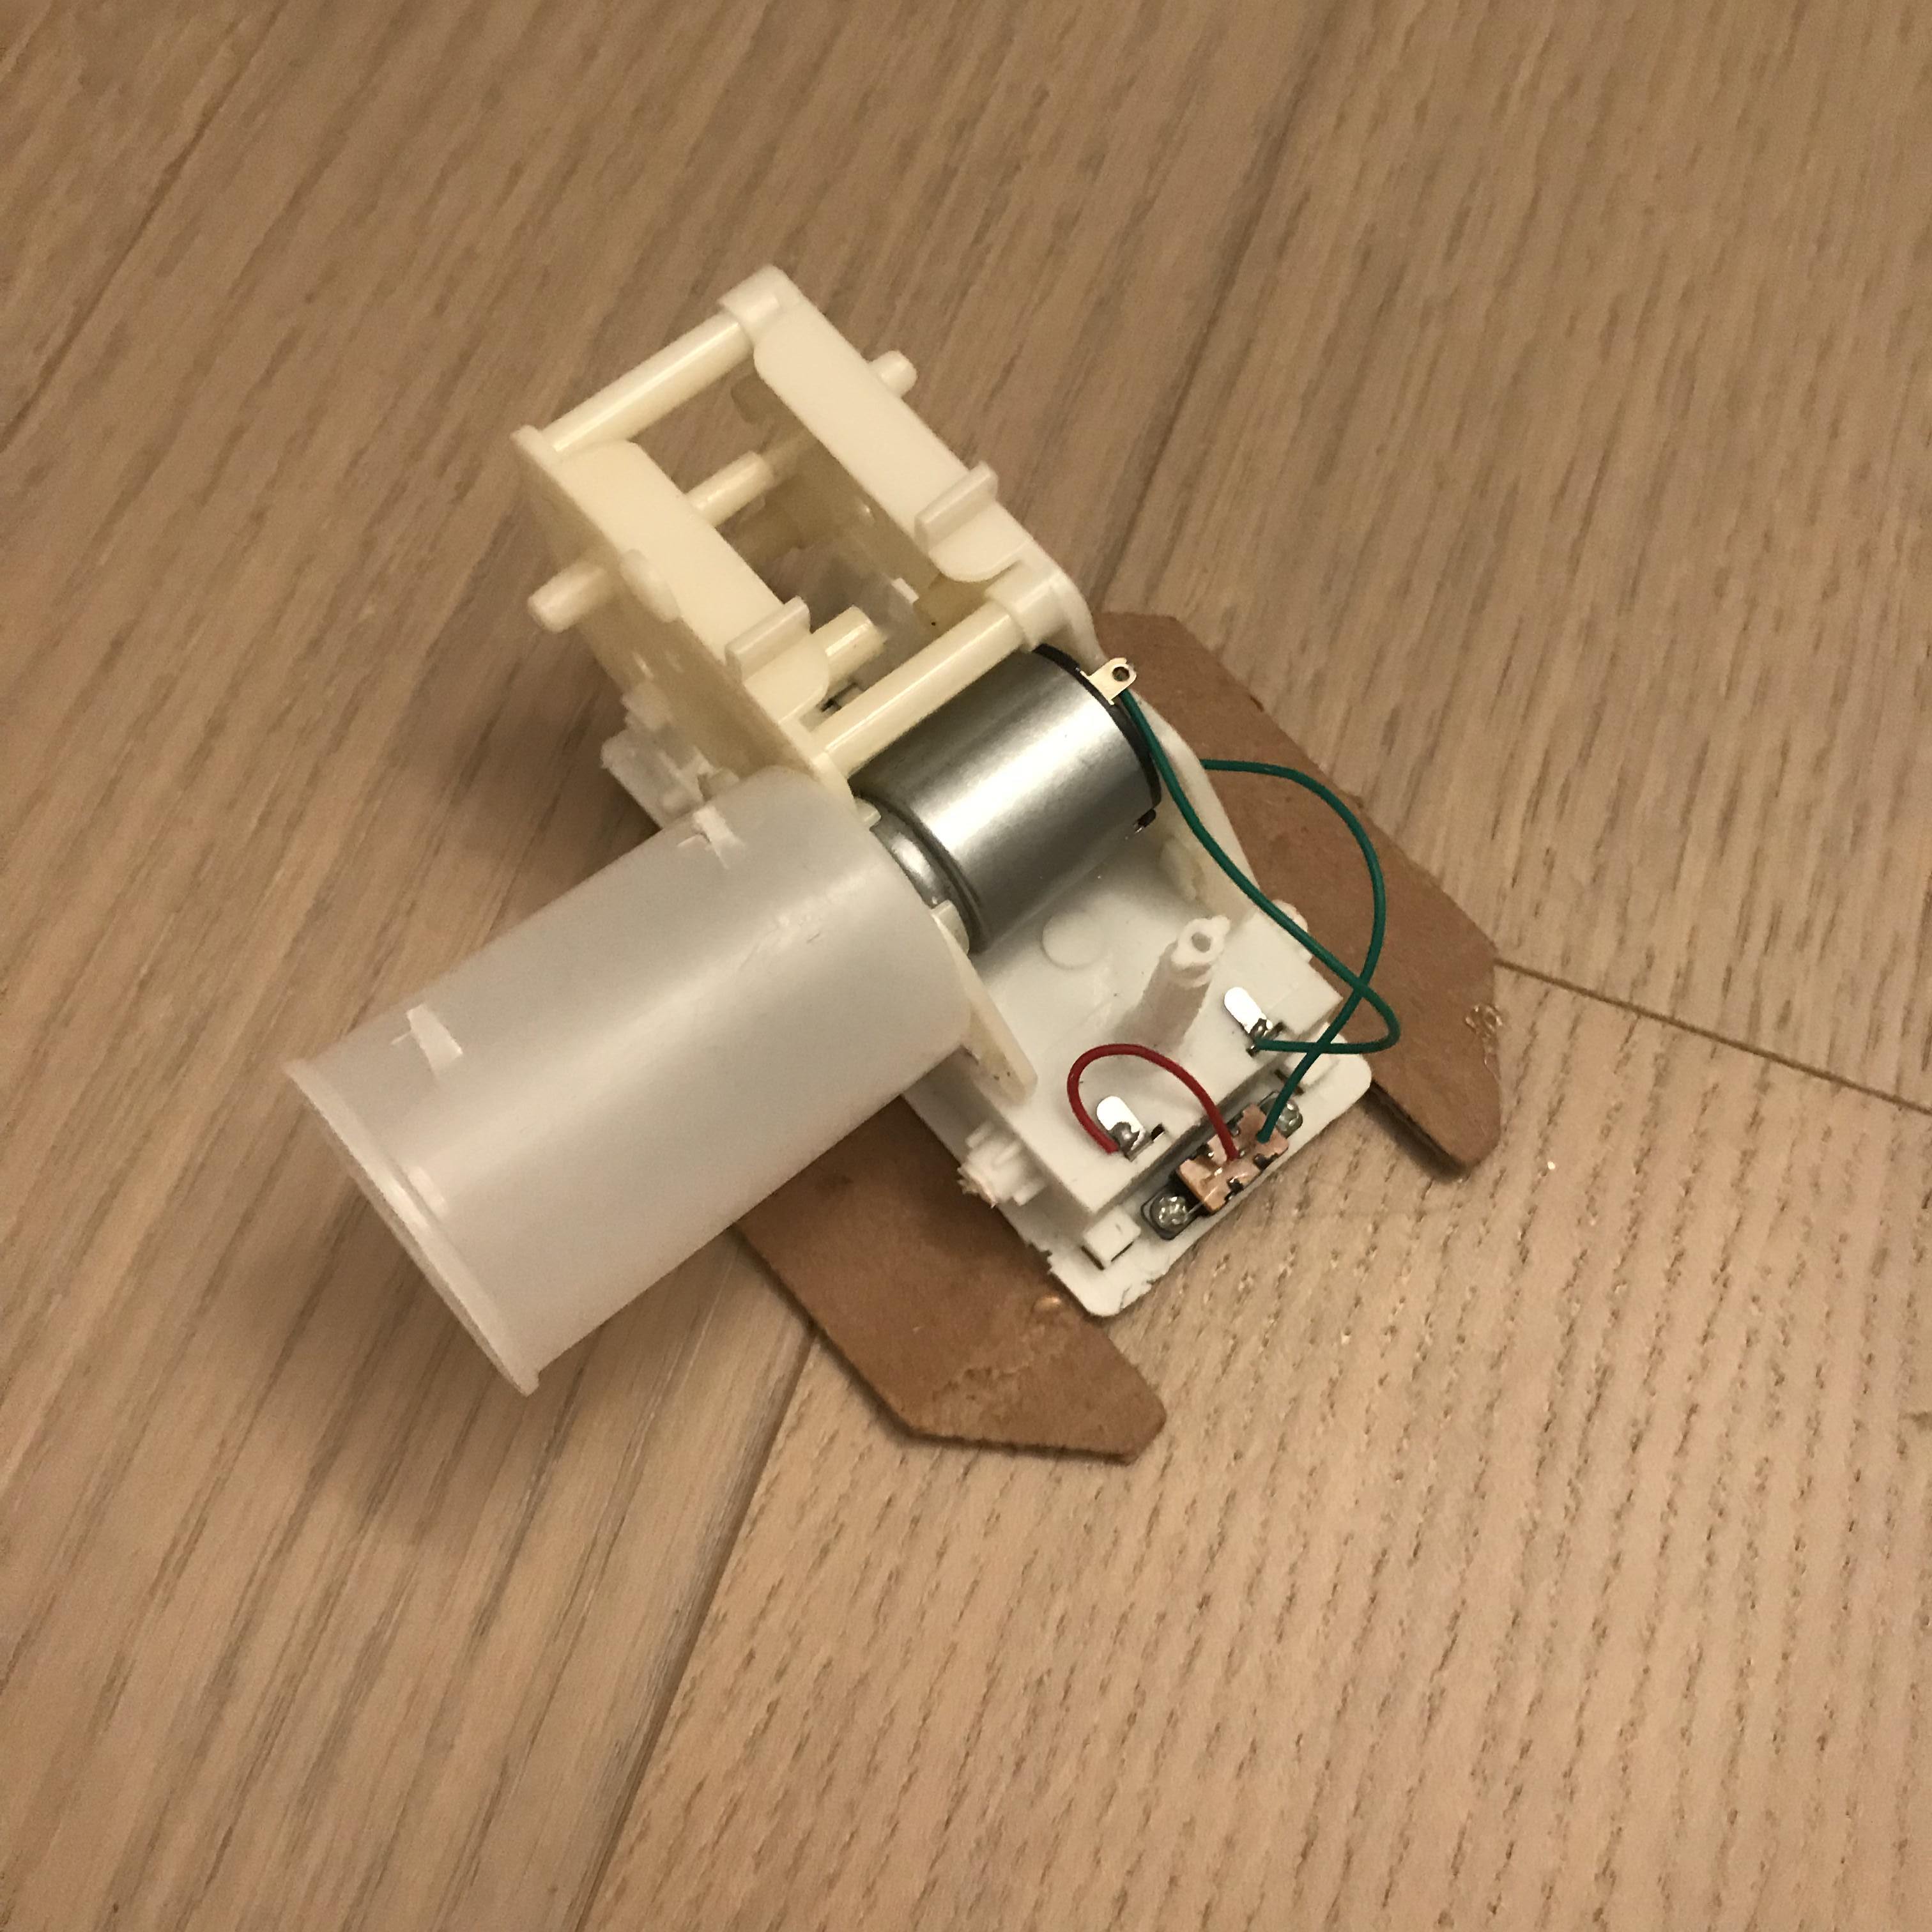
Week 6 - Motor: "Film Roller" & Starting kintsugi
Film negatives roller
For this week's project, the first 'on-shelf' motor that came to my mind is the dog toy that I often see on when I walk through Canal Street:
Then, I murdered it and took out the 'heart' of it:
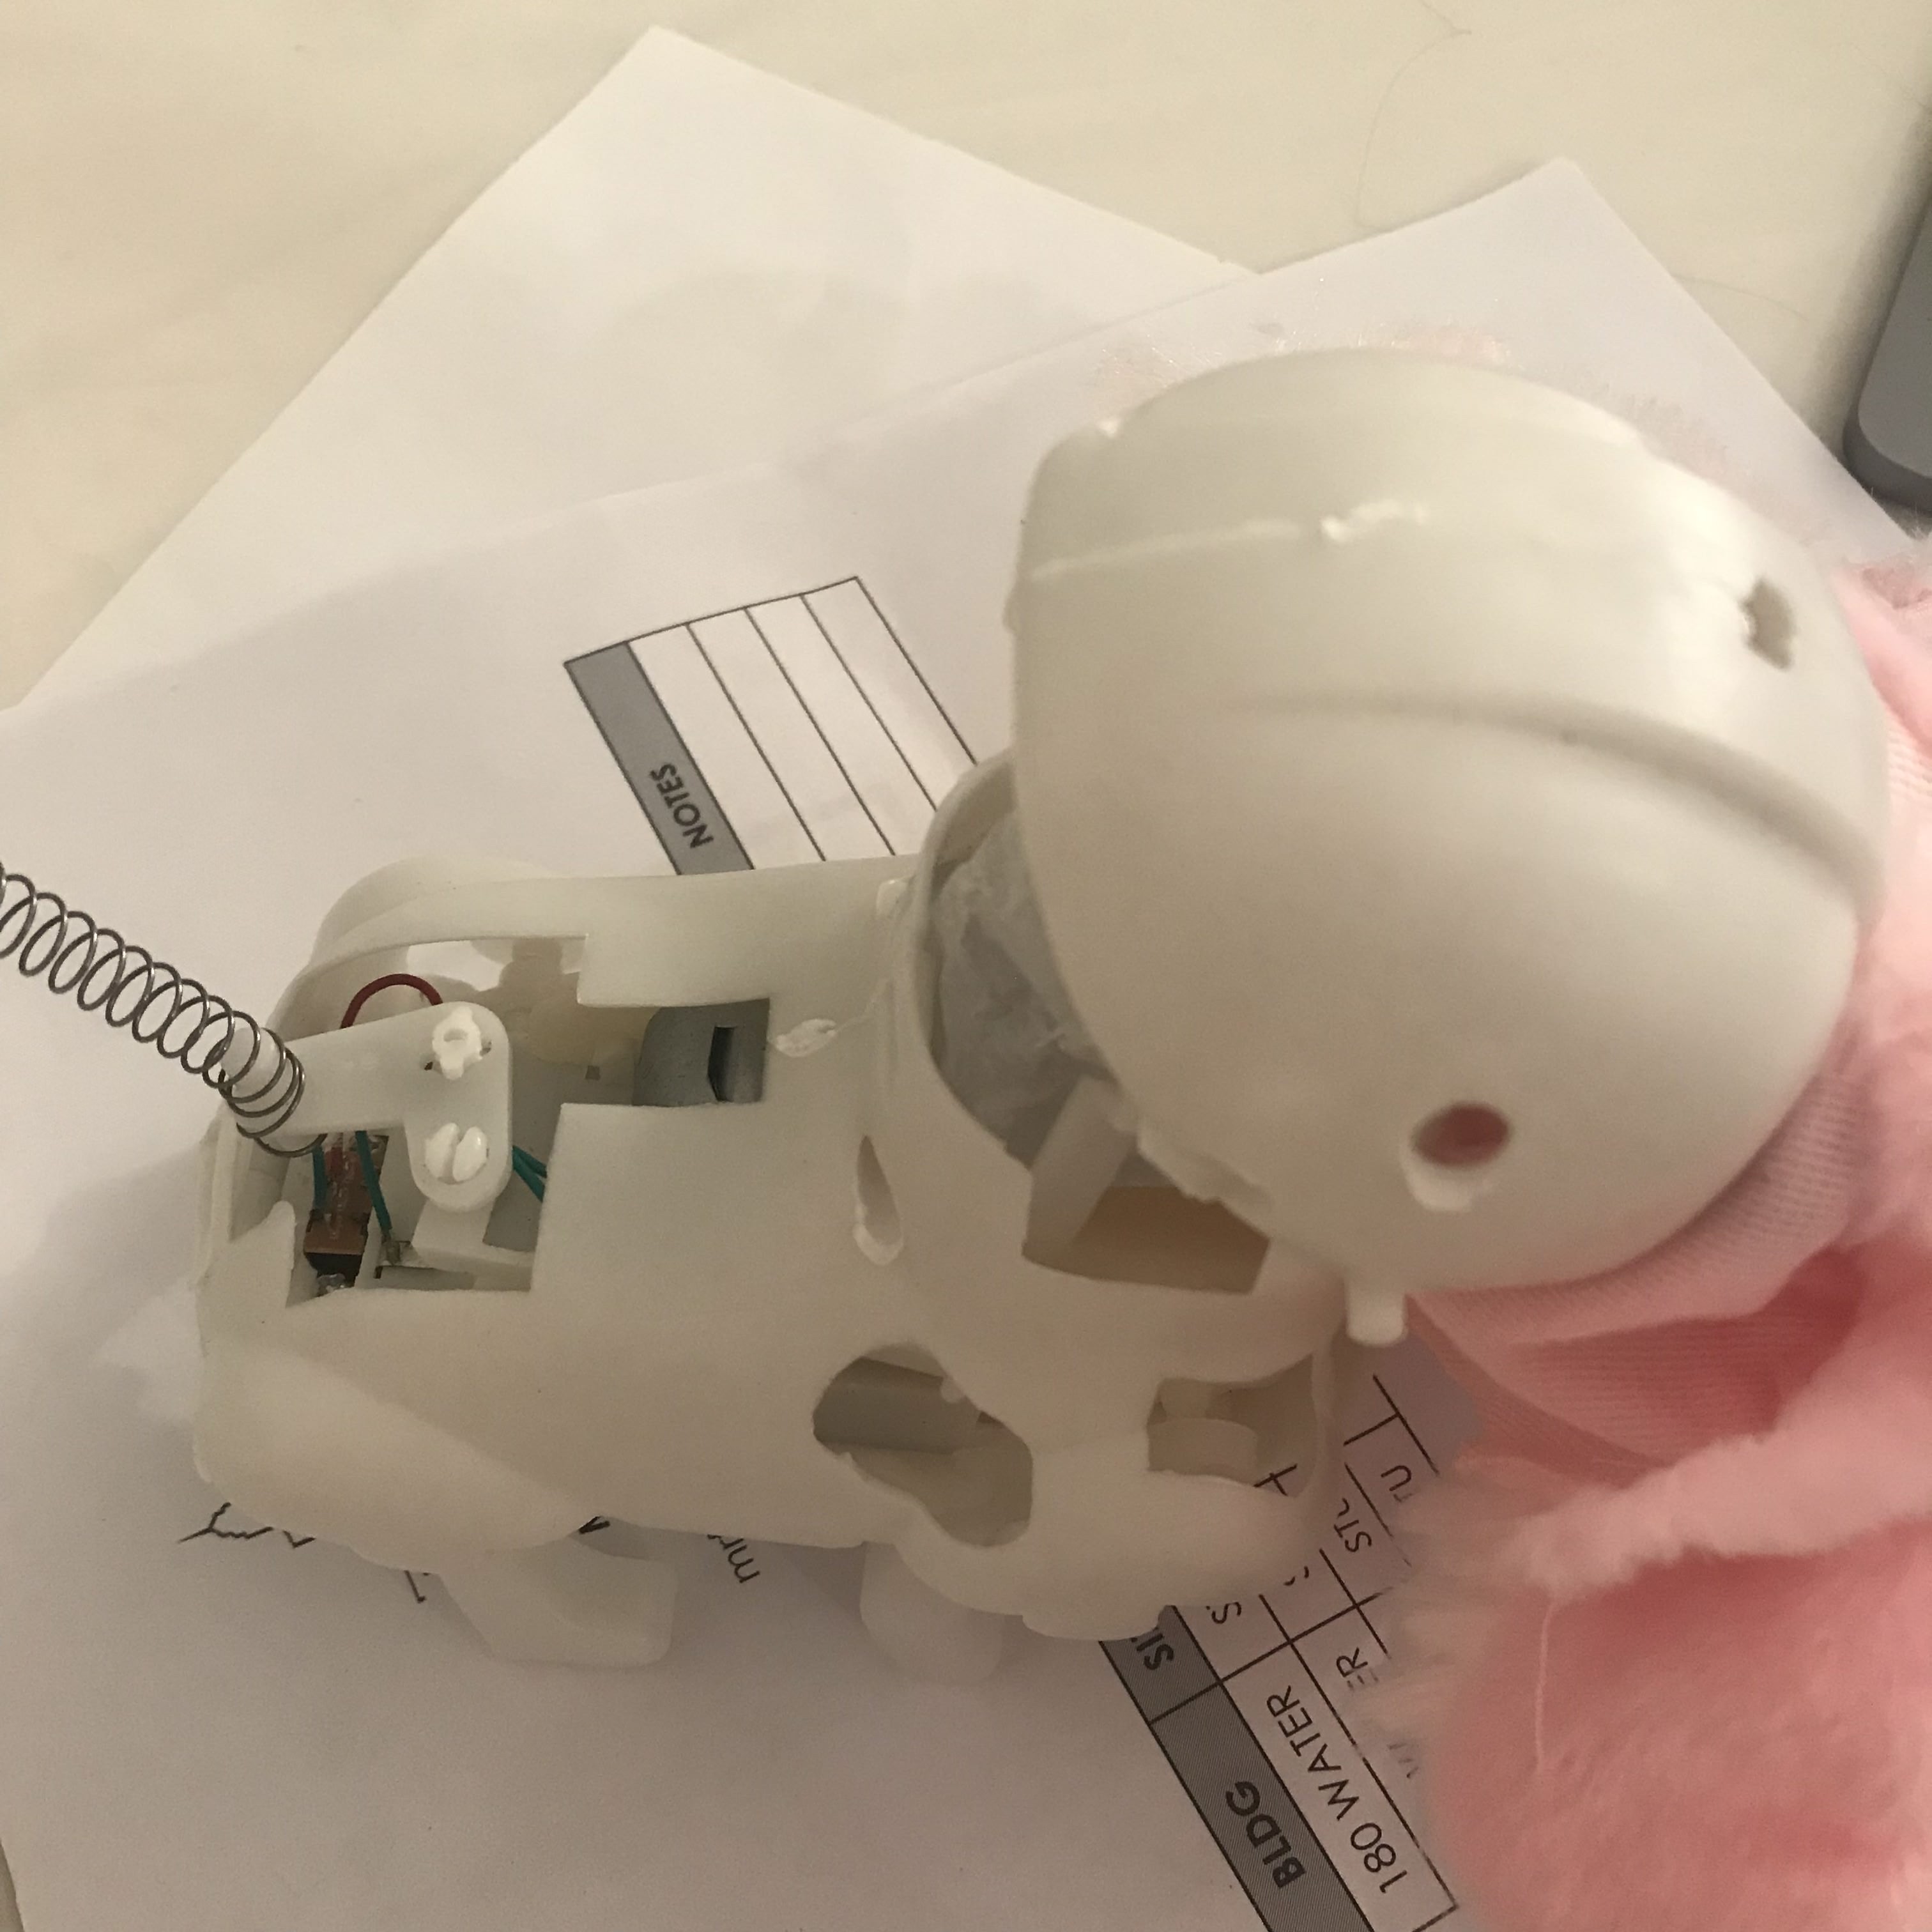
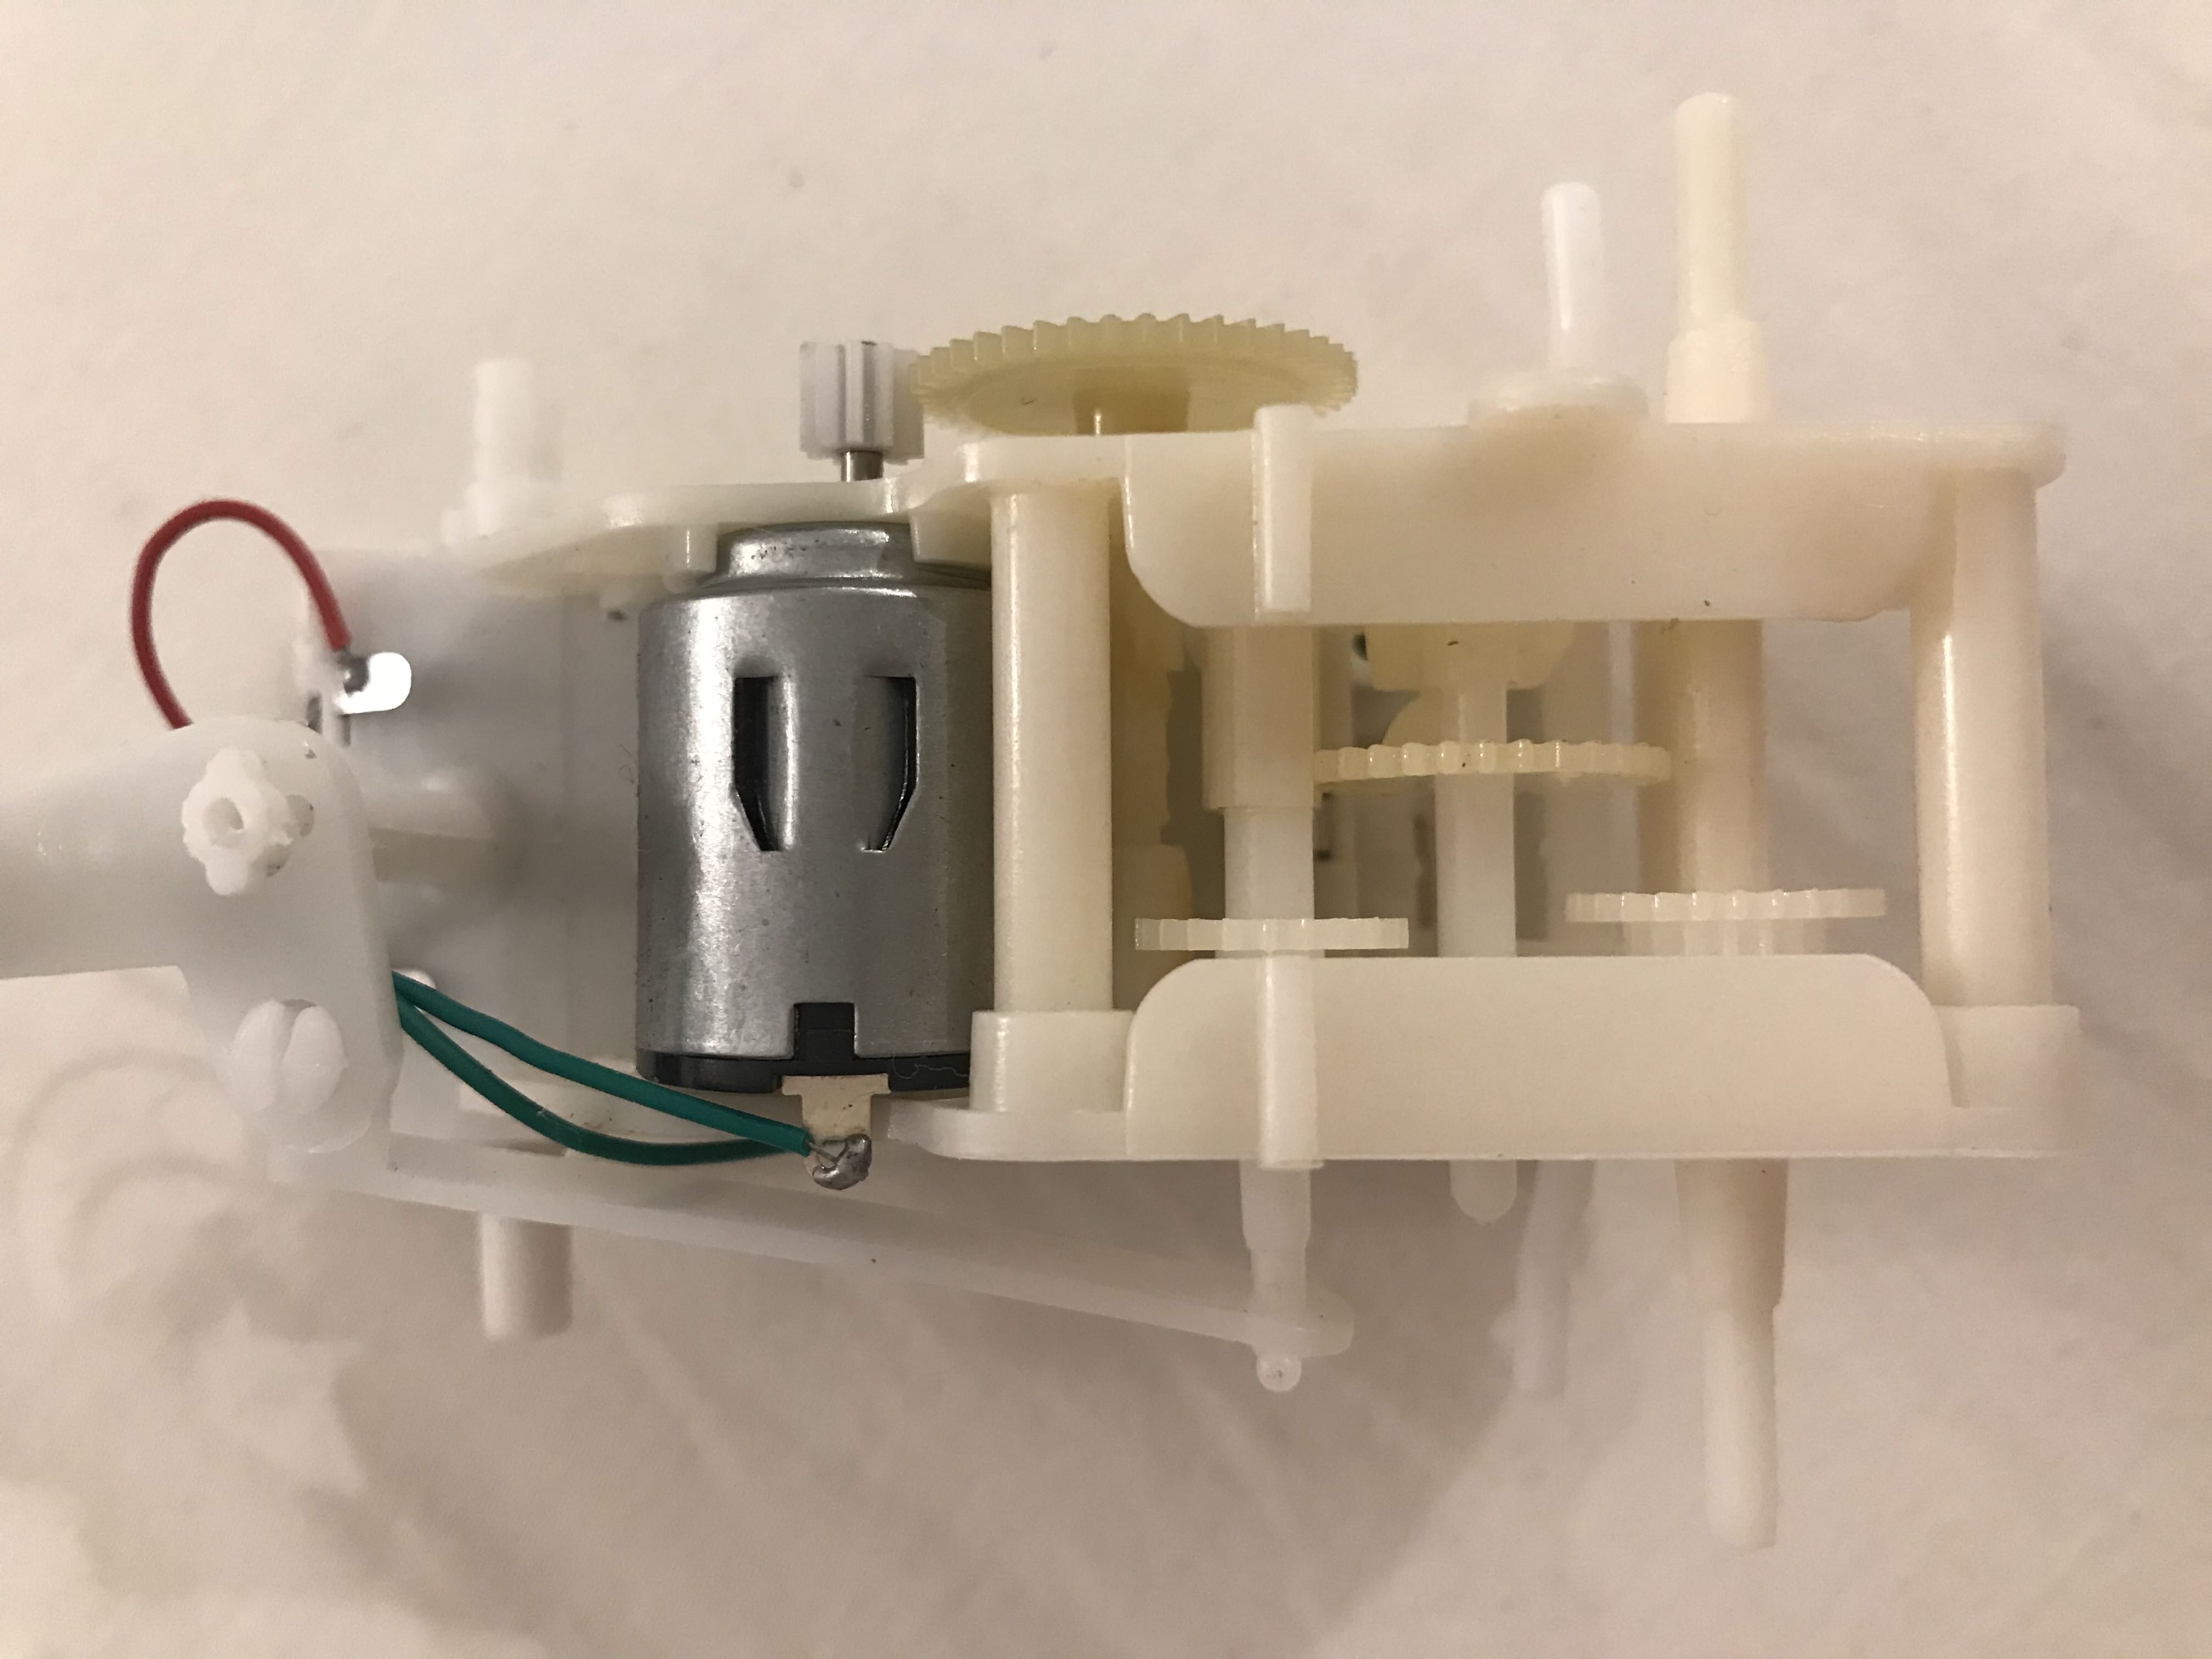
I figured that there are too many moving parts, which make it hard for me to think of any other thing that can attach to it, so I first cleaned up the gears that I do not need. Then, I came up with the idea of a pencil sharpener, however, due to the low energy the motor carries, it is too weak to sharpen a pencil...
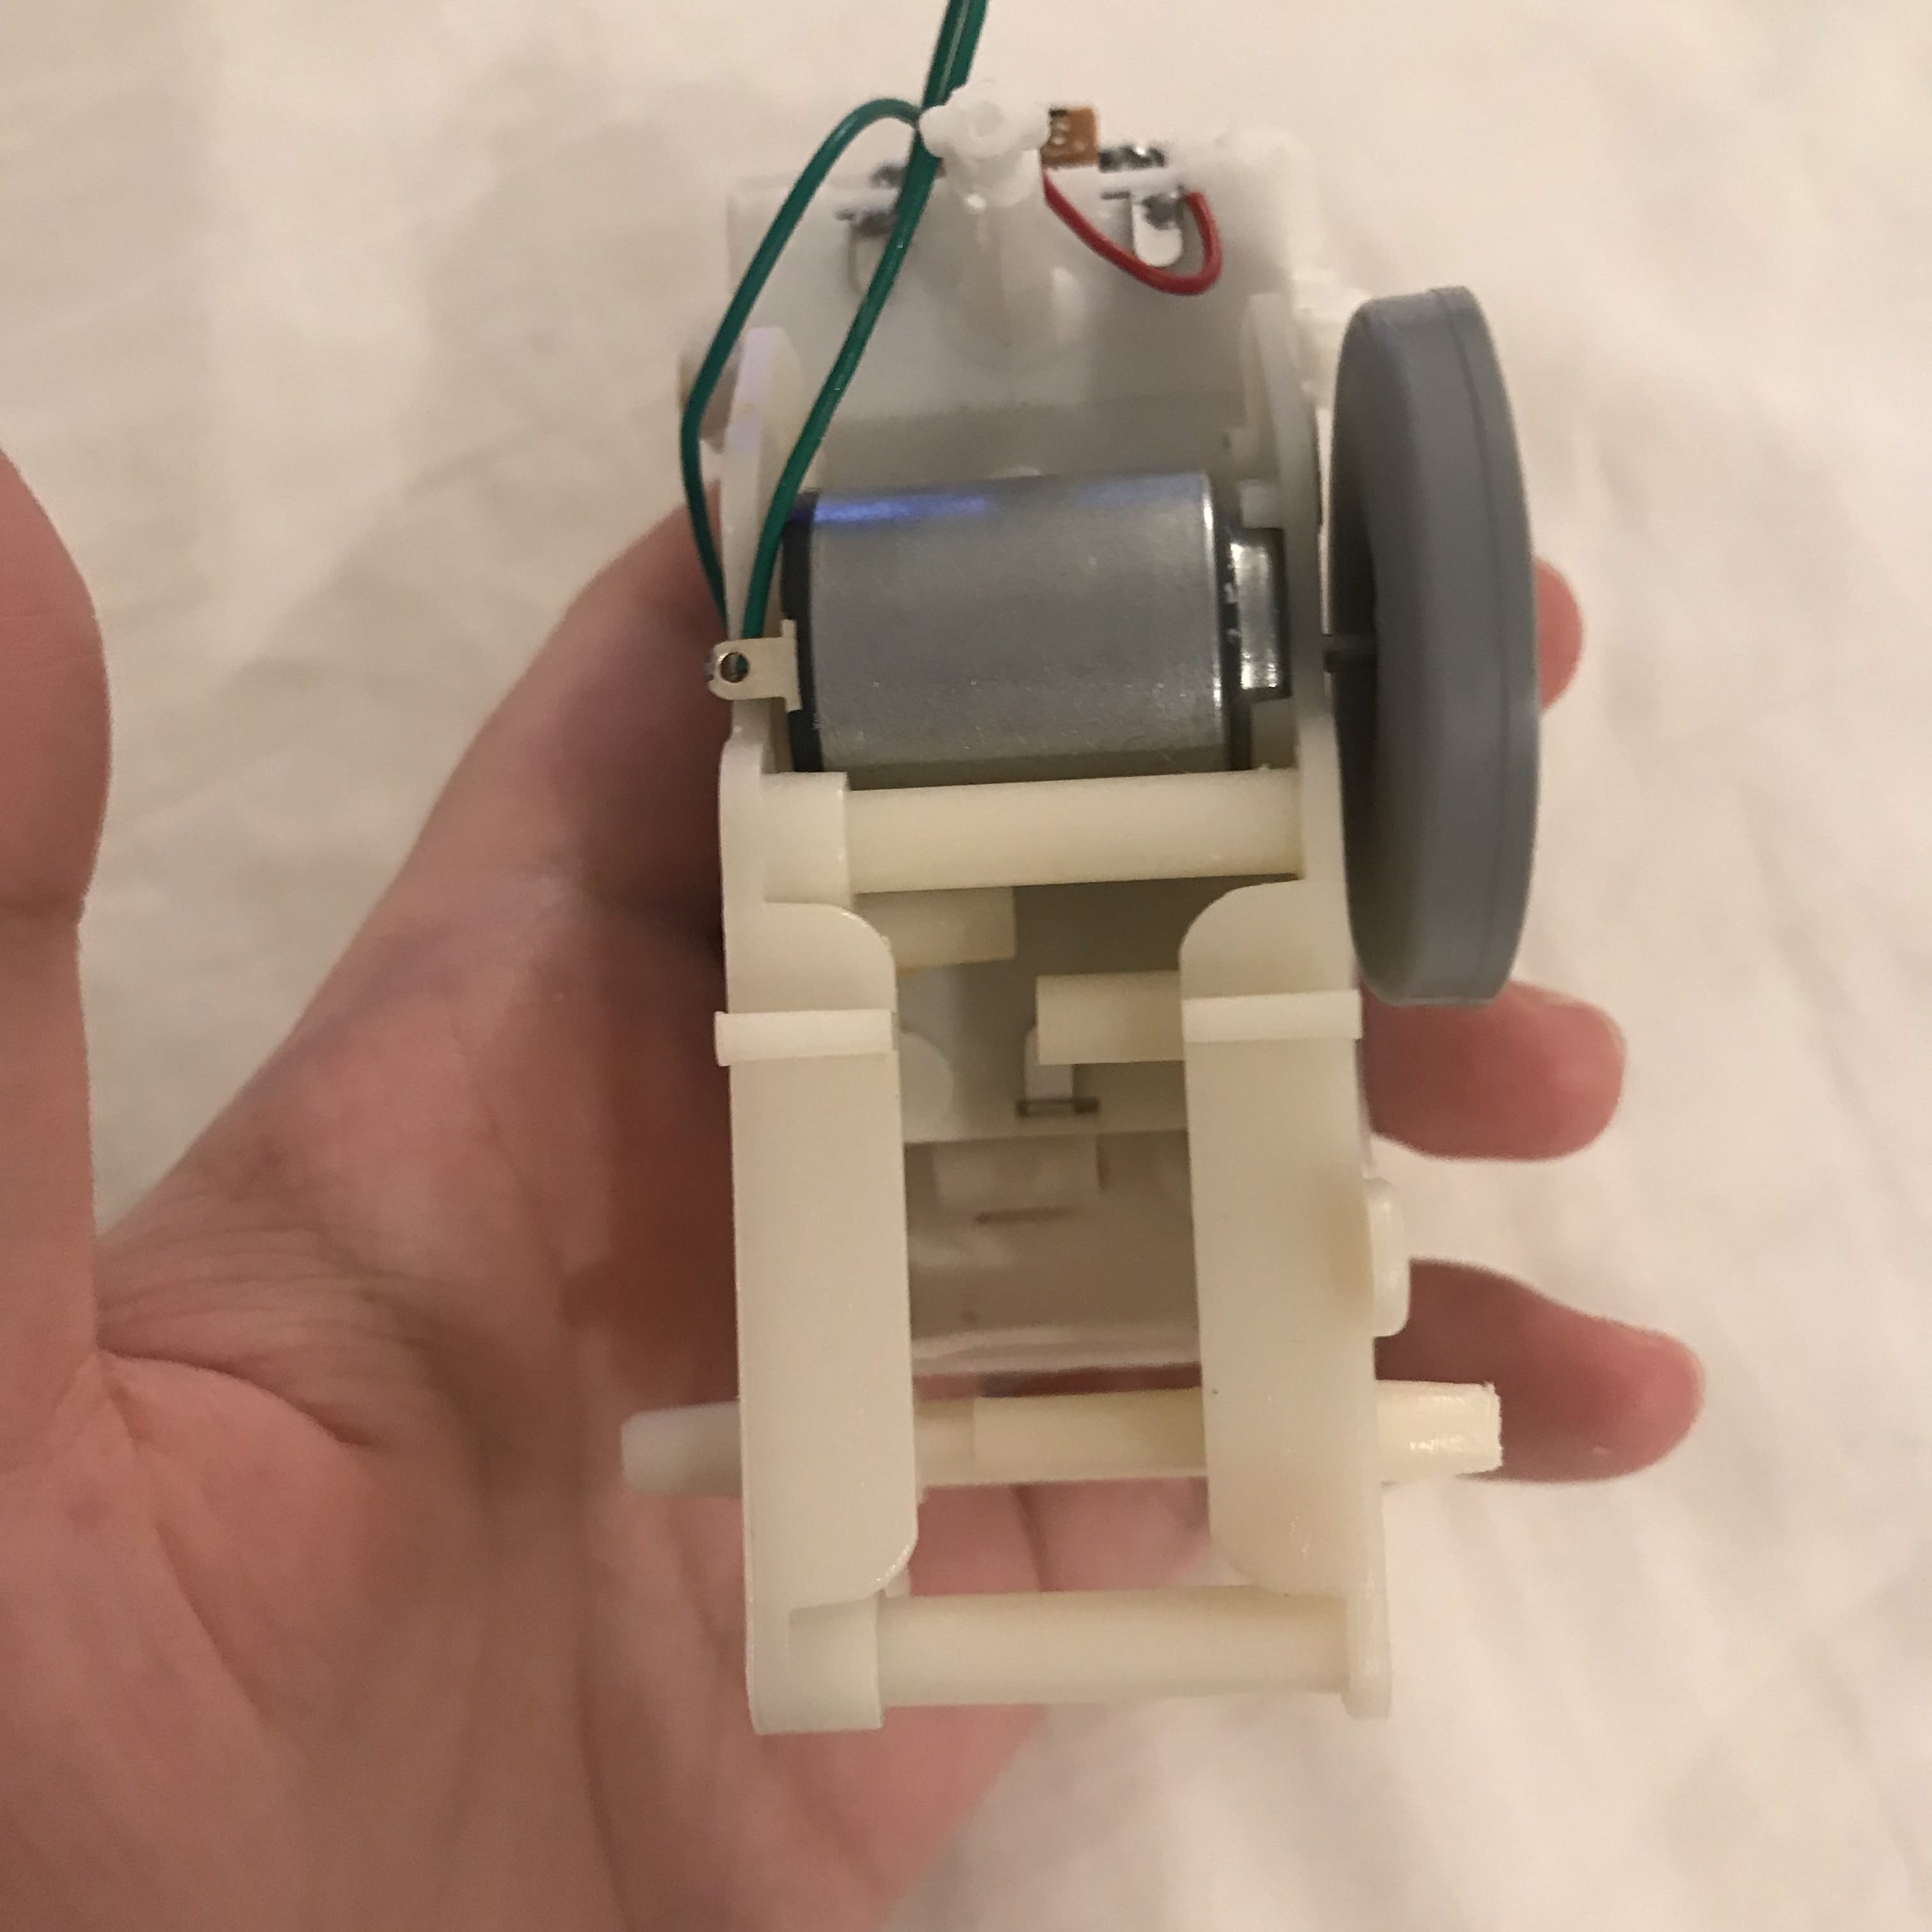
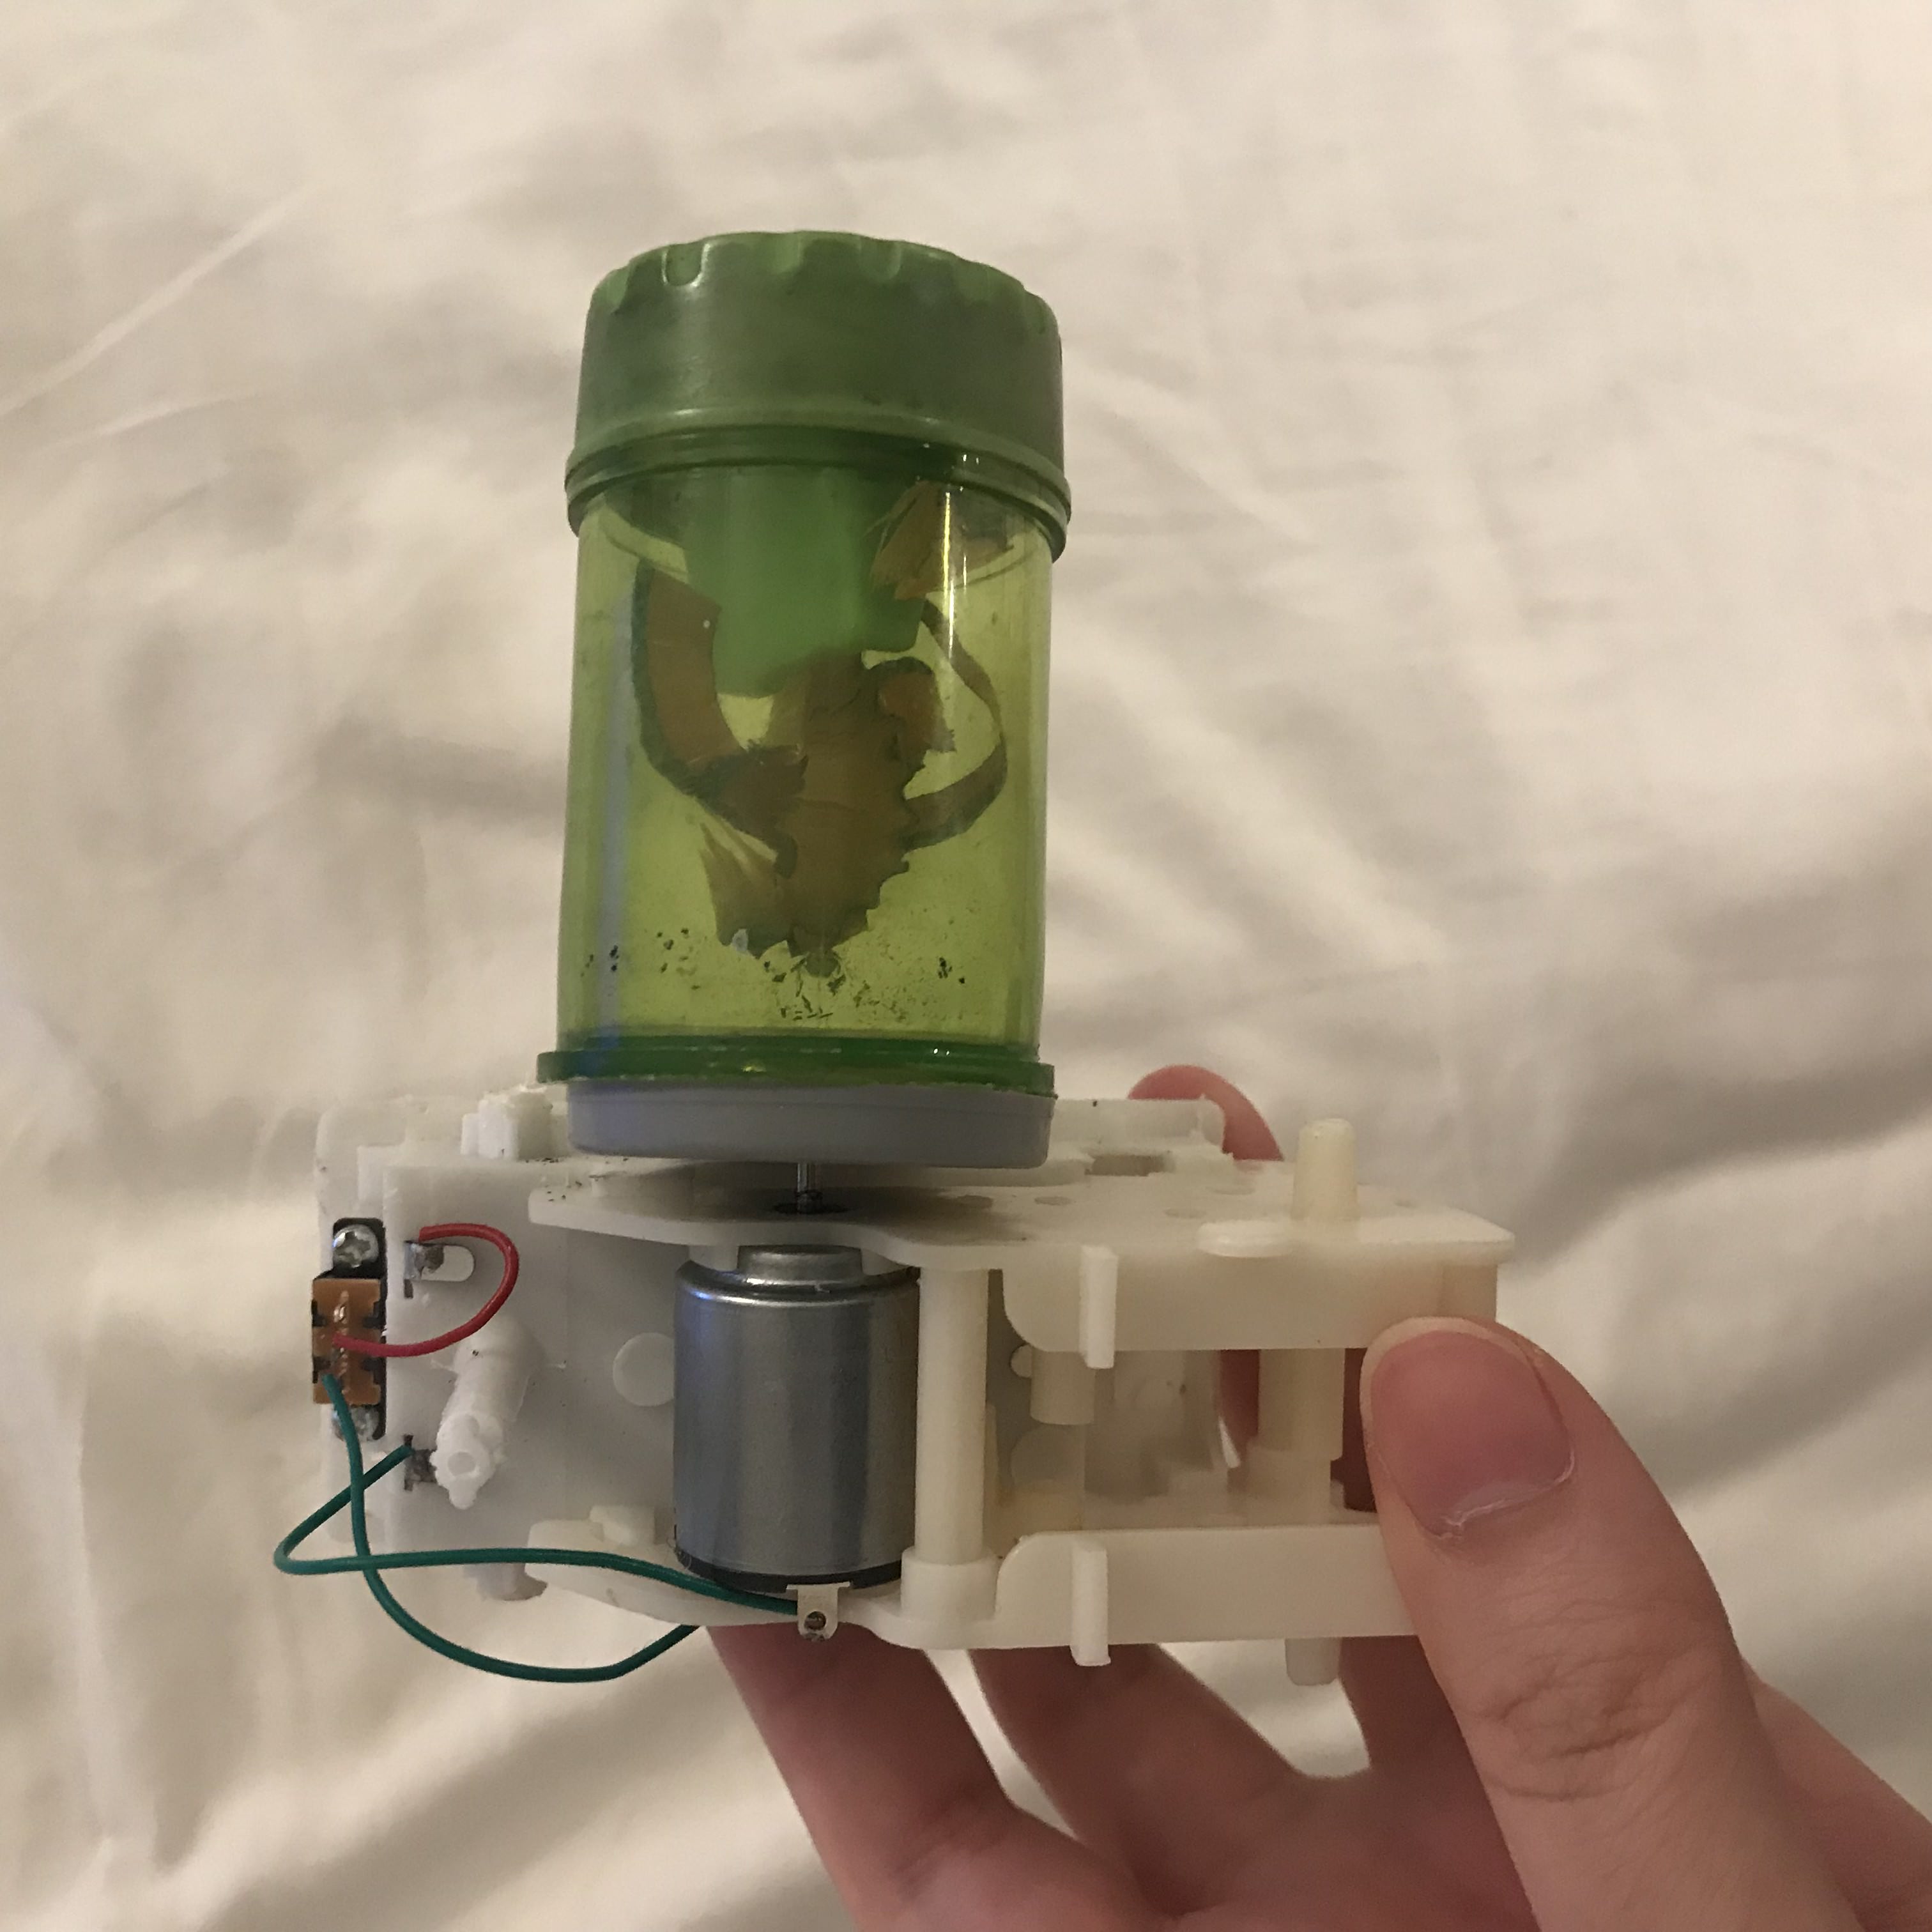
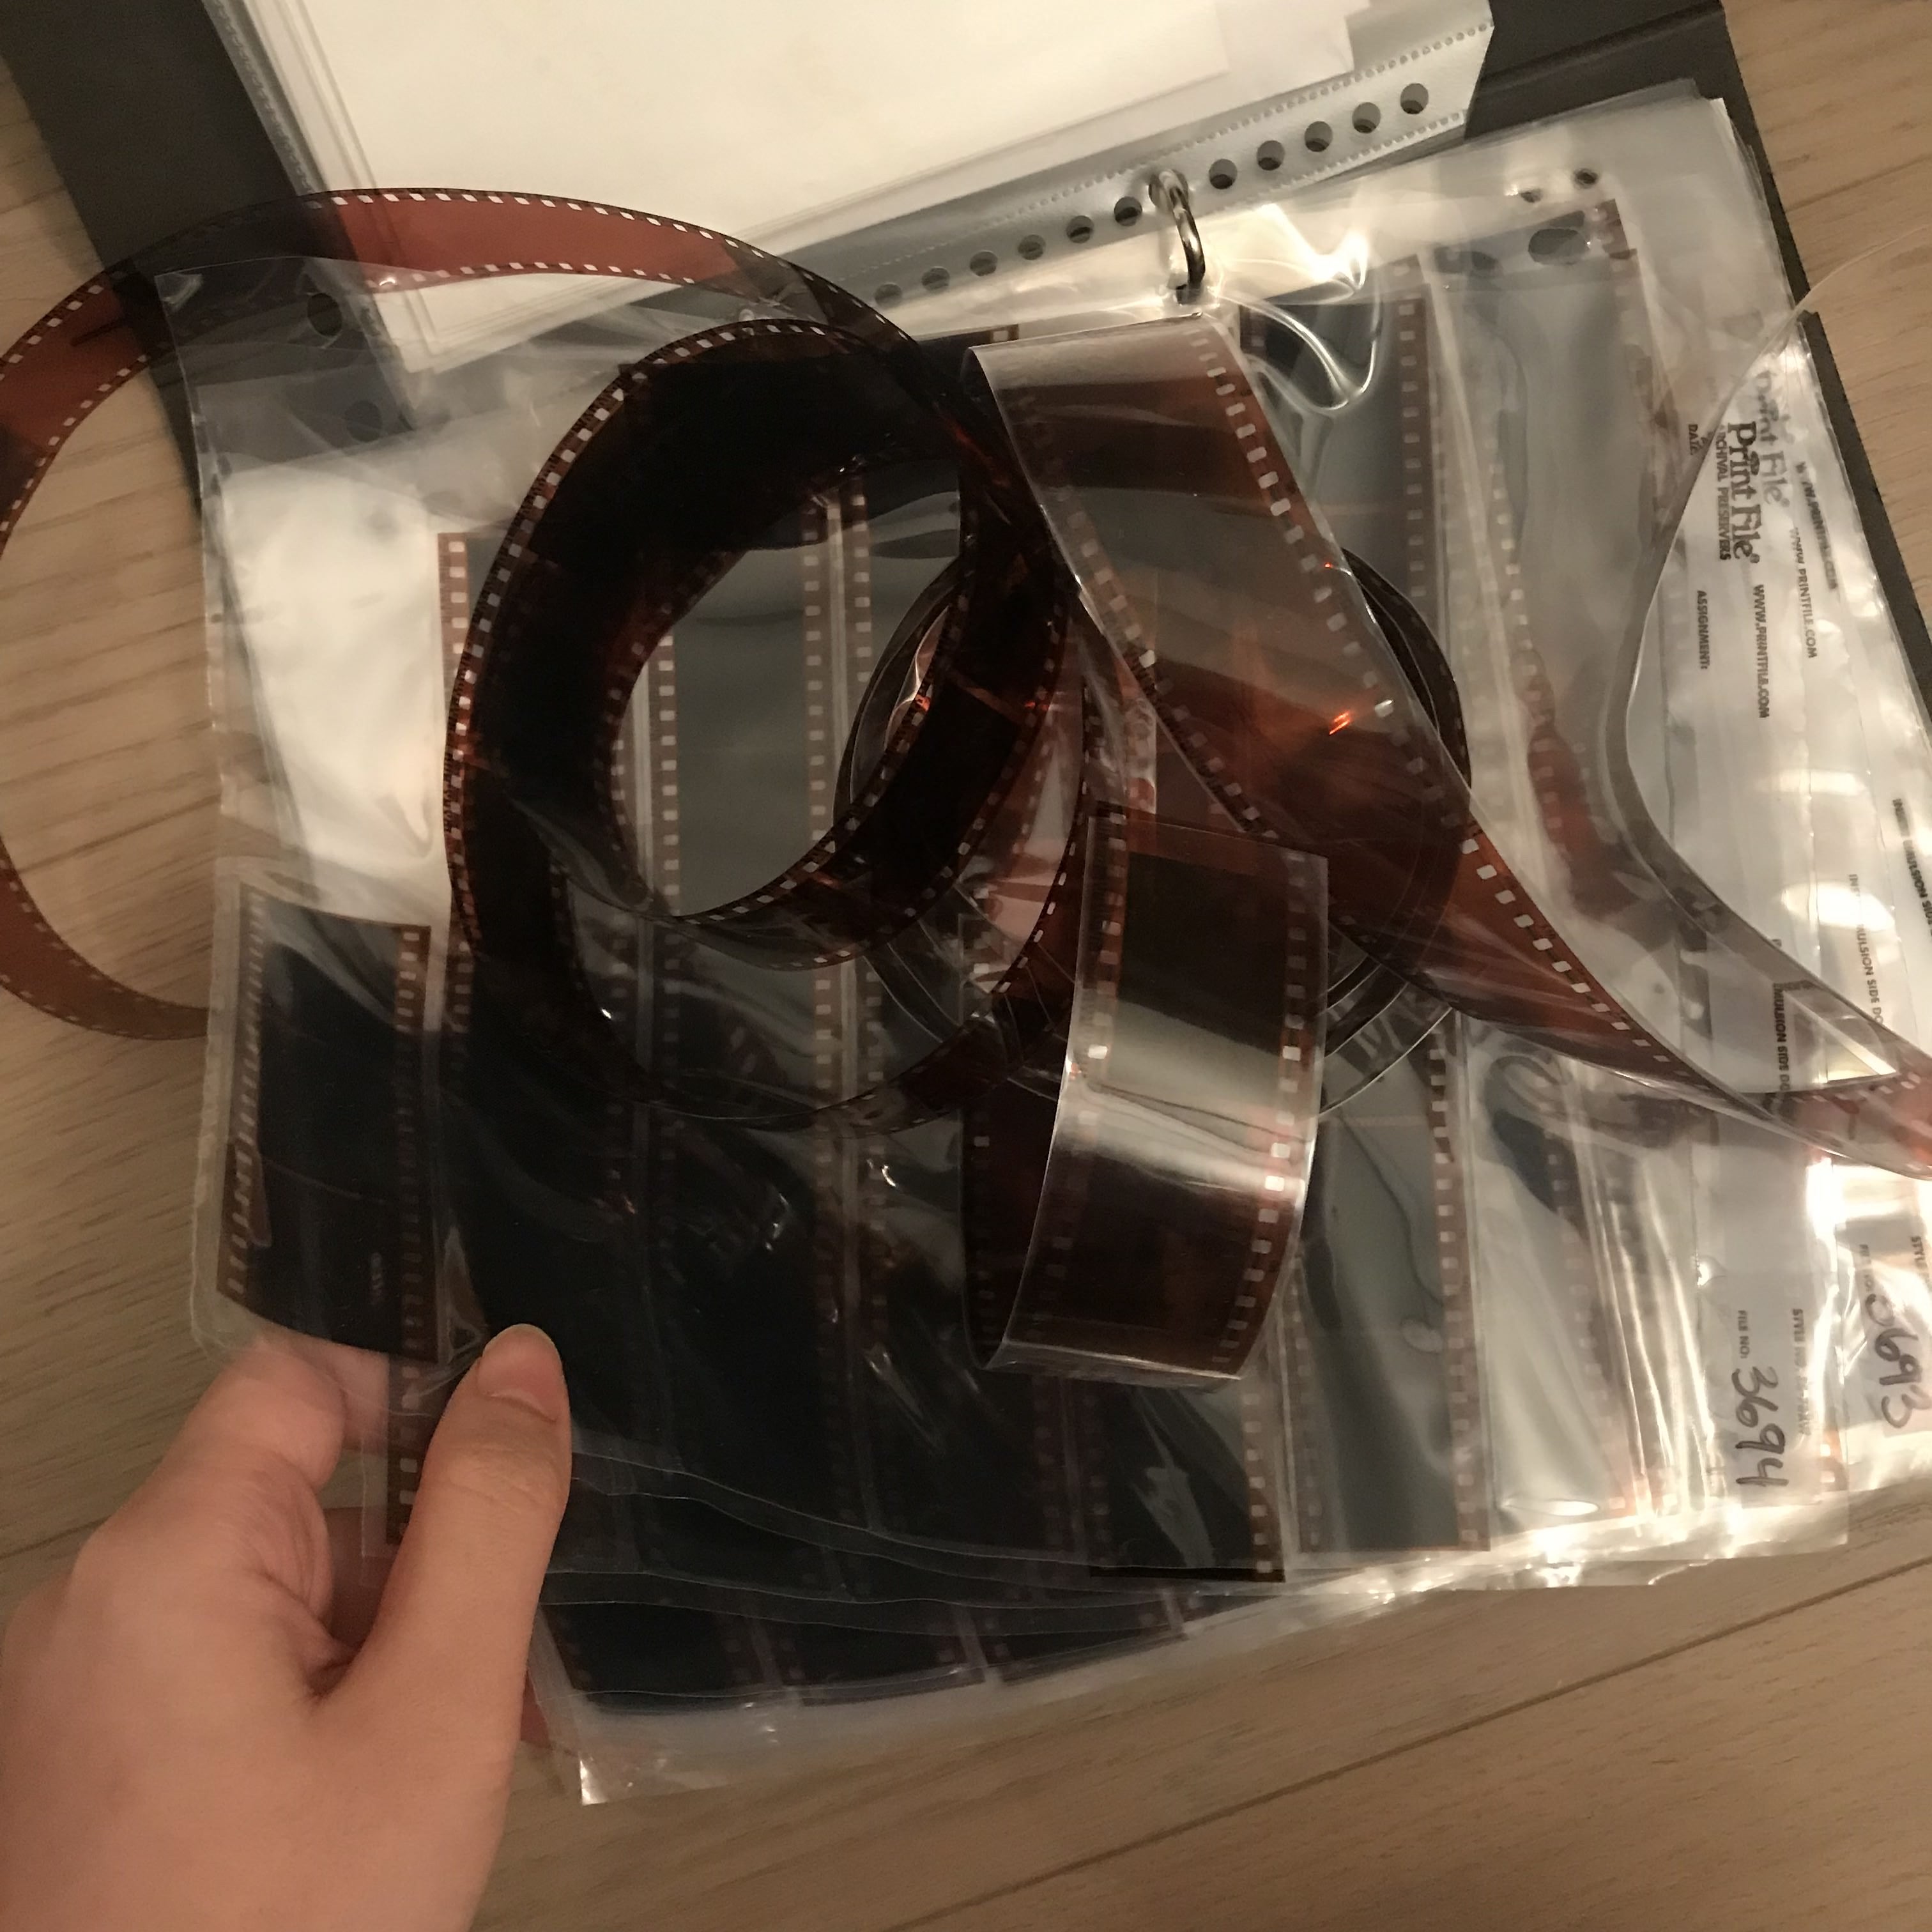
Then, I thought about a thing that I want it to be turning and requires less energy, and I look at my bookshelf and found my film folder, thinking why not a machine that can help me to roll my film negatives:
One thing about film that I want to use in this project is also because there's holes on the side of the negatives that can be held by teeth (which are also how it works in the camera), so to be cohesive with th concept, I made two teeth on to my film negative case:
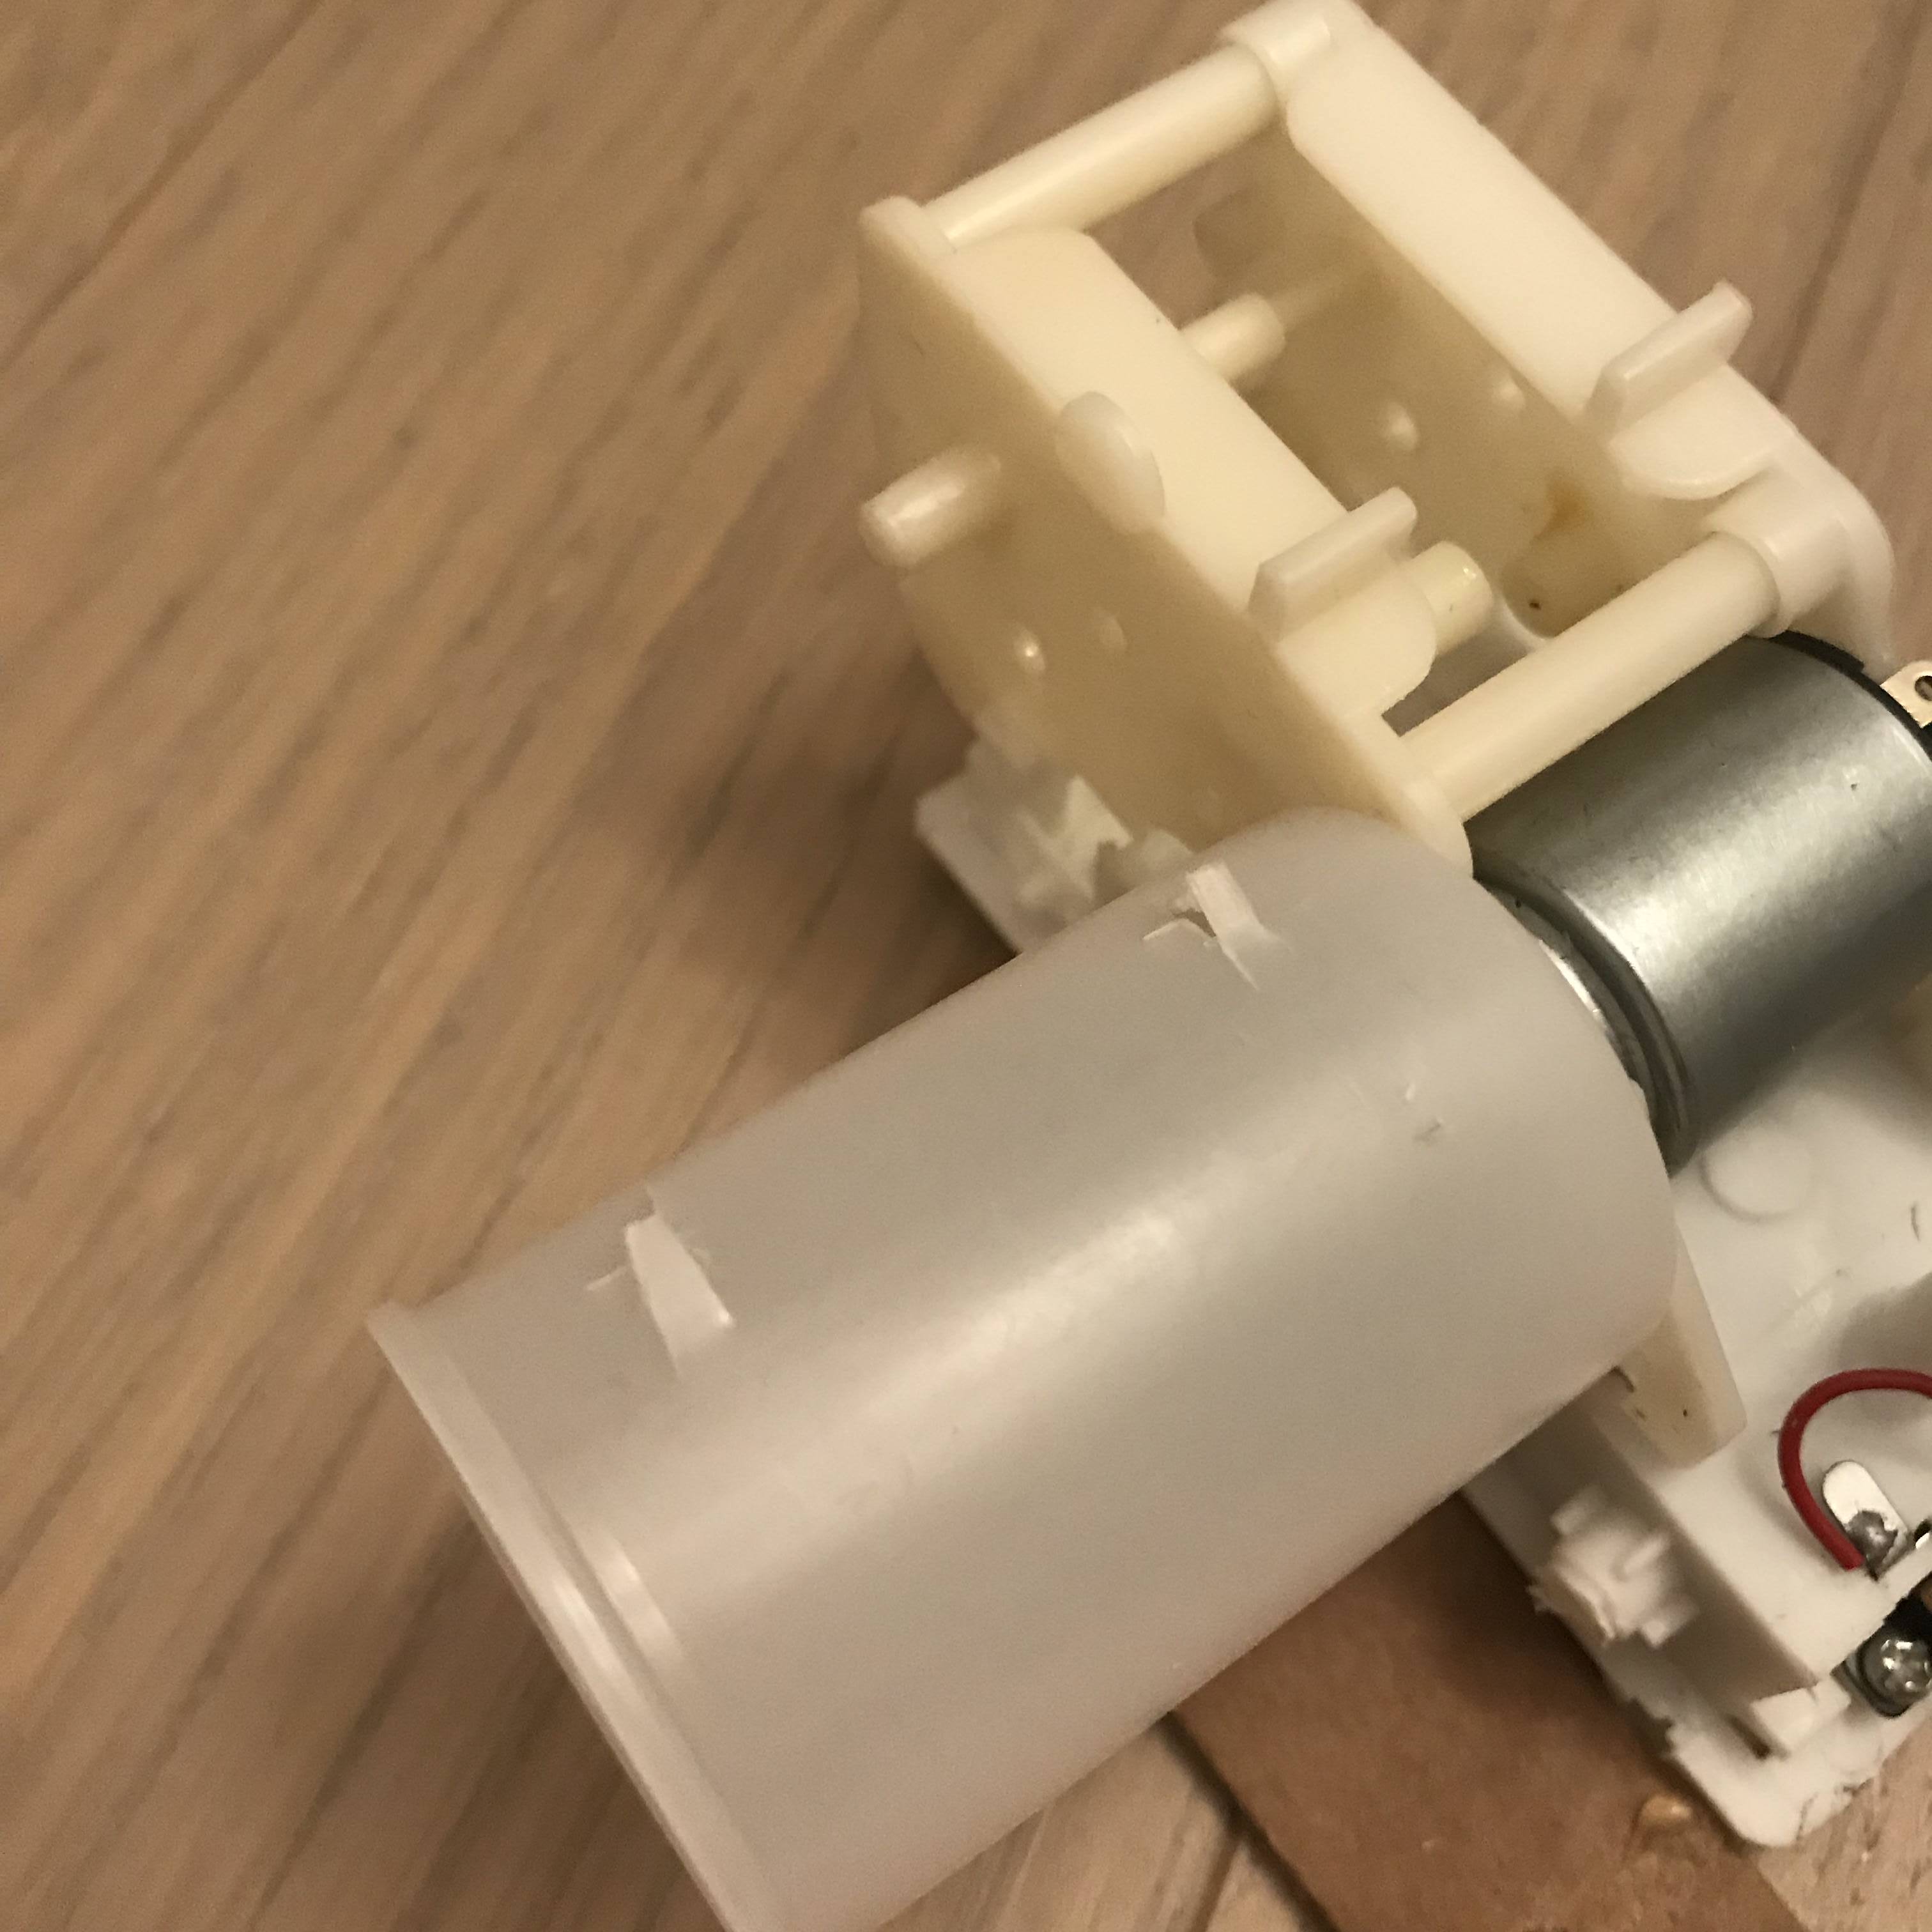
And then, I made some supports to hold the negative: one in the front to hold it paralle to the roller, and one at the back to tighten the rolled negative.
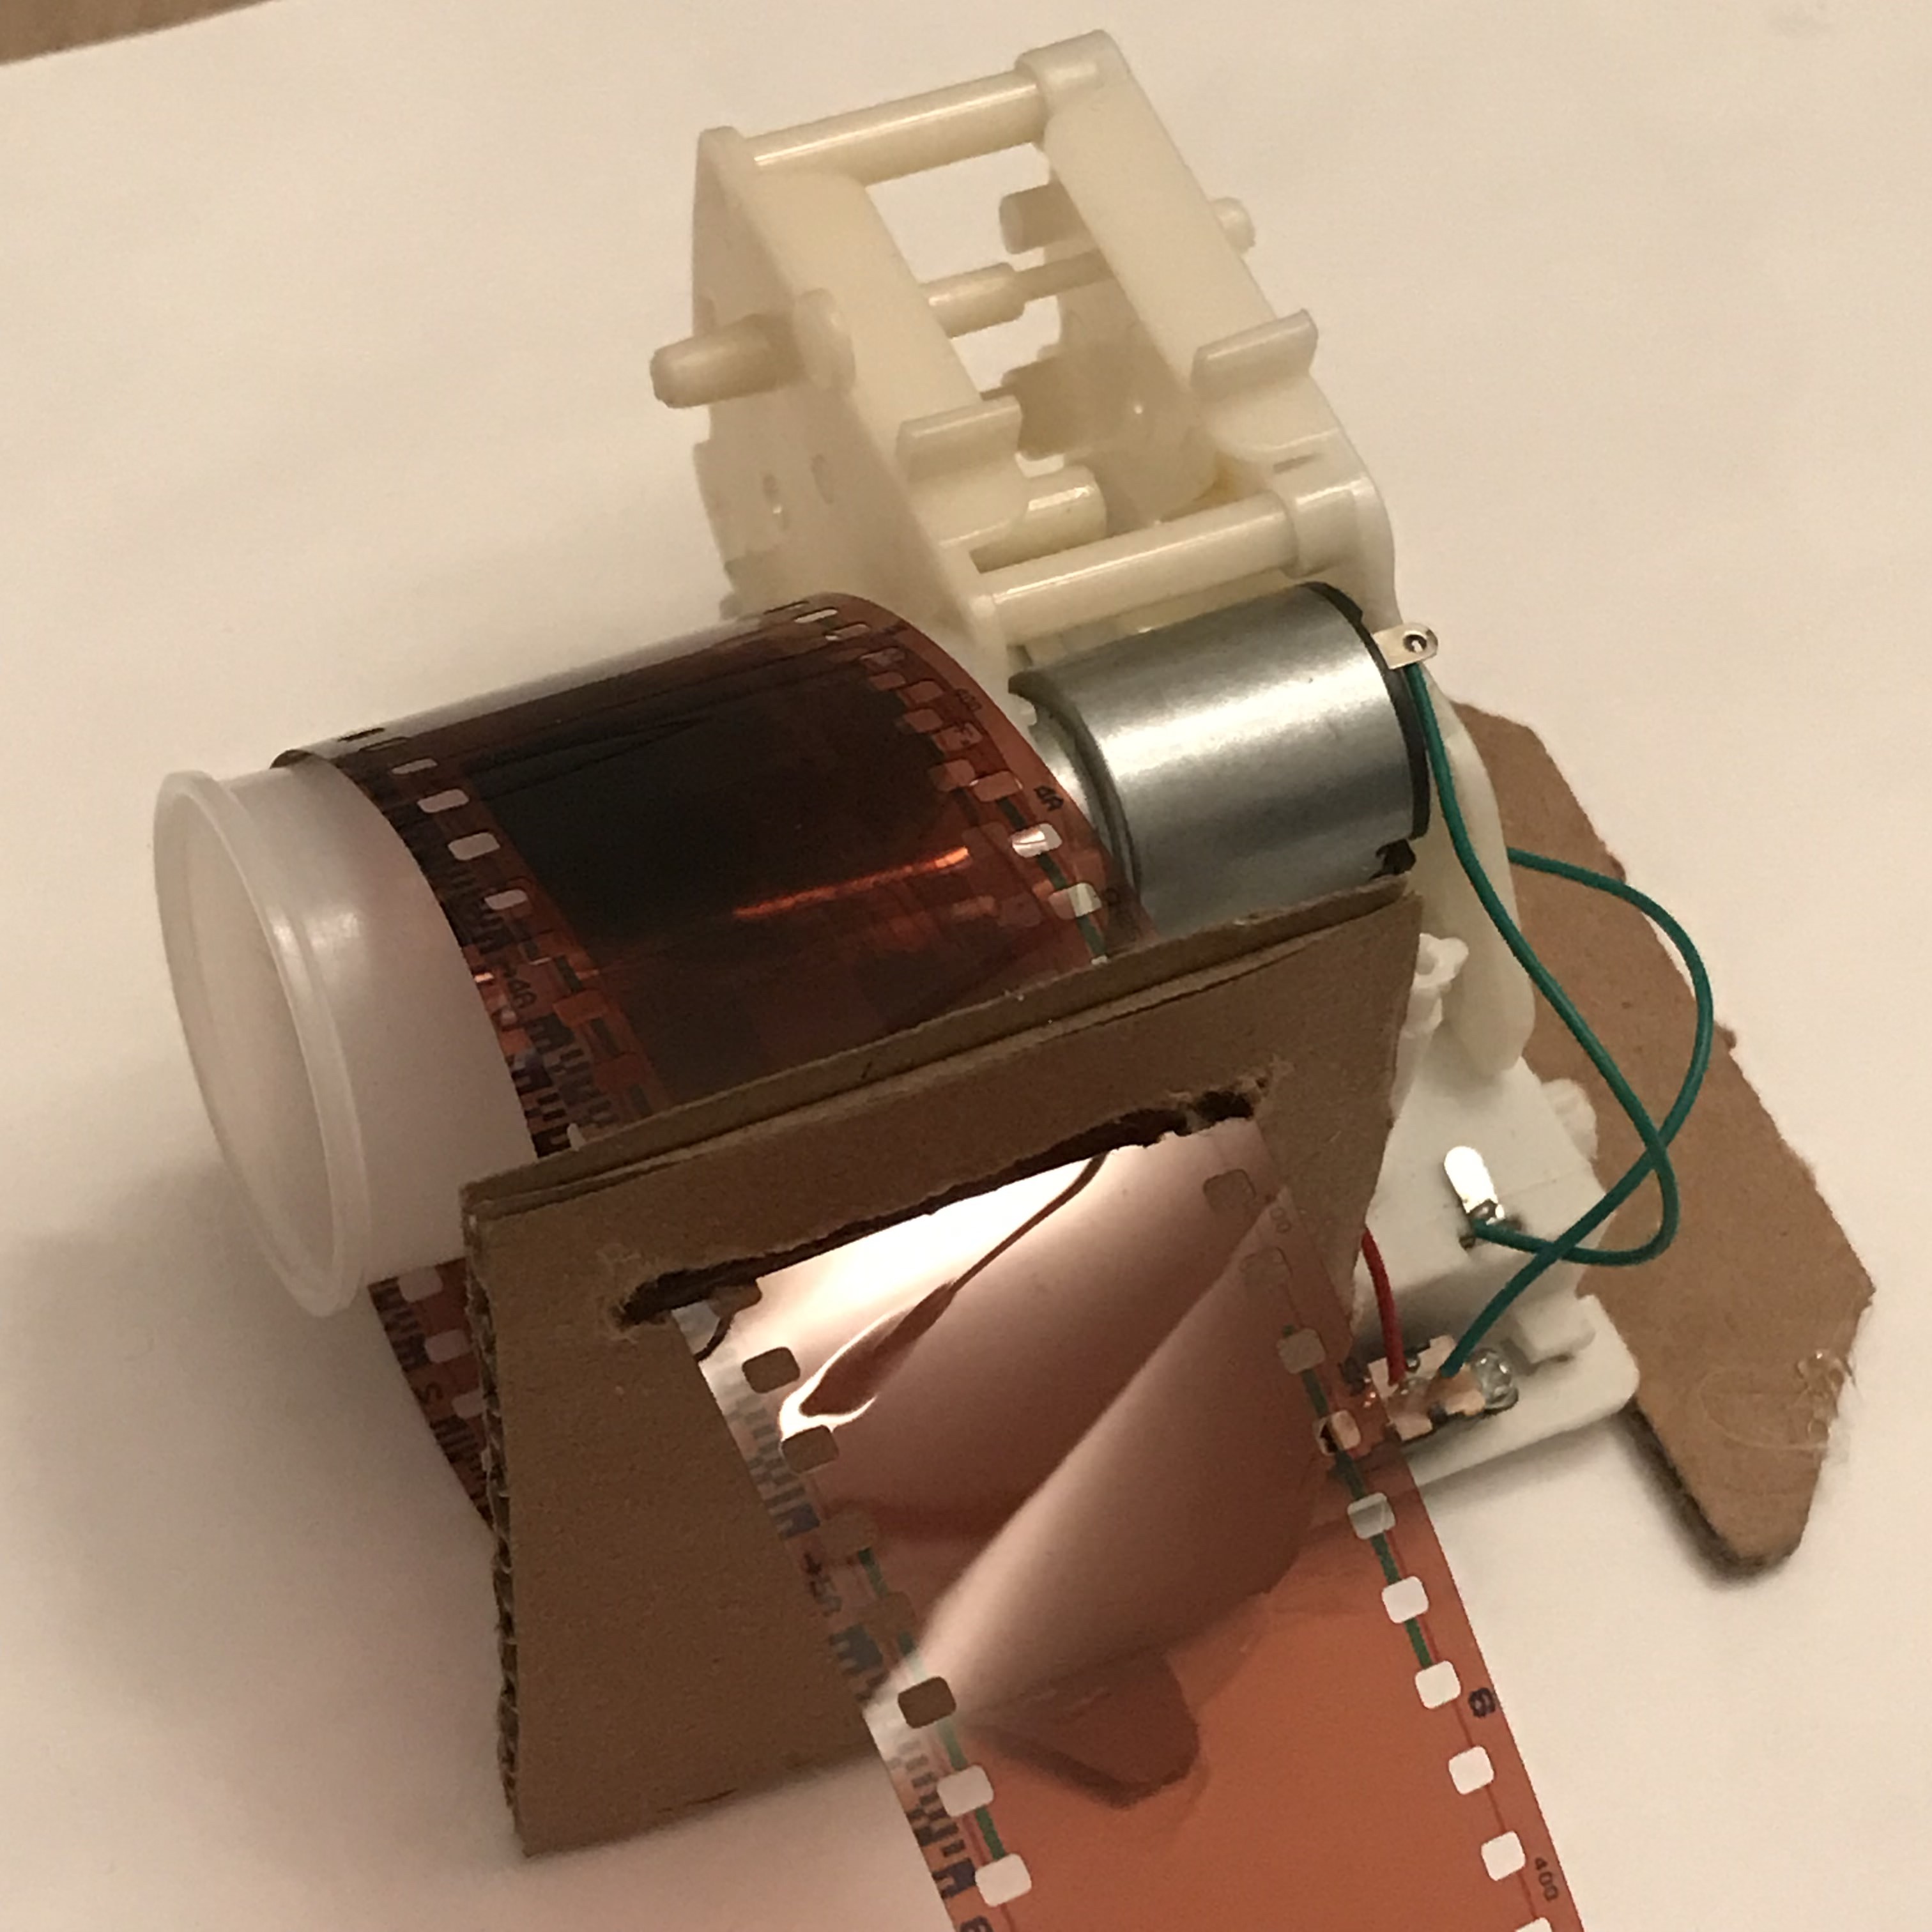
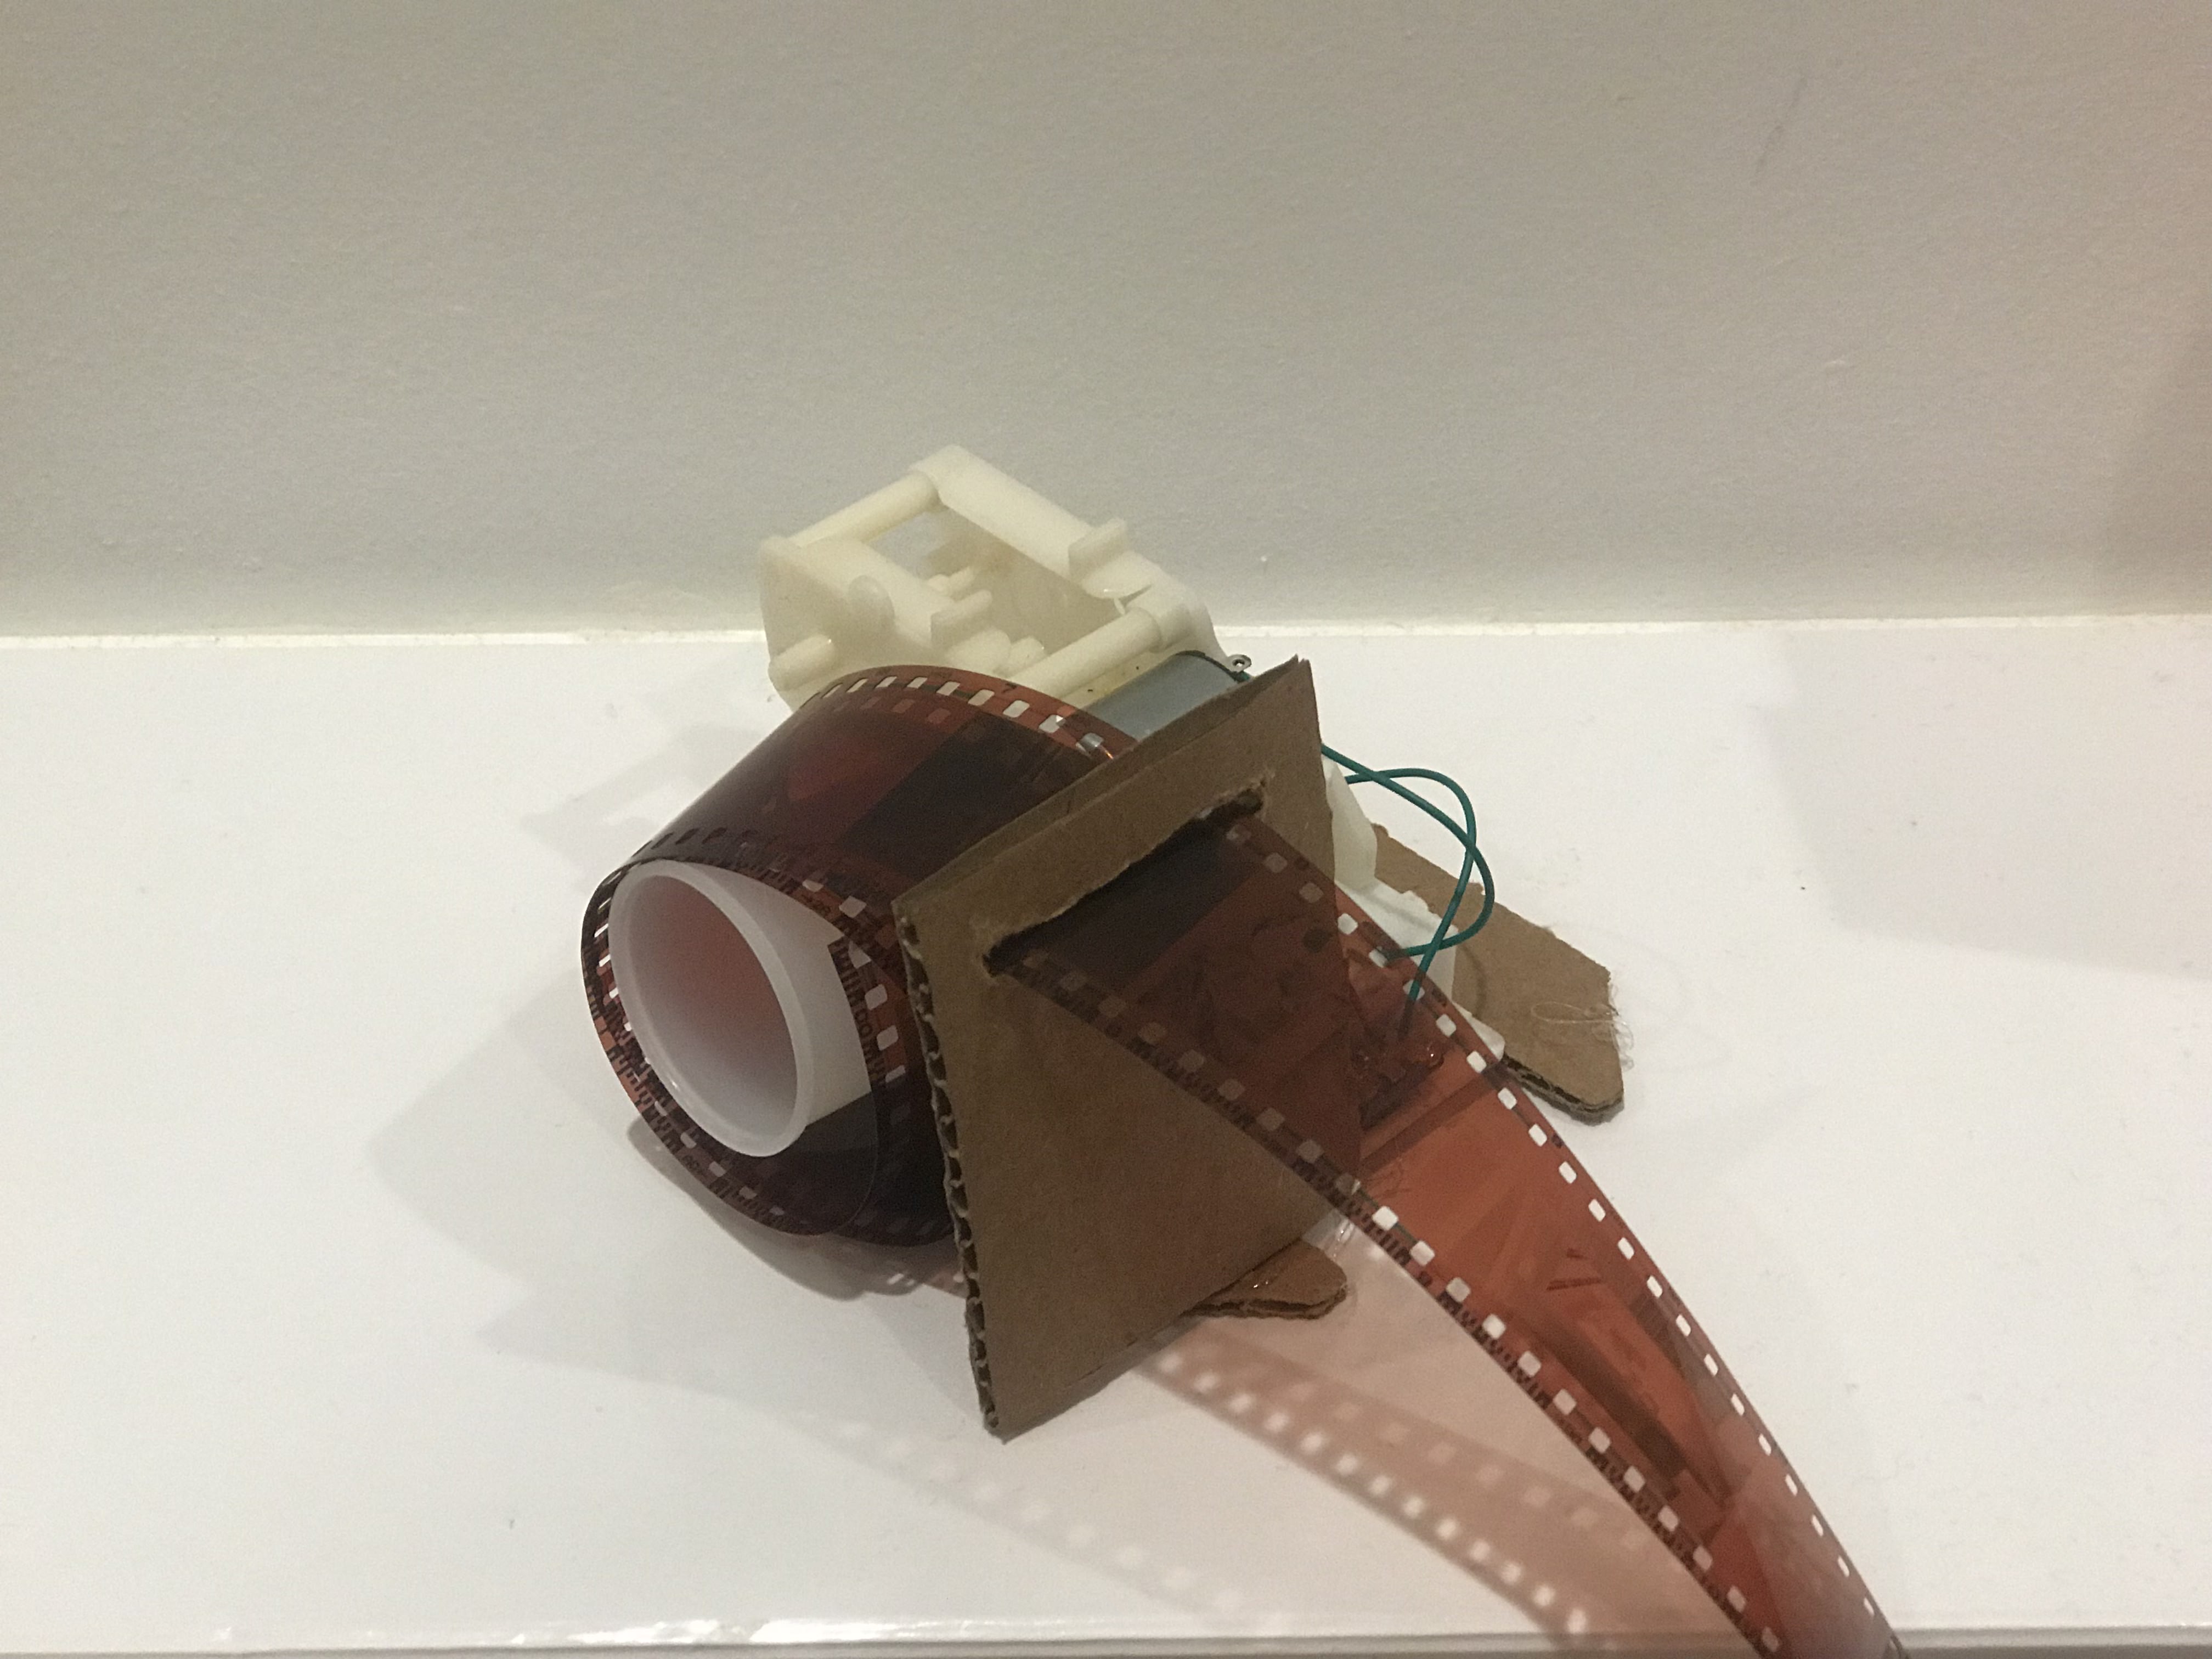
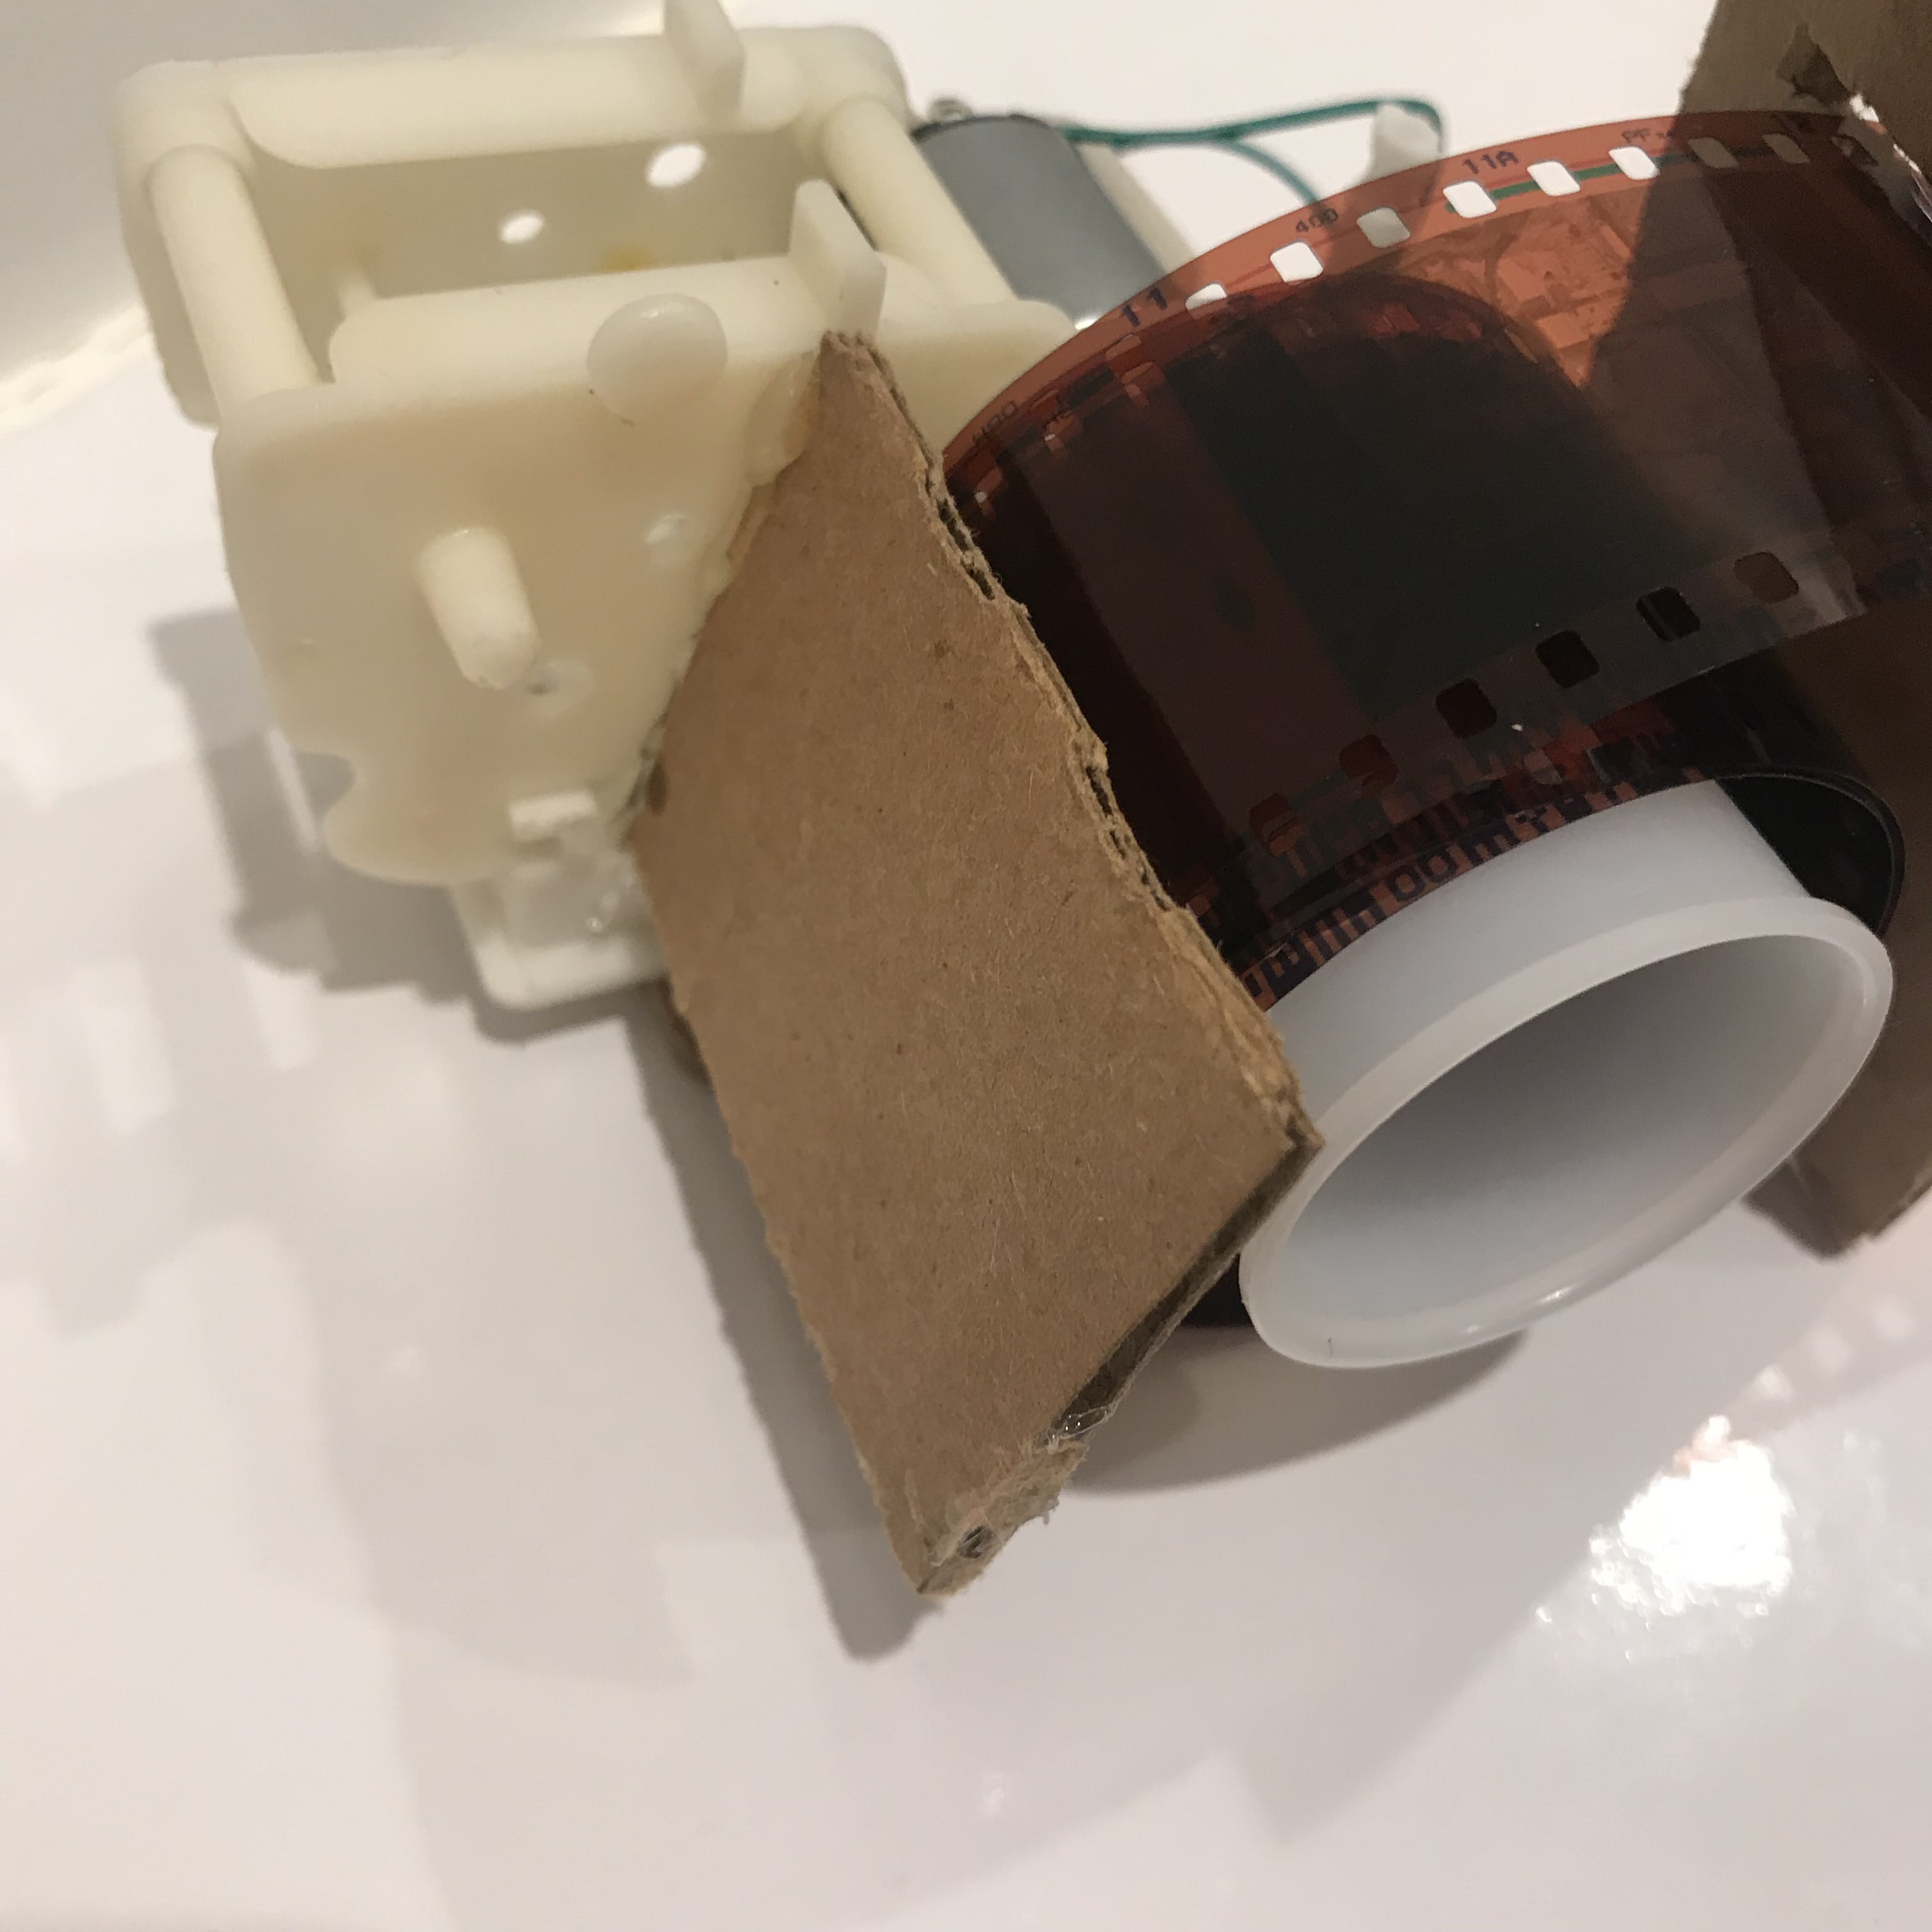
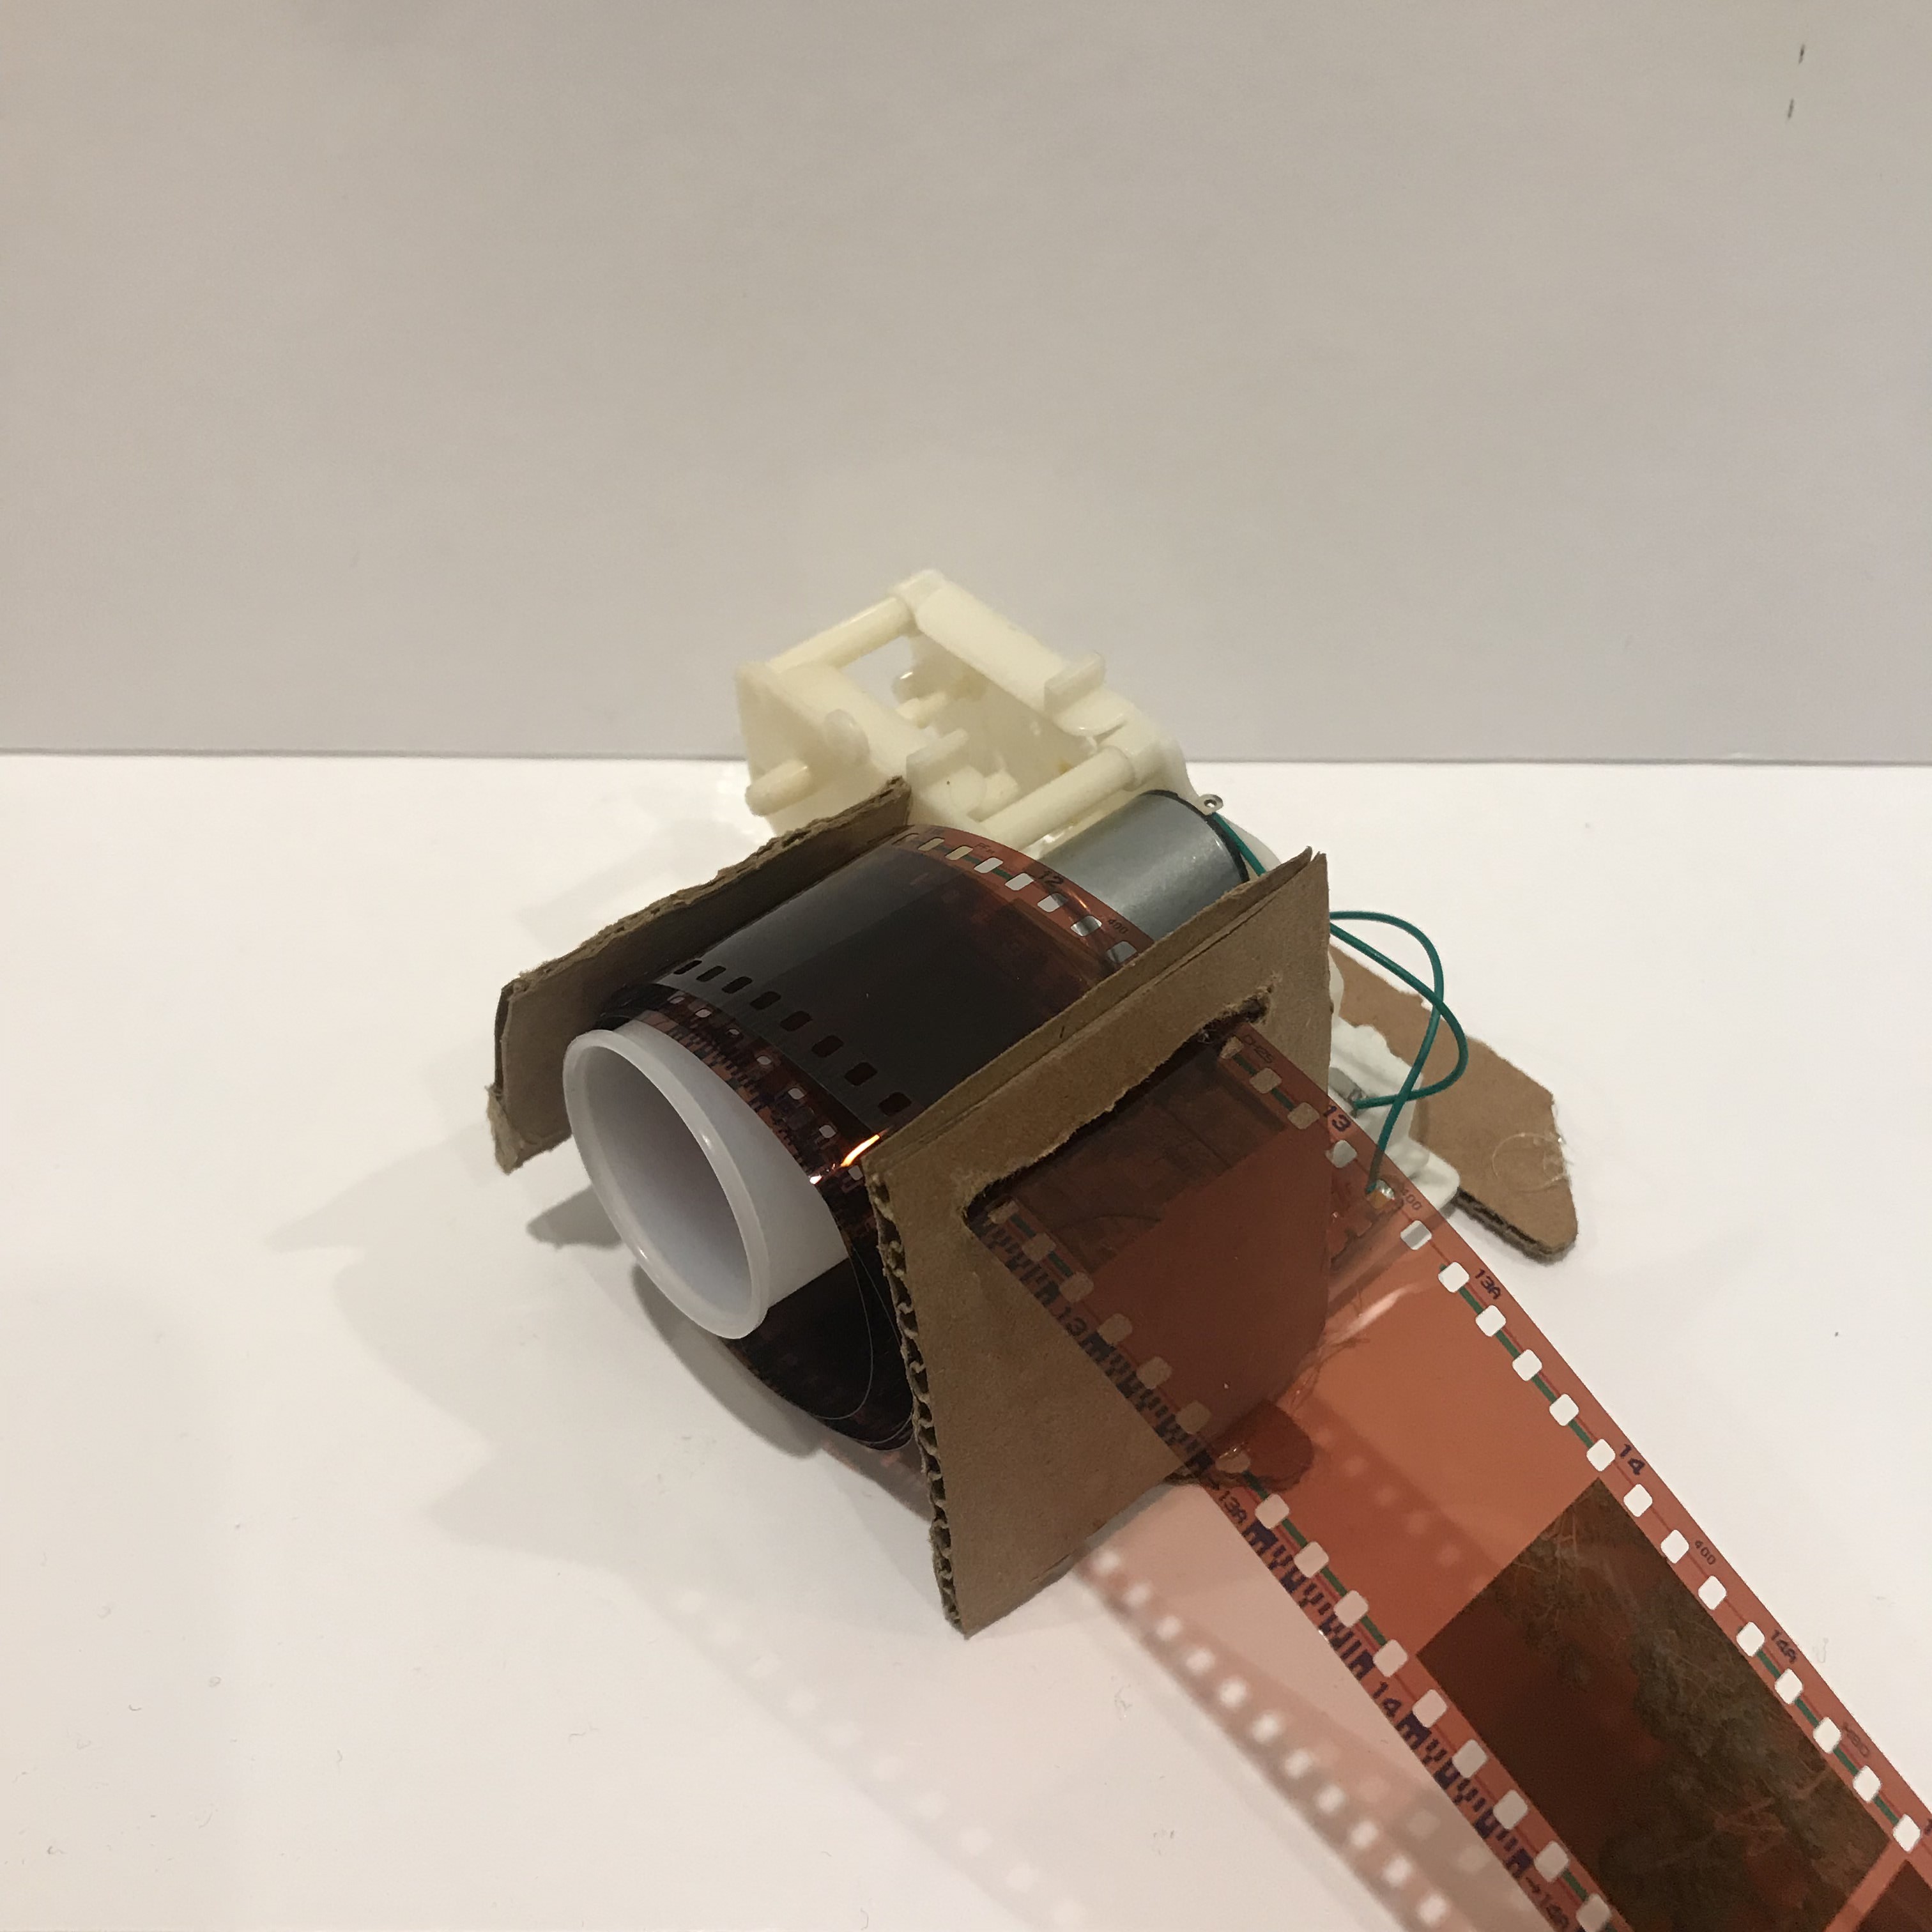
And here's the video of it moving, yet, the negative is still to heavy for the motor that it doesn't turn as I espected...
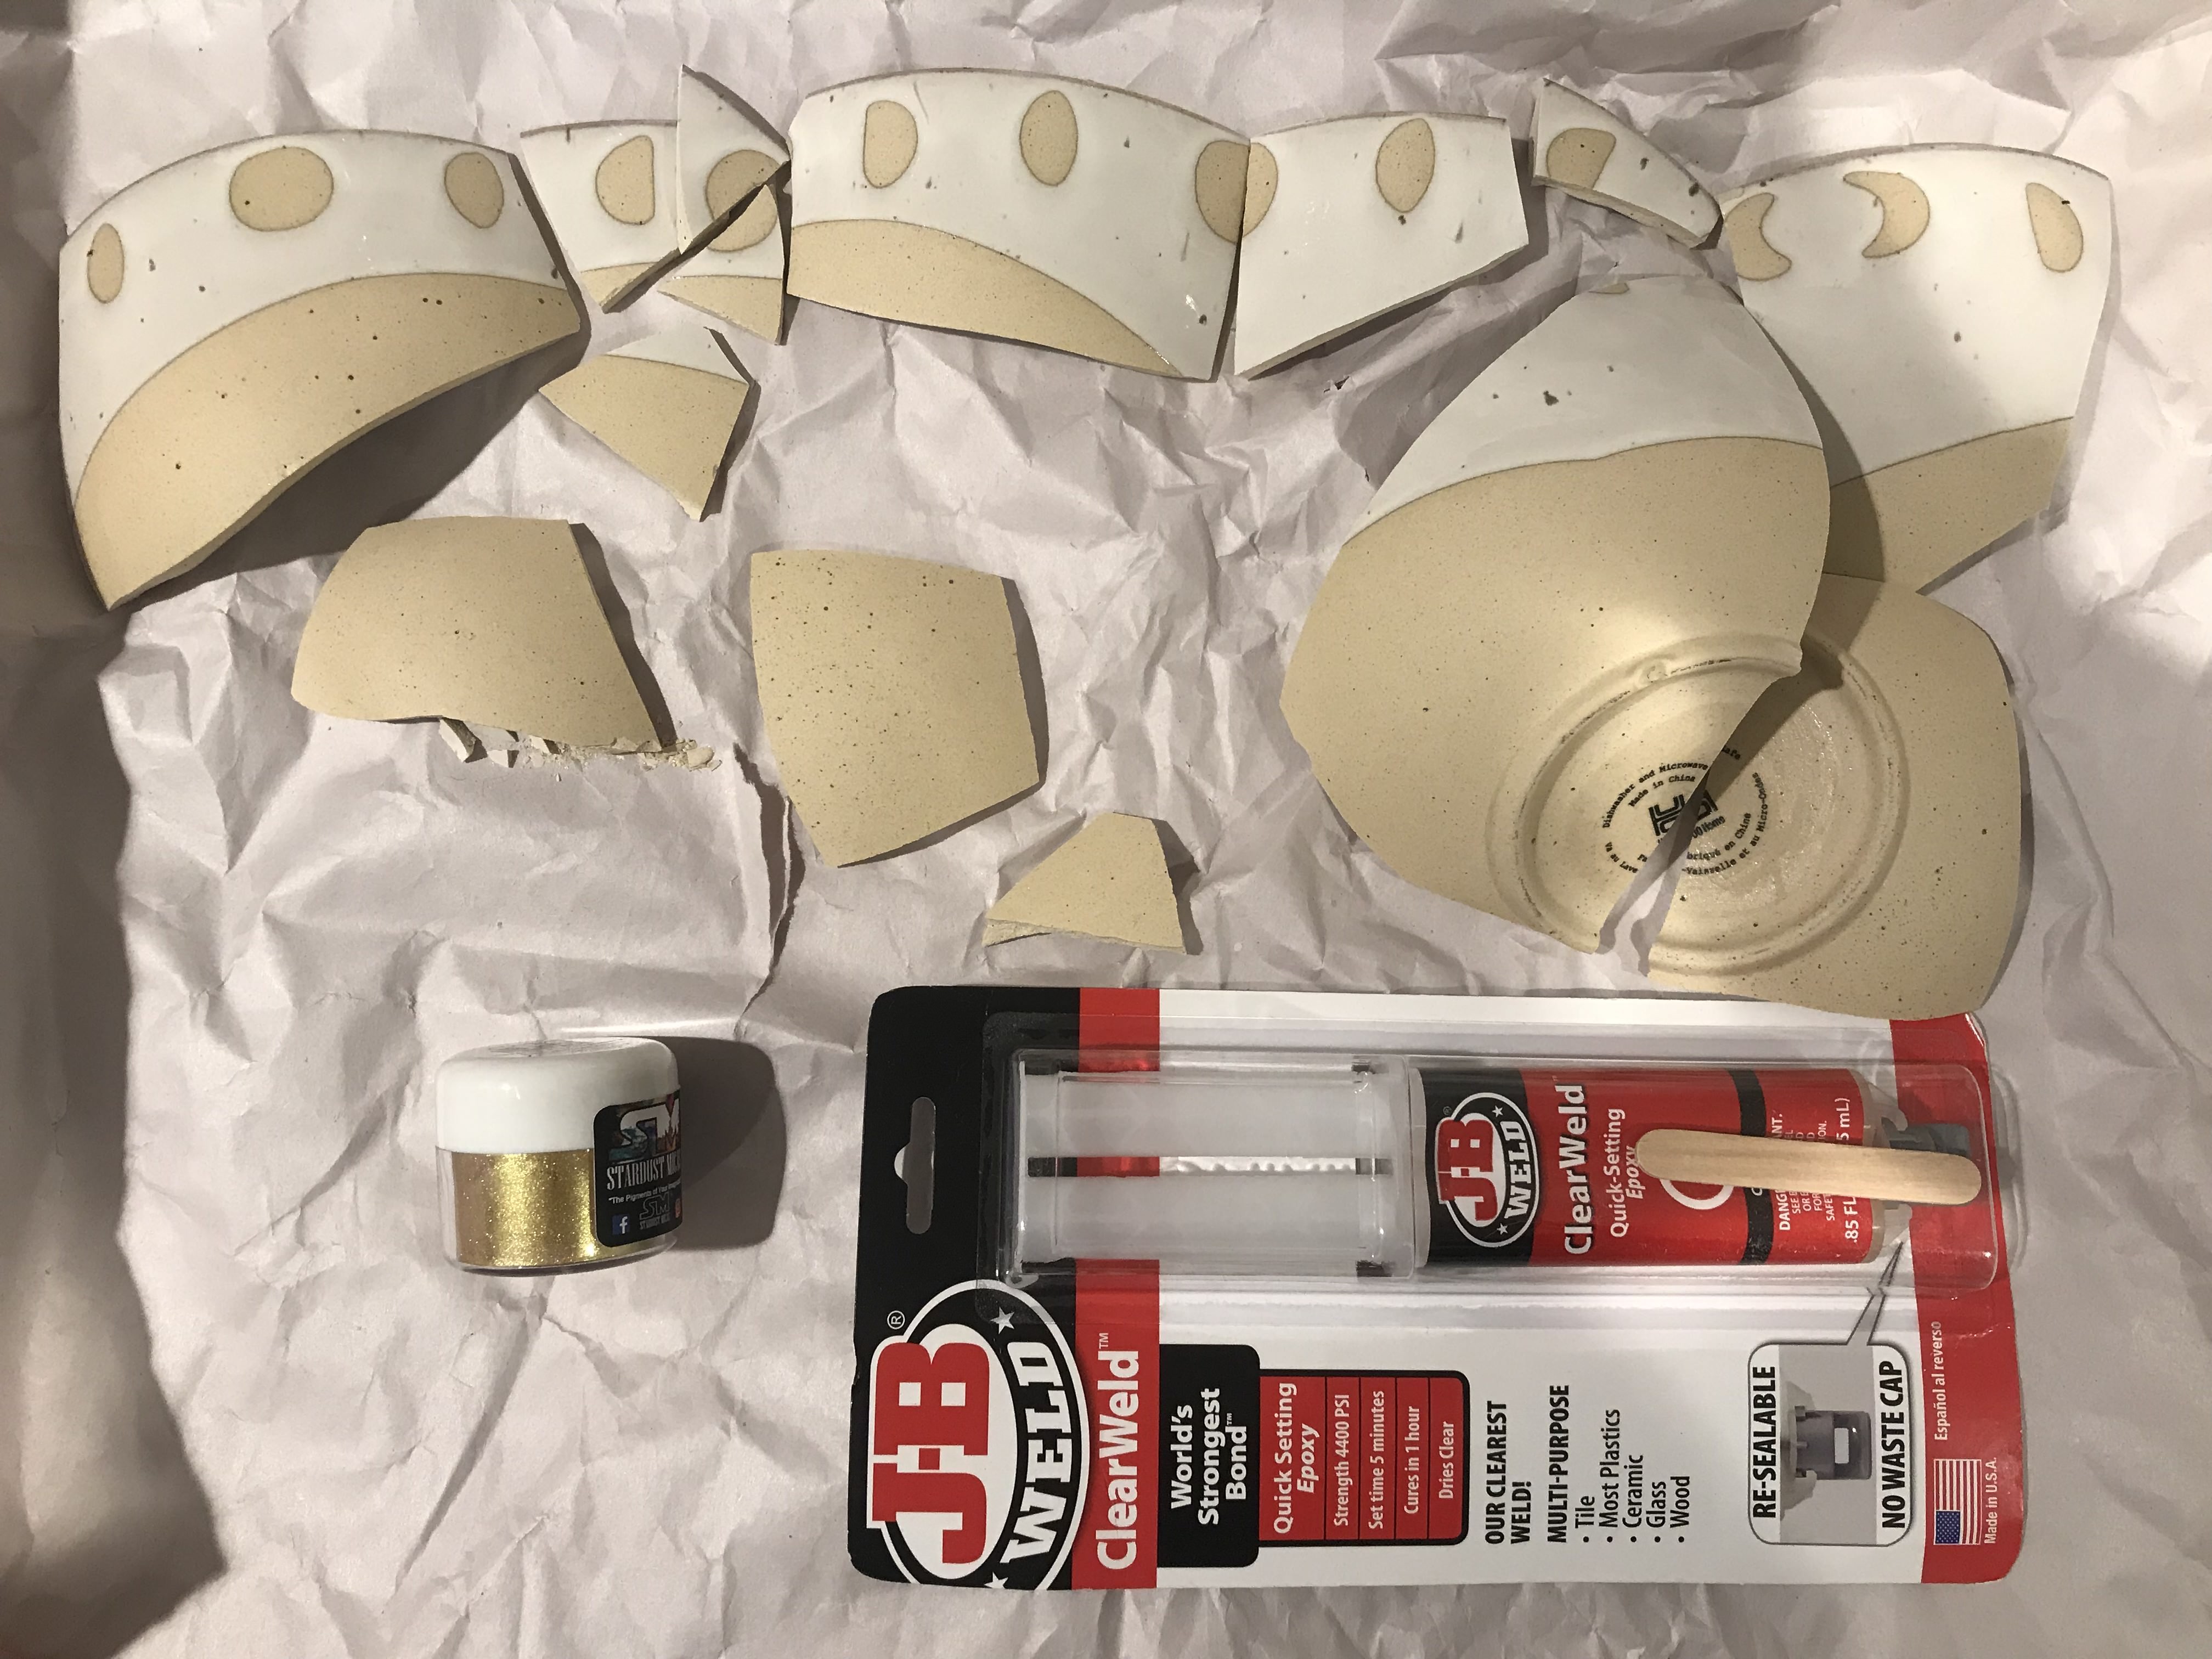
Pottery Repair - Kintsugi
So... This is a sad story... This happened the week that I was doing my two materials project: I received my birthday present from my friend--a cute clay bowl--and I accidentally dropped it, in front of her, while I was rushing to the bus... And I went back home search for pottery repair turtorial on Kintsugi--a way of decorating the 'broken parts' which also symblolizes 'rebirth'. And found out it could be a great two material project by just including another material such as wood... But never trust amazon... I waited to see whether the copper sheet came eailer or the materials of kintsugi came eailer, and the one arrived eailer will be my project. (Both came 2 days later than promised delivered date...) So I decided to just make this a side personal project with only the purpose of repairing it instead of combining two materials.I will start sooner this week.
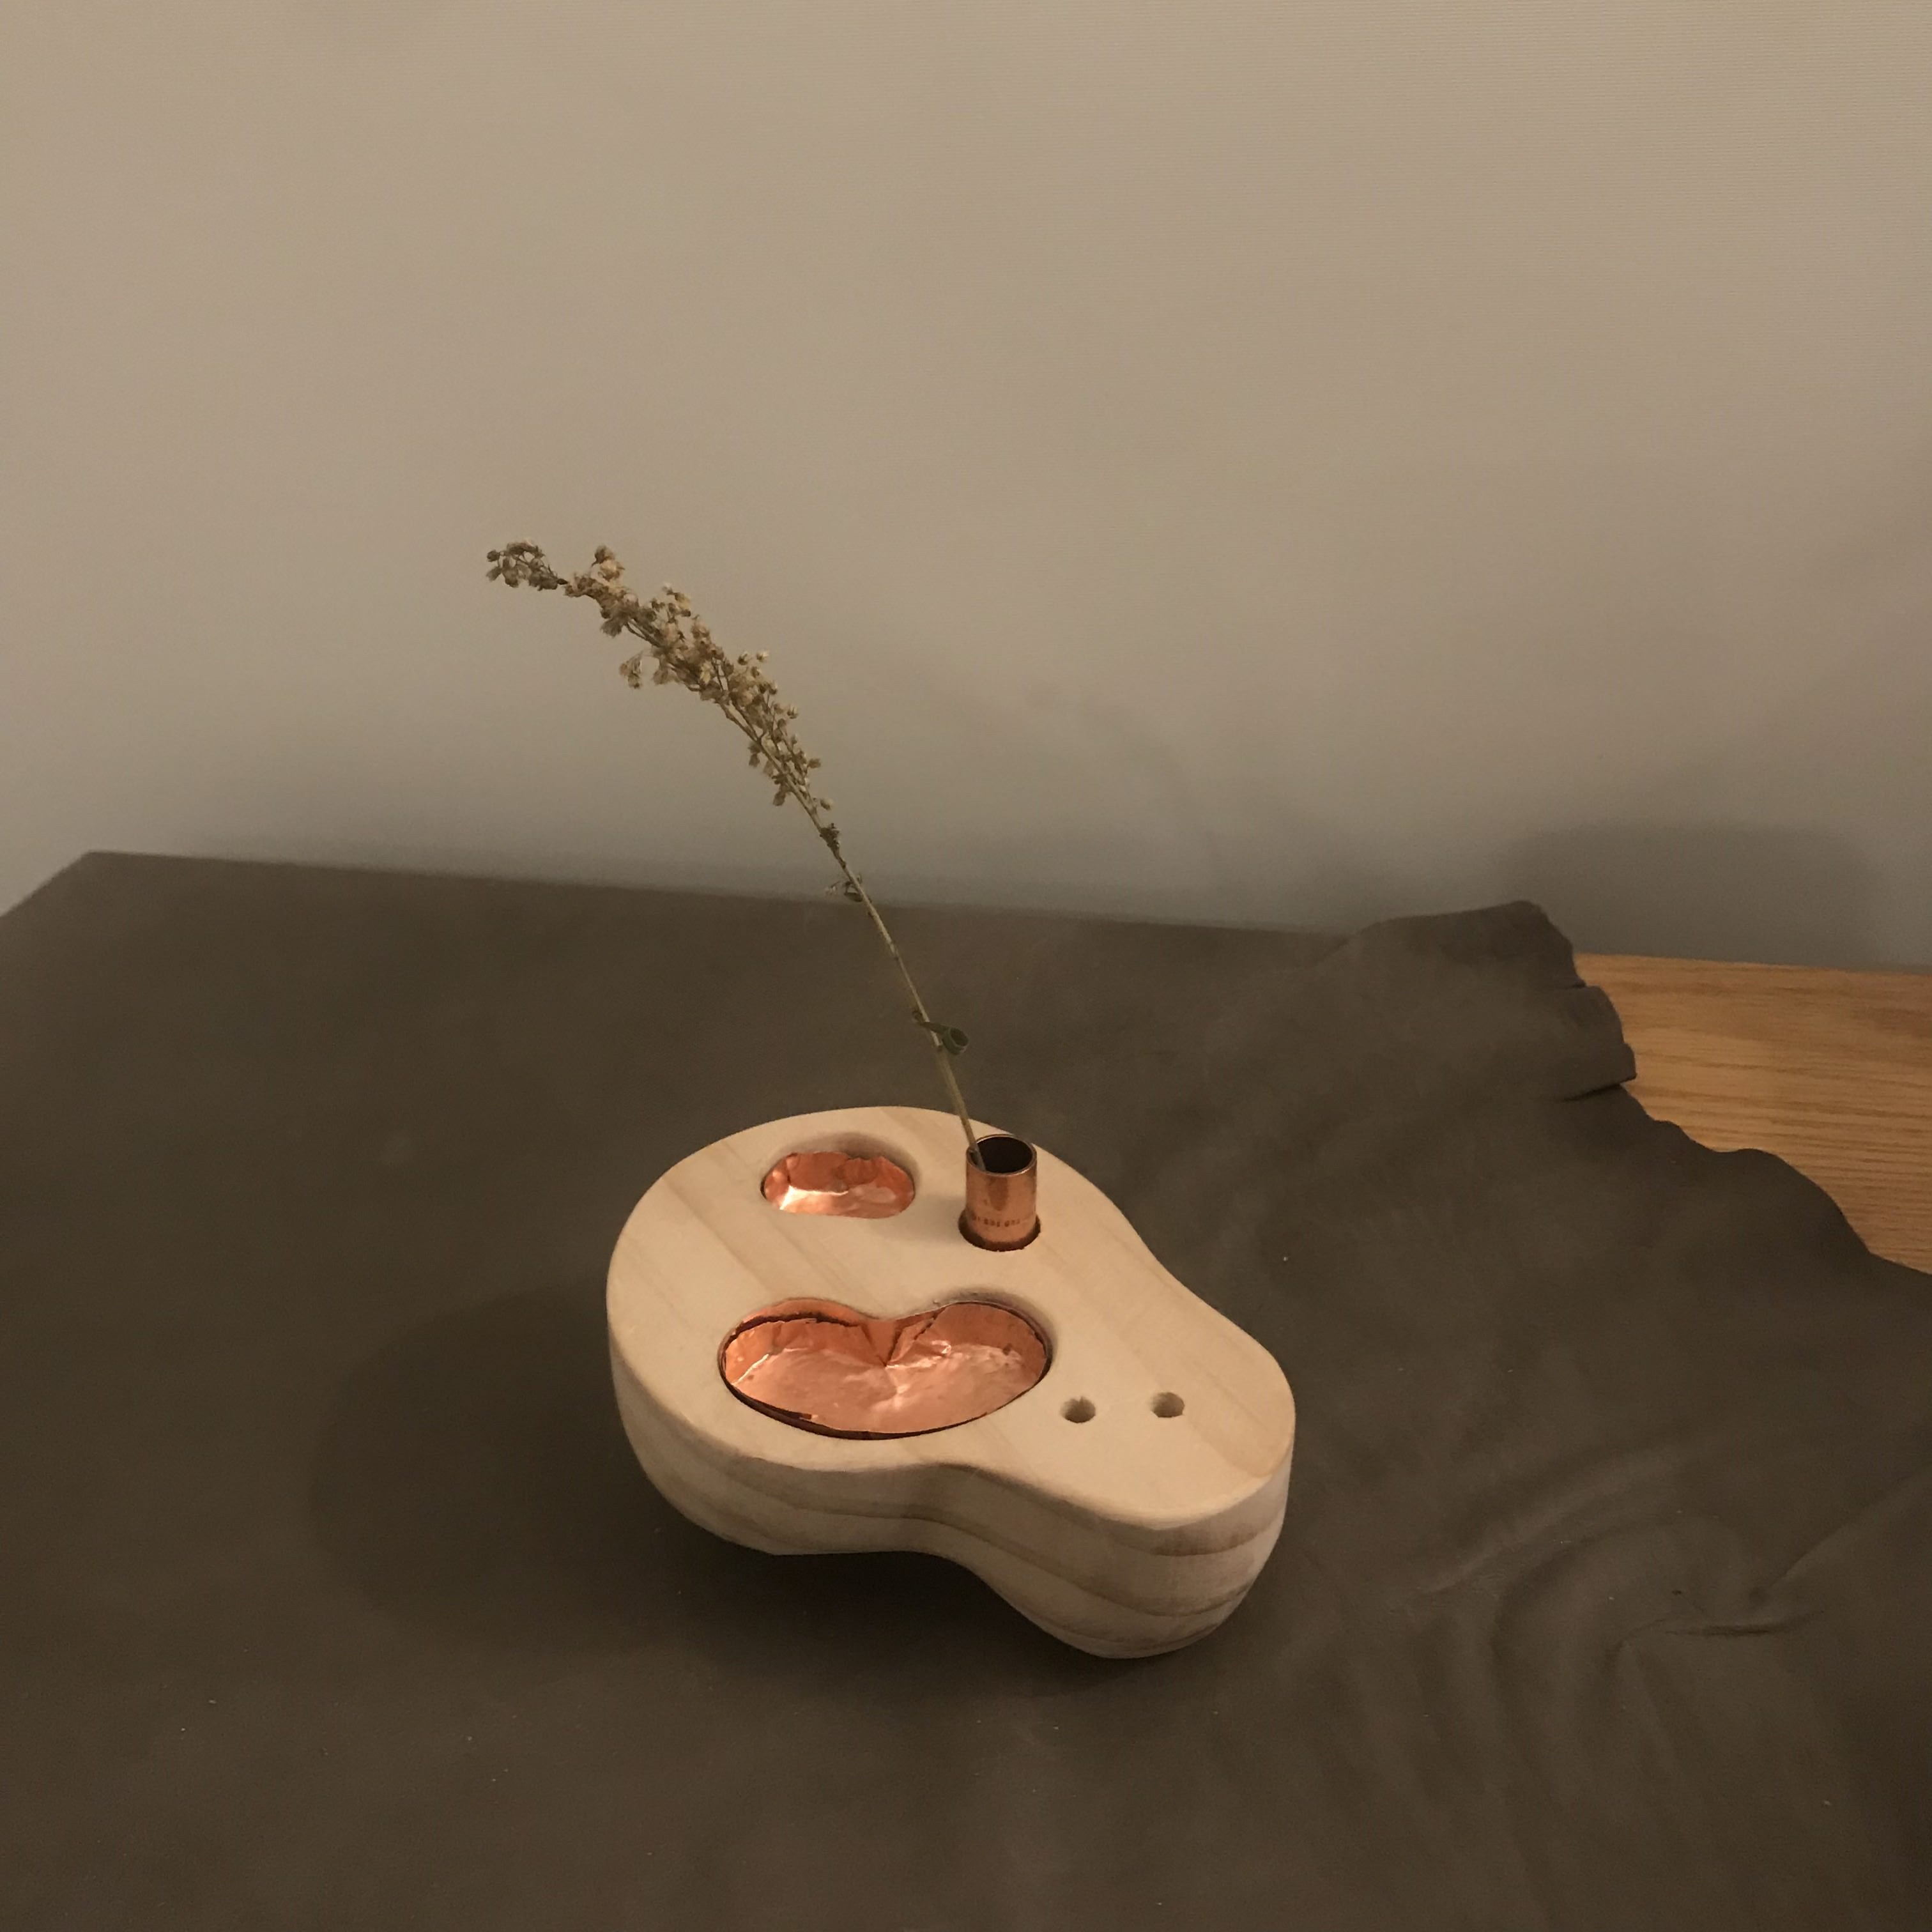
Week 5 - Wooden Jewelery Box / Insense Burner - "Jie" & Another Box
"Jie" - The continuation of "Lei"
For this week's two materials, I always wanted to create a wood version of my lasercut project "Lei", and the other material I chose copper, which is one of the material that I always wanted to try, so the design and materials was decided very fast.However, I do sort of redesigned it based on the new materials. Instead of a small drawer that you can remove the tray, I just made the copper stay loose and have a solid wooden base.
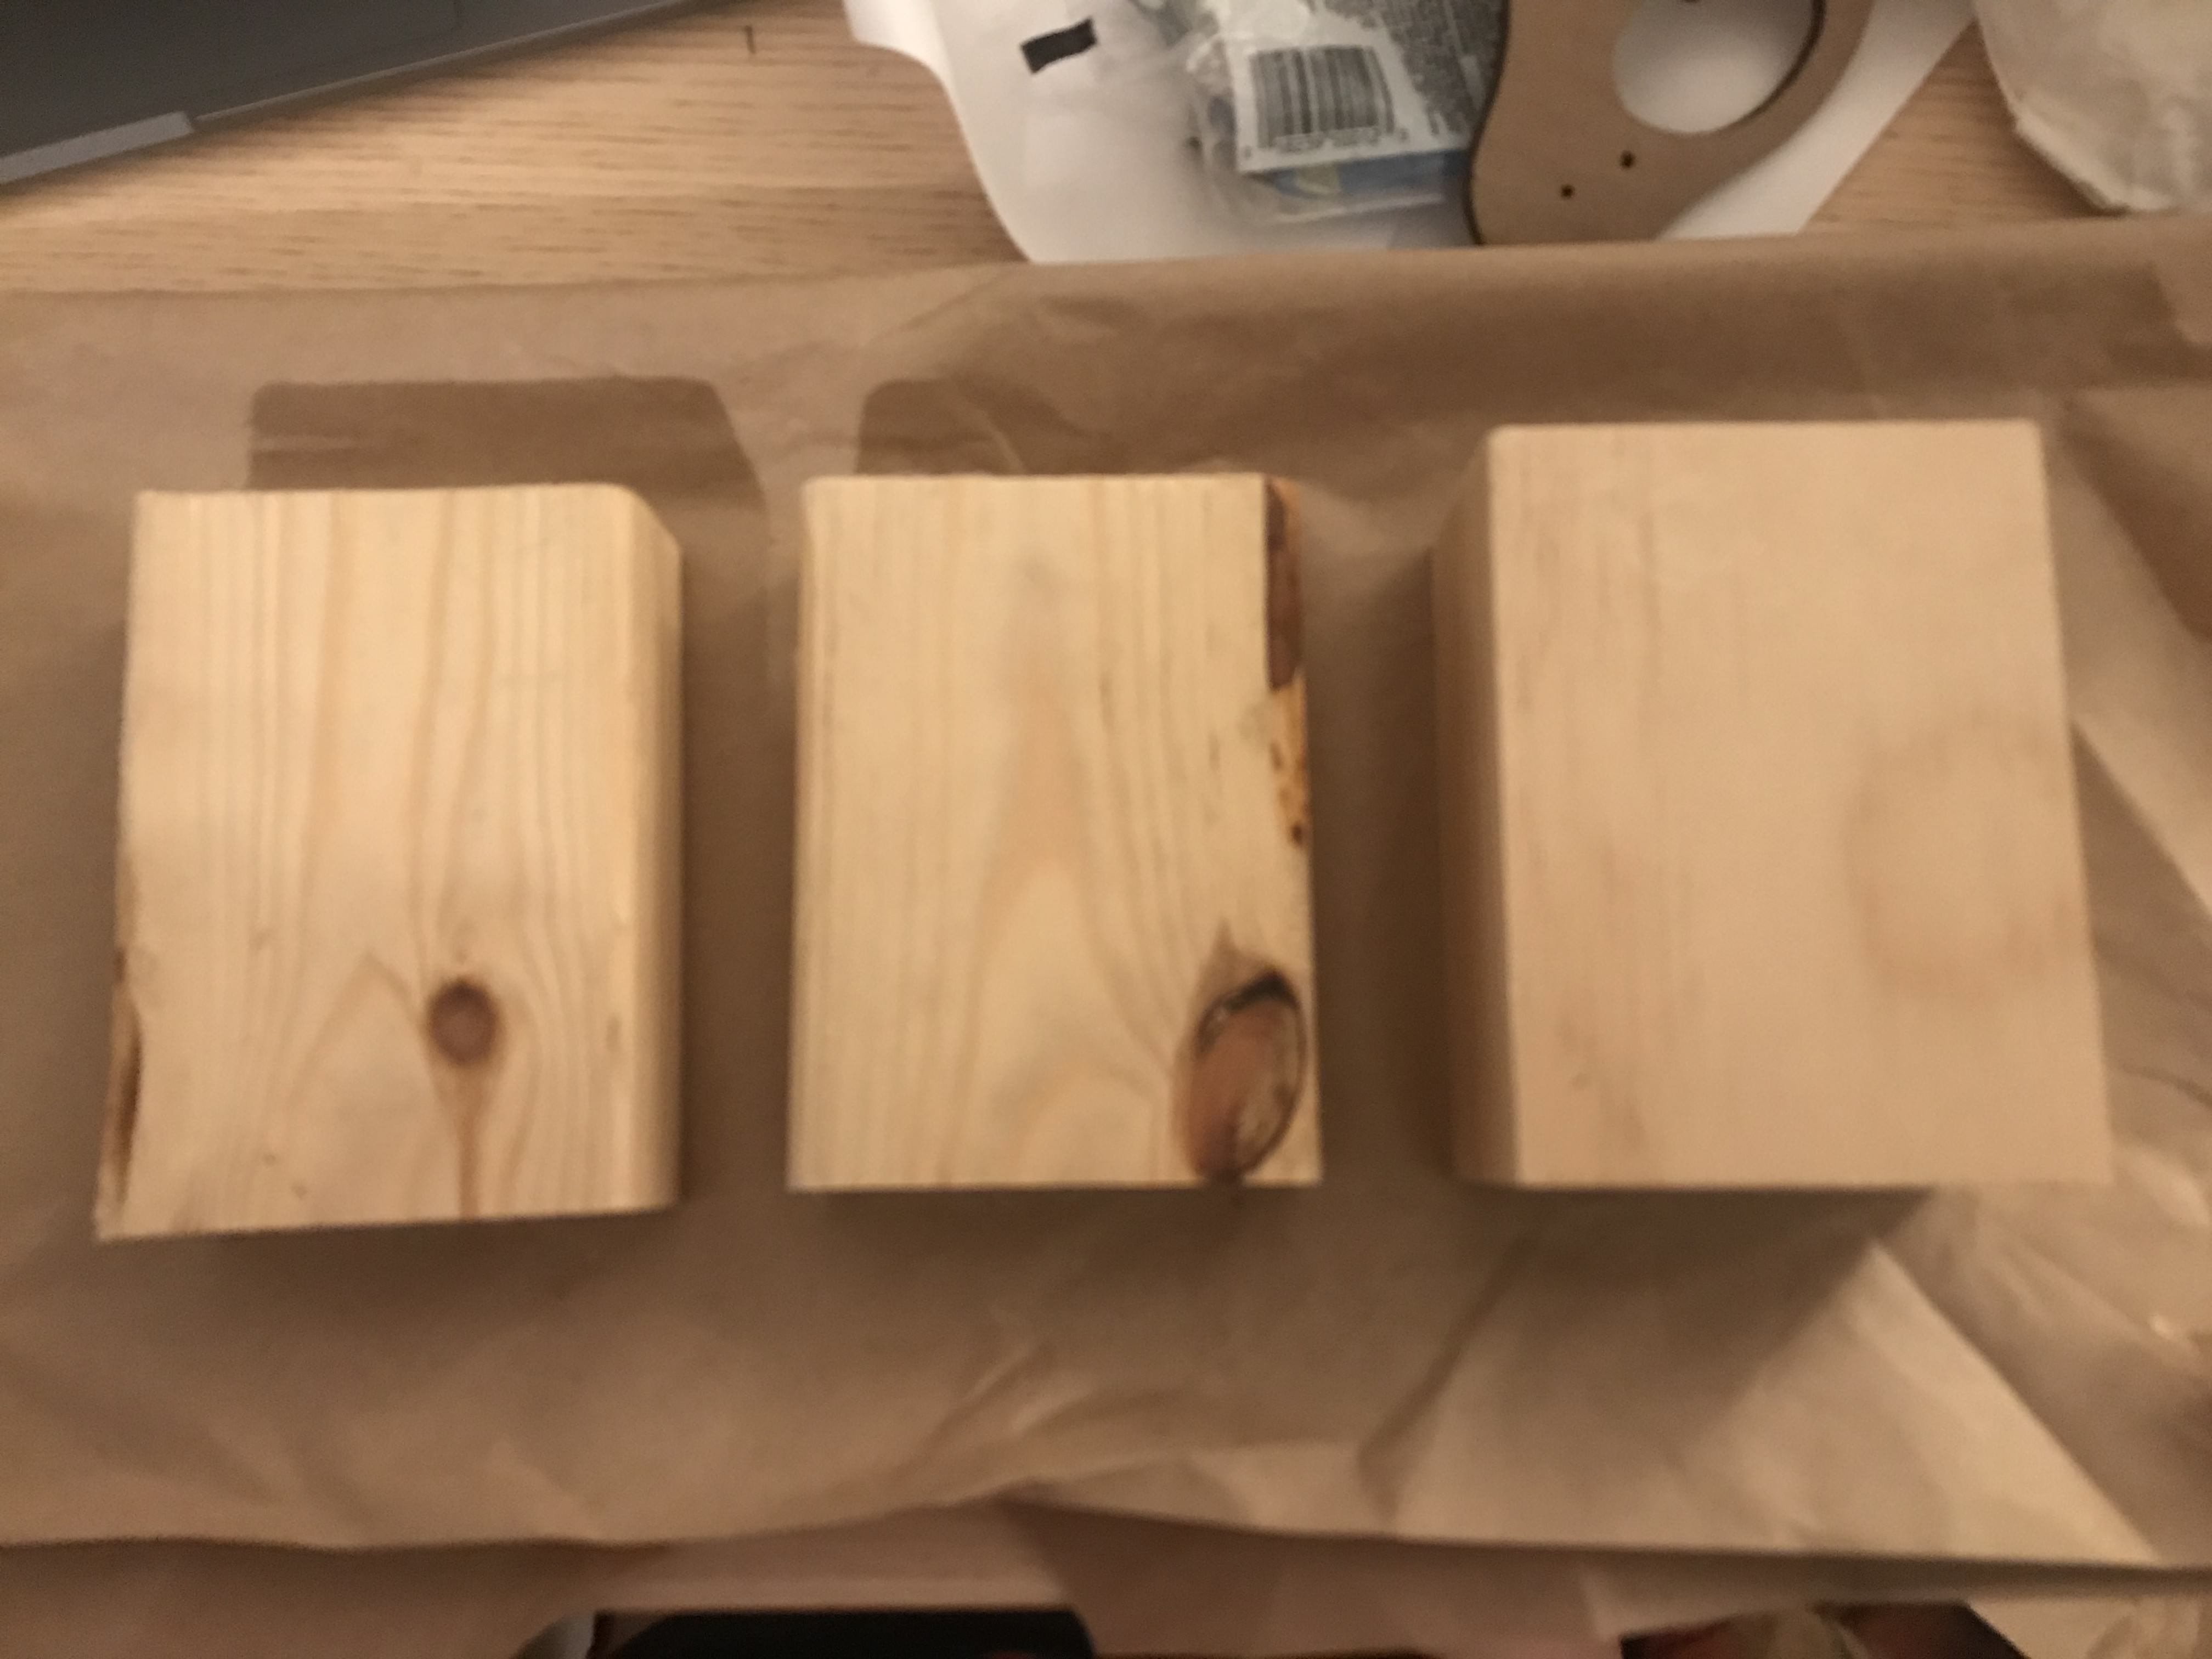
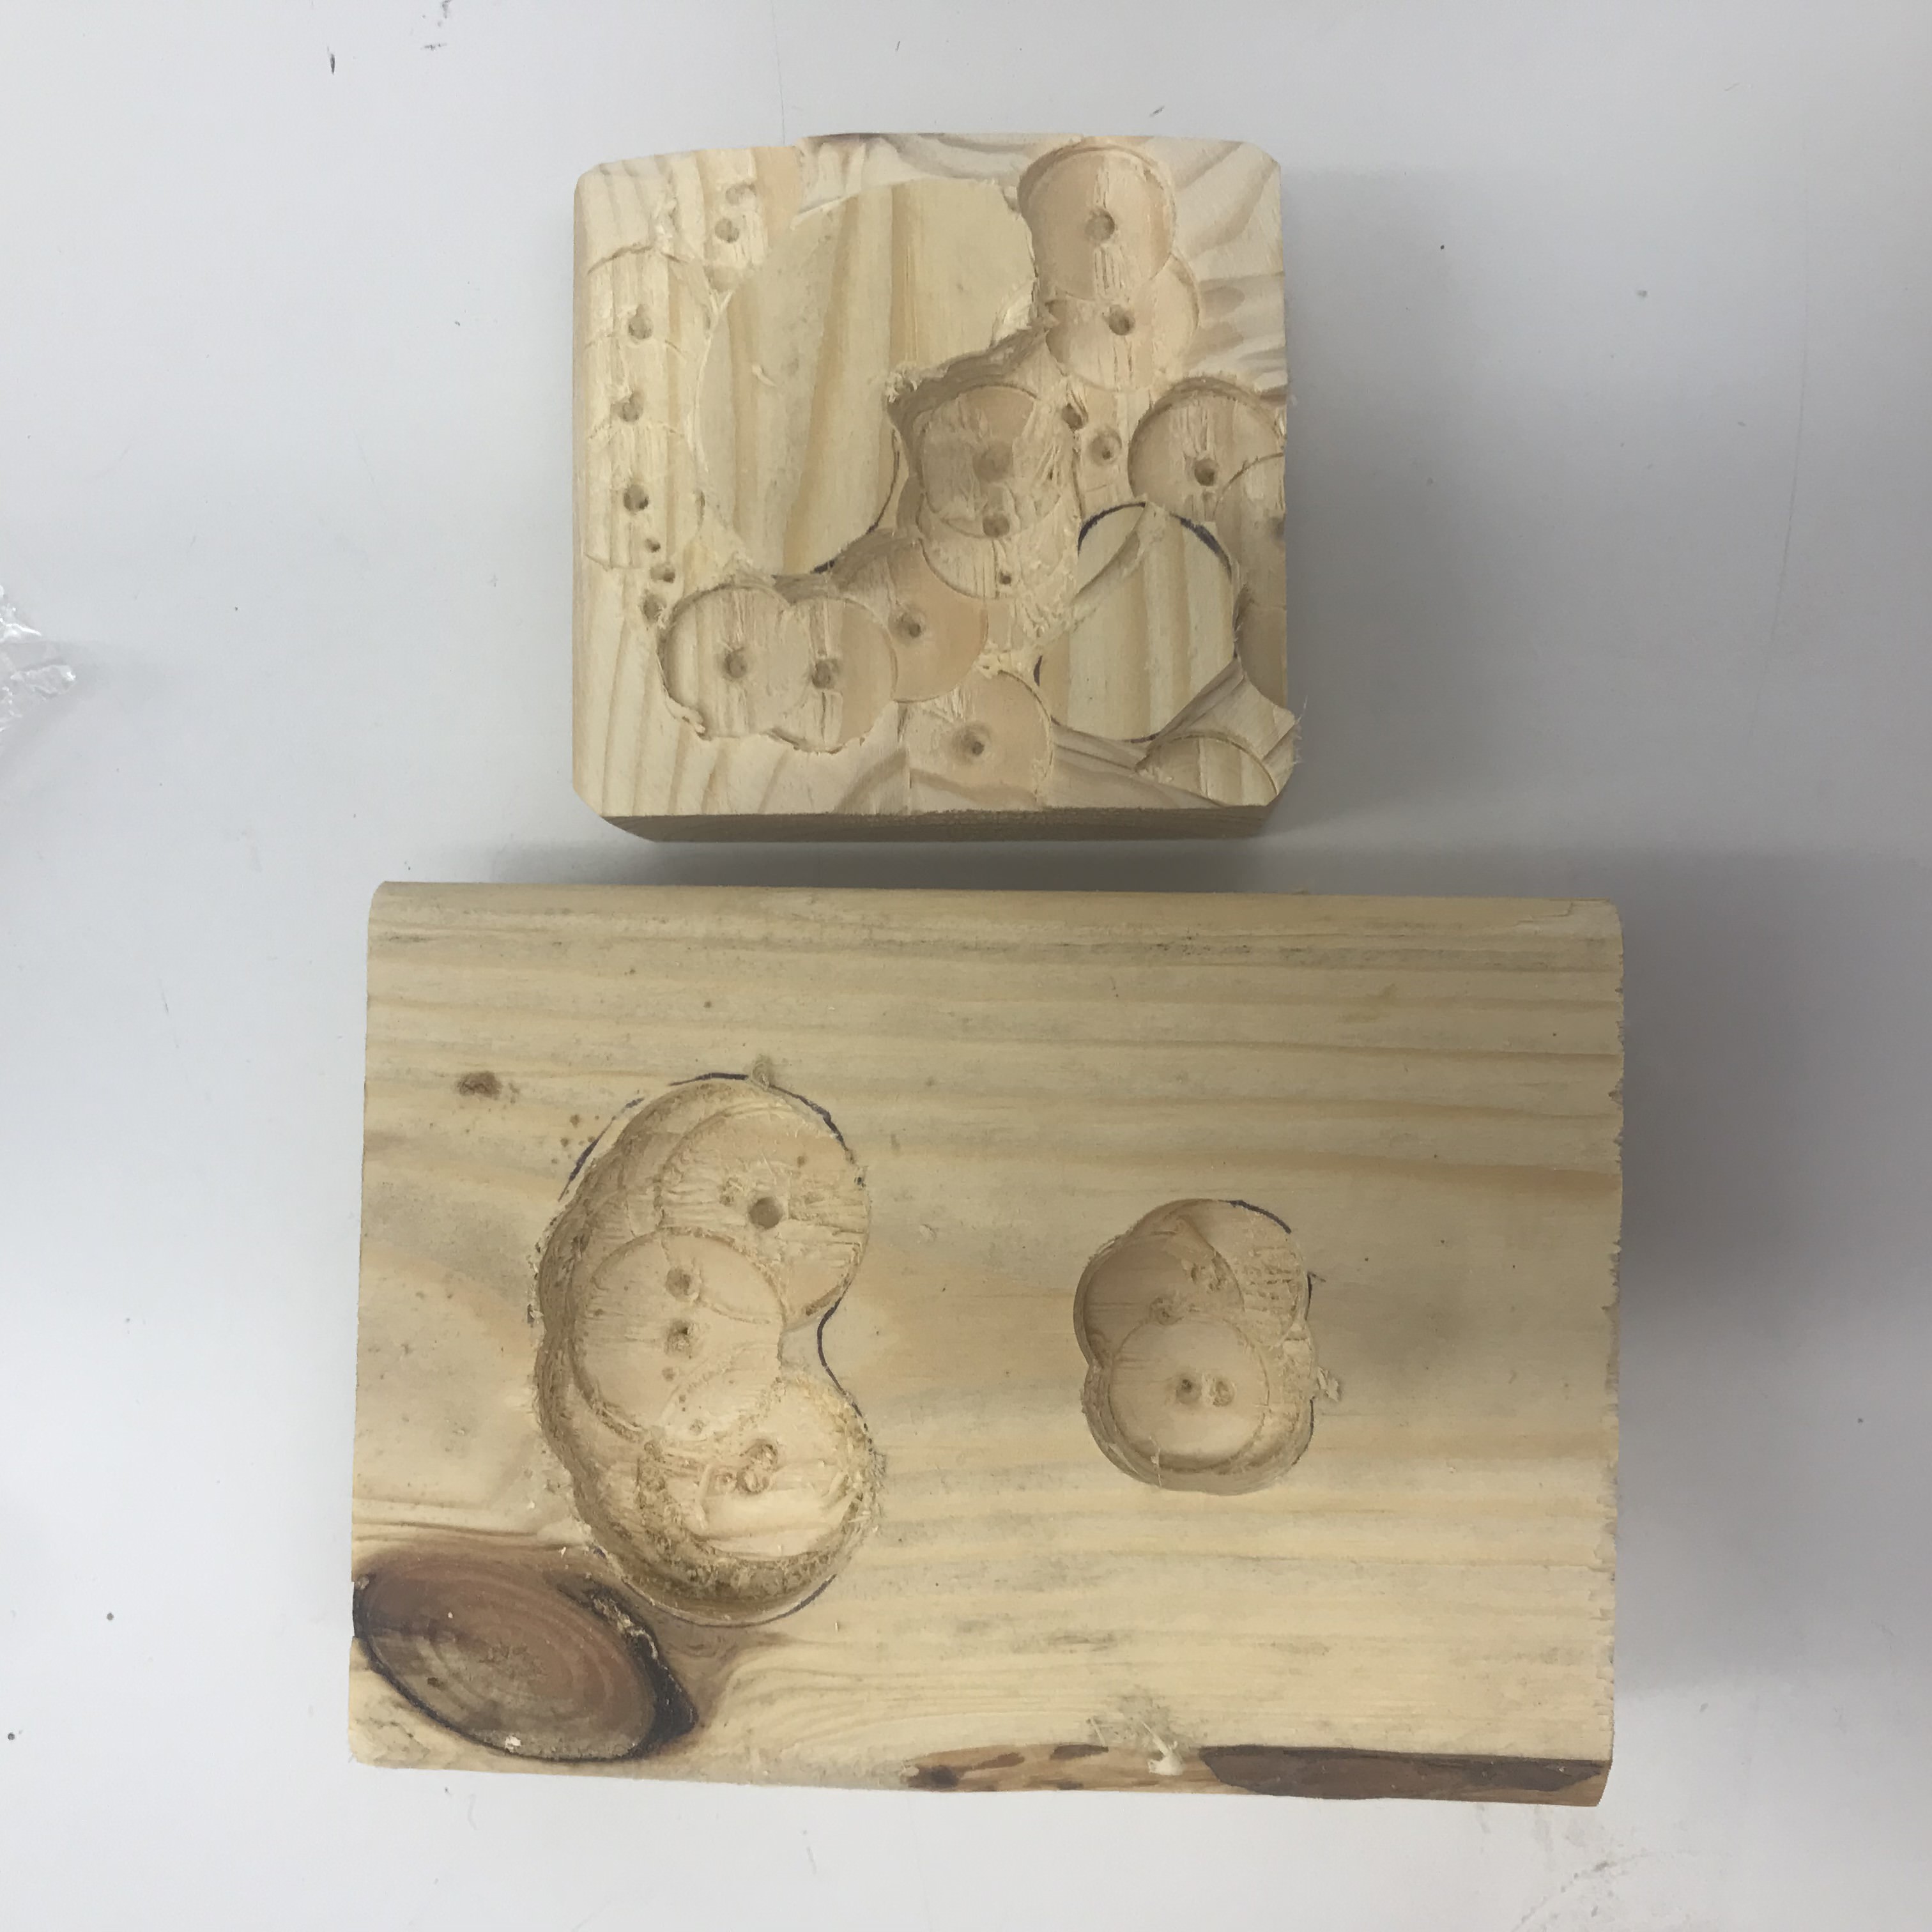
While I am waiting for amazon to deliver my copper sheet, I started with the wooden base. I went to get some of my own wood, but I found better ones at ITP:
Two will be made into jigs that I will be using to shape the copper sheet and one I started shaping it into my design:
And my jigs:
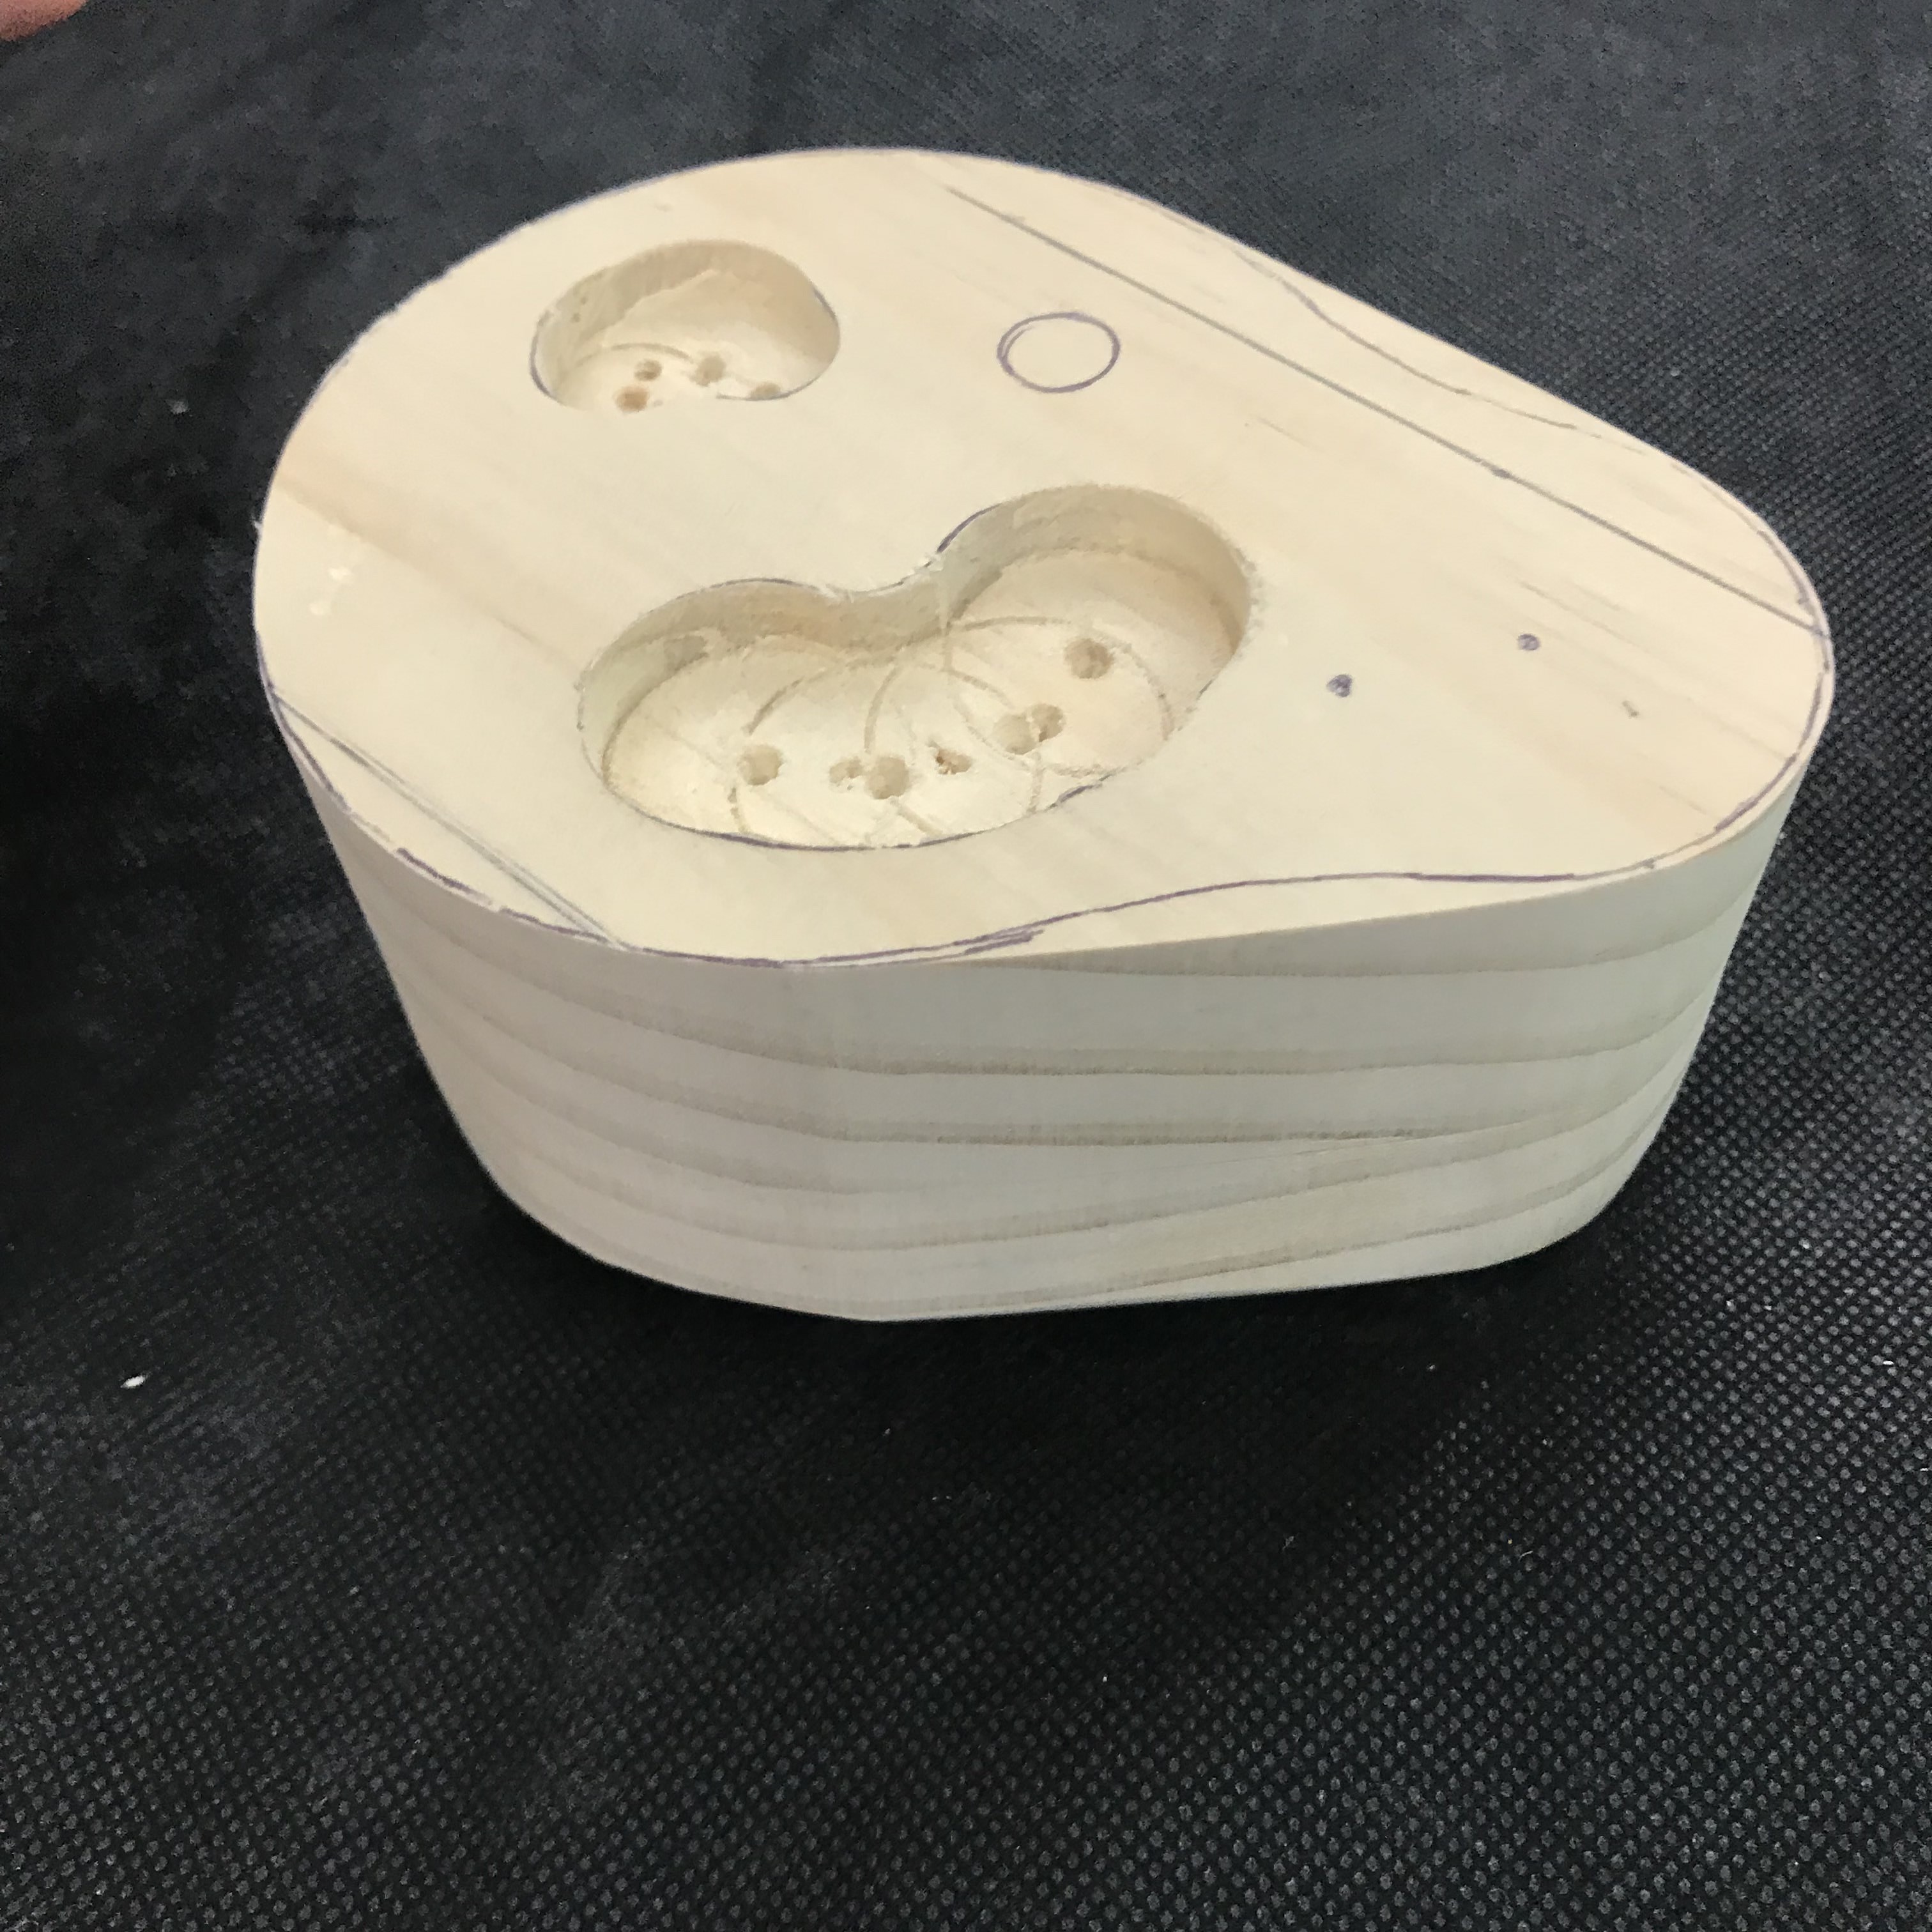
Then I started to shape the bottom part of the base. There isn't any way I could think of to make this organic shape expect drilling it in a "stair" way and than sand it down.
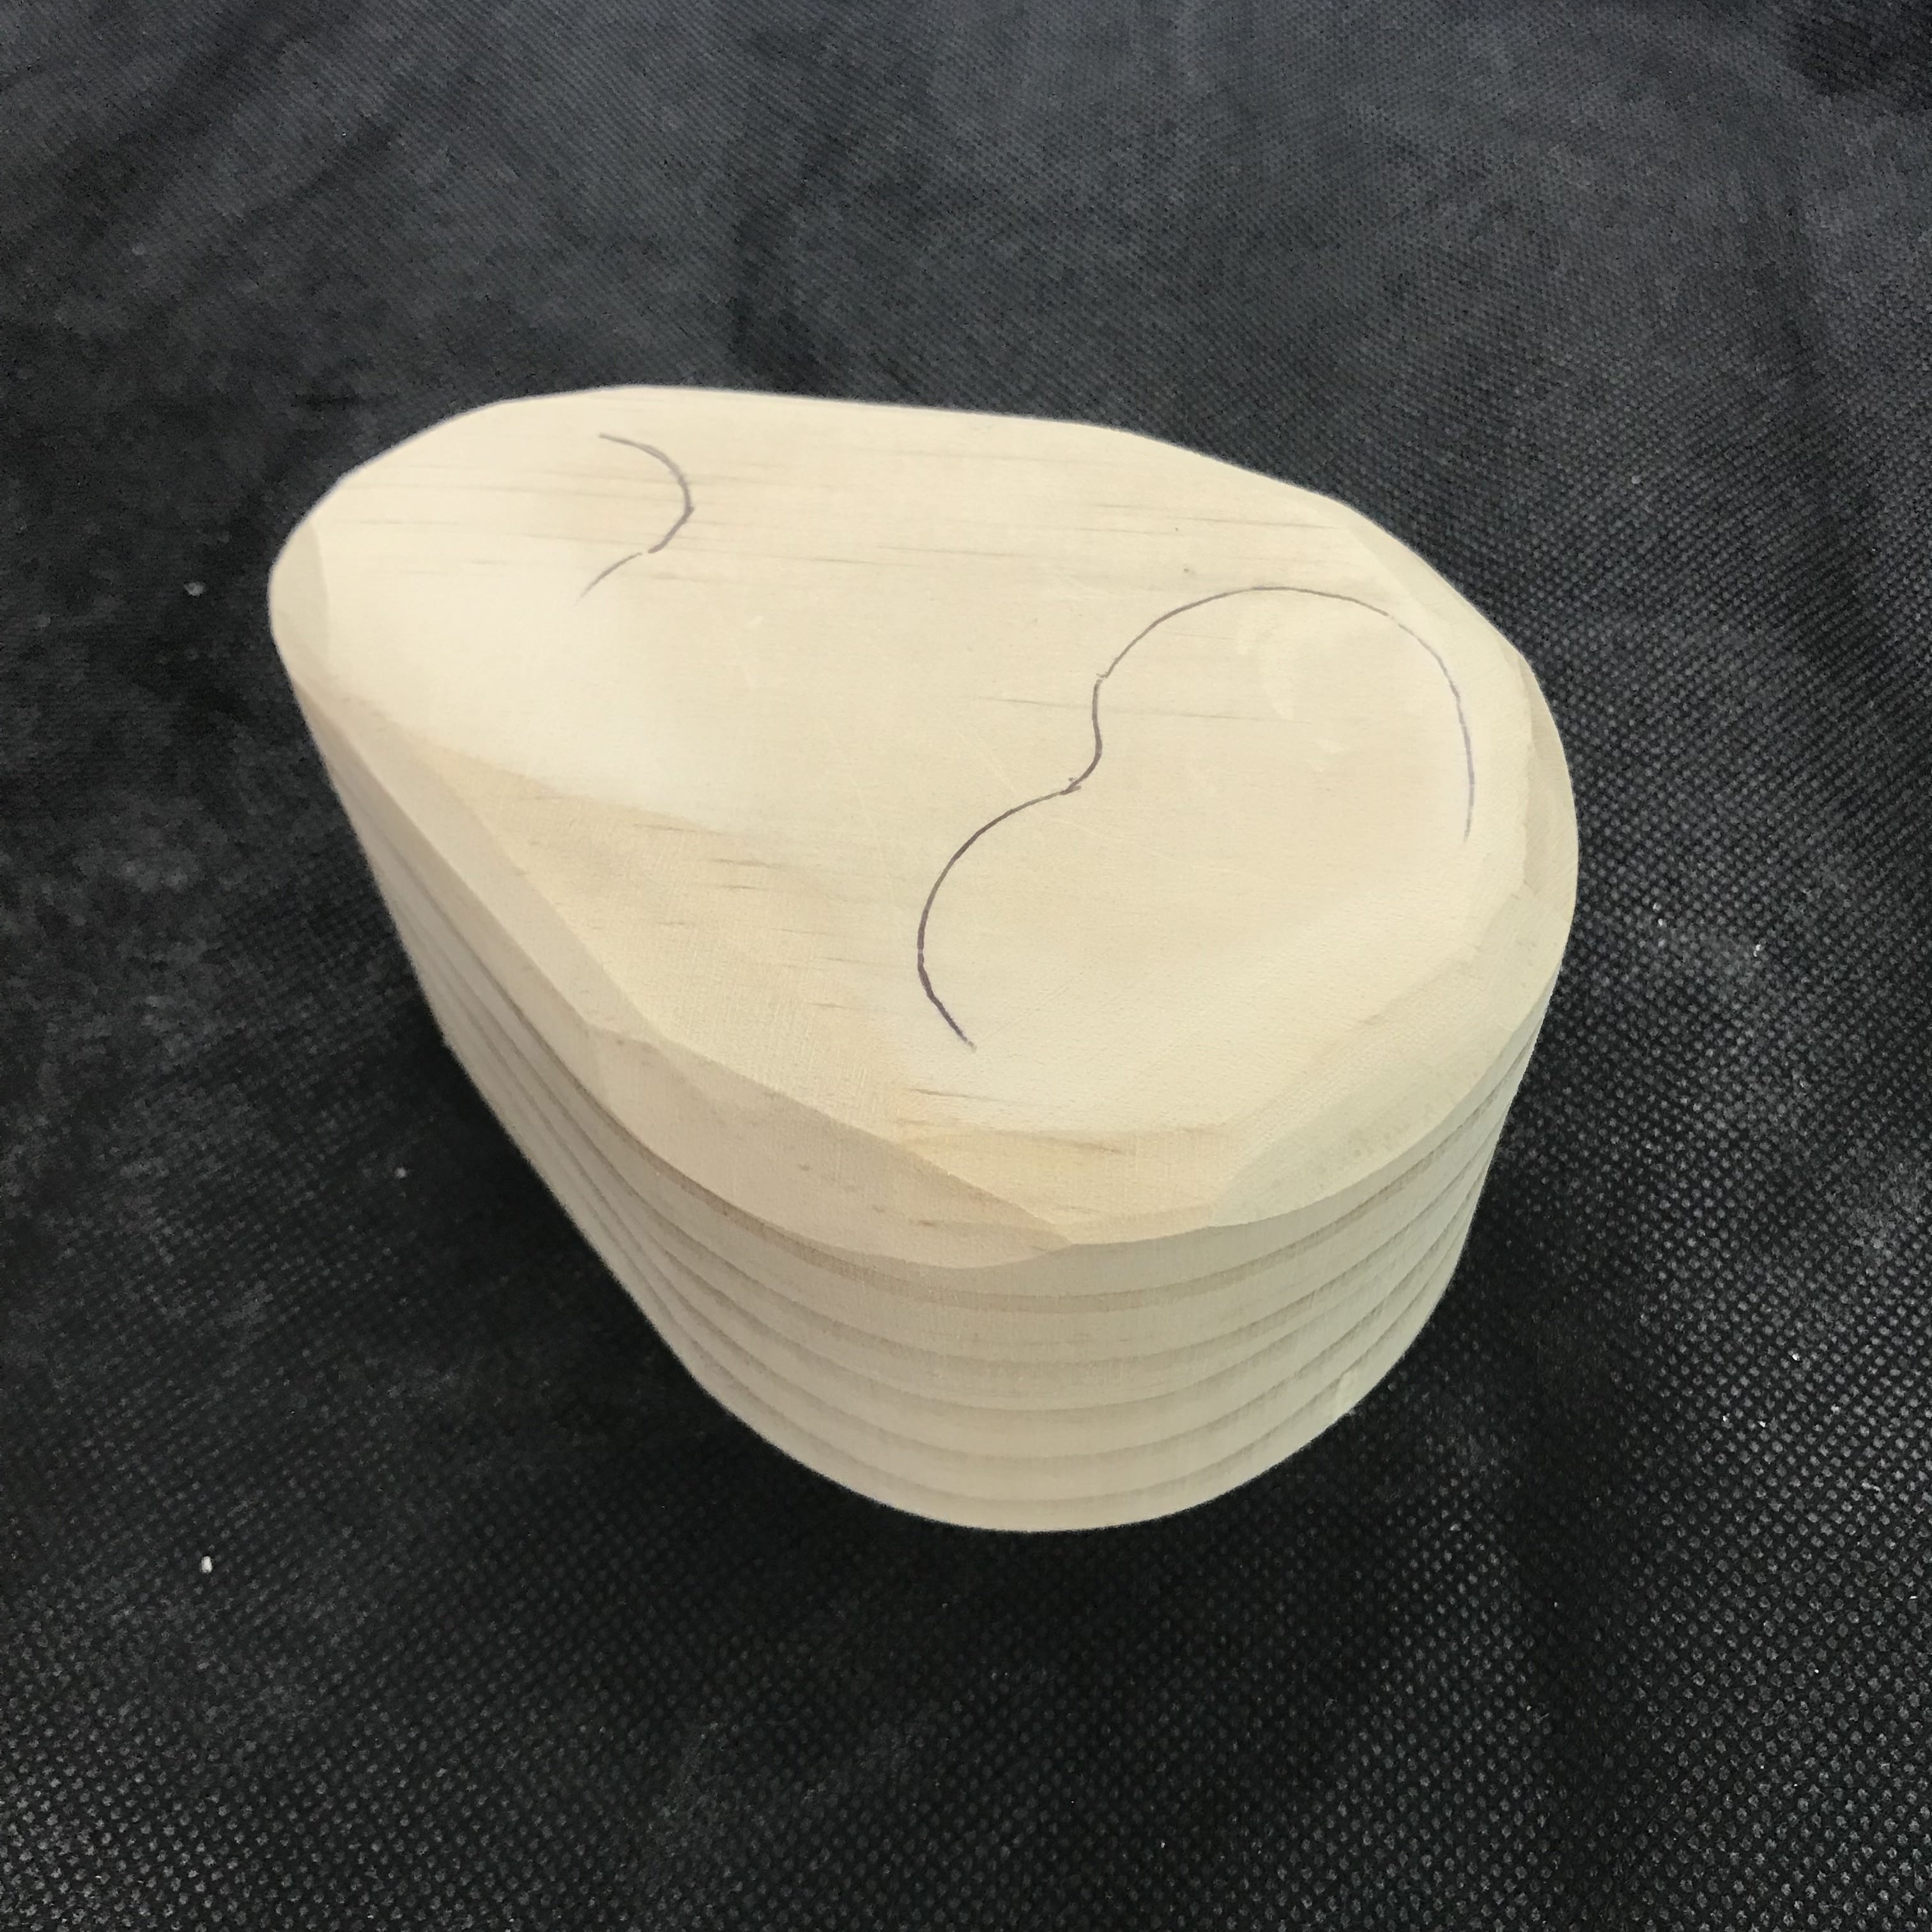
Then, I sand it more to make it look polished:
And finally, the copper sheet arrived, HOWEVER, it was too thick that I cannot cut it properly nor shape it with a hammer:

So I ran to Bruno's Bruno's... but they only carry the very thin one that could be easily reshaped so was also hard to shape it. If copper can not be a tray, then a design with wood cannot be an insense burner. So I decided to make it a muliti usage item: You can remove parts and have different functionality:
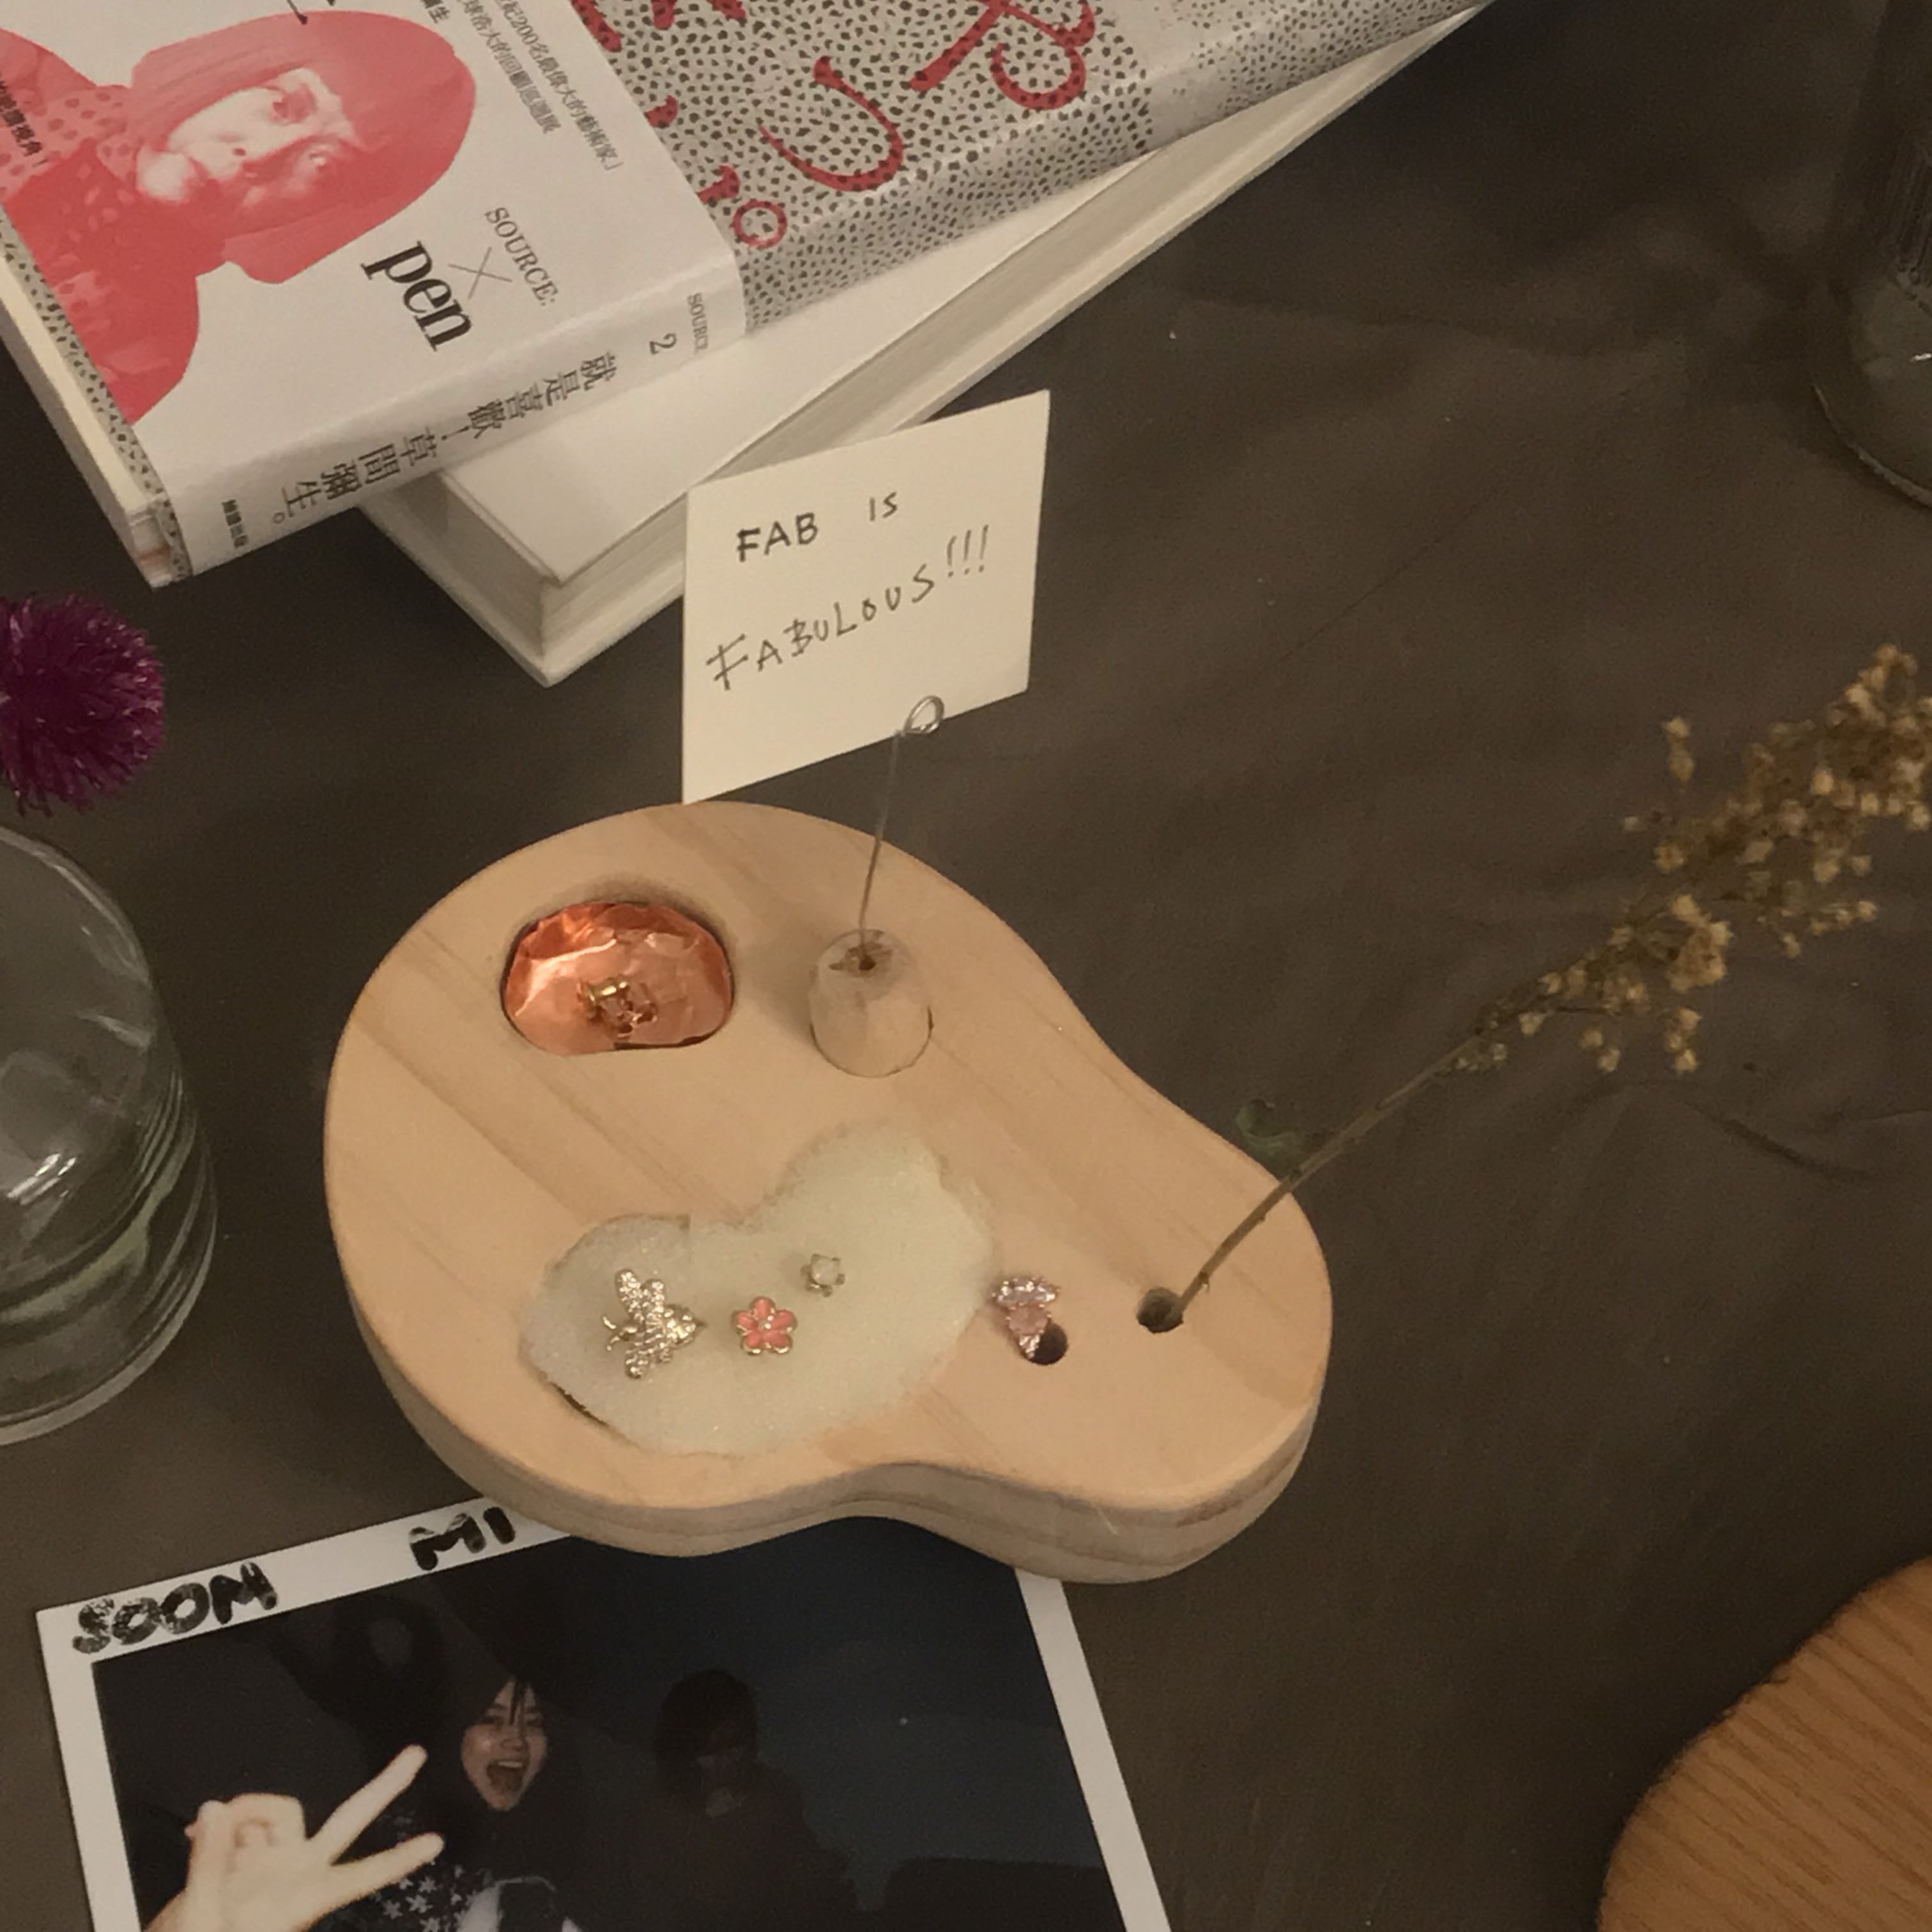
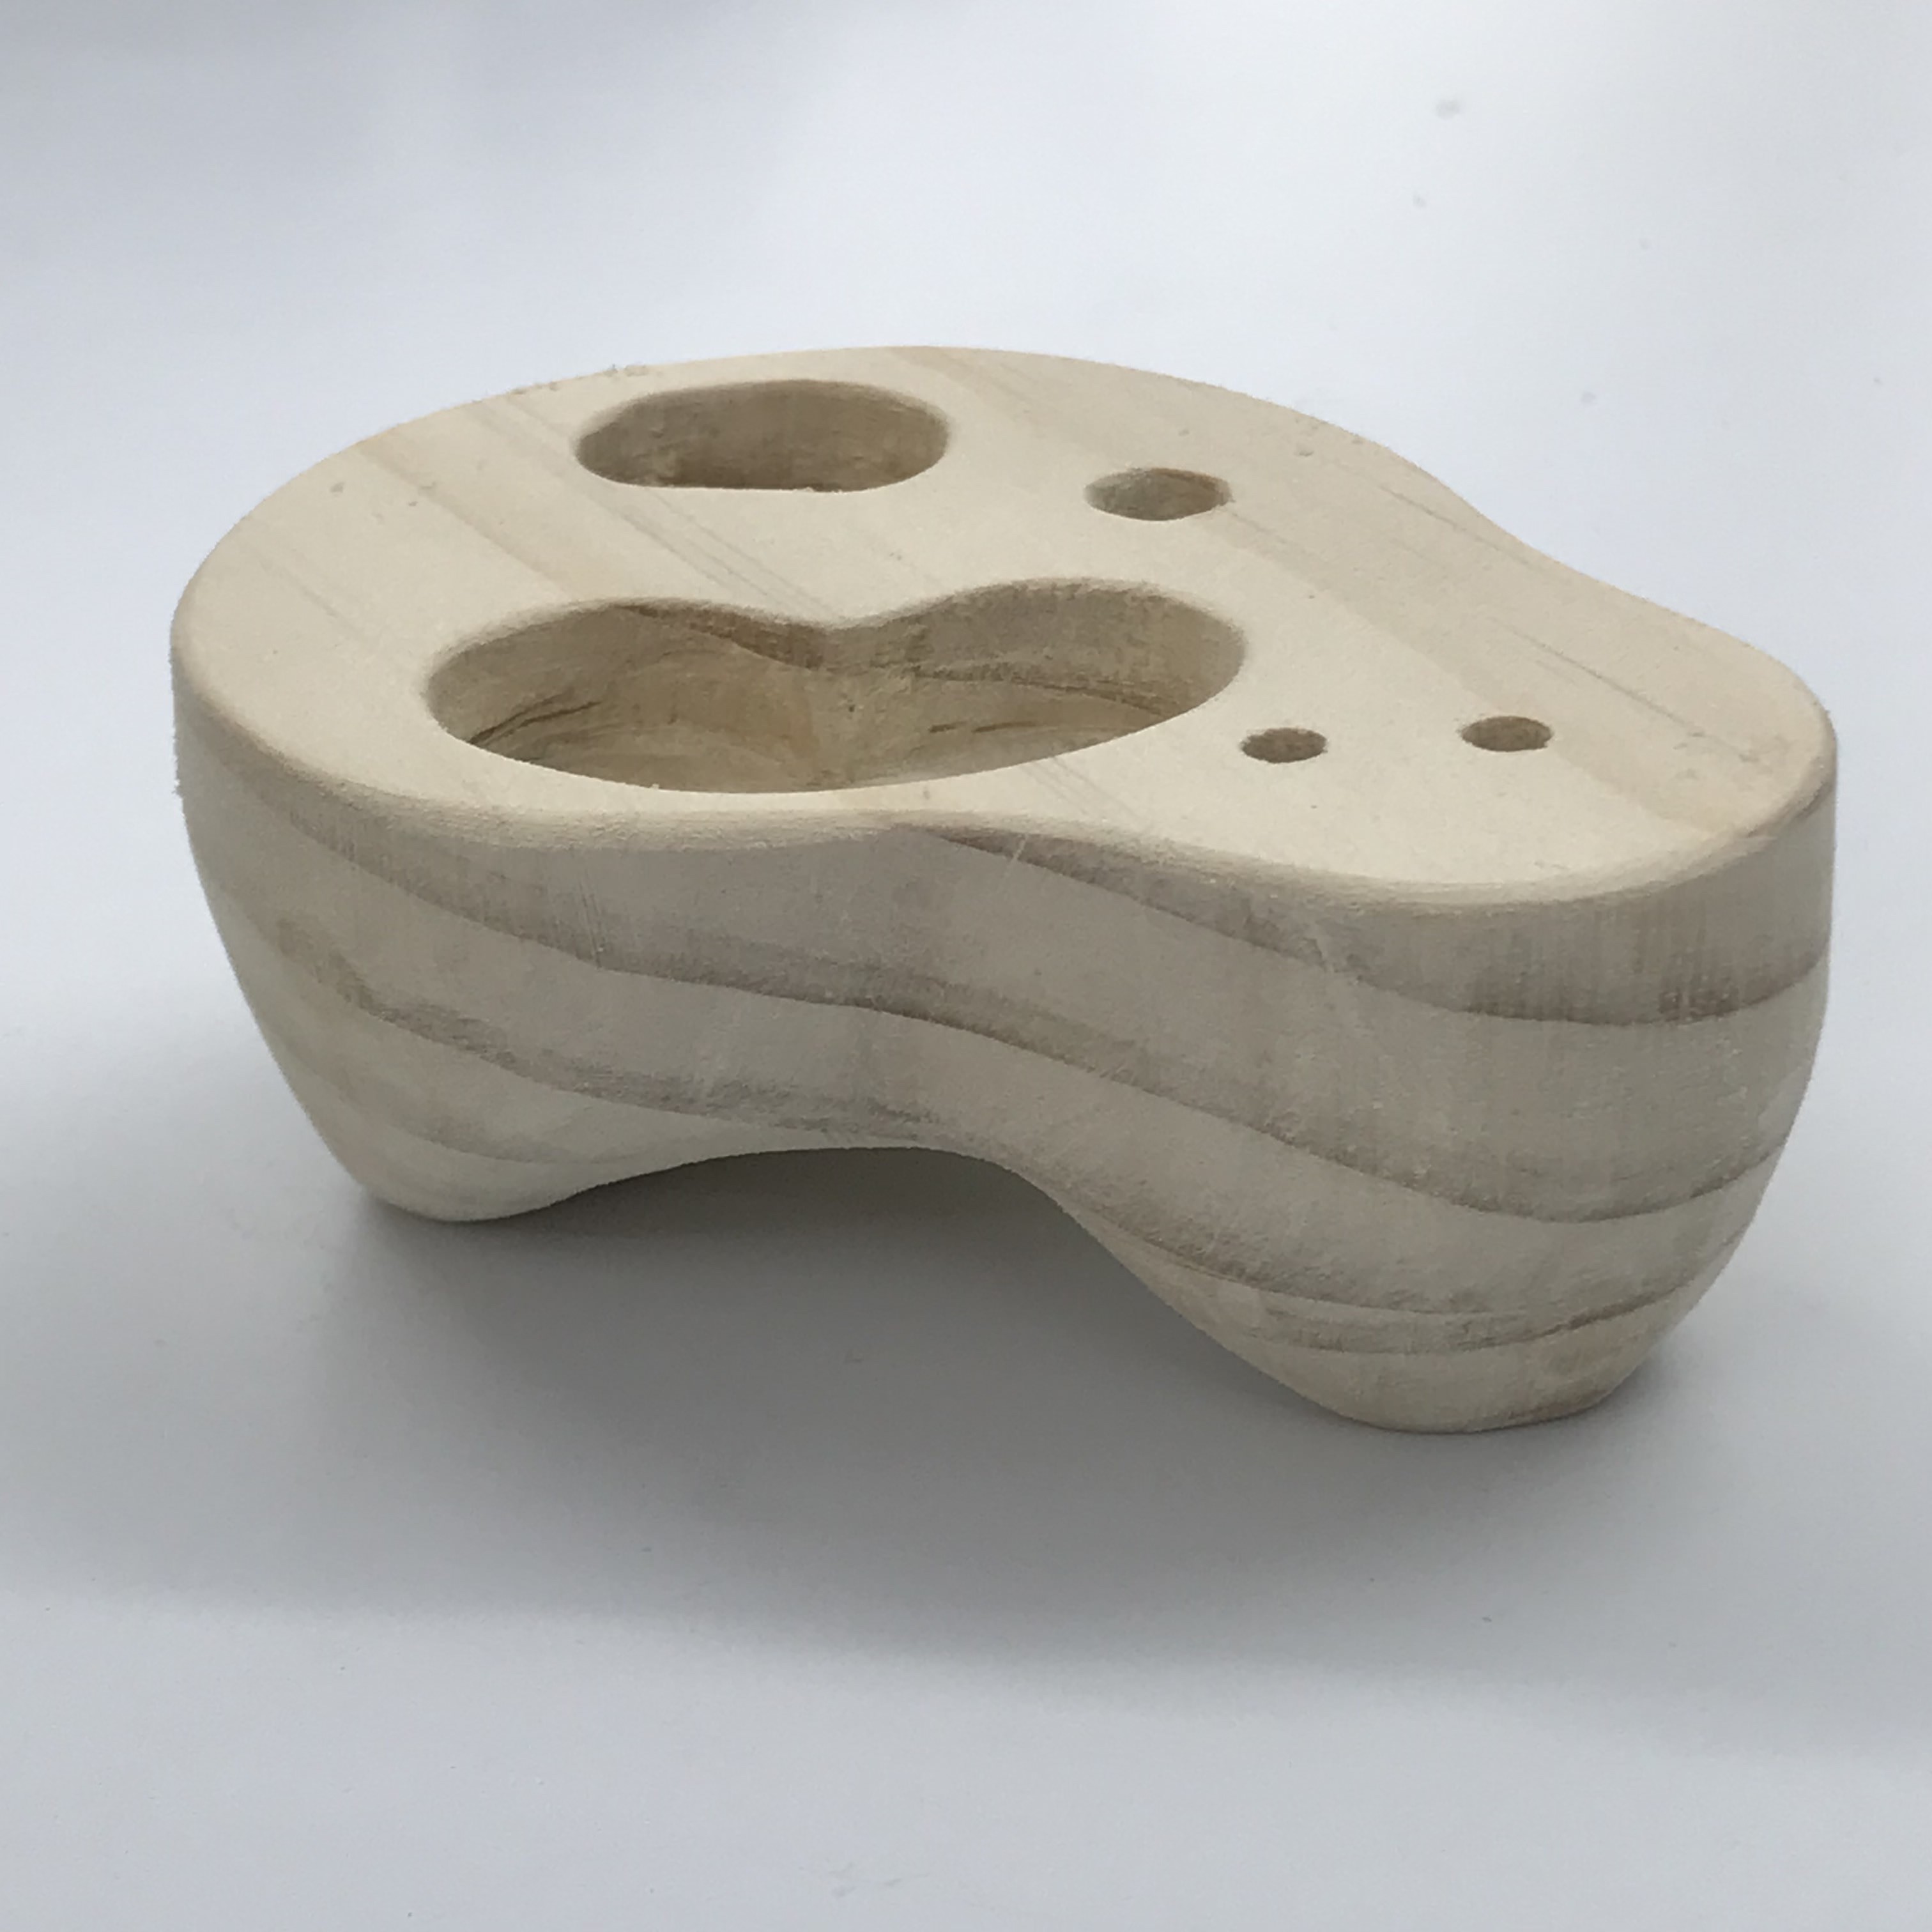
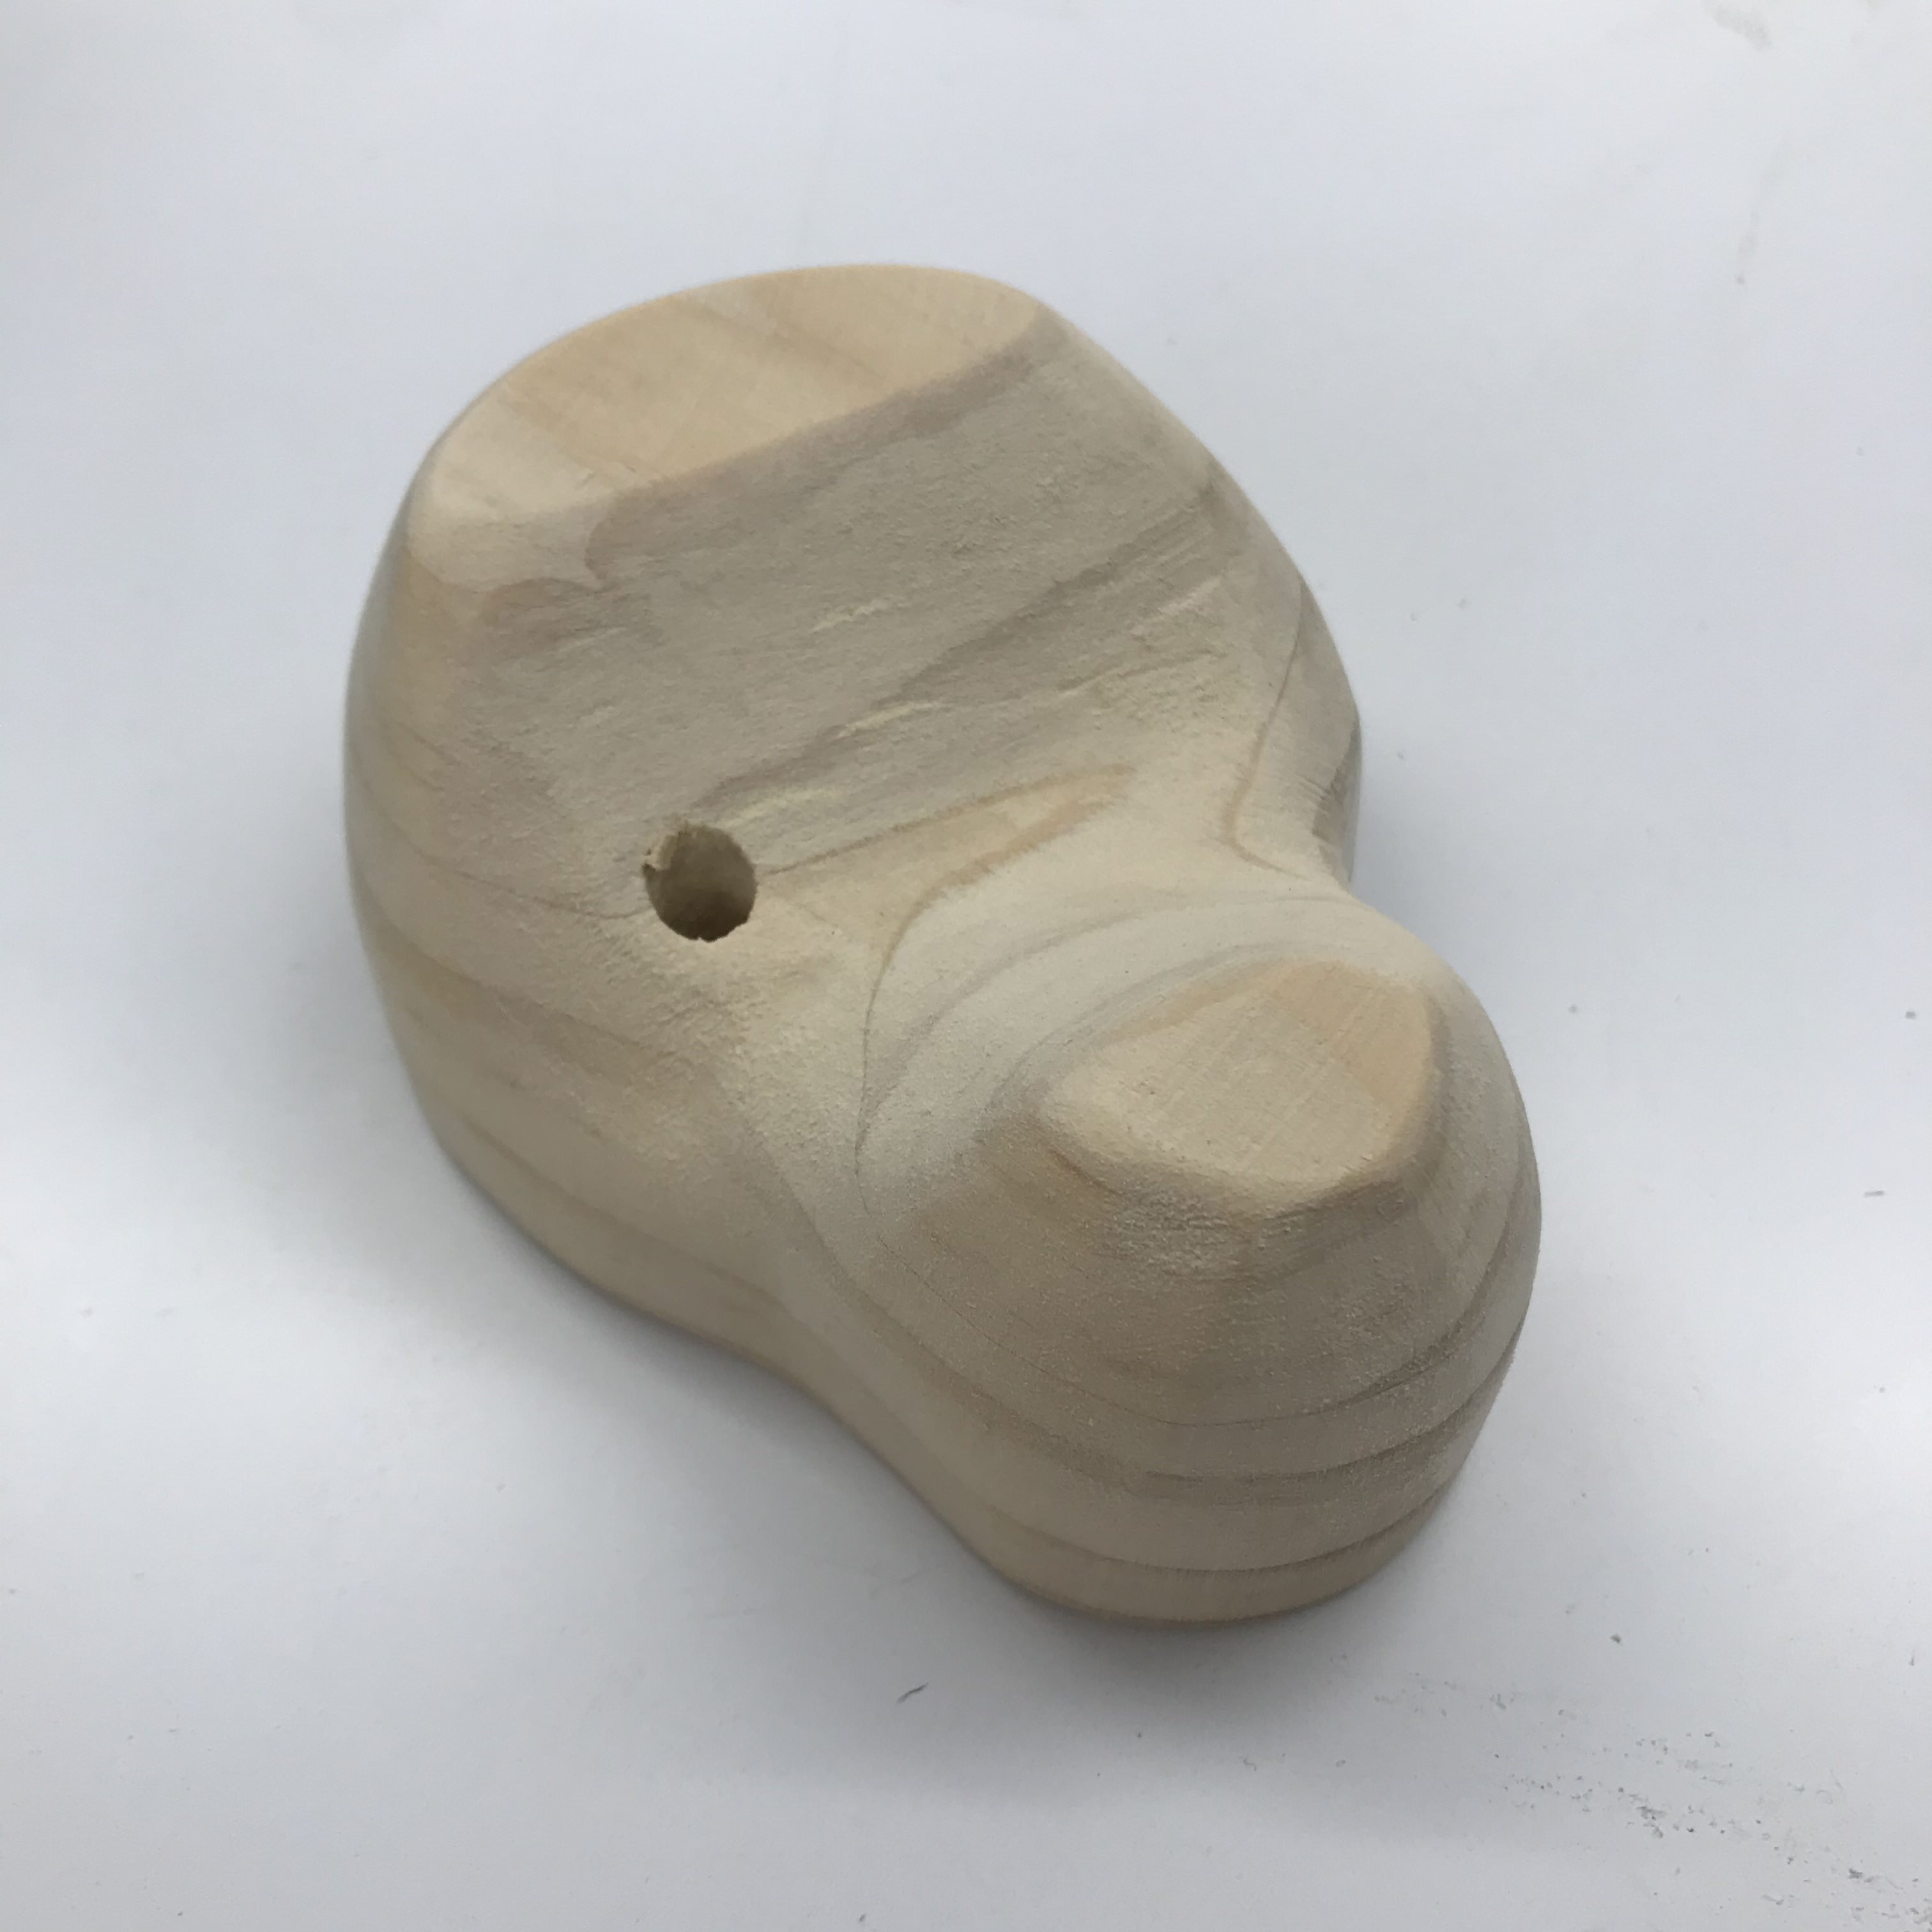
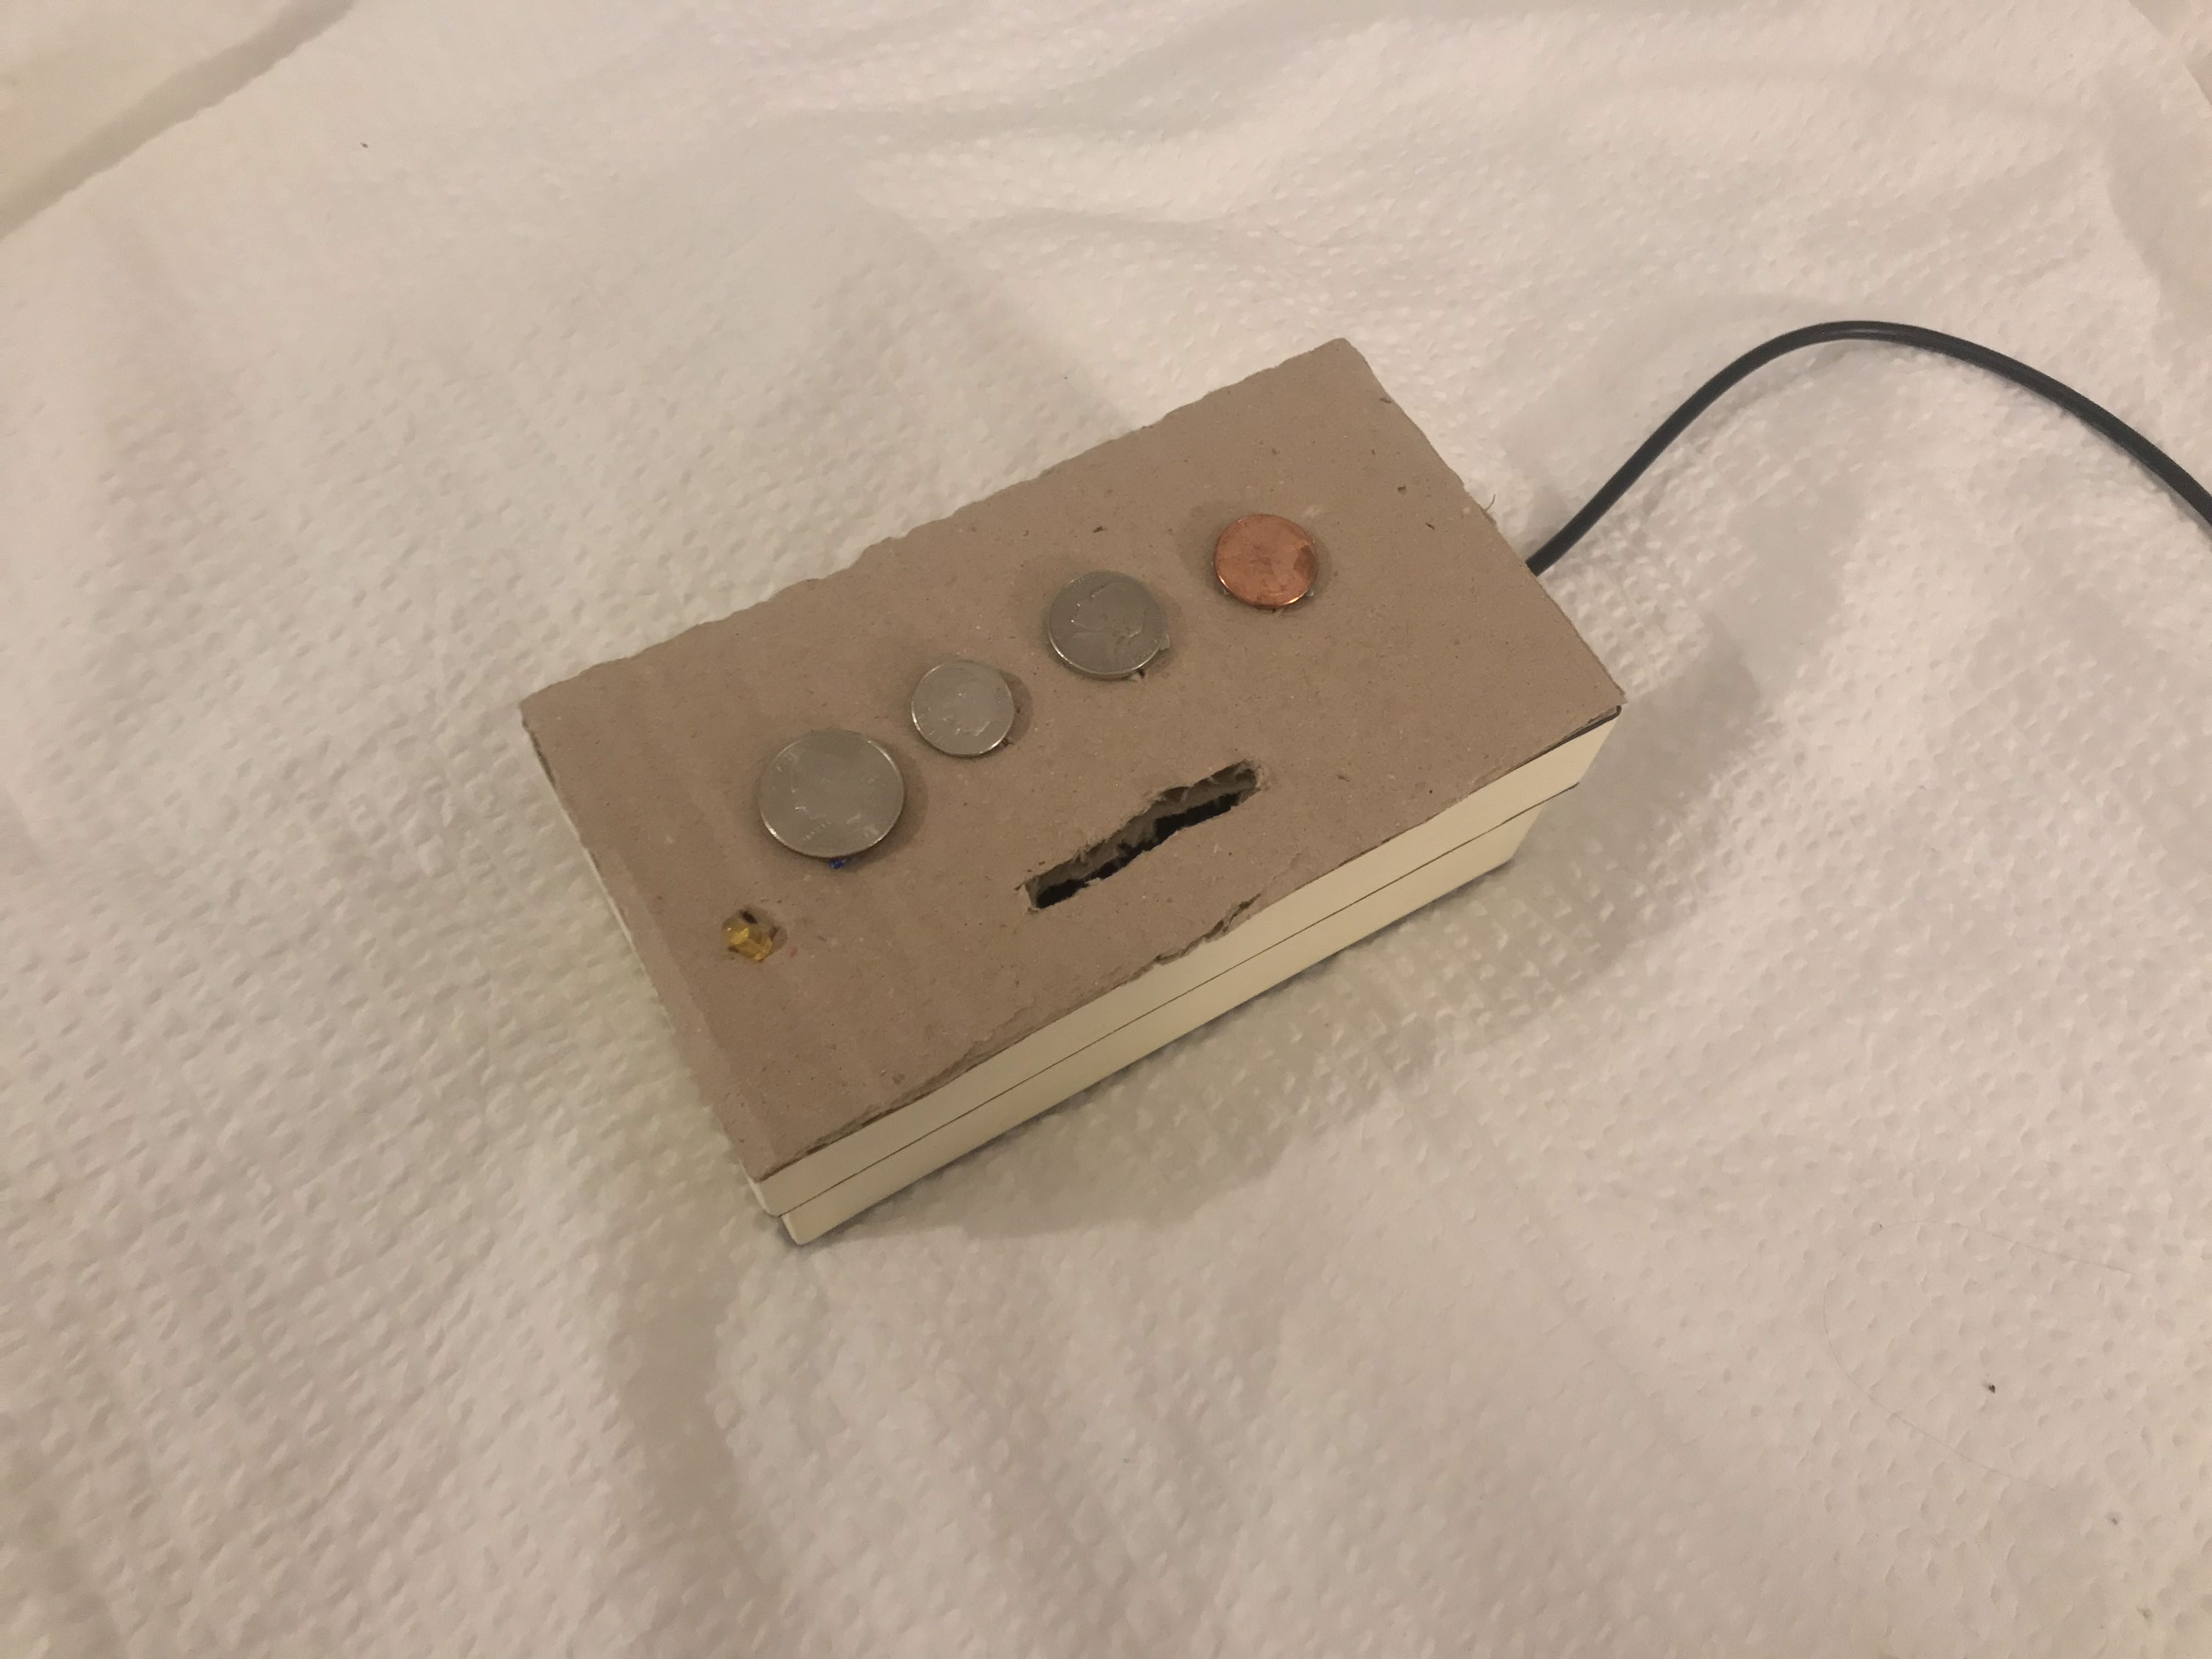
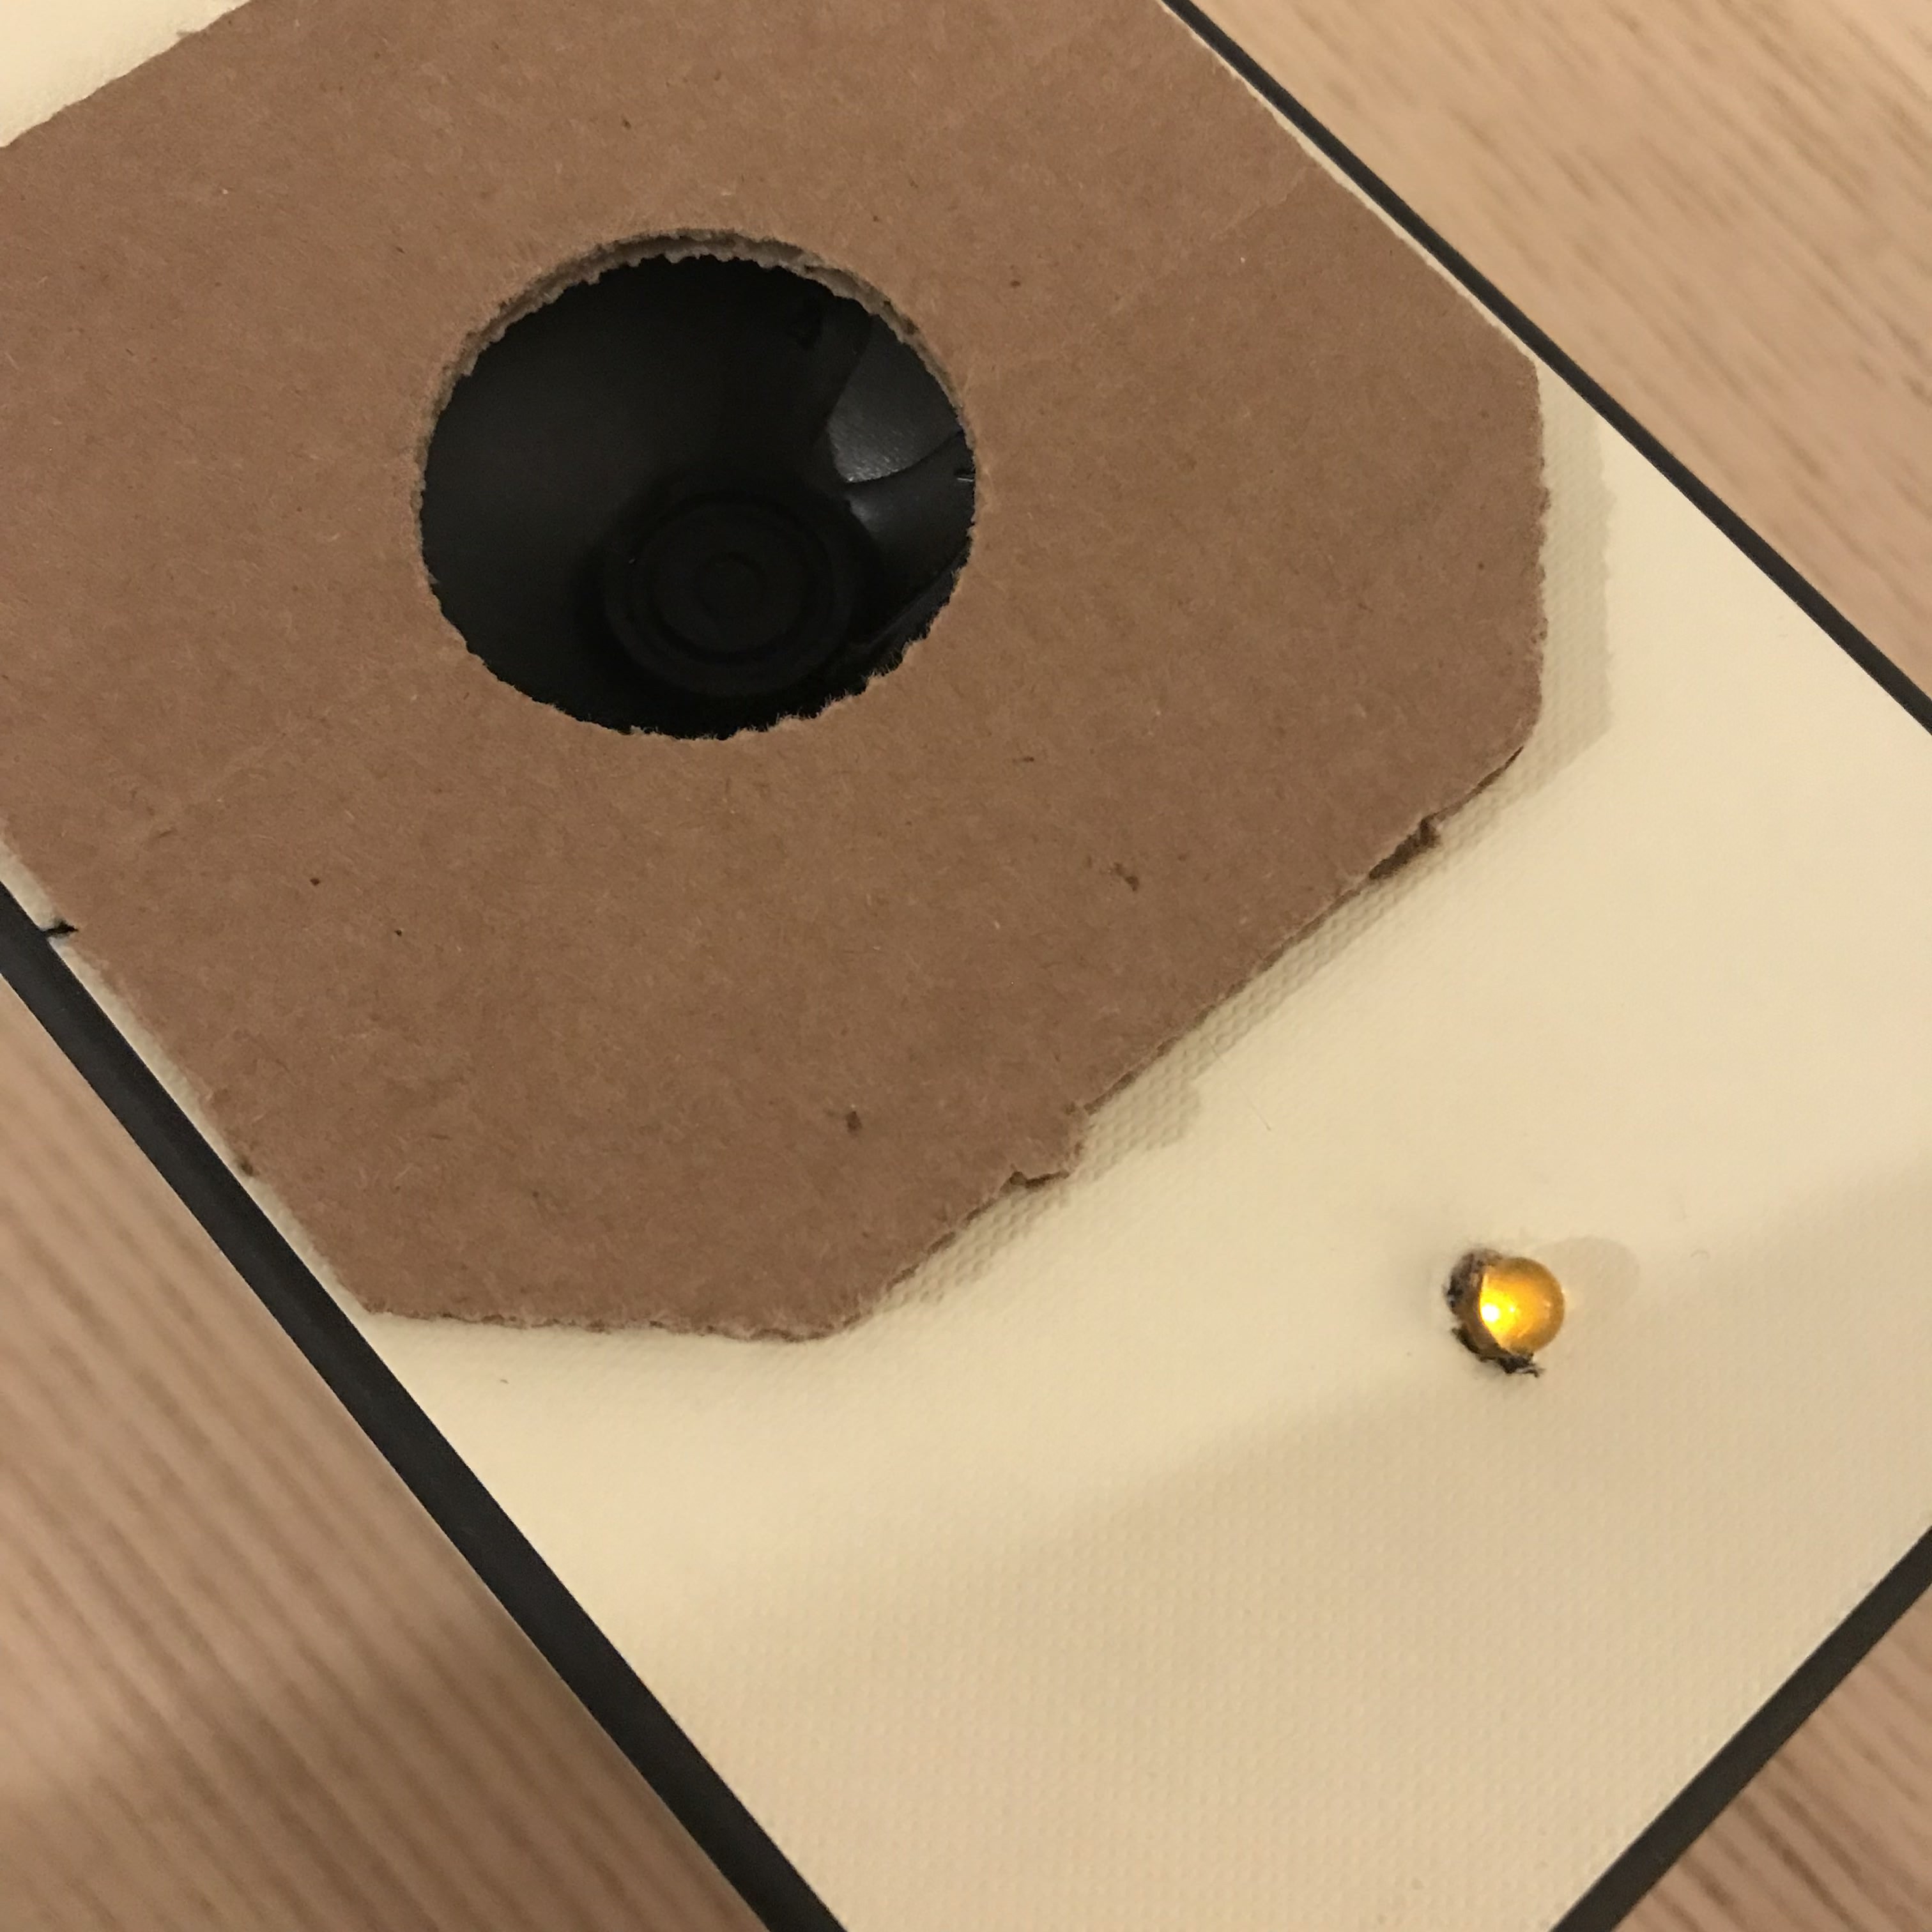
Where's my dollar piano box
For this week's Pcomp project, I made a box that's suitable for the project, it is, a 'Coin' Piano Box:
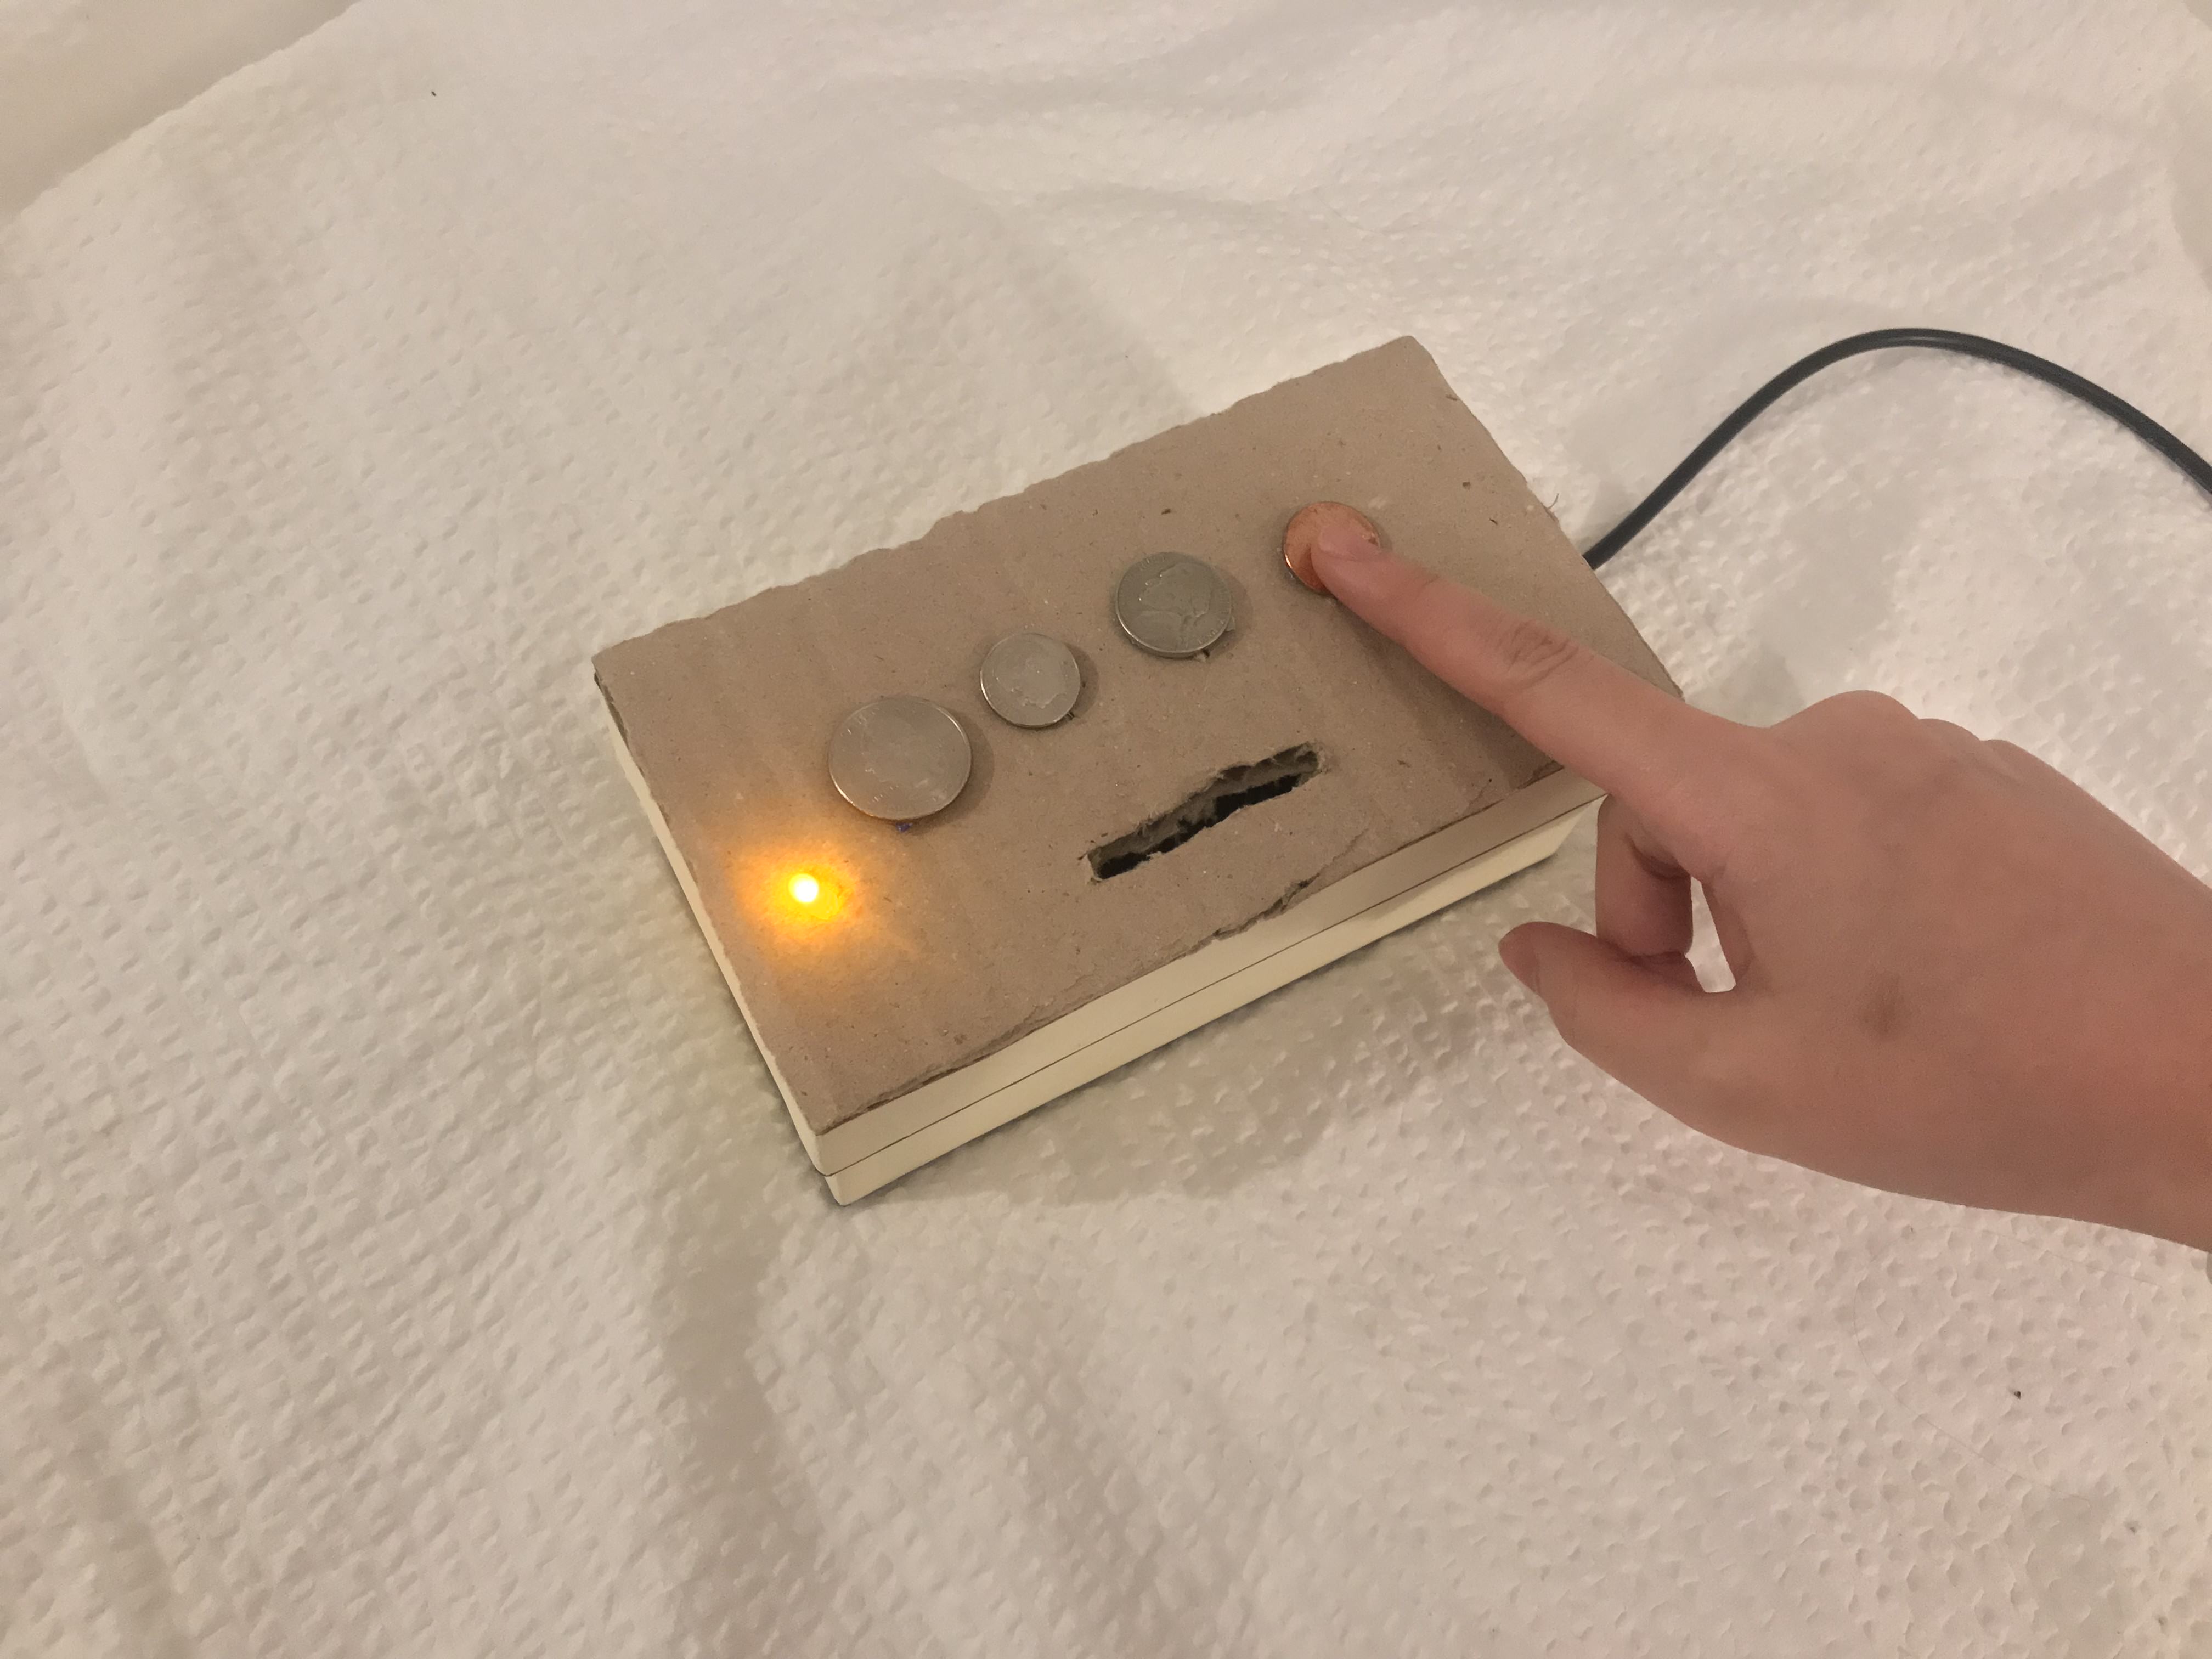
The video:
Week 5 - Japanese Brass Work
For this week's assignment, I want to revisit my previous project, the lasercut project--Lei, and redesign is with a wooden bas and brass details (the cutouts, ash tray and vase tube.)
My father used to collaborate with a brass maker and had designed a brass cup (which he made a huge mistake for not adding a handle to it... it conduct heat too well!) so I learned a little (with my eyes) about how brass works were formed. So I already foresee myself holding a hammer and being the annoying neighbor... But I have to share this video, this is too beautiful. It is saying how the brass makers are more in love with the time they spent with the work more than the finished work. I feel them so much when I was watching this video...
Week 4 - Enclosure
For this week's project, I wanted to actually make a box that works for what we learn in the pcomp class, which is, the tone output!
When I'm ready heading towards The Container Store, my boxes at home be like "Mom, you don't need more..."

So I decided to work with them.
I was sick during the week, so I forgot to do the documentaries...
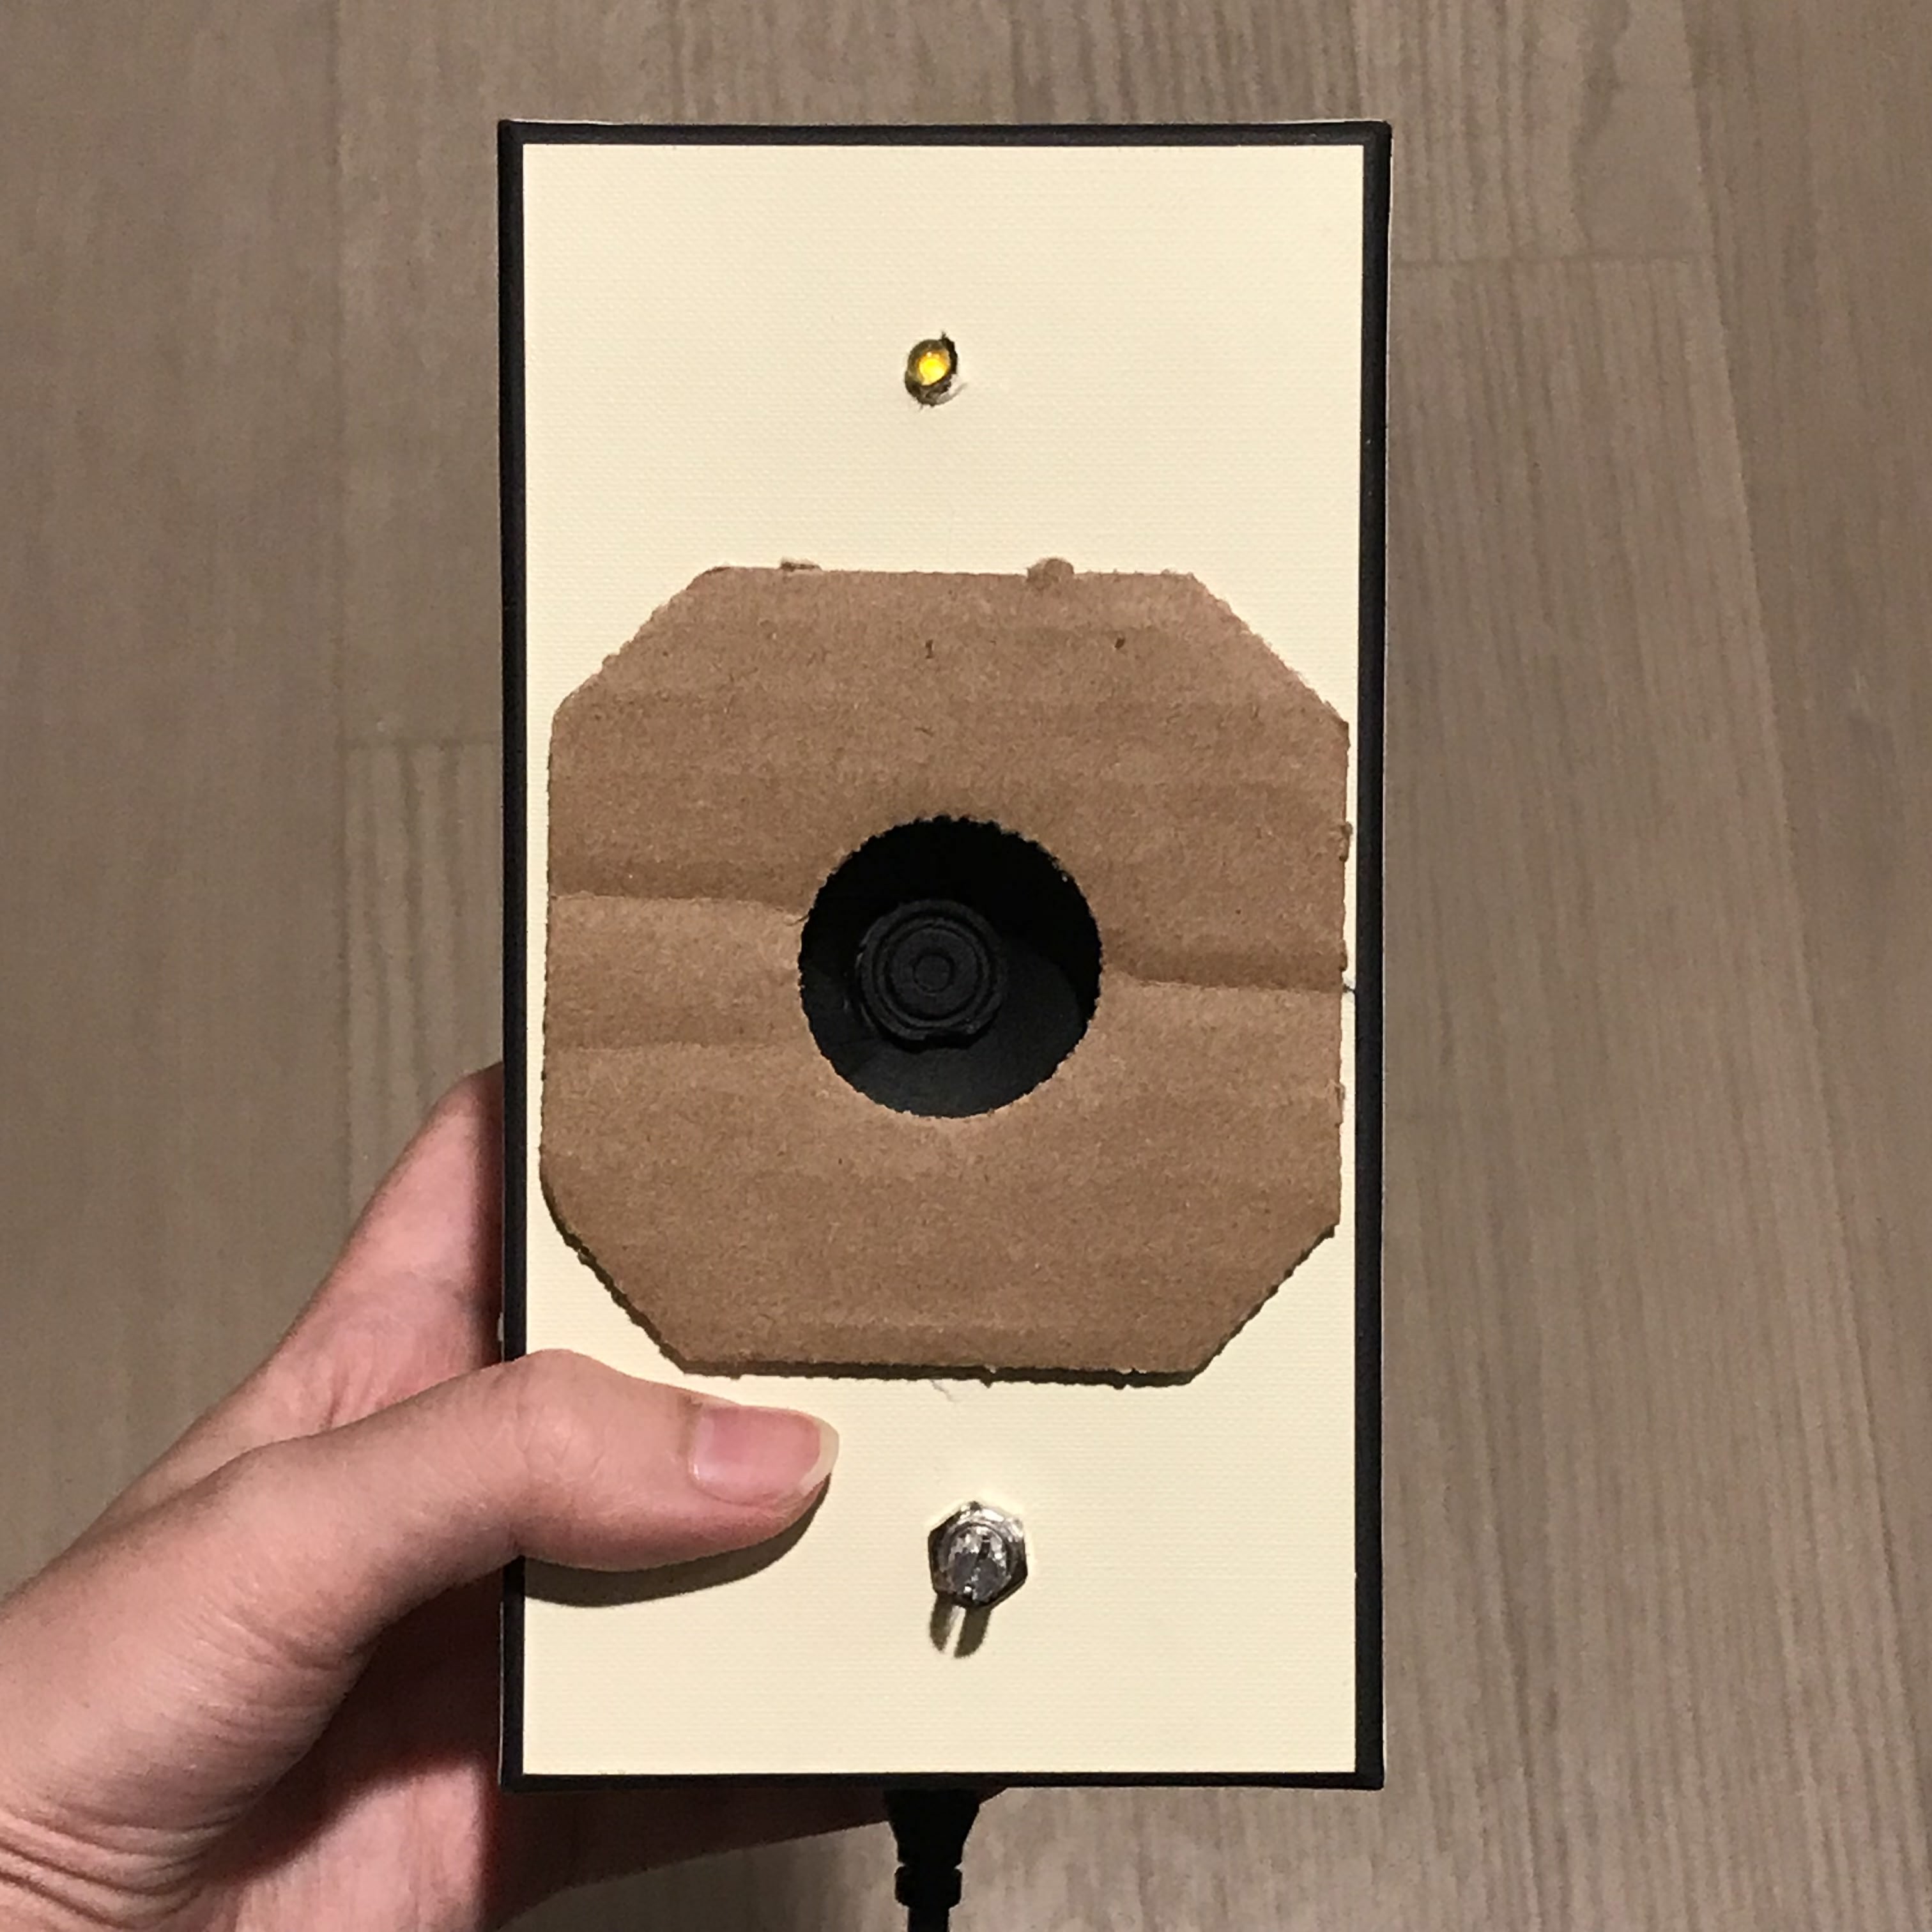
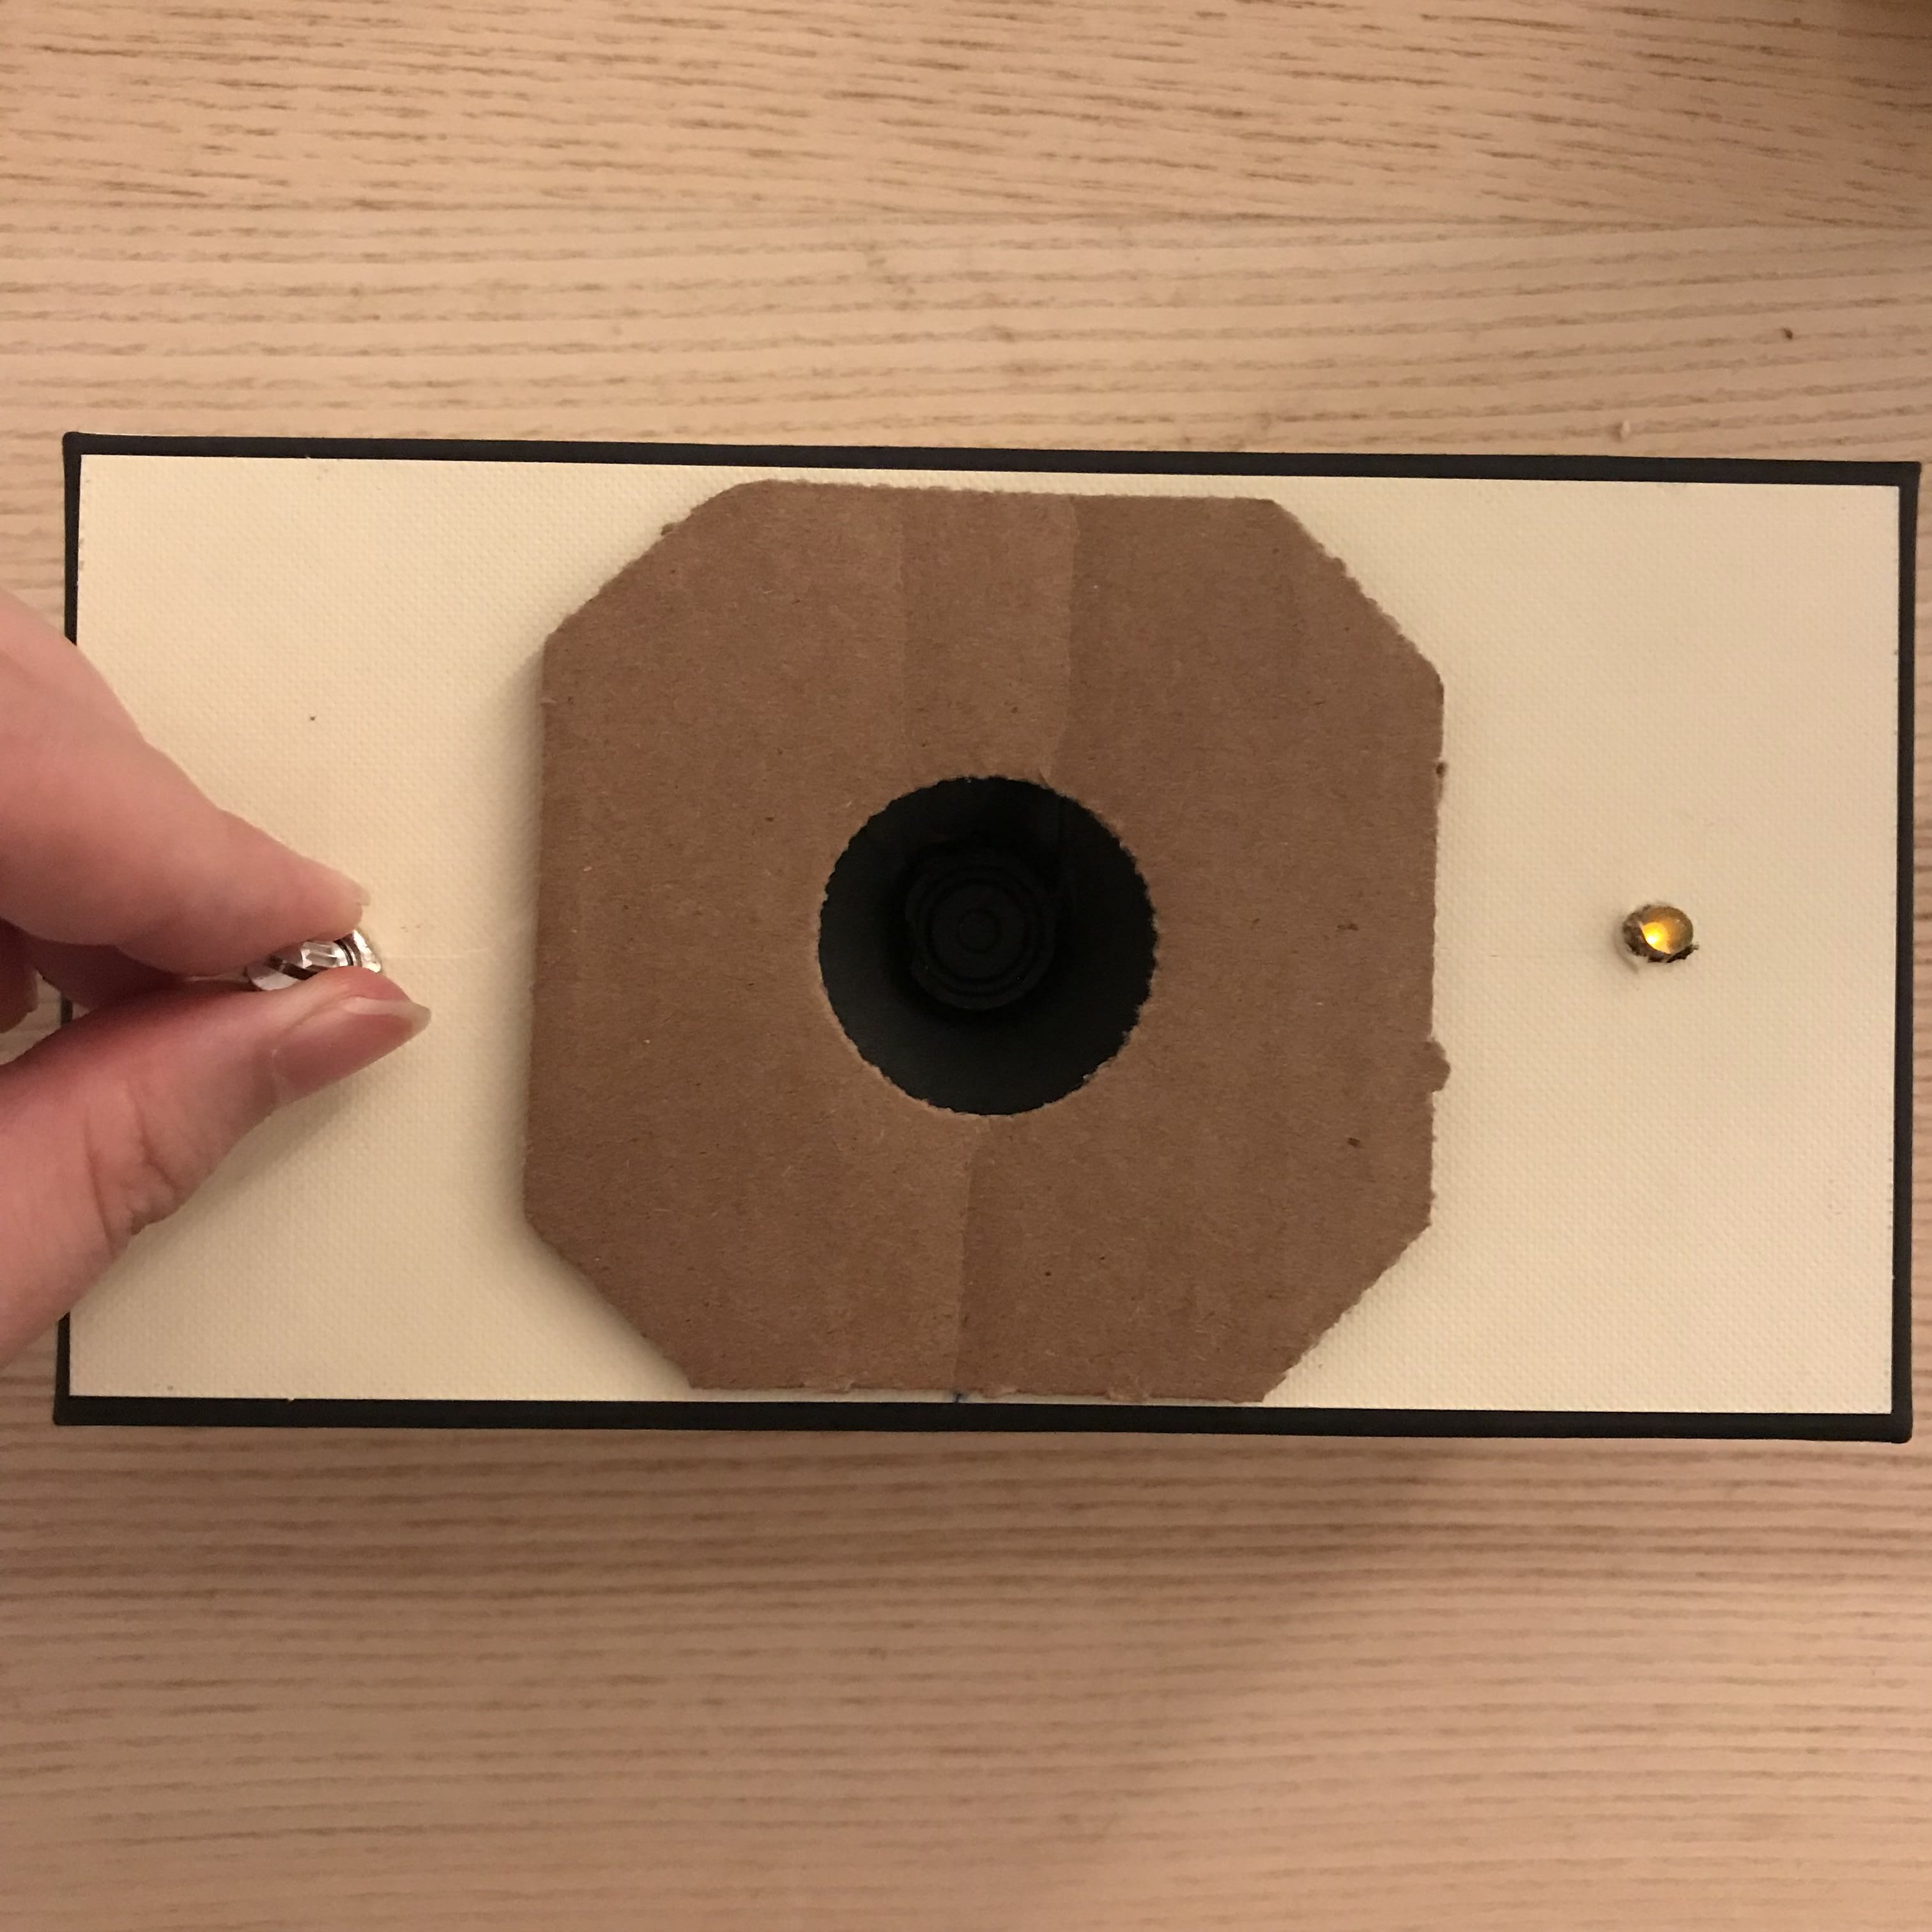
I made three holes on the cover surface for the following parts: the potentiometer, speaker and the LED light. And one on the side for the USB.
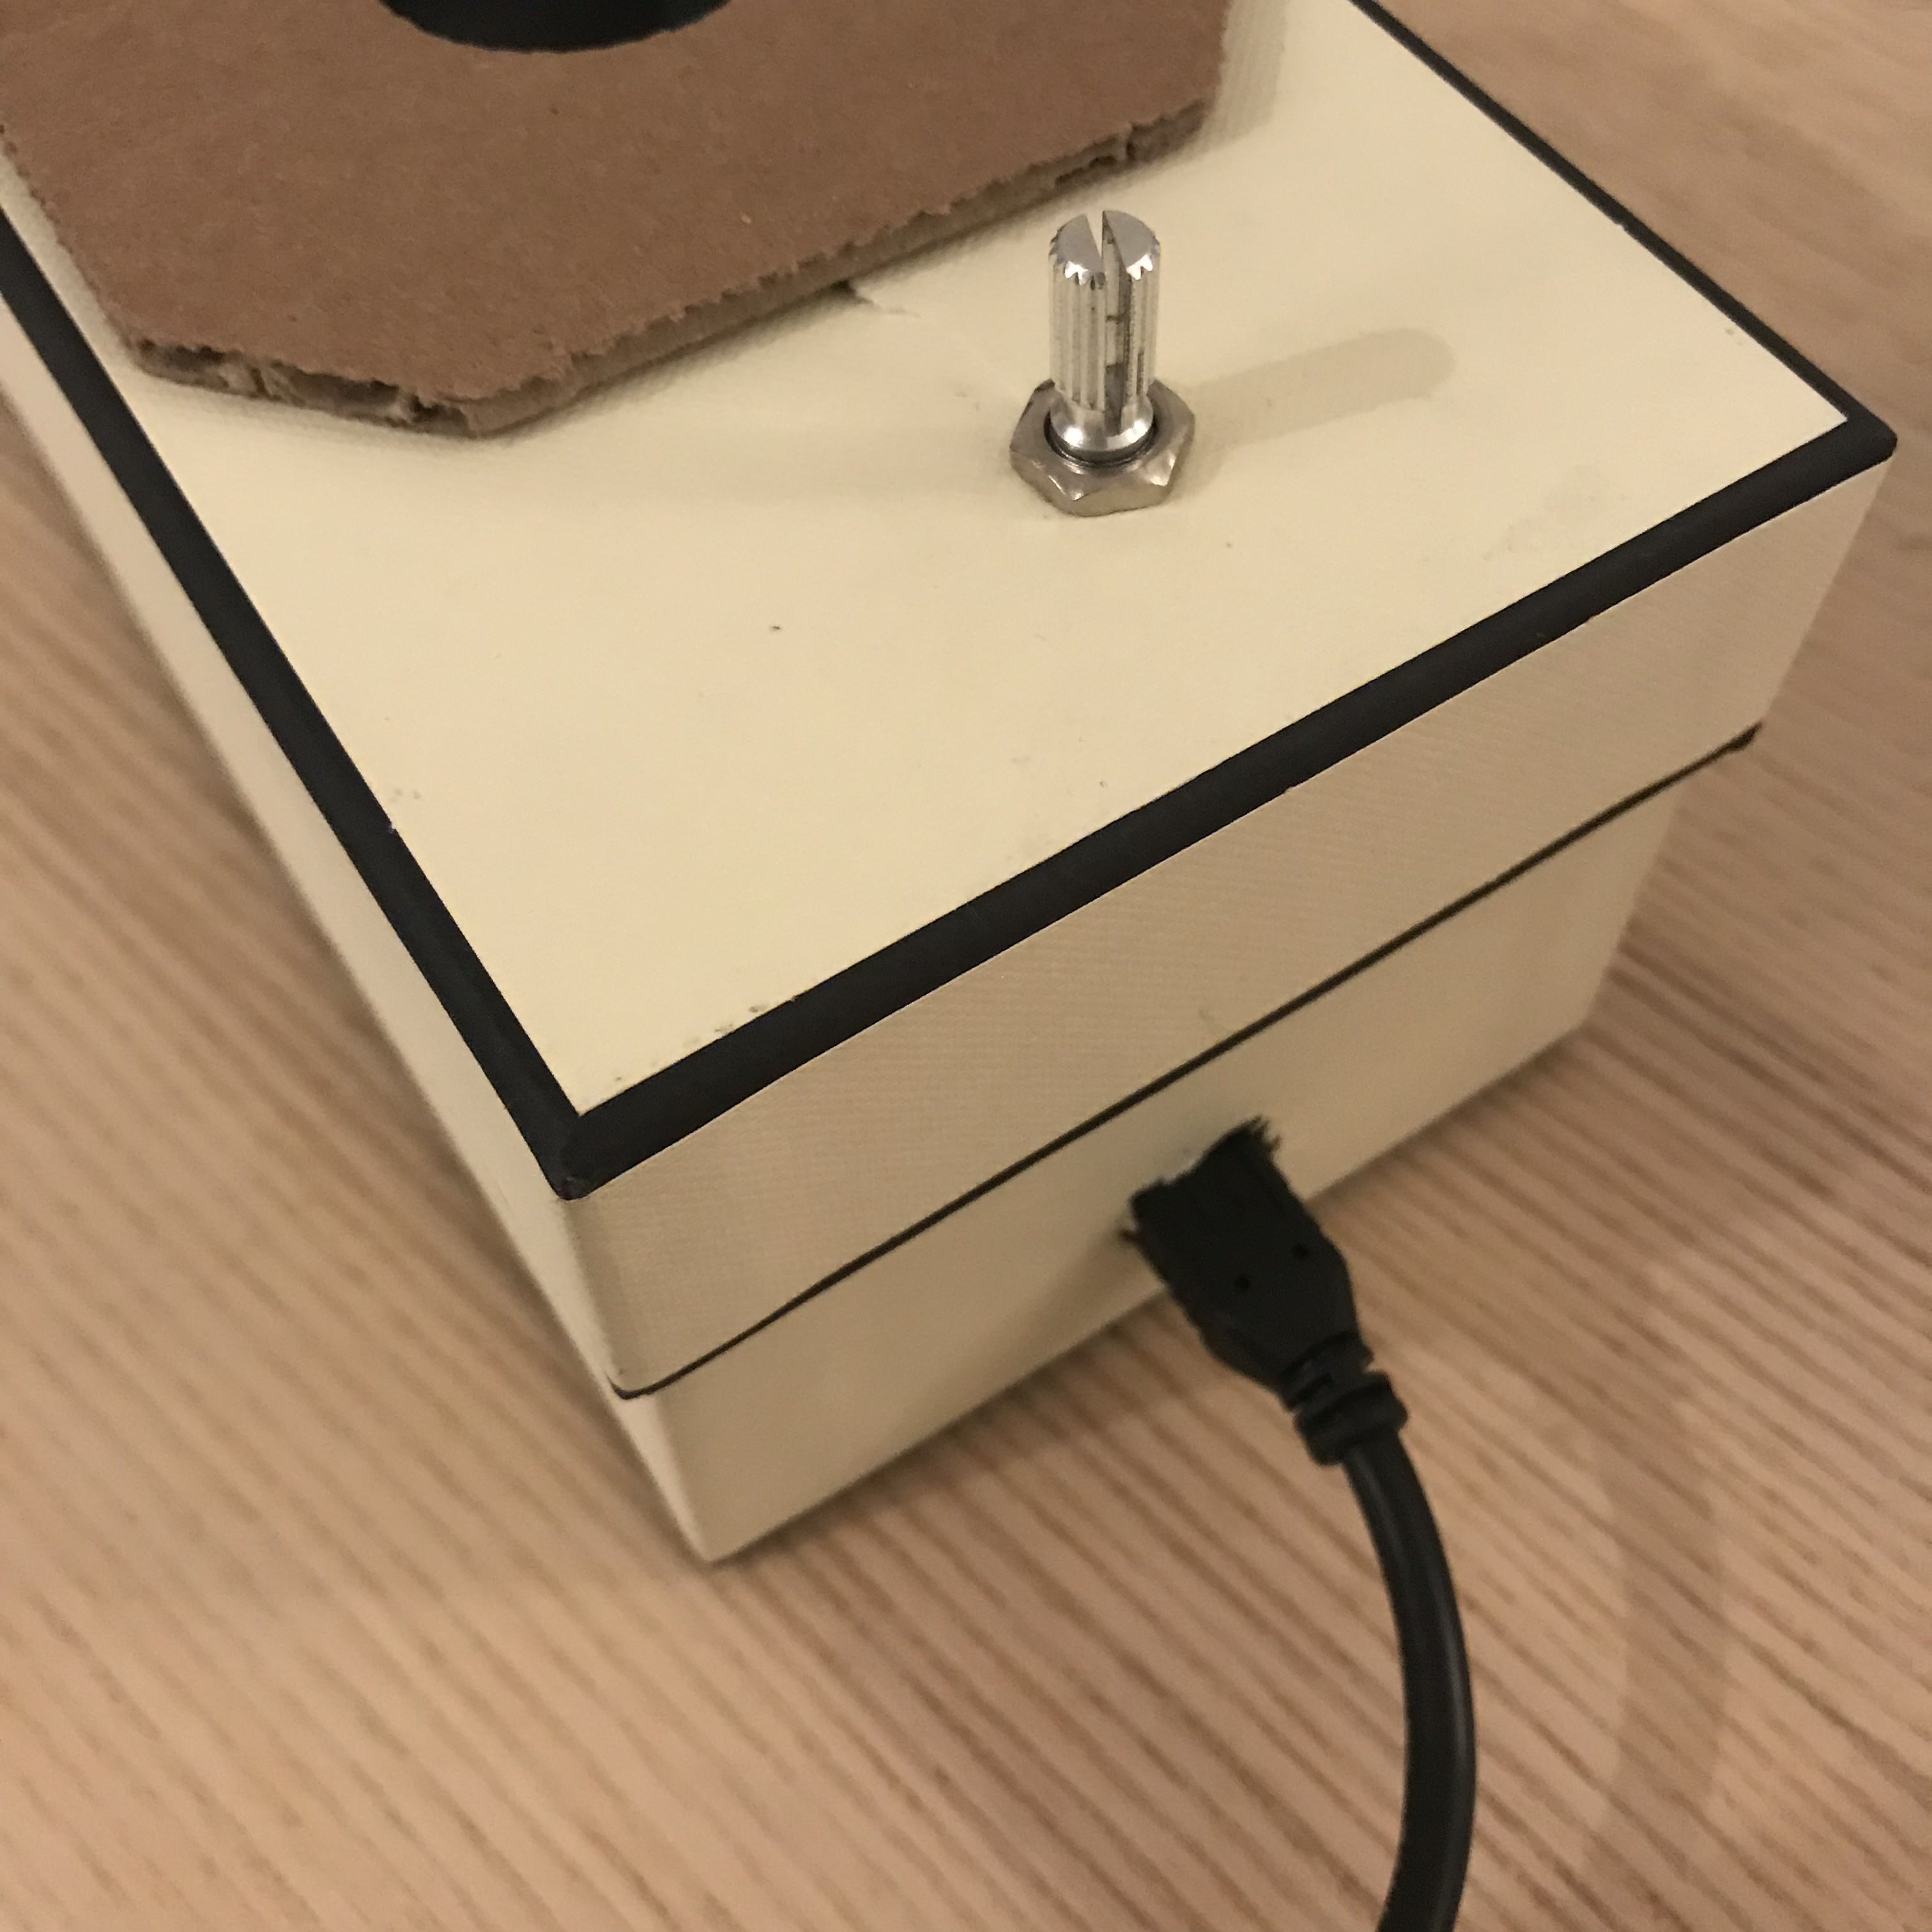
The cover parts were first connected to the cover, then connected to the breadboard.
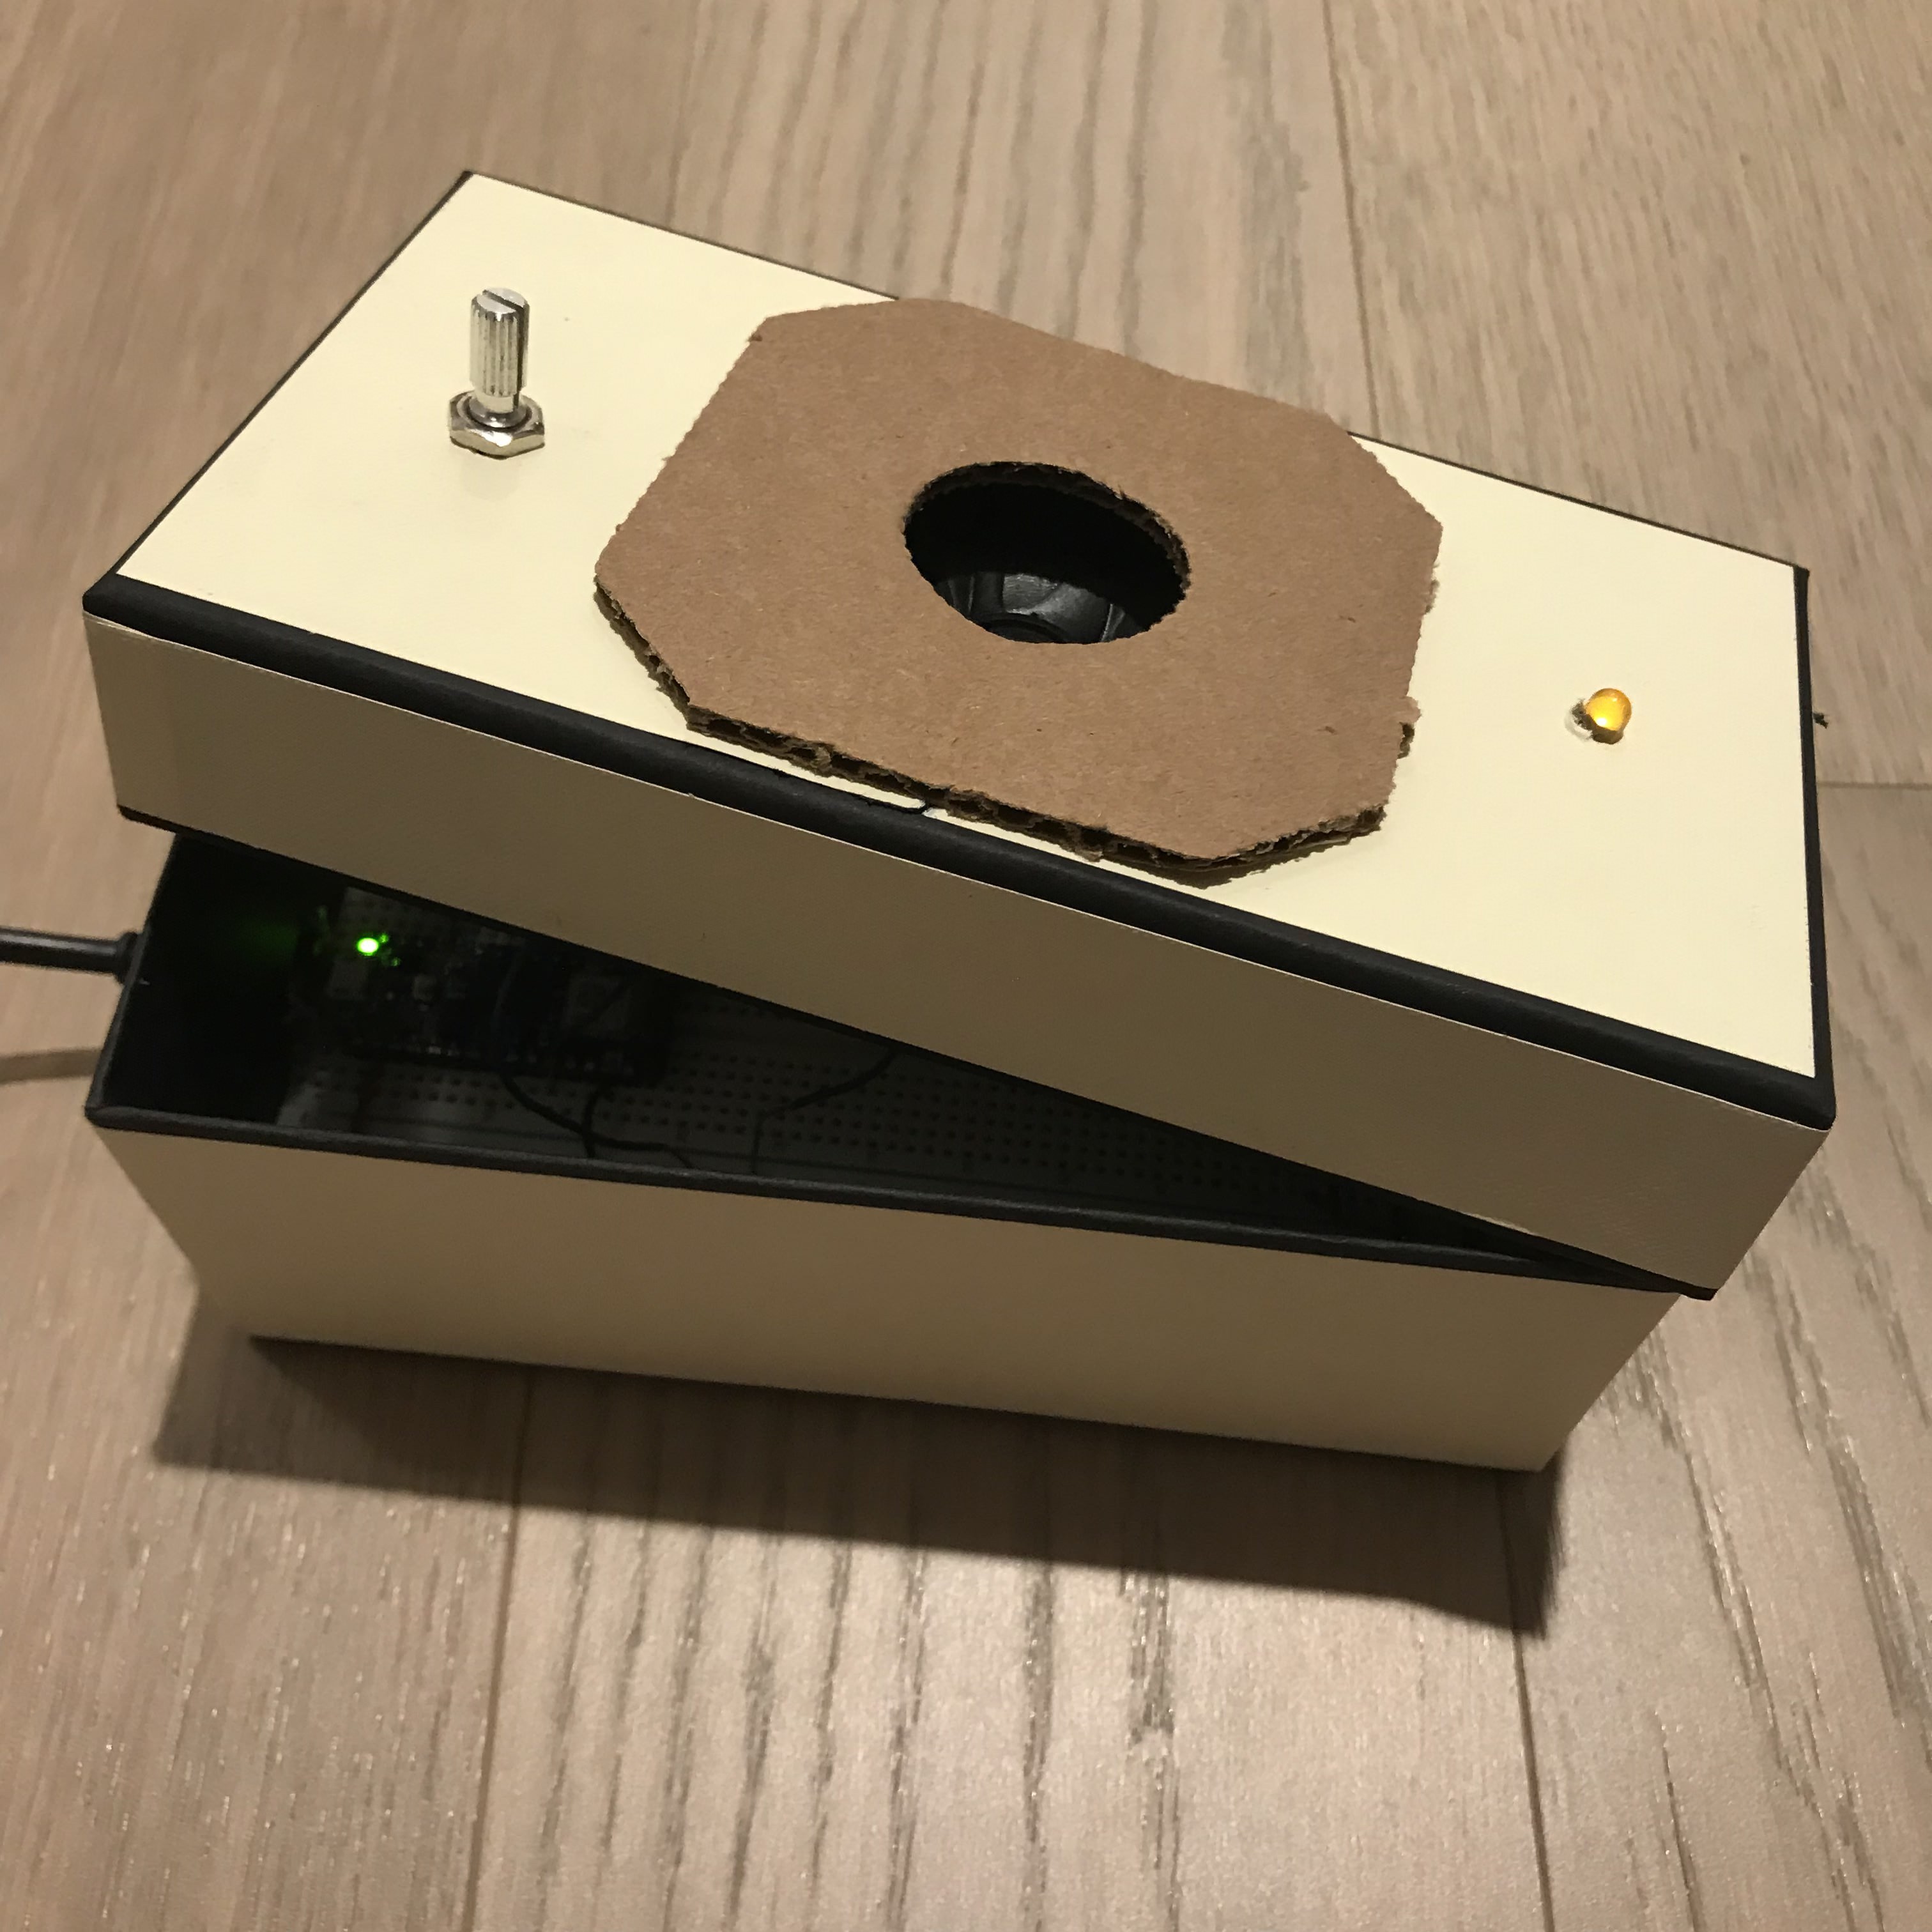

And make it workable


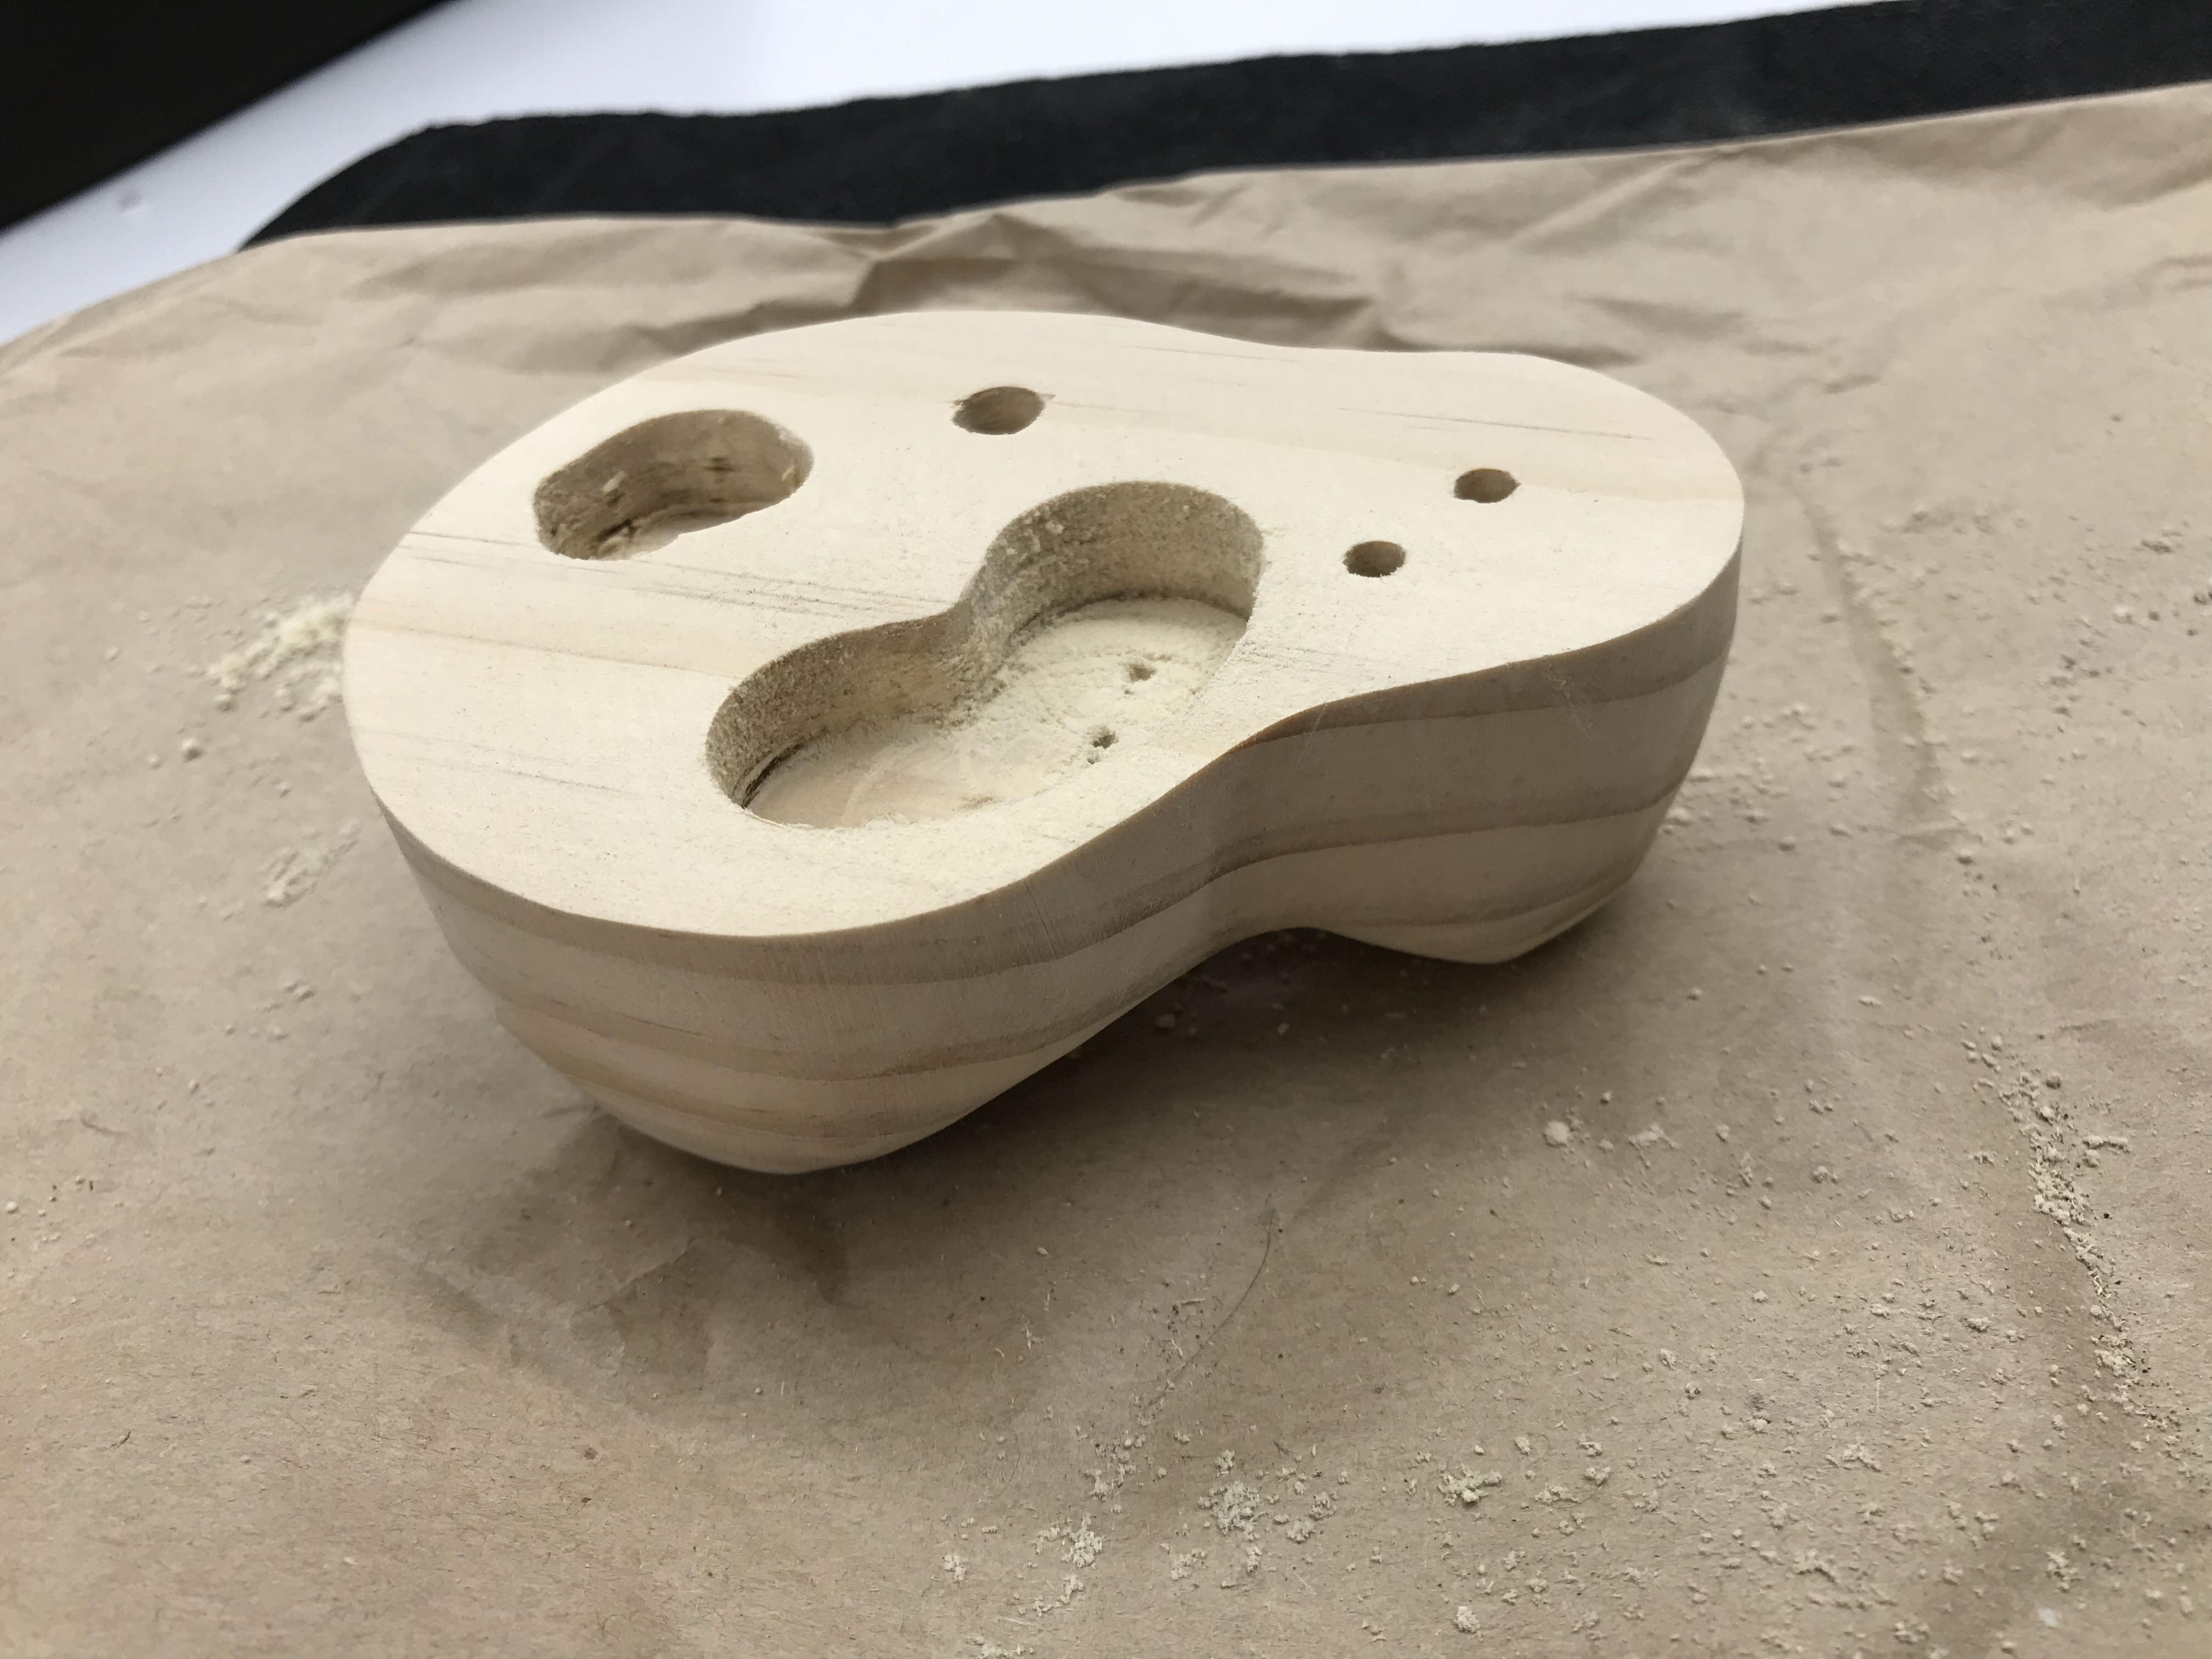
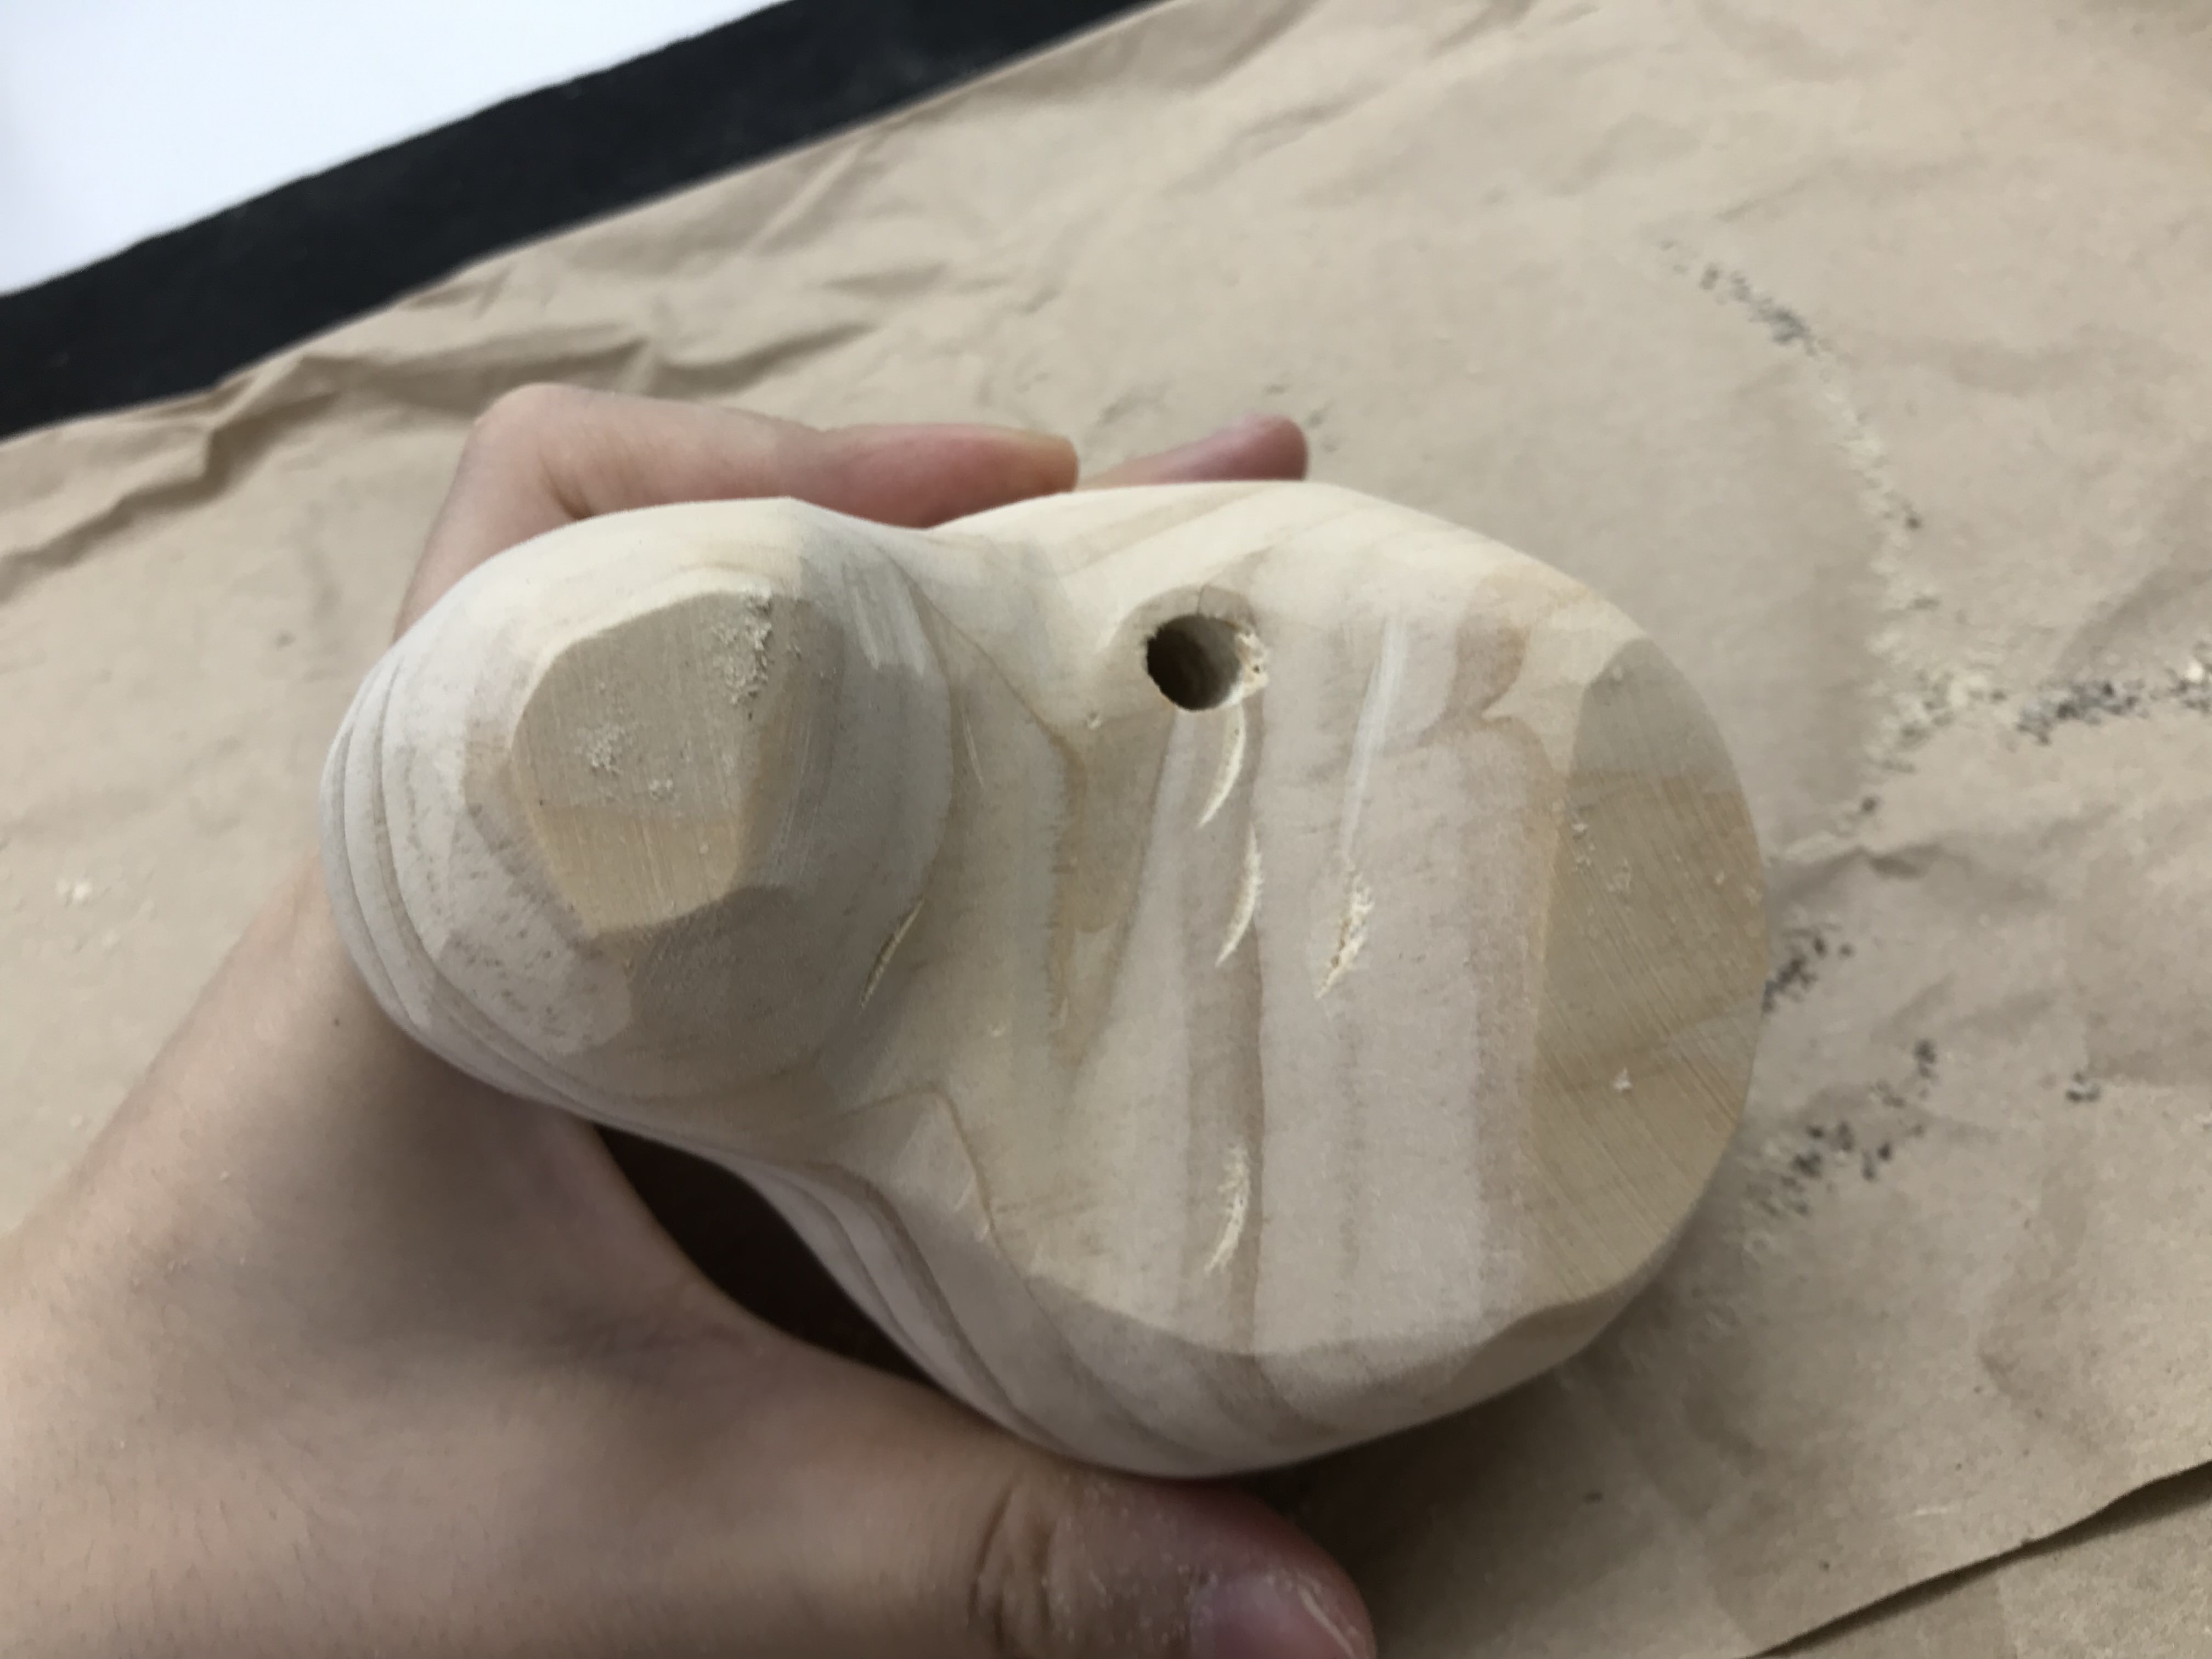
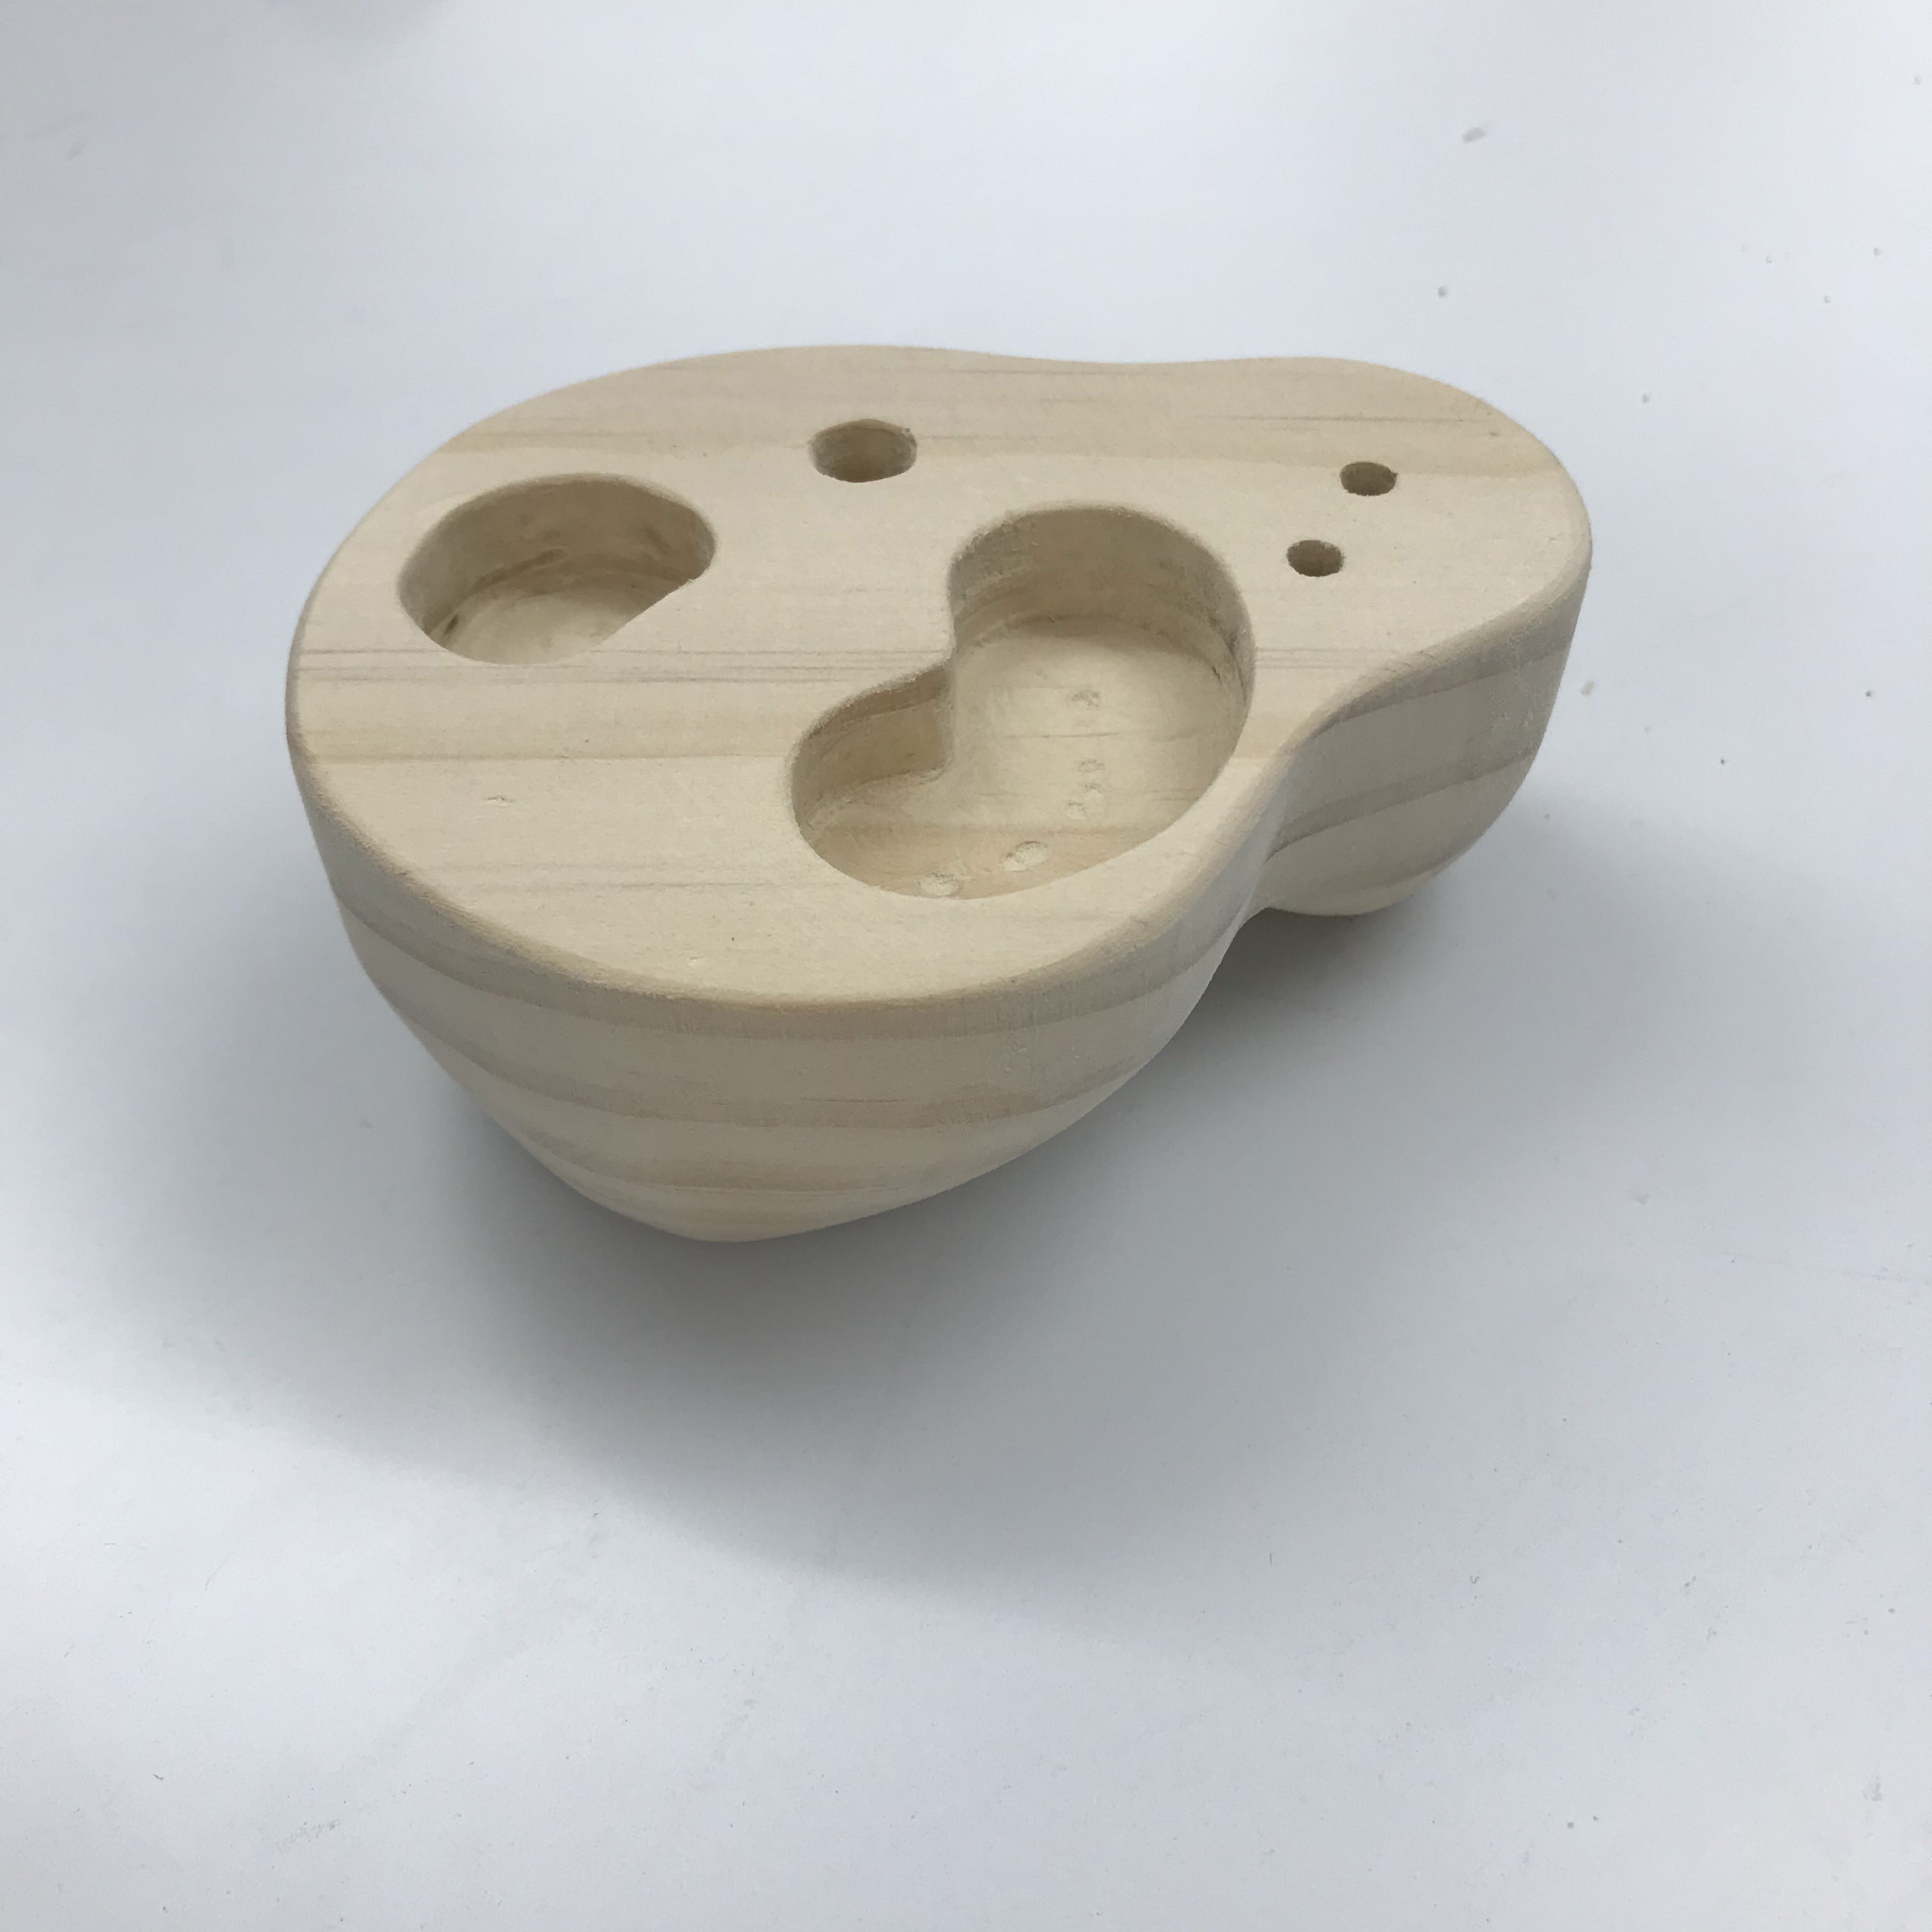
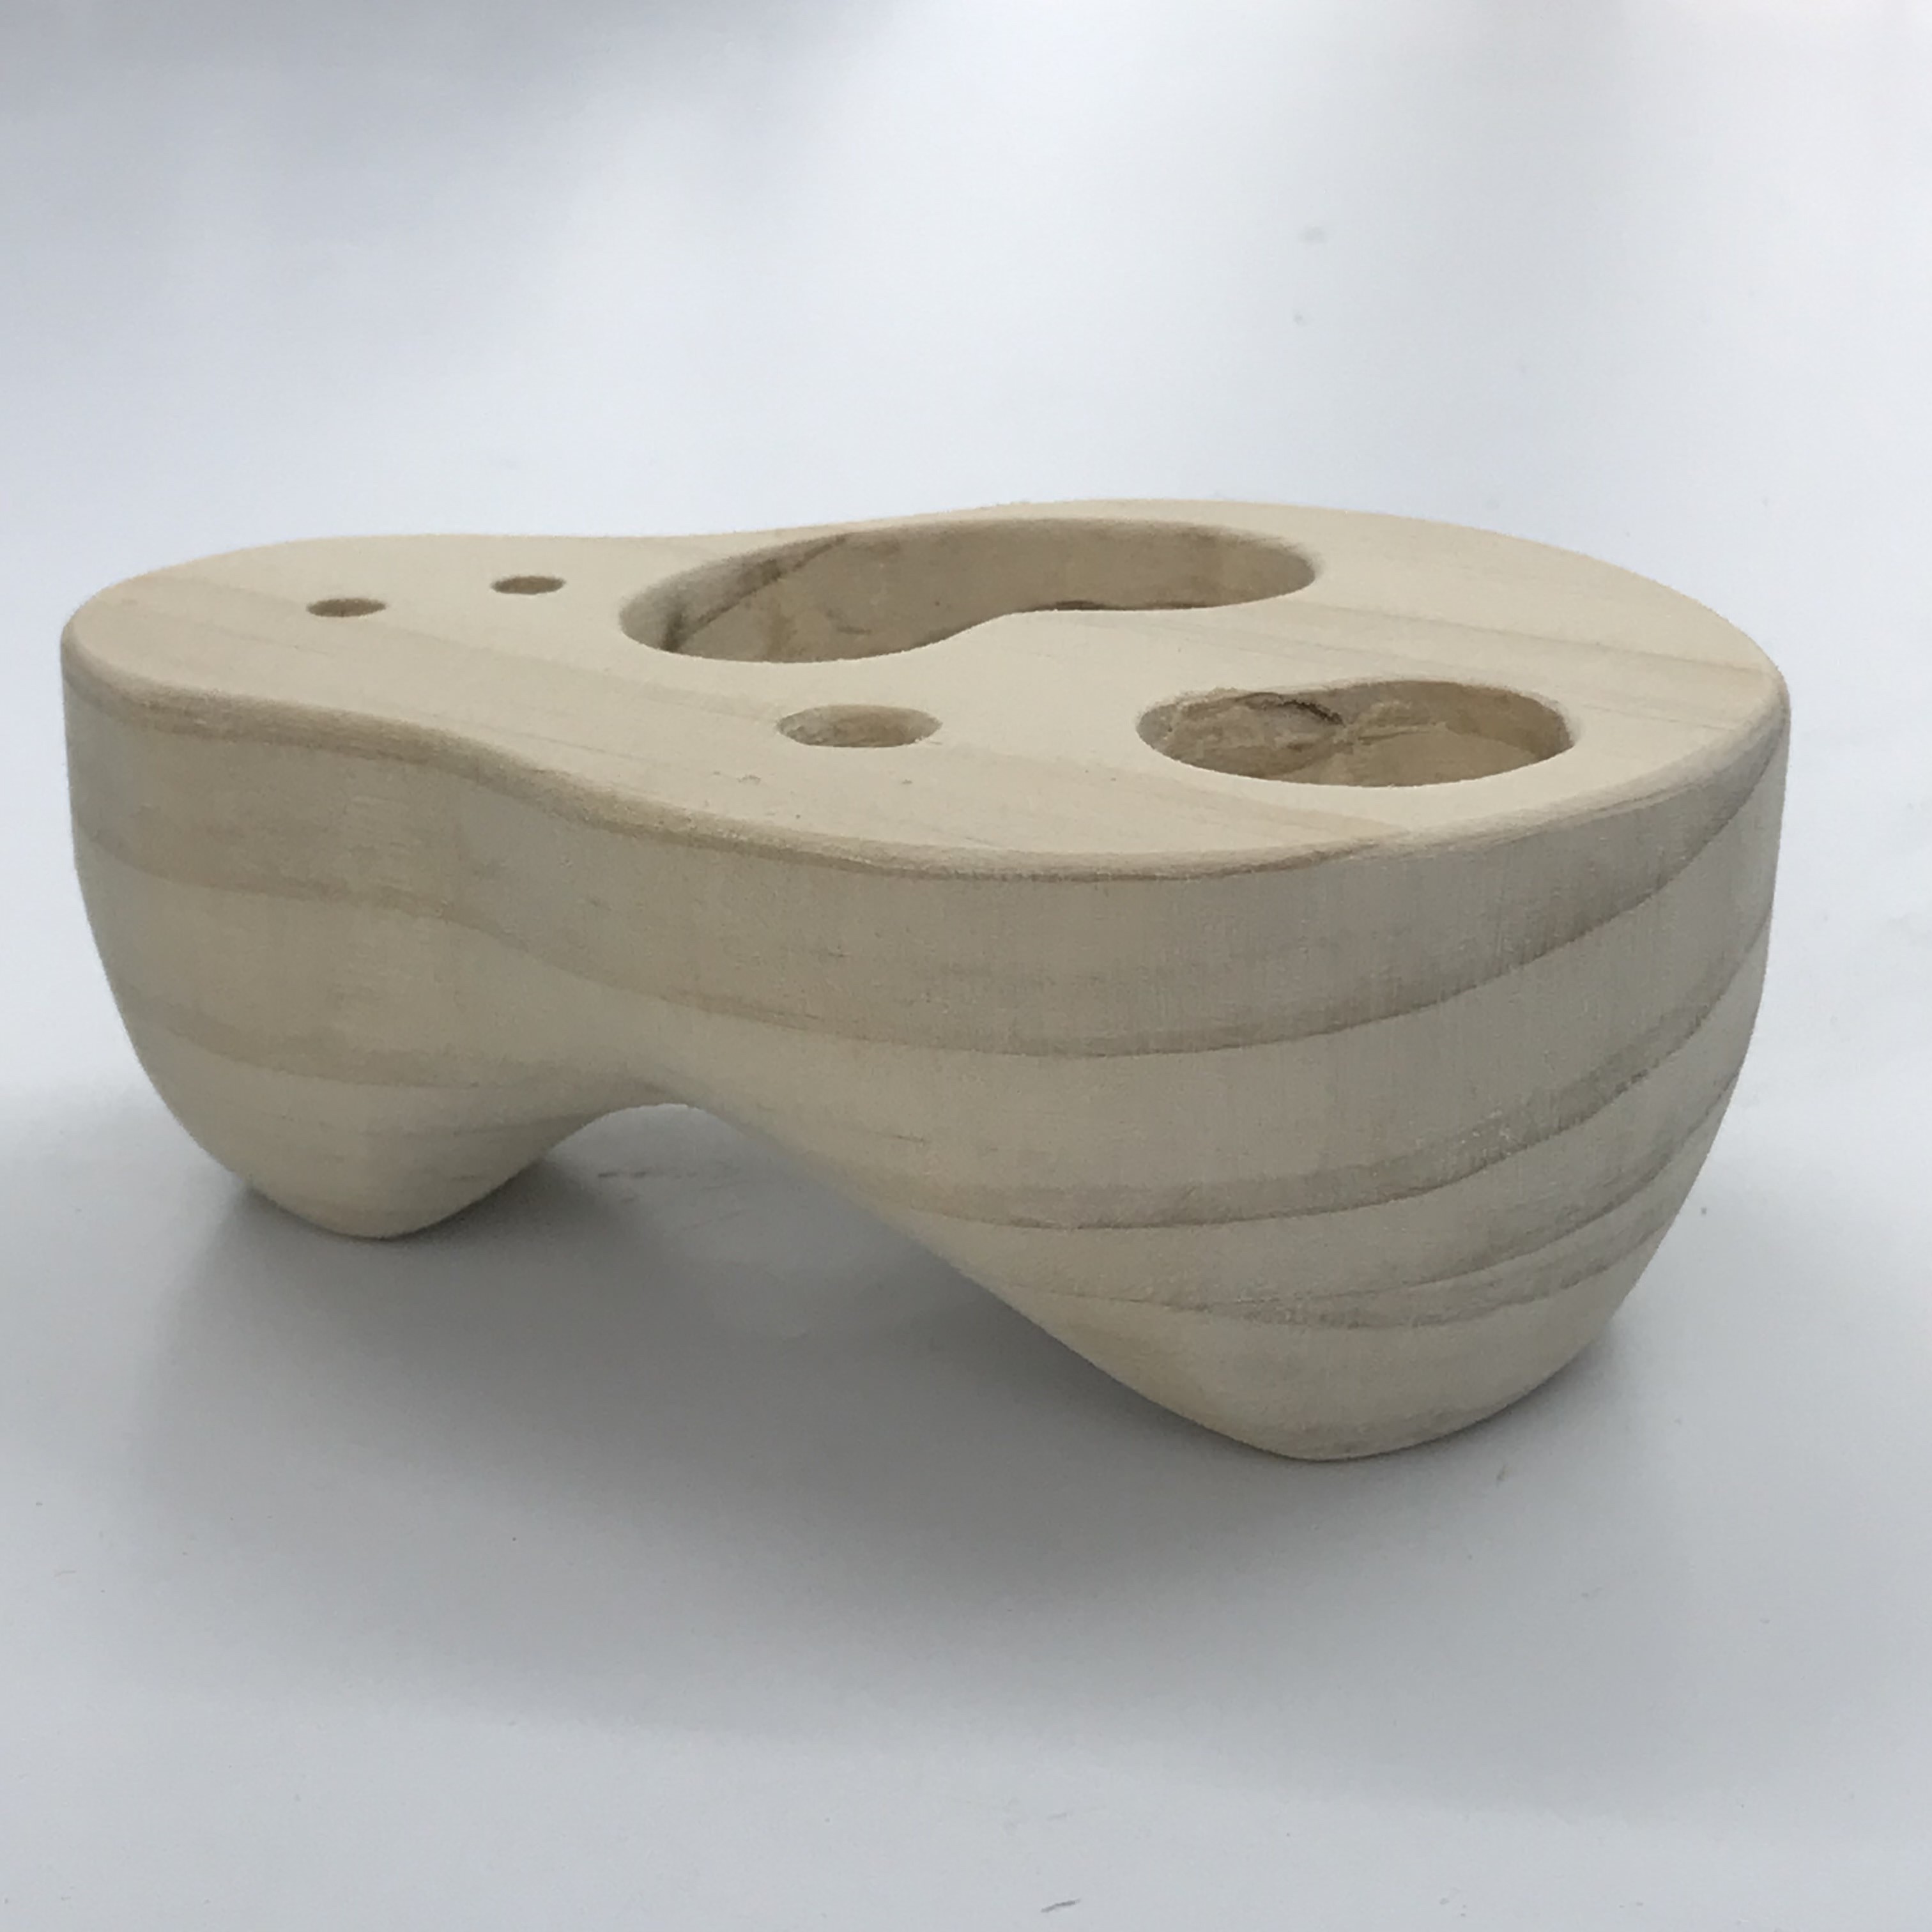
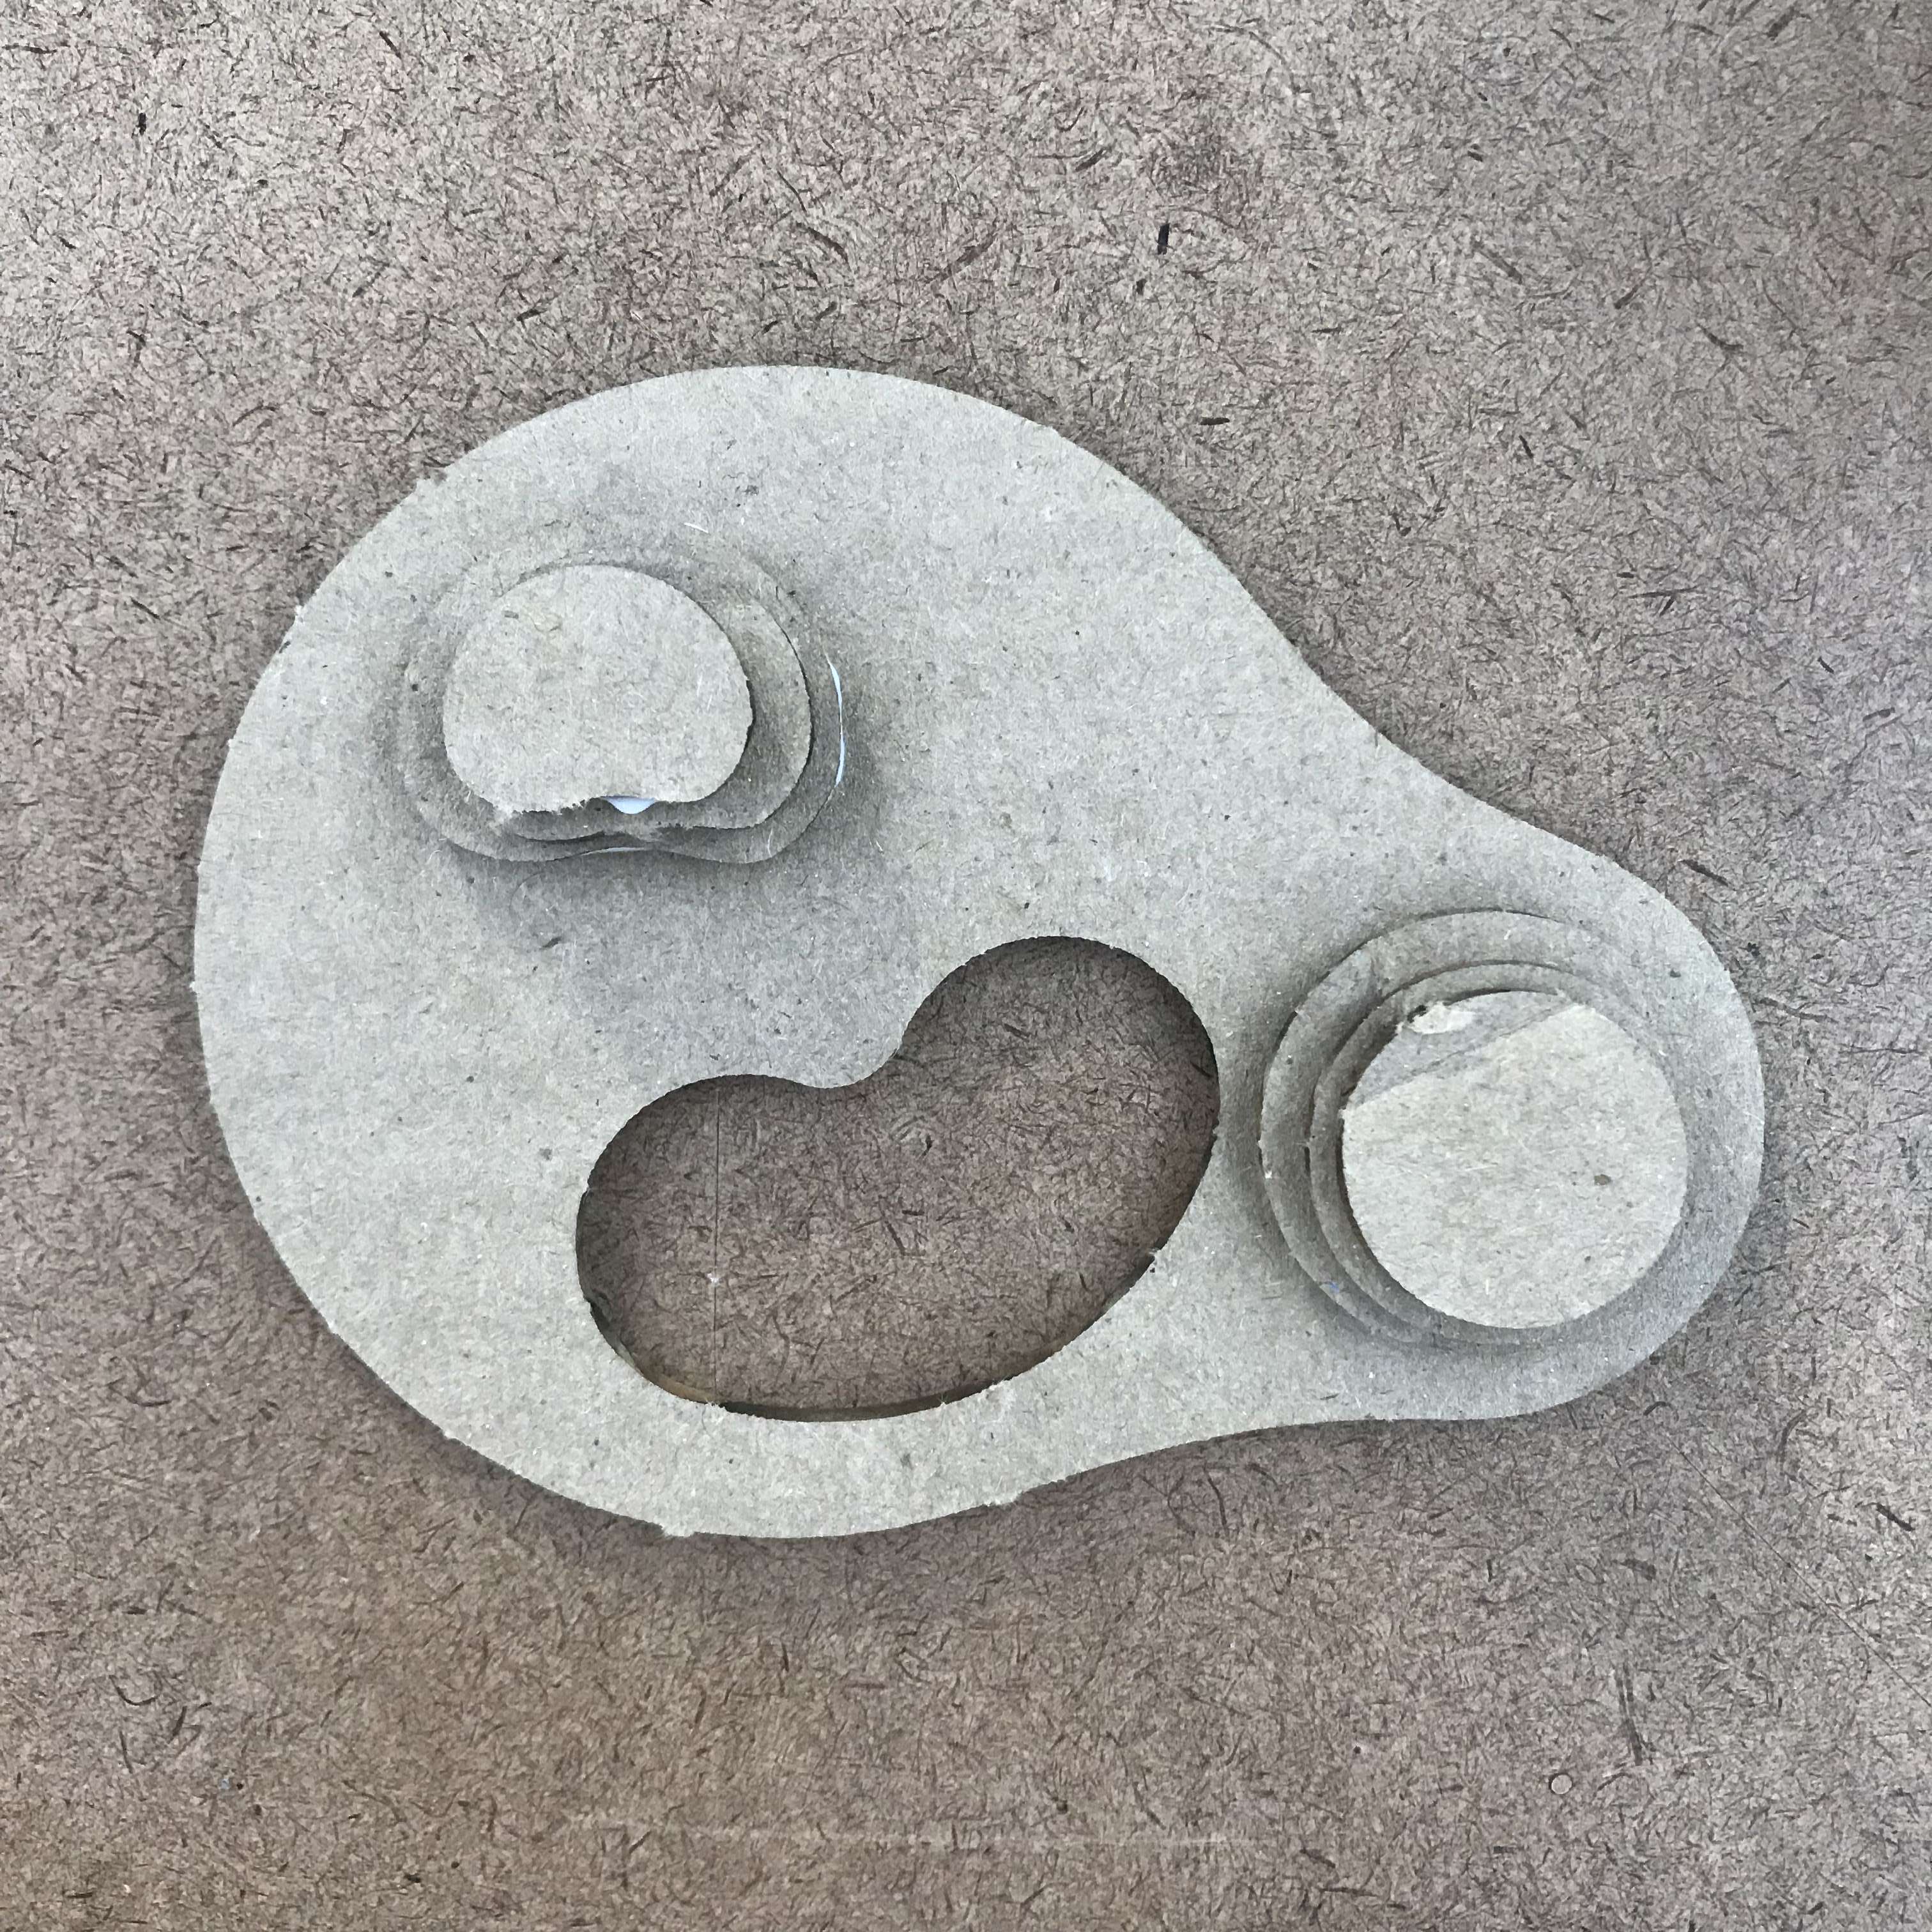
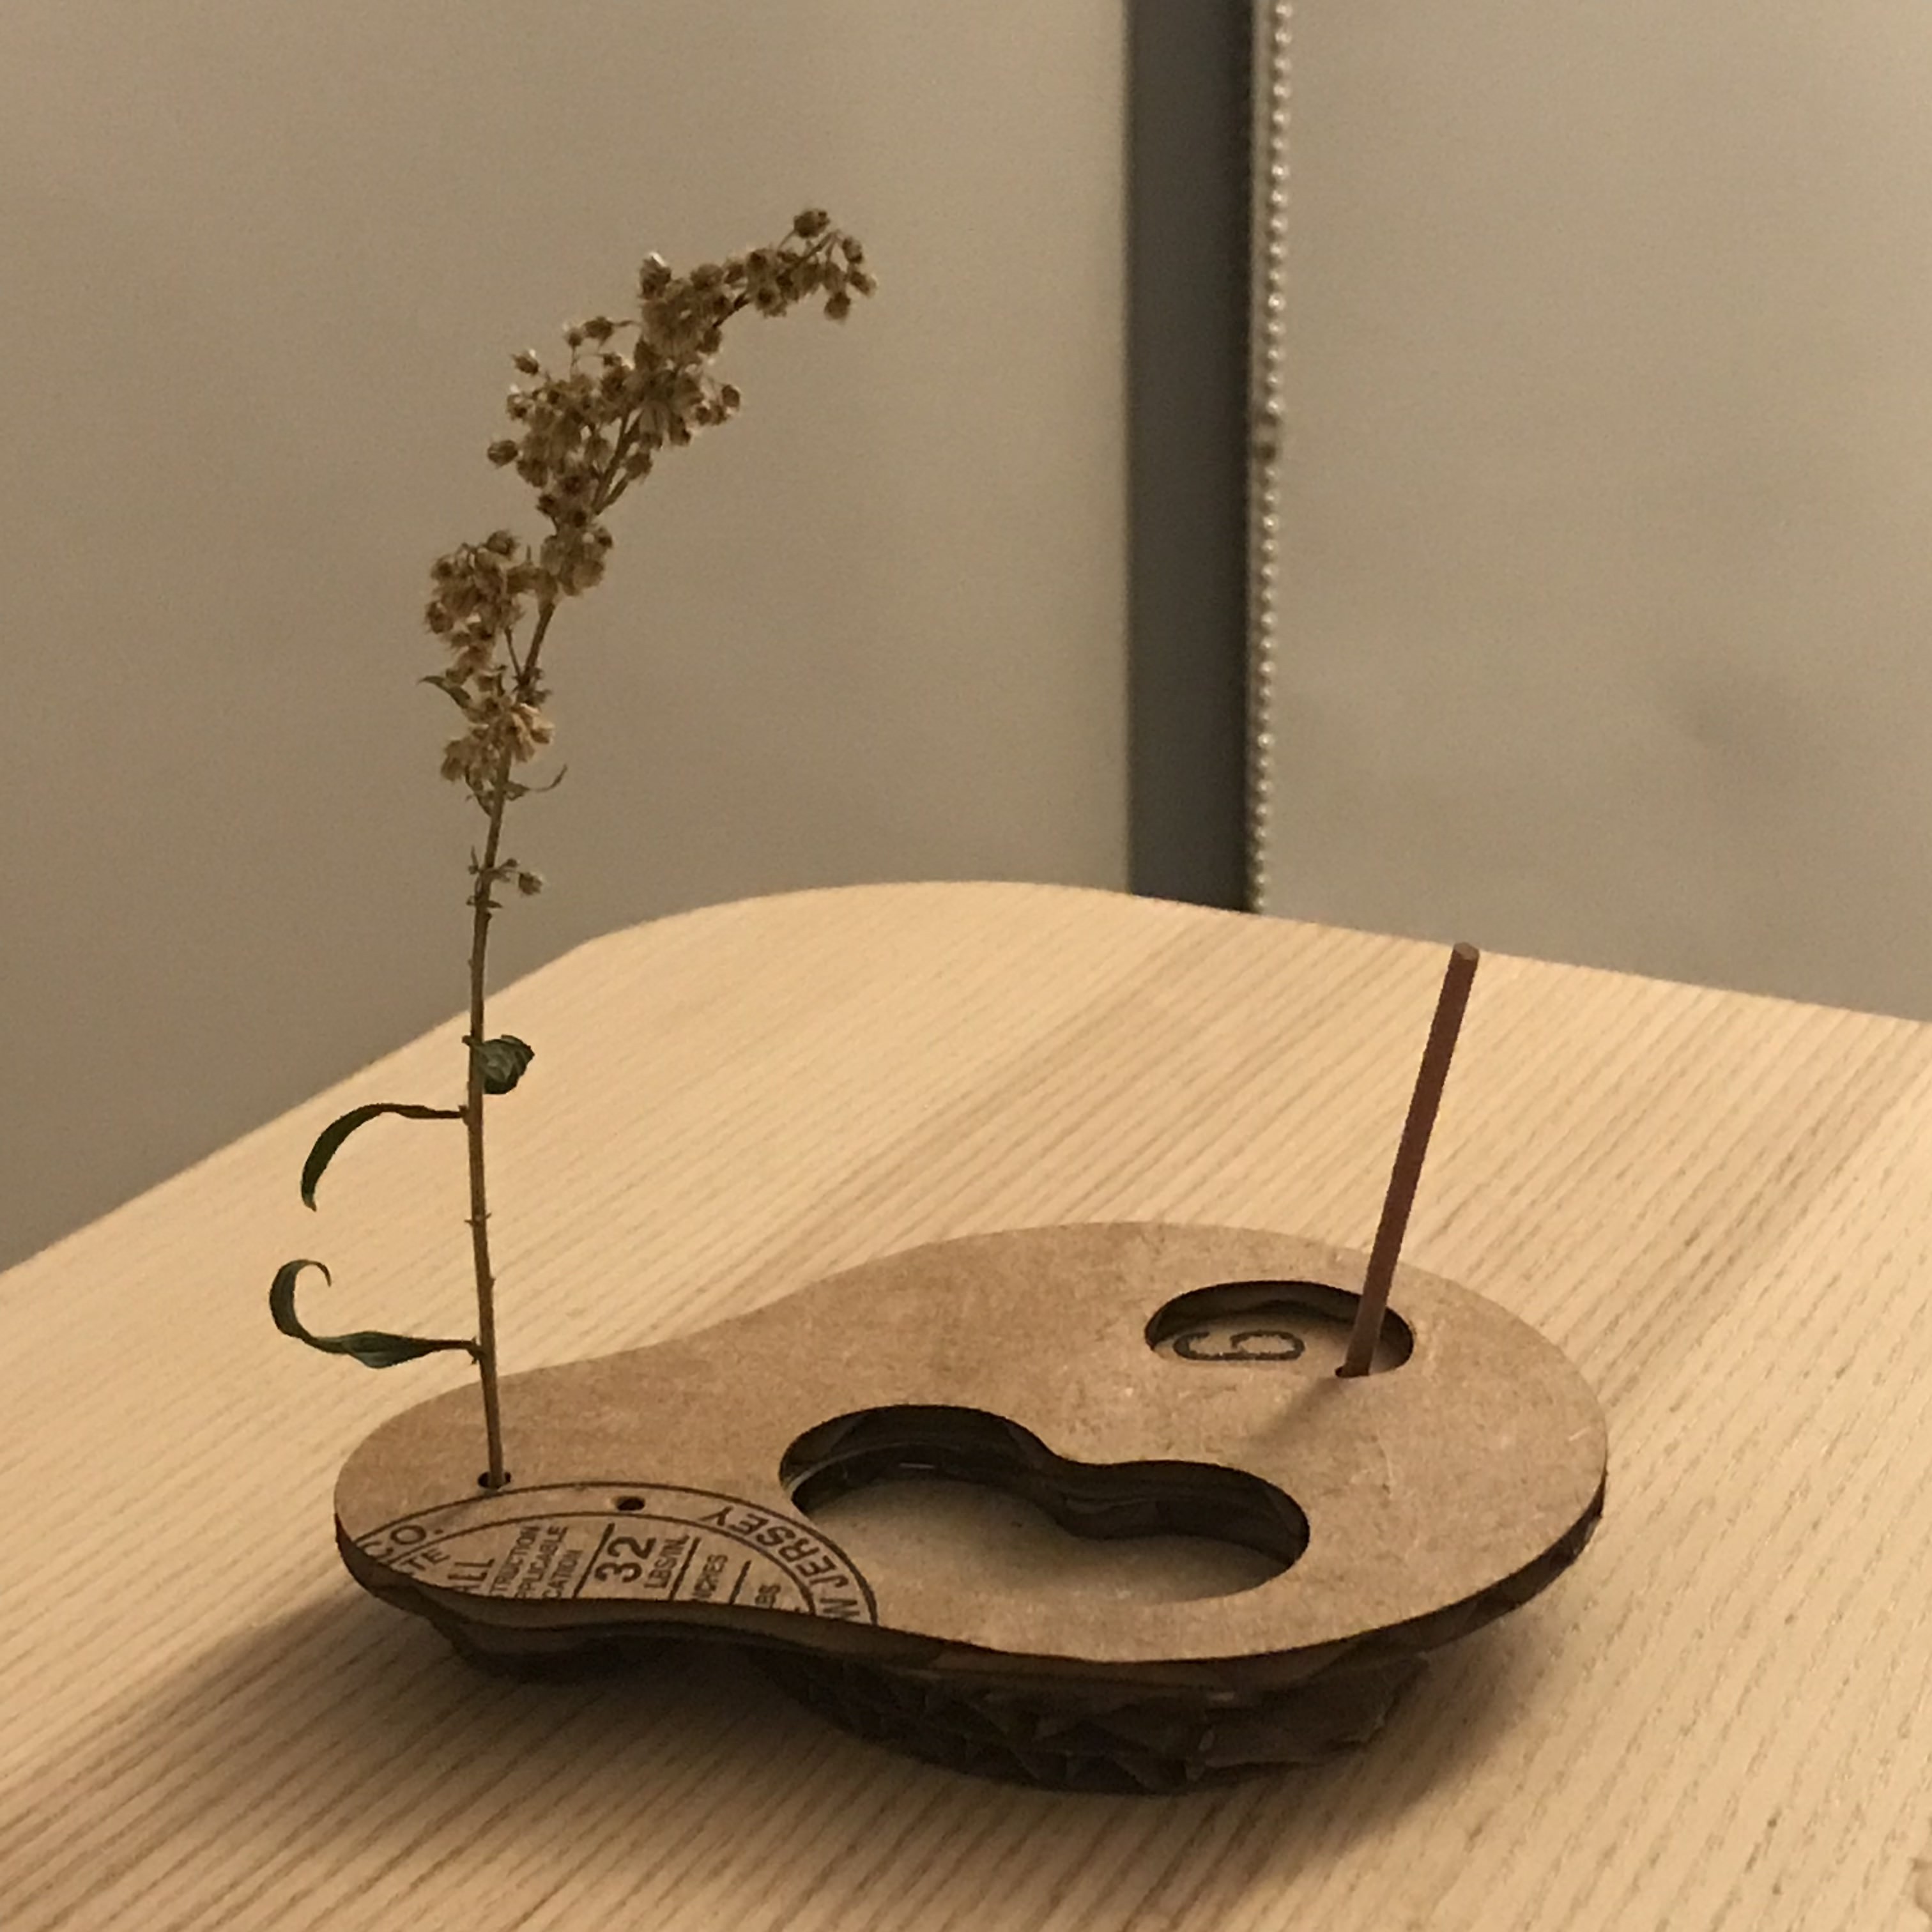
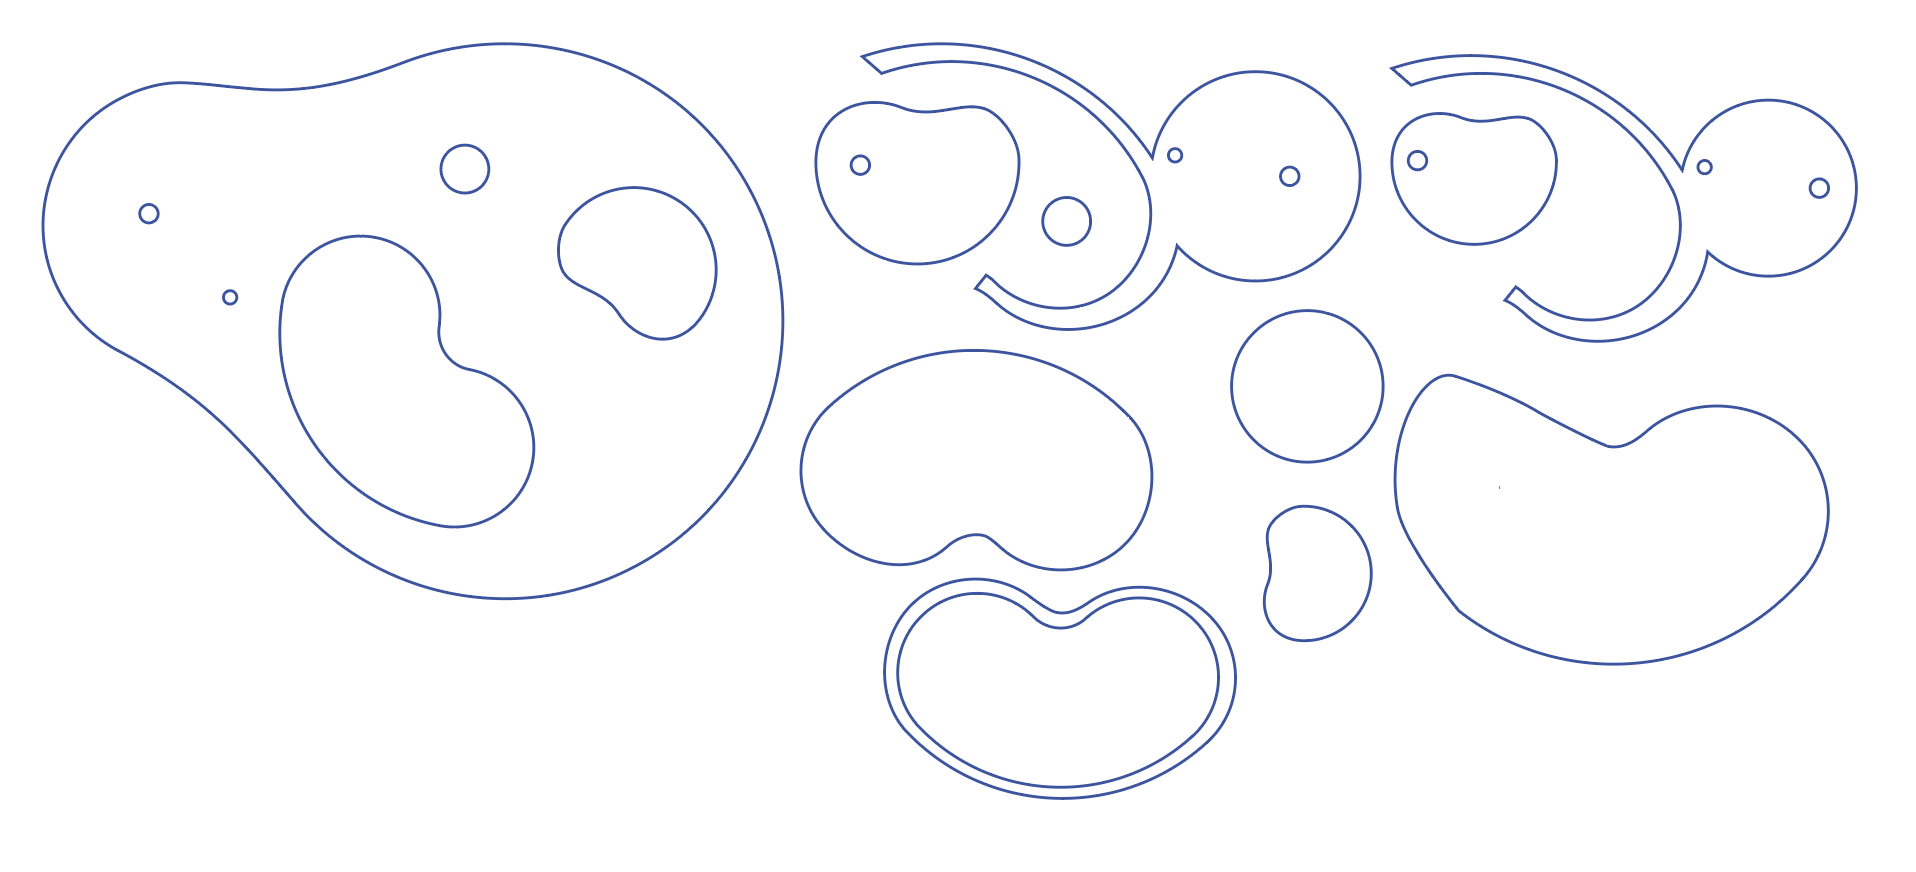
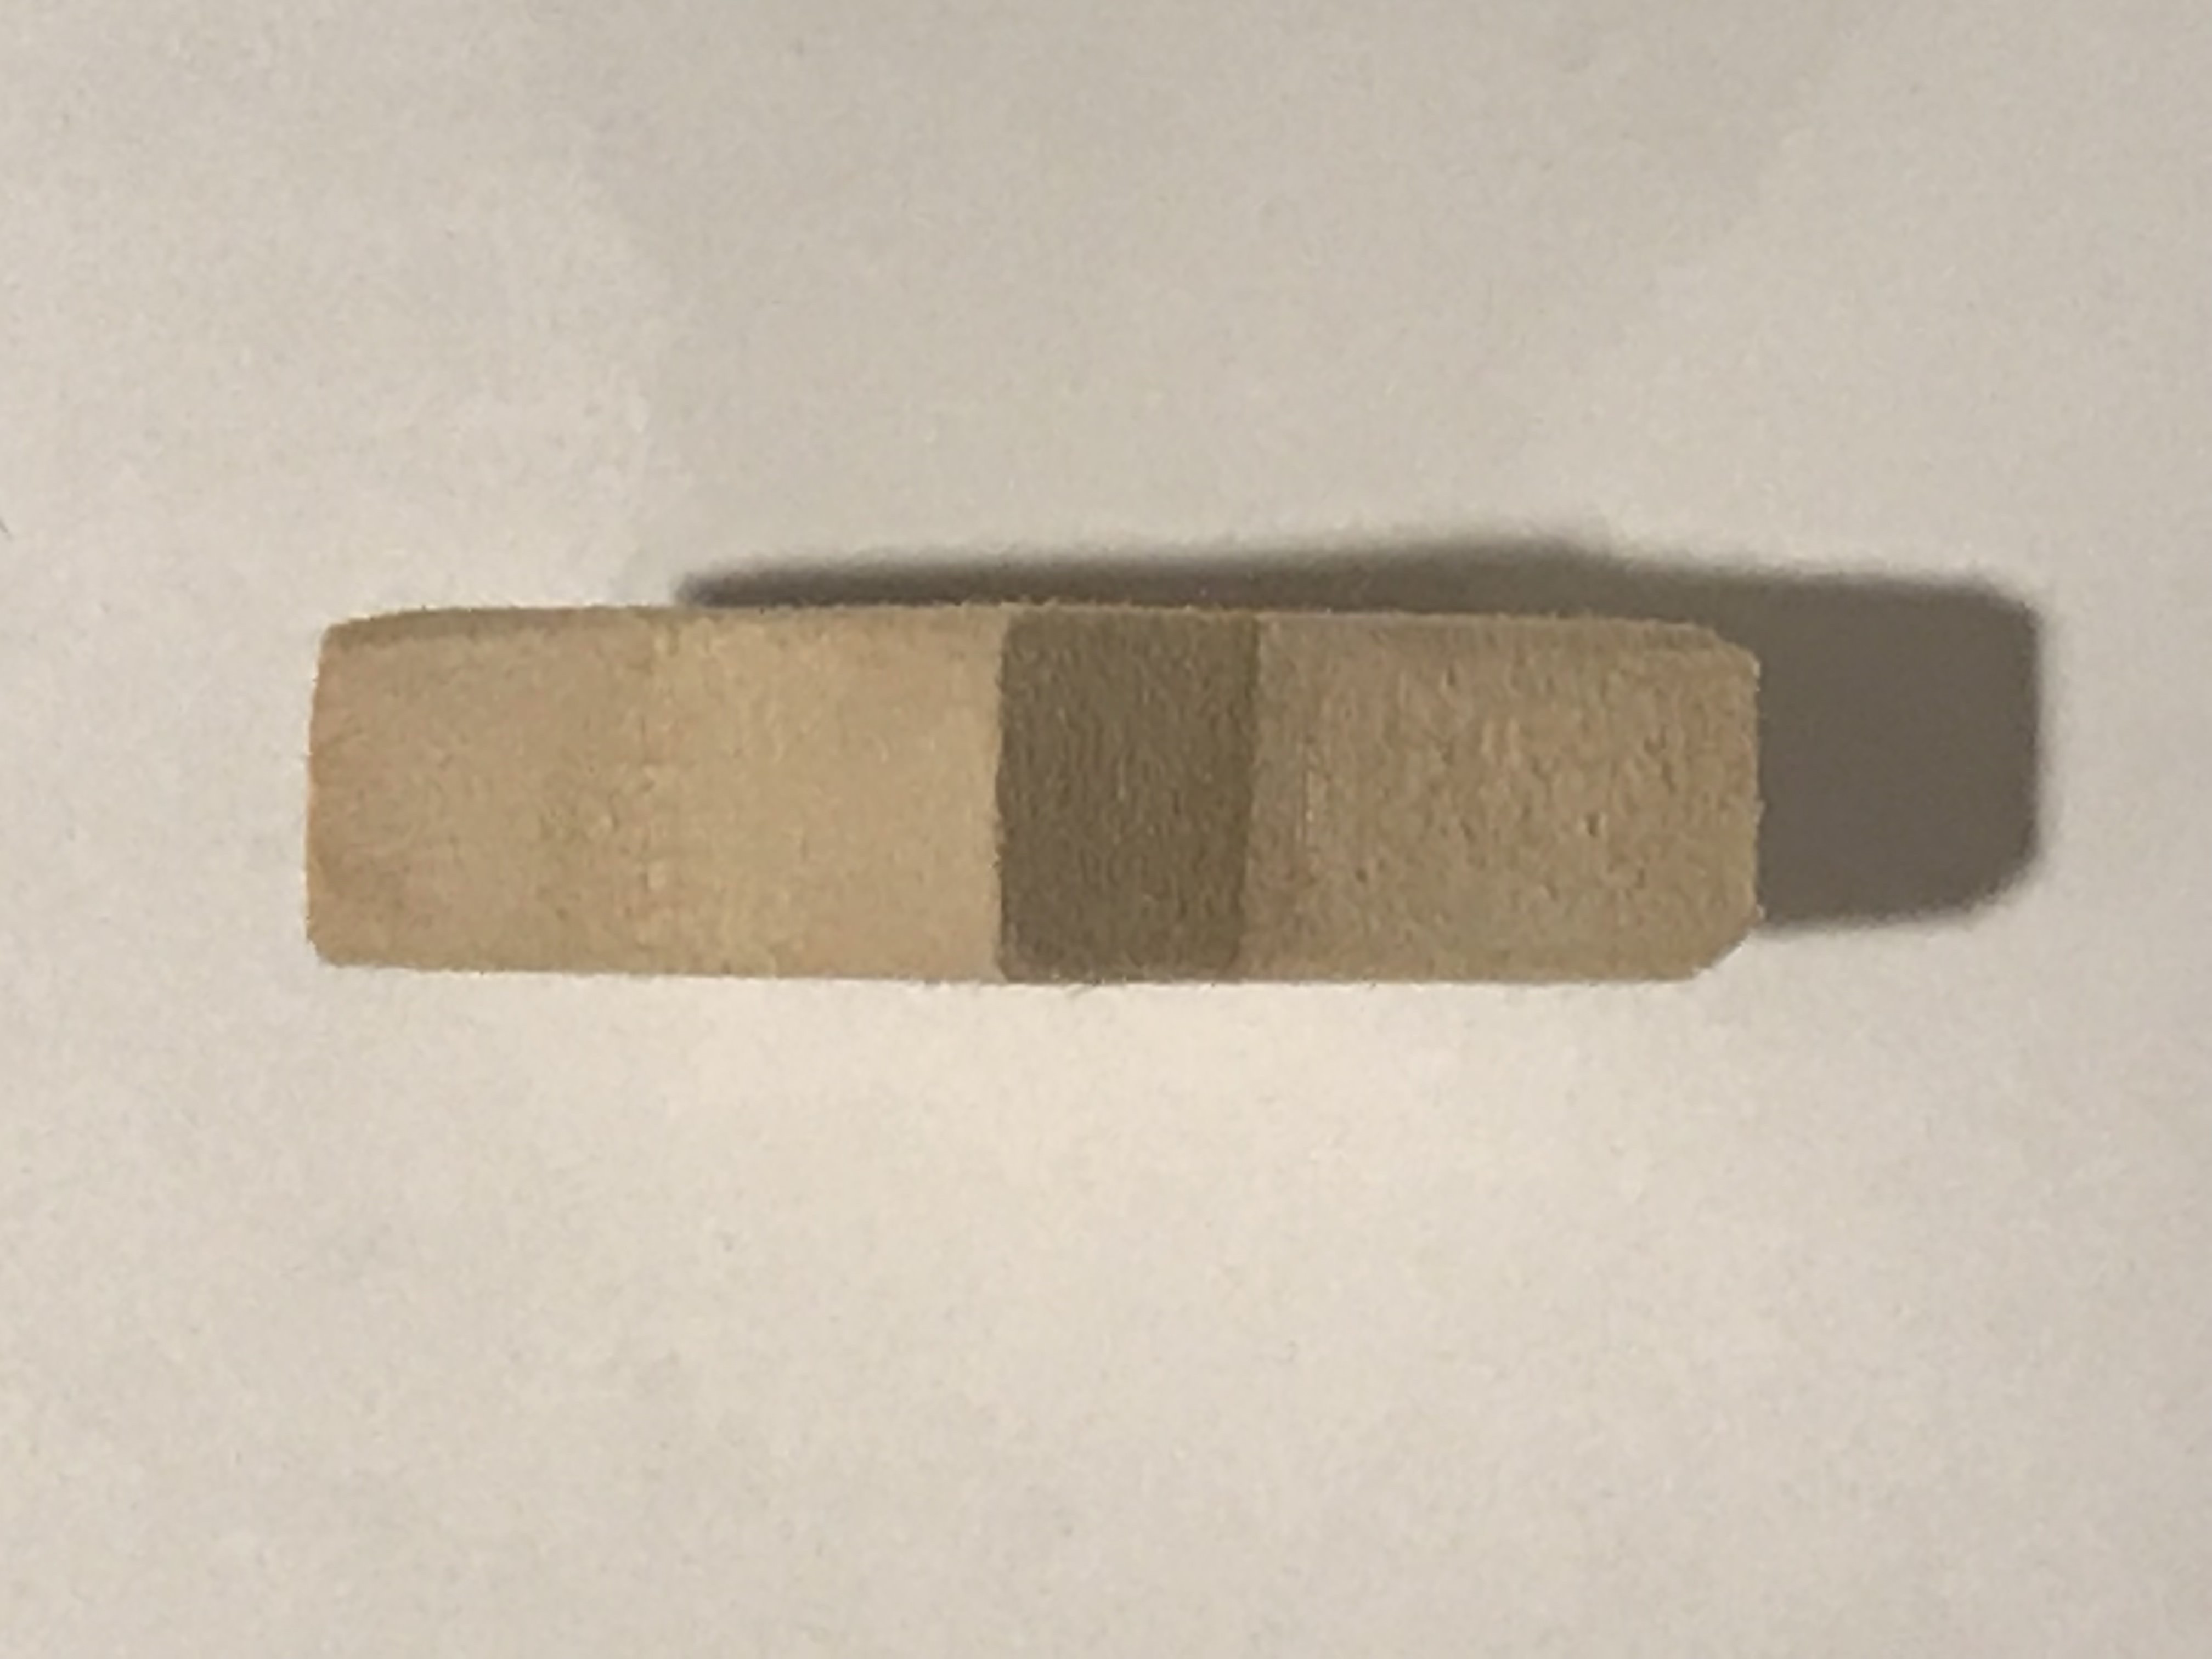
Week 3 - Lasercut incense burner and Vase: Lei (淚)
Lei (淚) means Tears - The essence of ones' emotion.
Inspiration / Design / cardboard / acrylic / Final
Inspiration
My parents are big fans on artists' pottery art works--they have collected these from places they've travelled. Since I grew up under this environment, I'm also attracted to pottery arts. Whenever I mentioned that I like one of the item in their collection, they will give me as a gift, however, there's exceptions.And it is this:
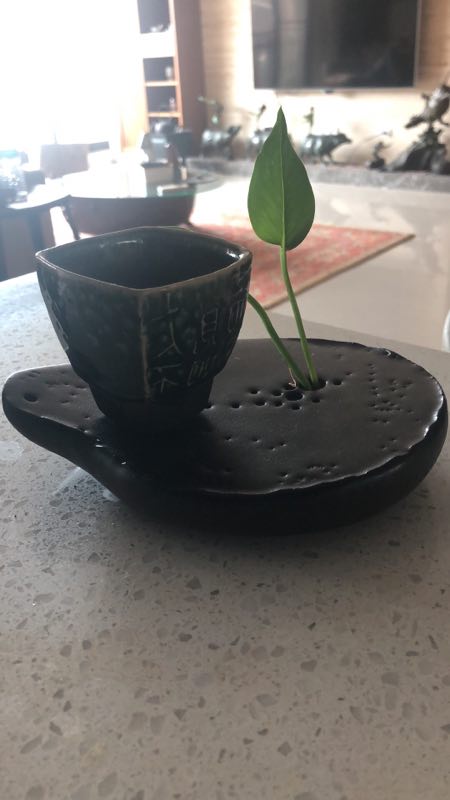
This might looks 'huh?' from this image, beacuse it is now in Taiwan and my mom took this picture (sorry, mom.) But this is such a beautiful piece—the naturally formed shape incorporate with its function—a vase and incense burner! This is the exact thing that I always wanted! And when I tell my parents they're like "..instead! Do you want that (point to a cup)?"
So, why not make myself?
Design
I have been using Illustrator for about 10 yrs already, and when I was in Parsons, I had experience dealing with lasercutter's AI formats.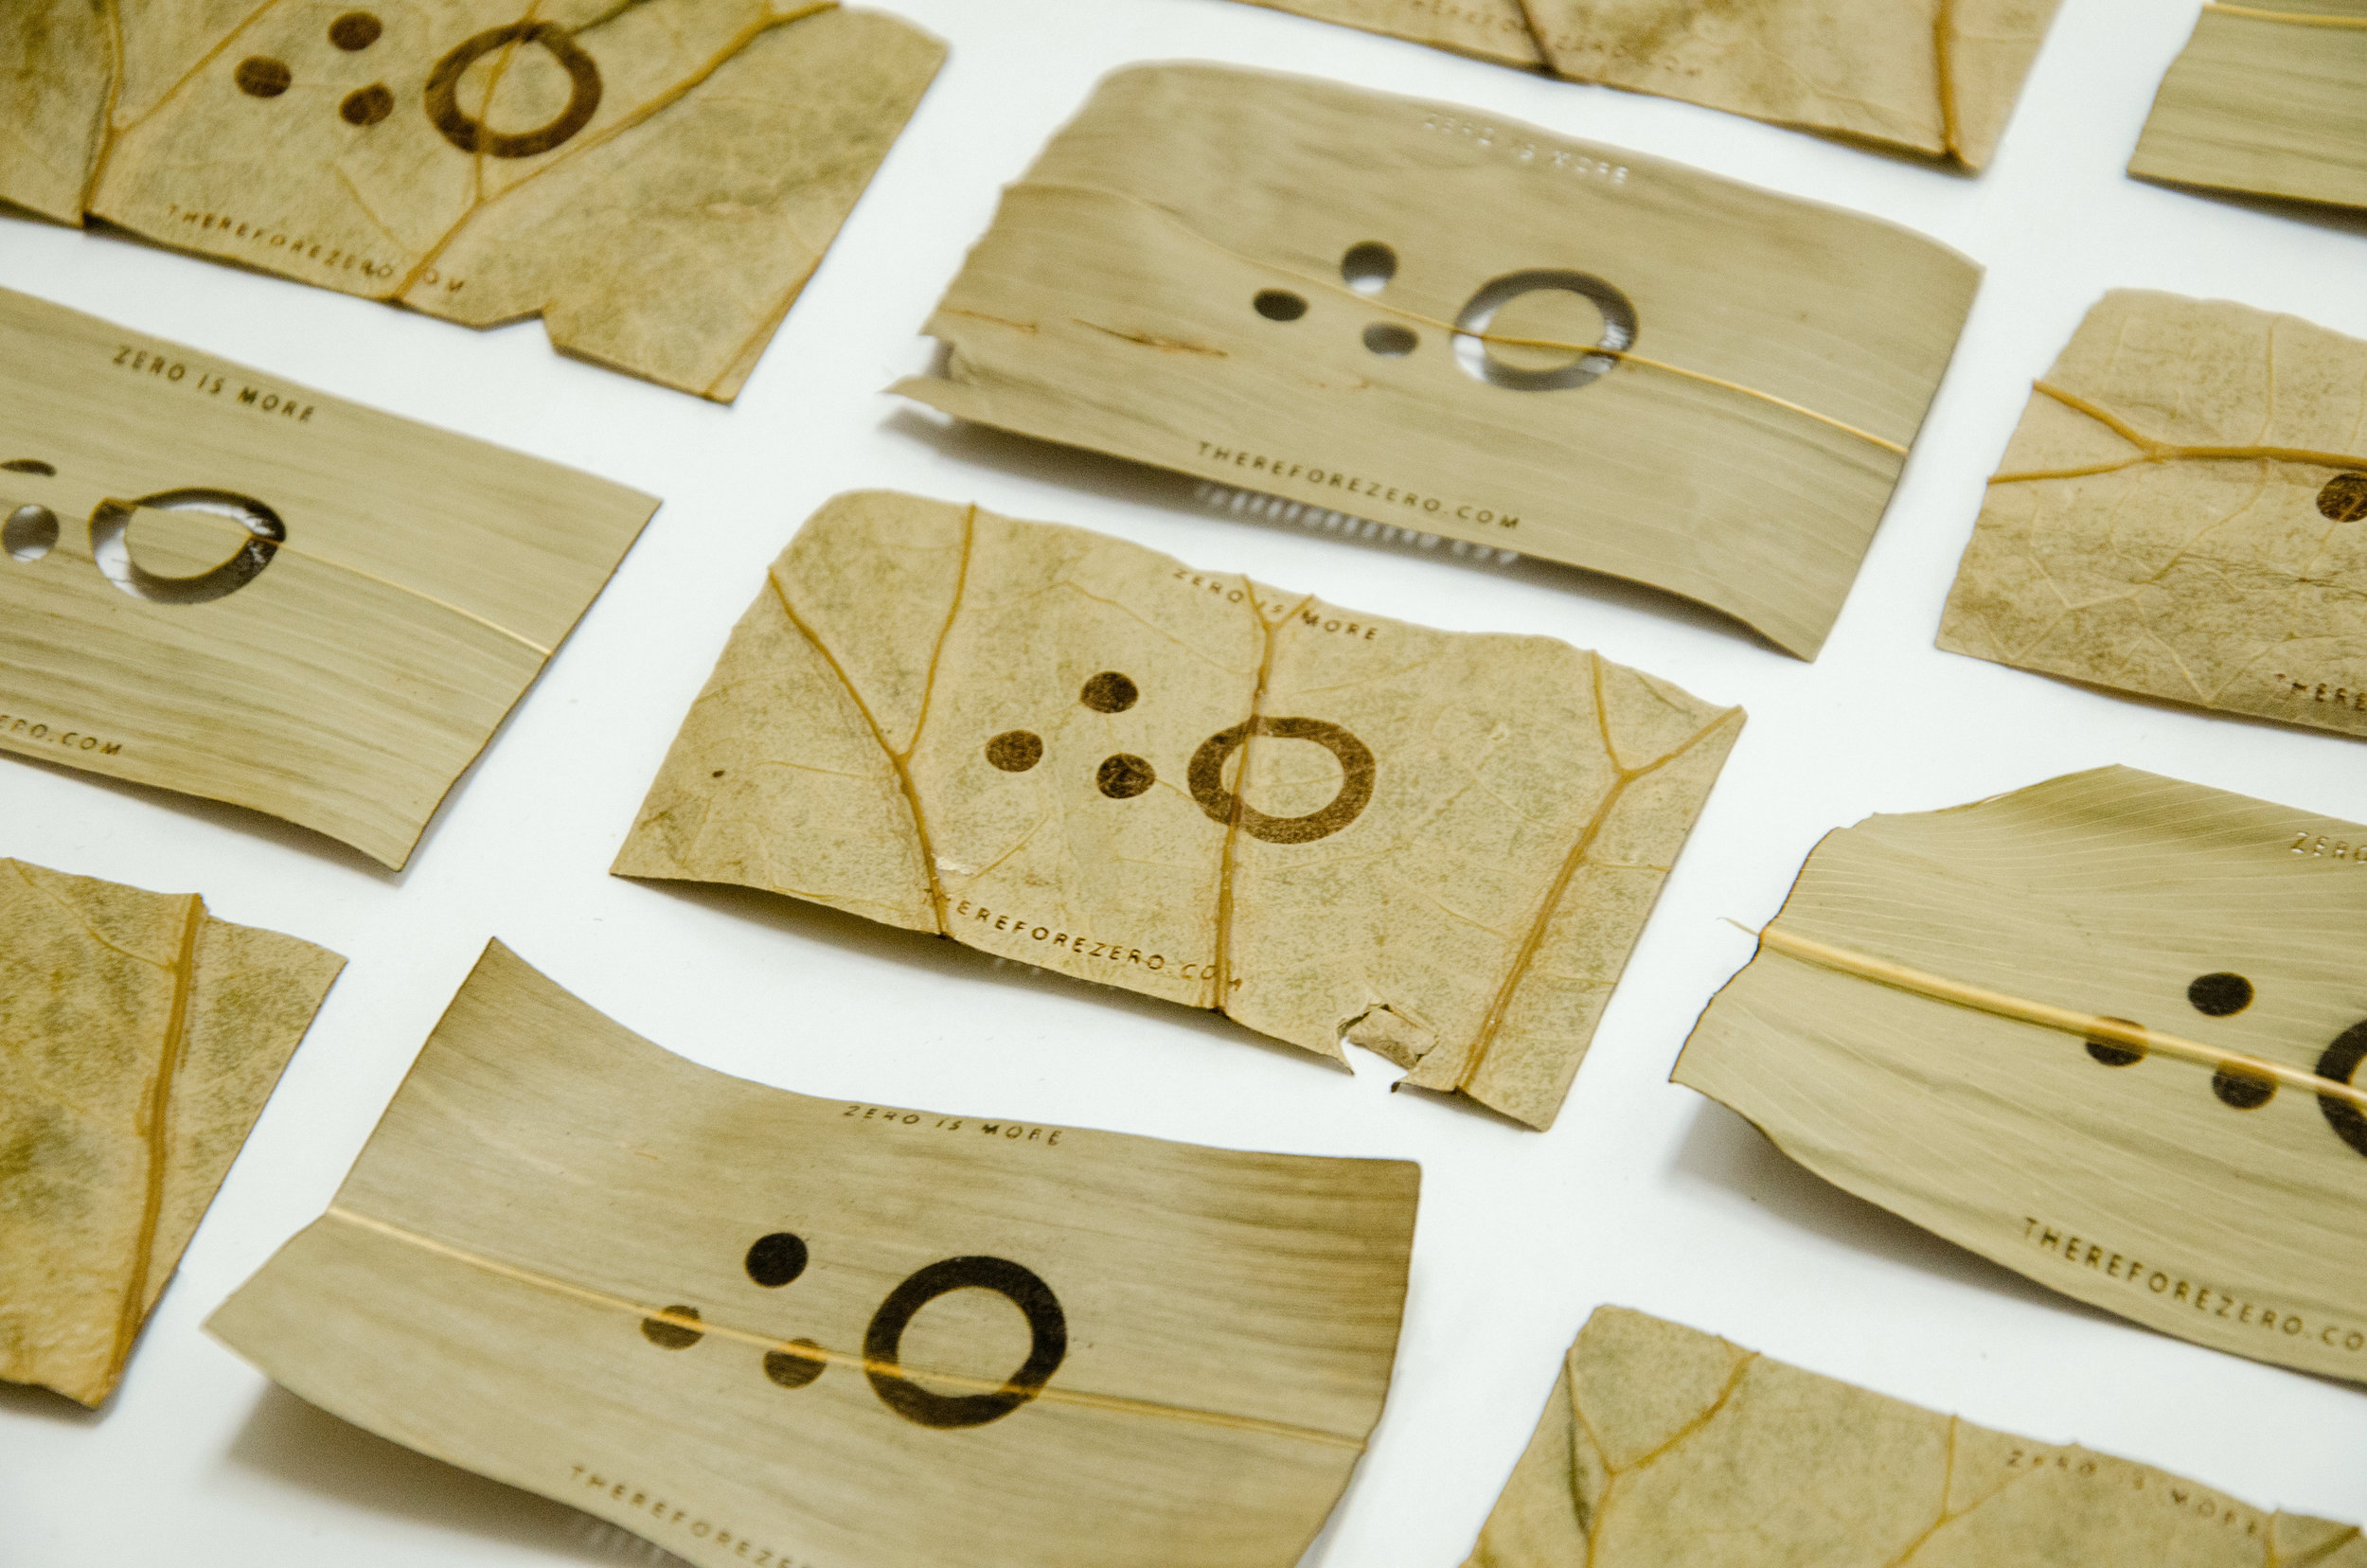

But different from my previous experience, which is also two to three years ago, I rarely do AI for 3D projects. Being a interaction designer that have been living under the screen for so long, to have a 3D mind is challenging for me.
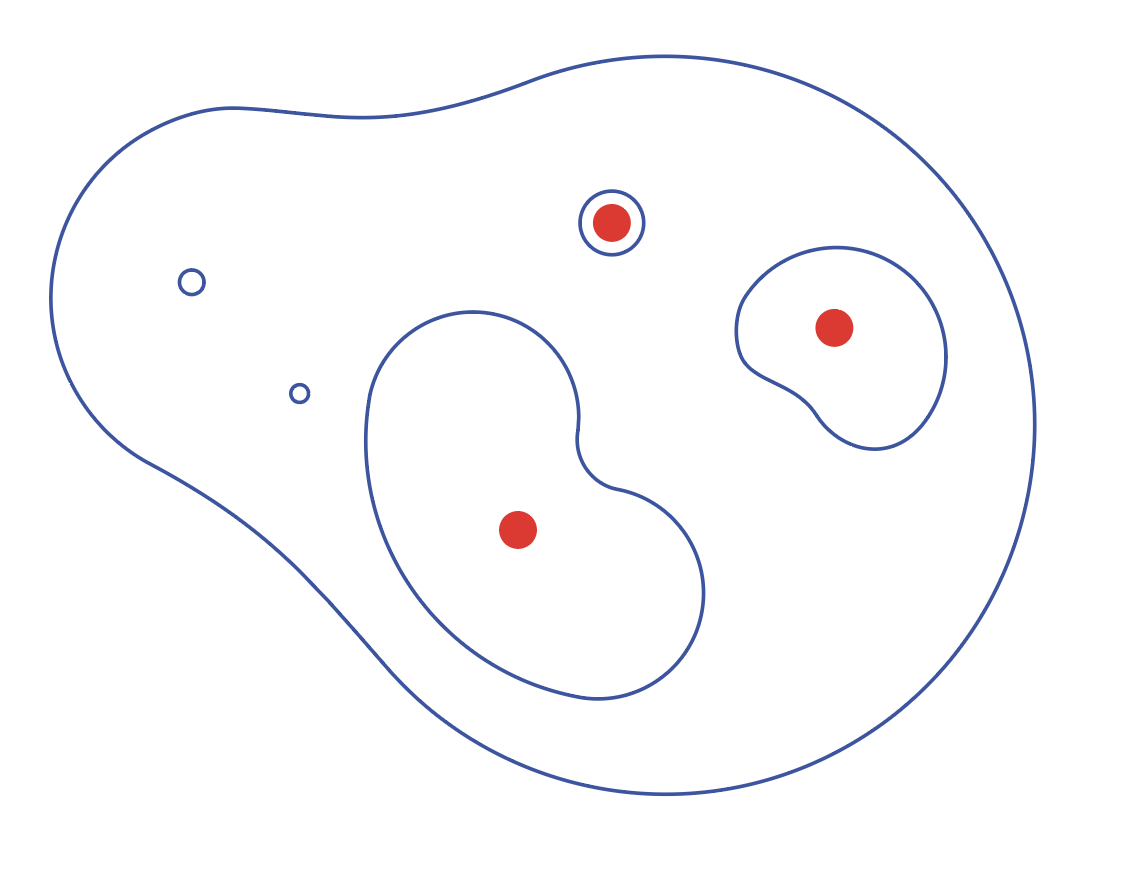
I came up with a organic shape, and wanting to have it to look like s miniture Chinese garden.
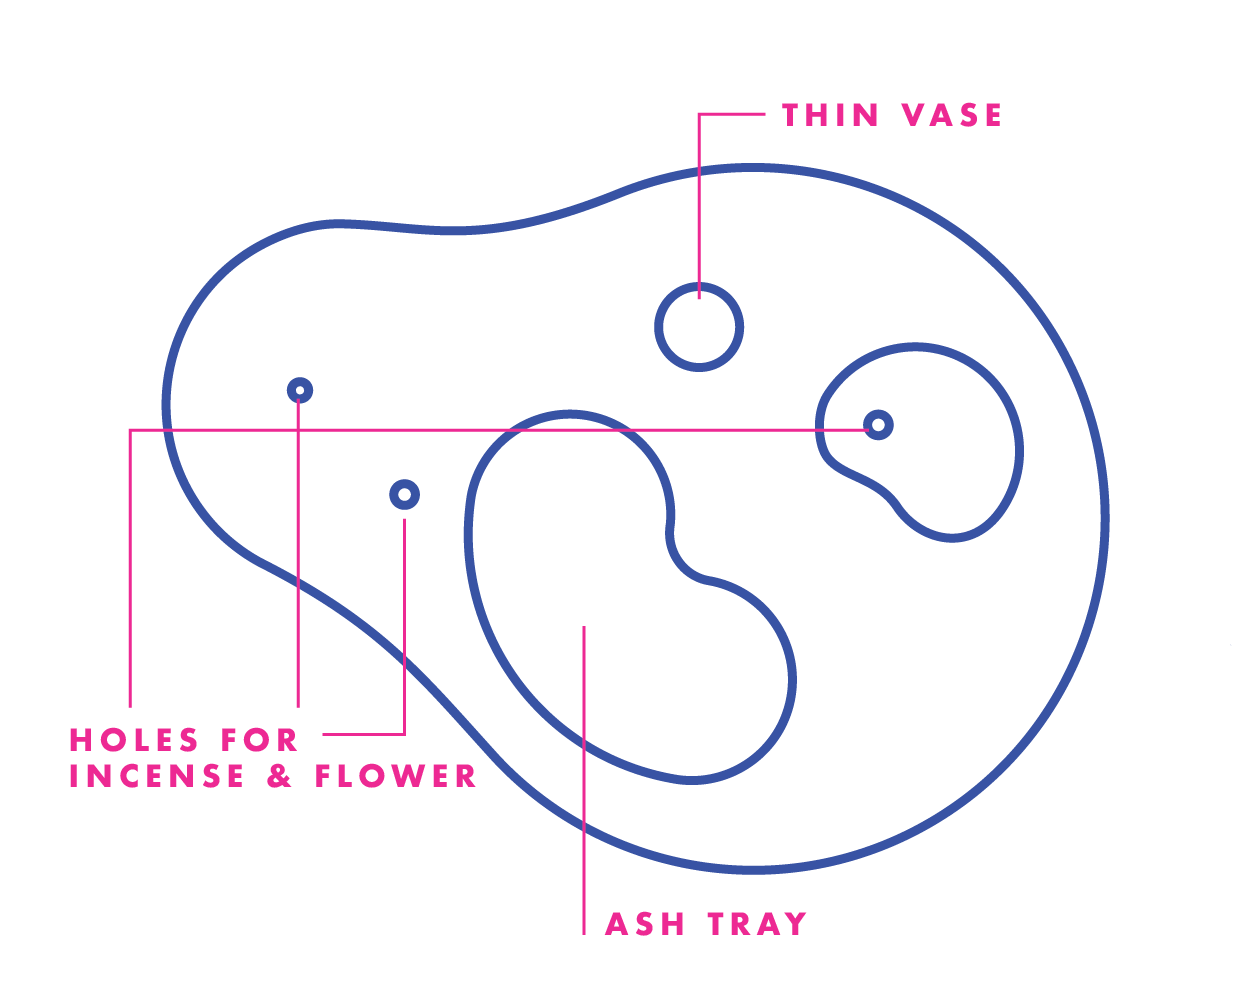
And I have different planing on how each section will be contruct:
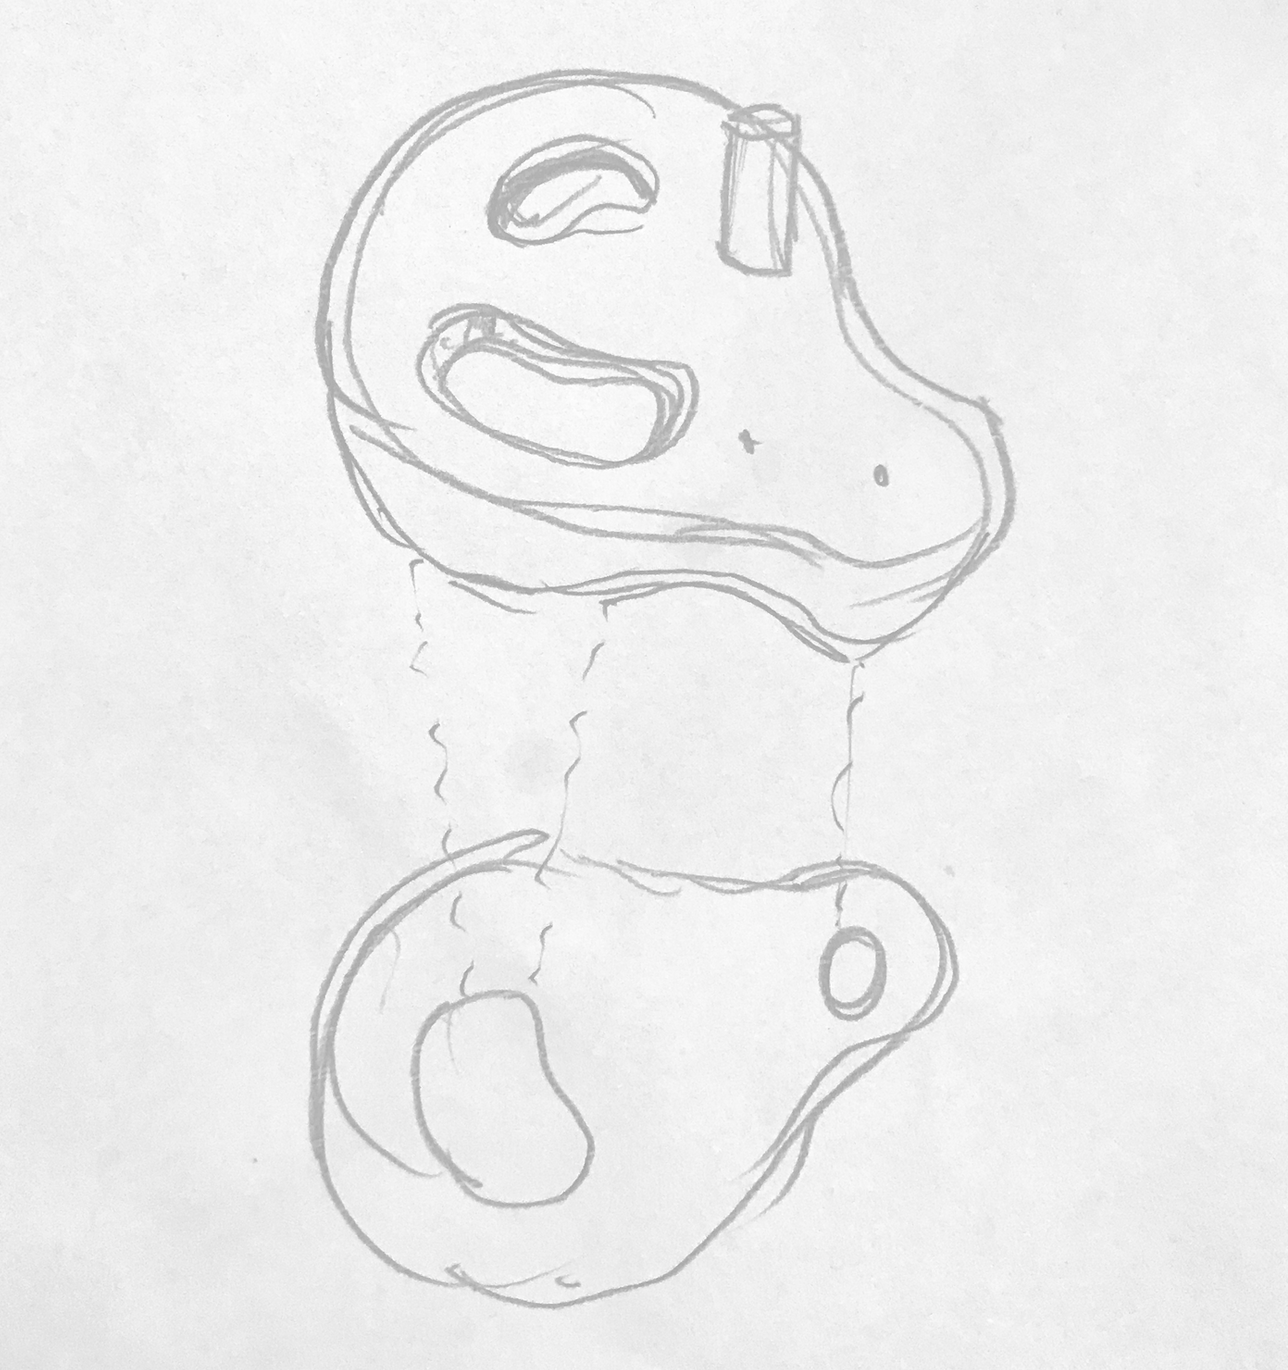
Base —— the organic shape, with two small holes on the left, a hole for vase and two organic cut outs.
Ash tray —— different color / material as the base, should be removeable. Thus I will need to make slot that can work like a drawer.
Cut out with a hole —— different color / material as the base. Need a hole that has tolerance for incense or flower.
Thin vase —— different color / material as the base, should be removeable. I added it later on when I was doing the 3D stuff.
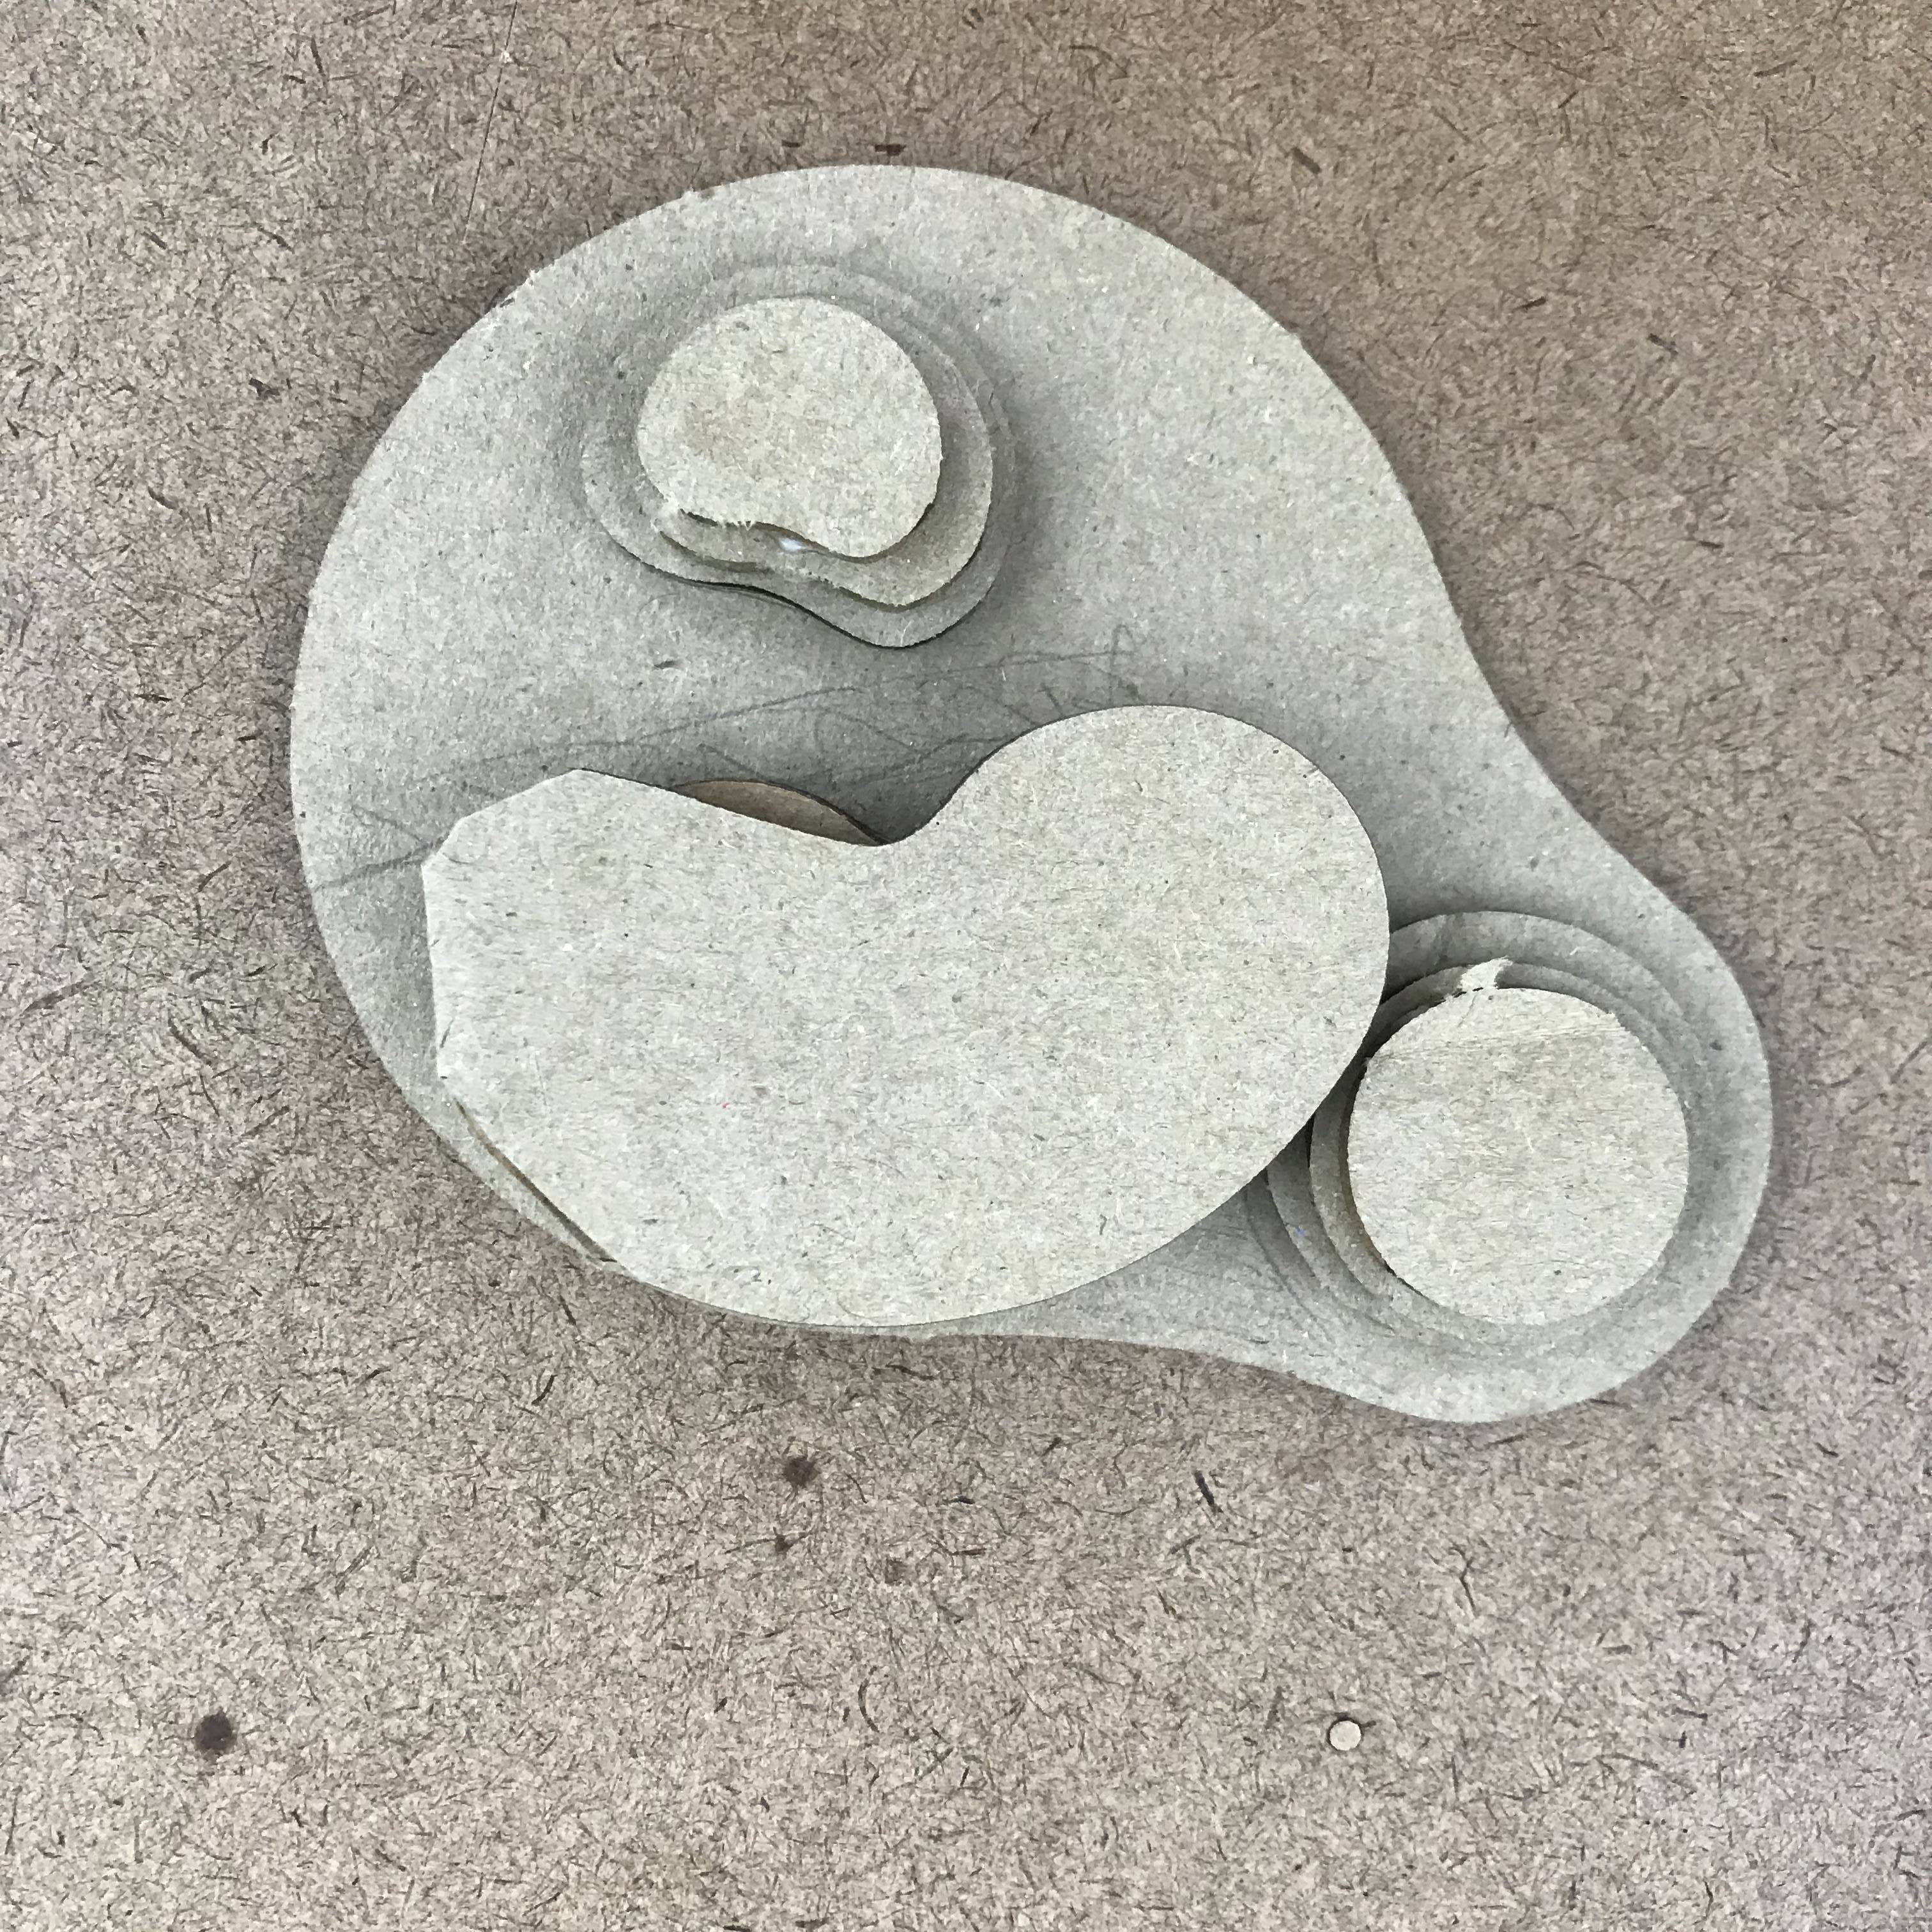
from the above rough planing, I decided to design the height of the burner based on how many layers the ash tray will need. so the ash tray itself, need at lease two layers: a wall layer and a bottom layer
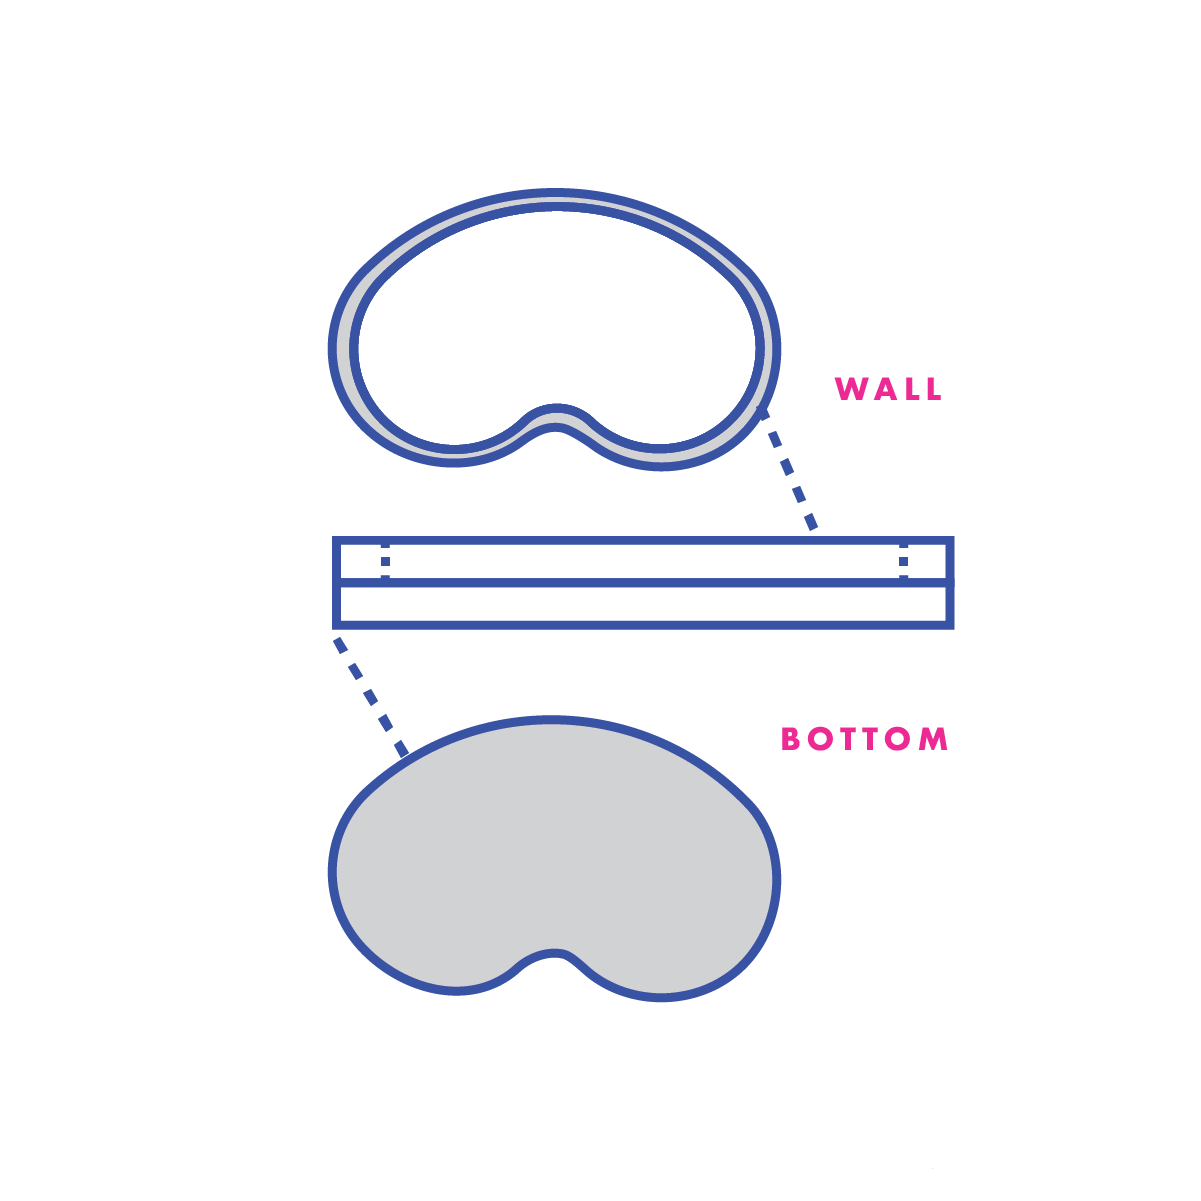
and there will be one more layer needed to hold the tray to the base. So including the base, it will be four layers in total.
But just by thinking without having the 3D stuff is a little challenging, so I went to the lasercutter.
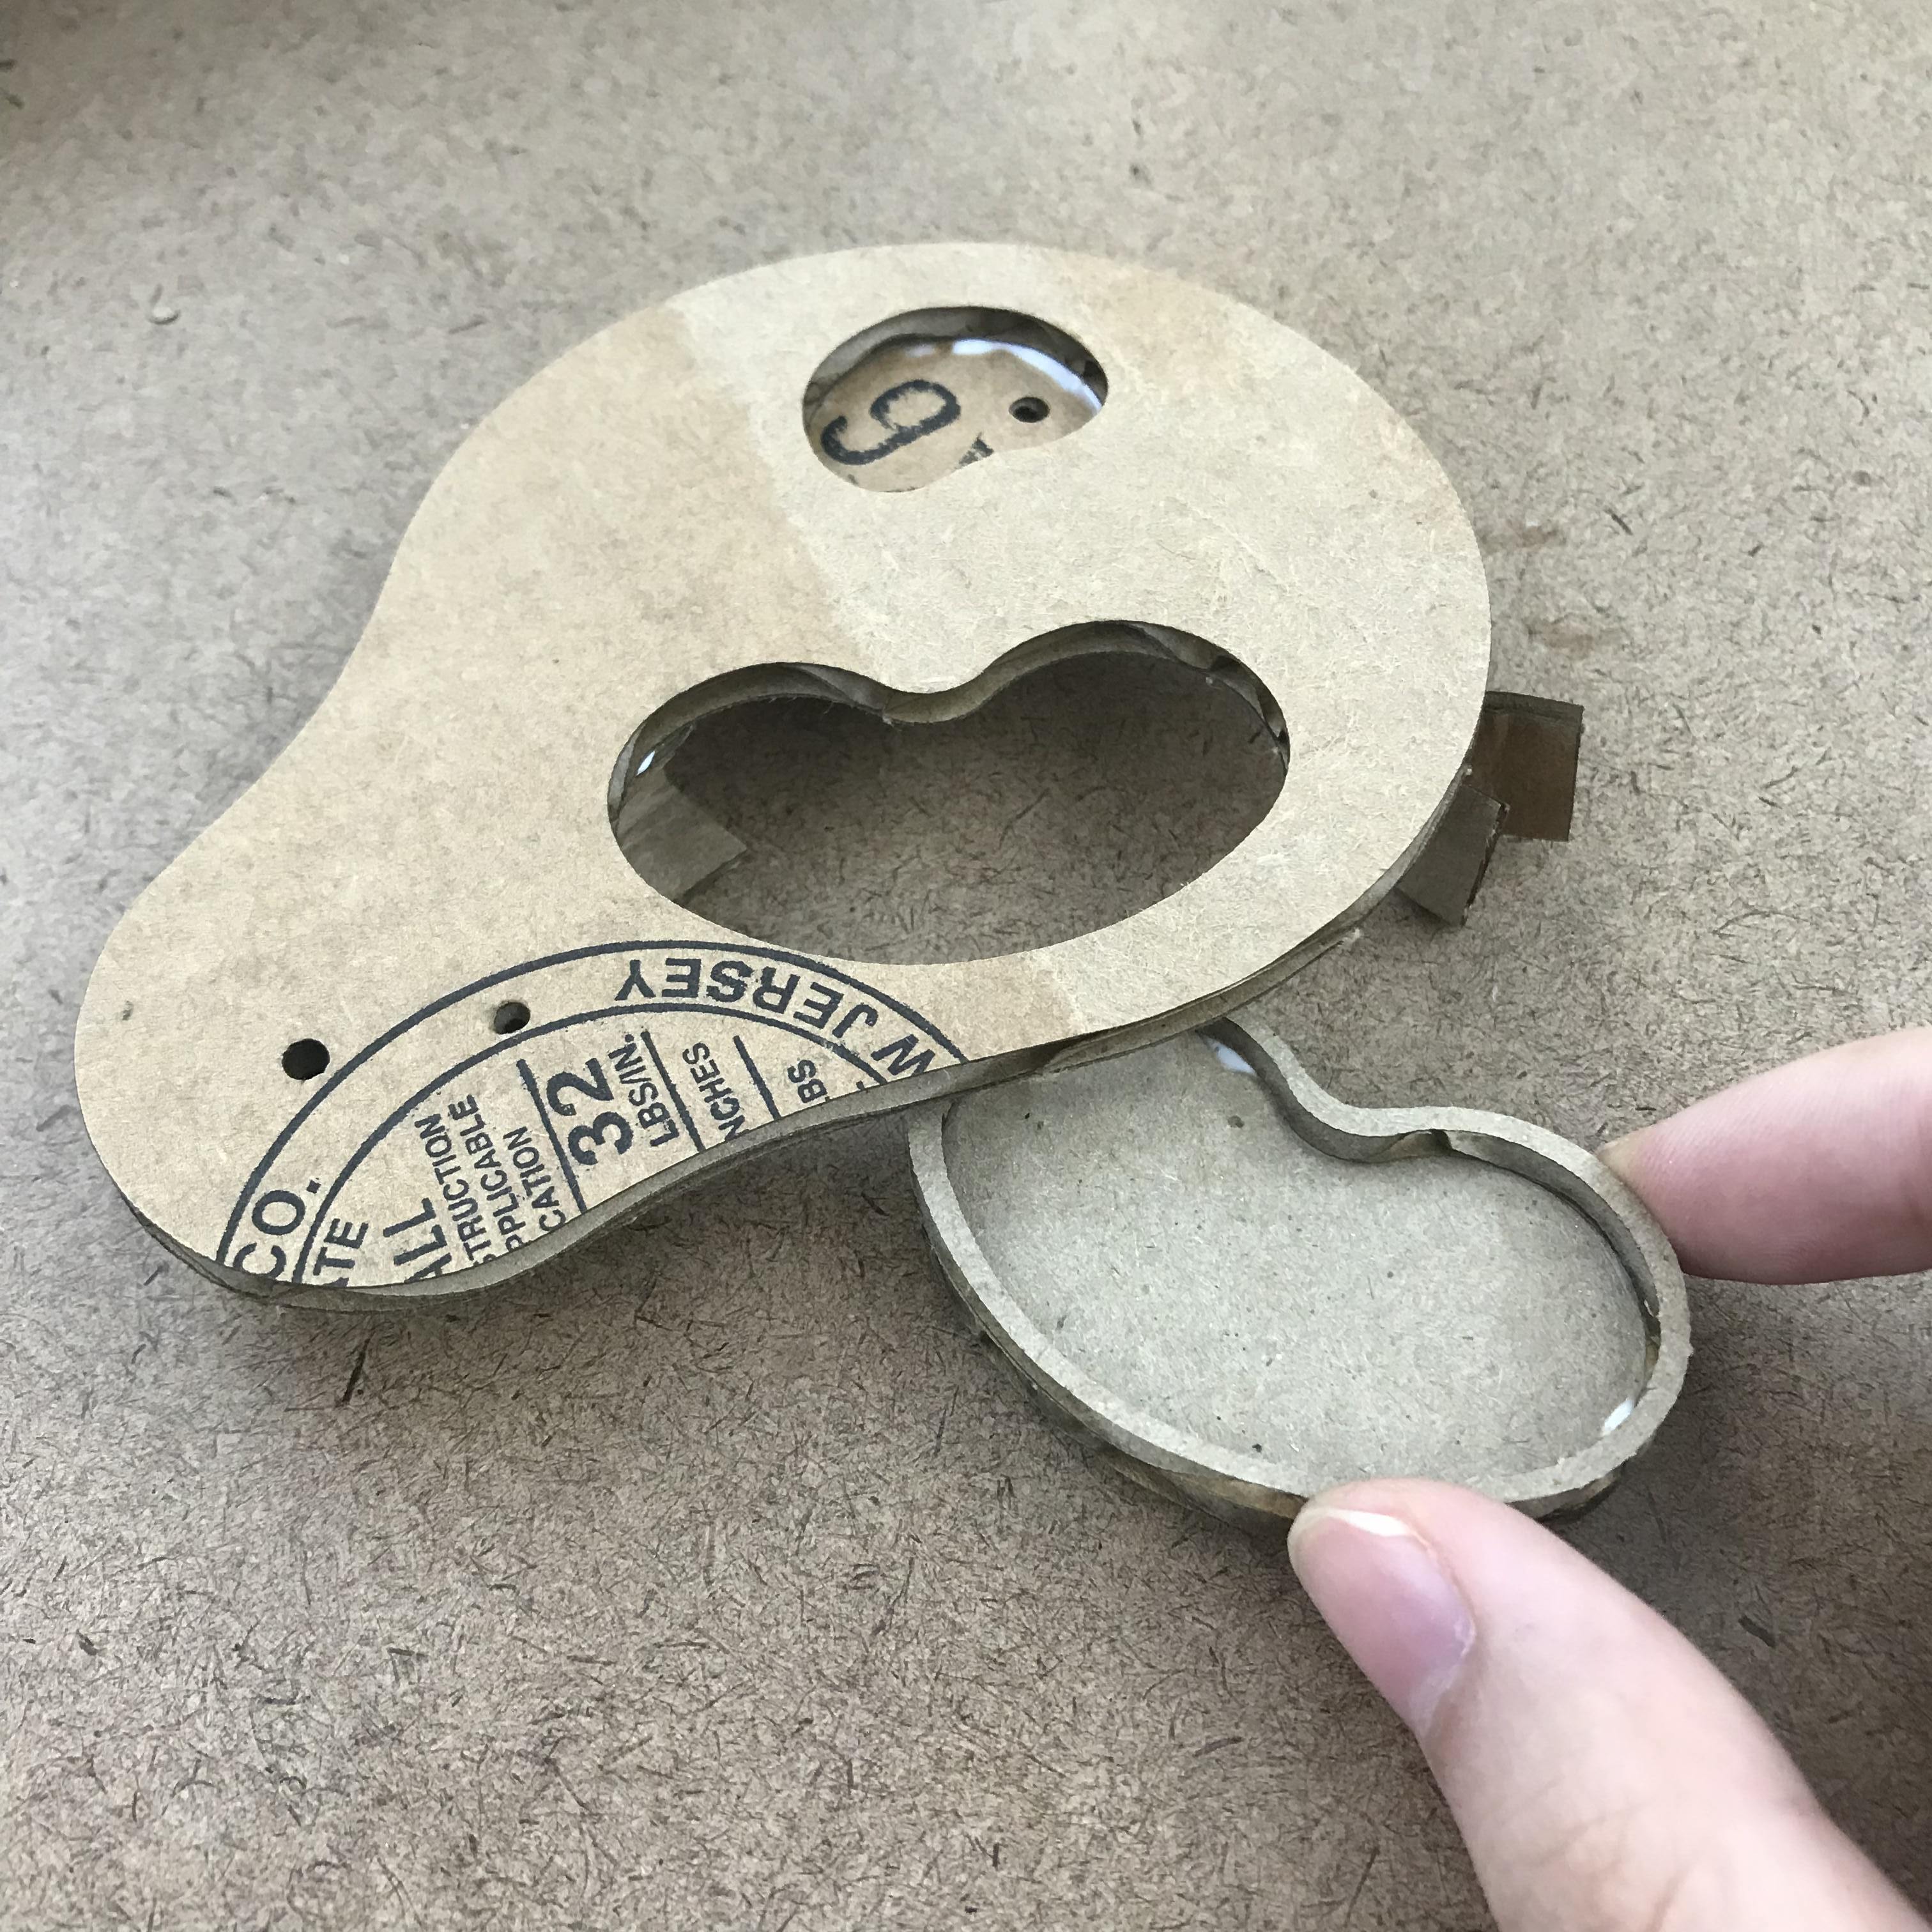
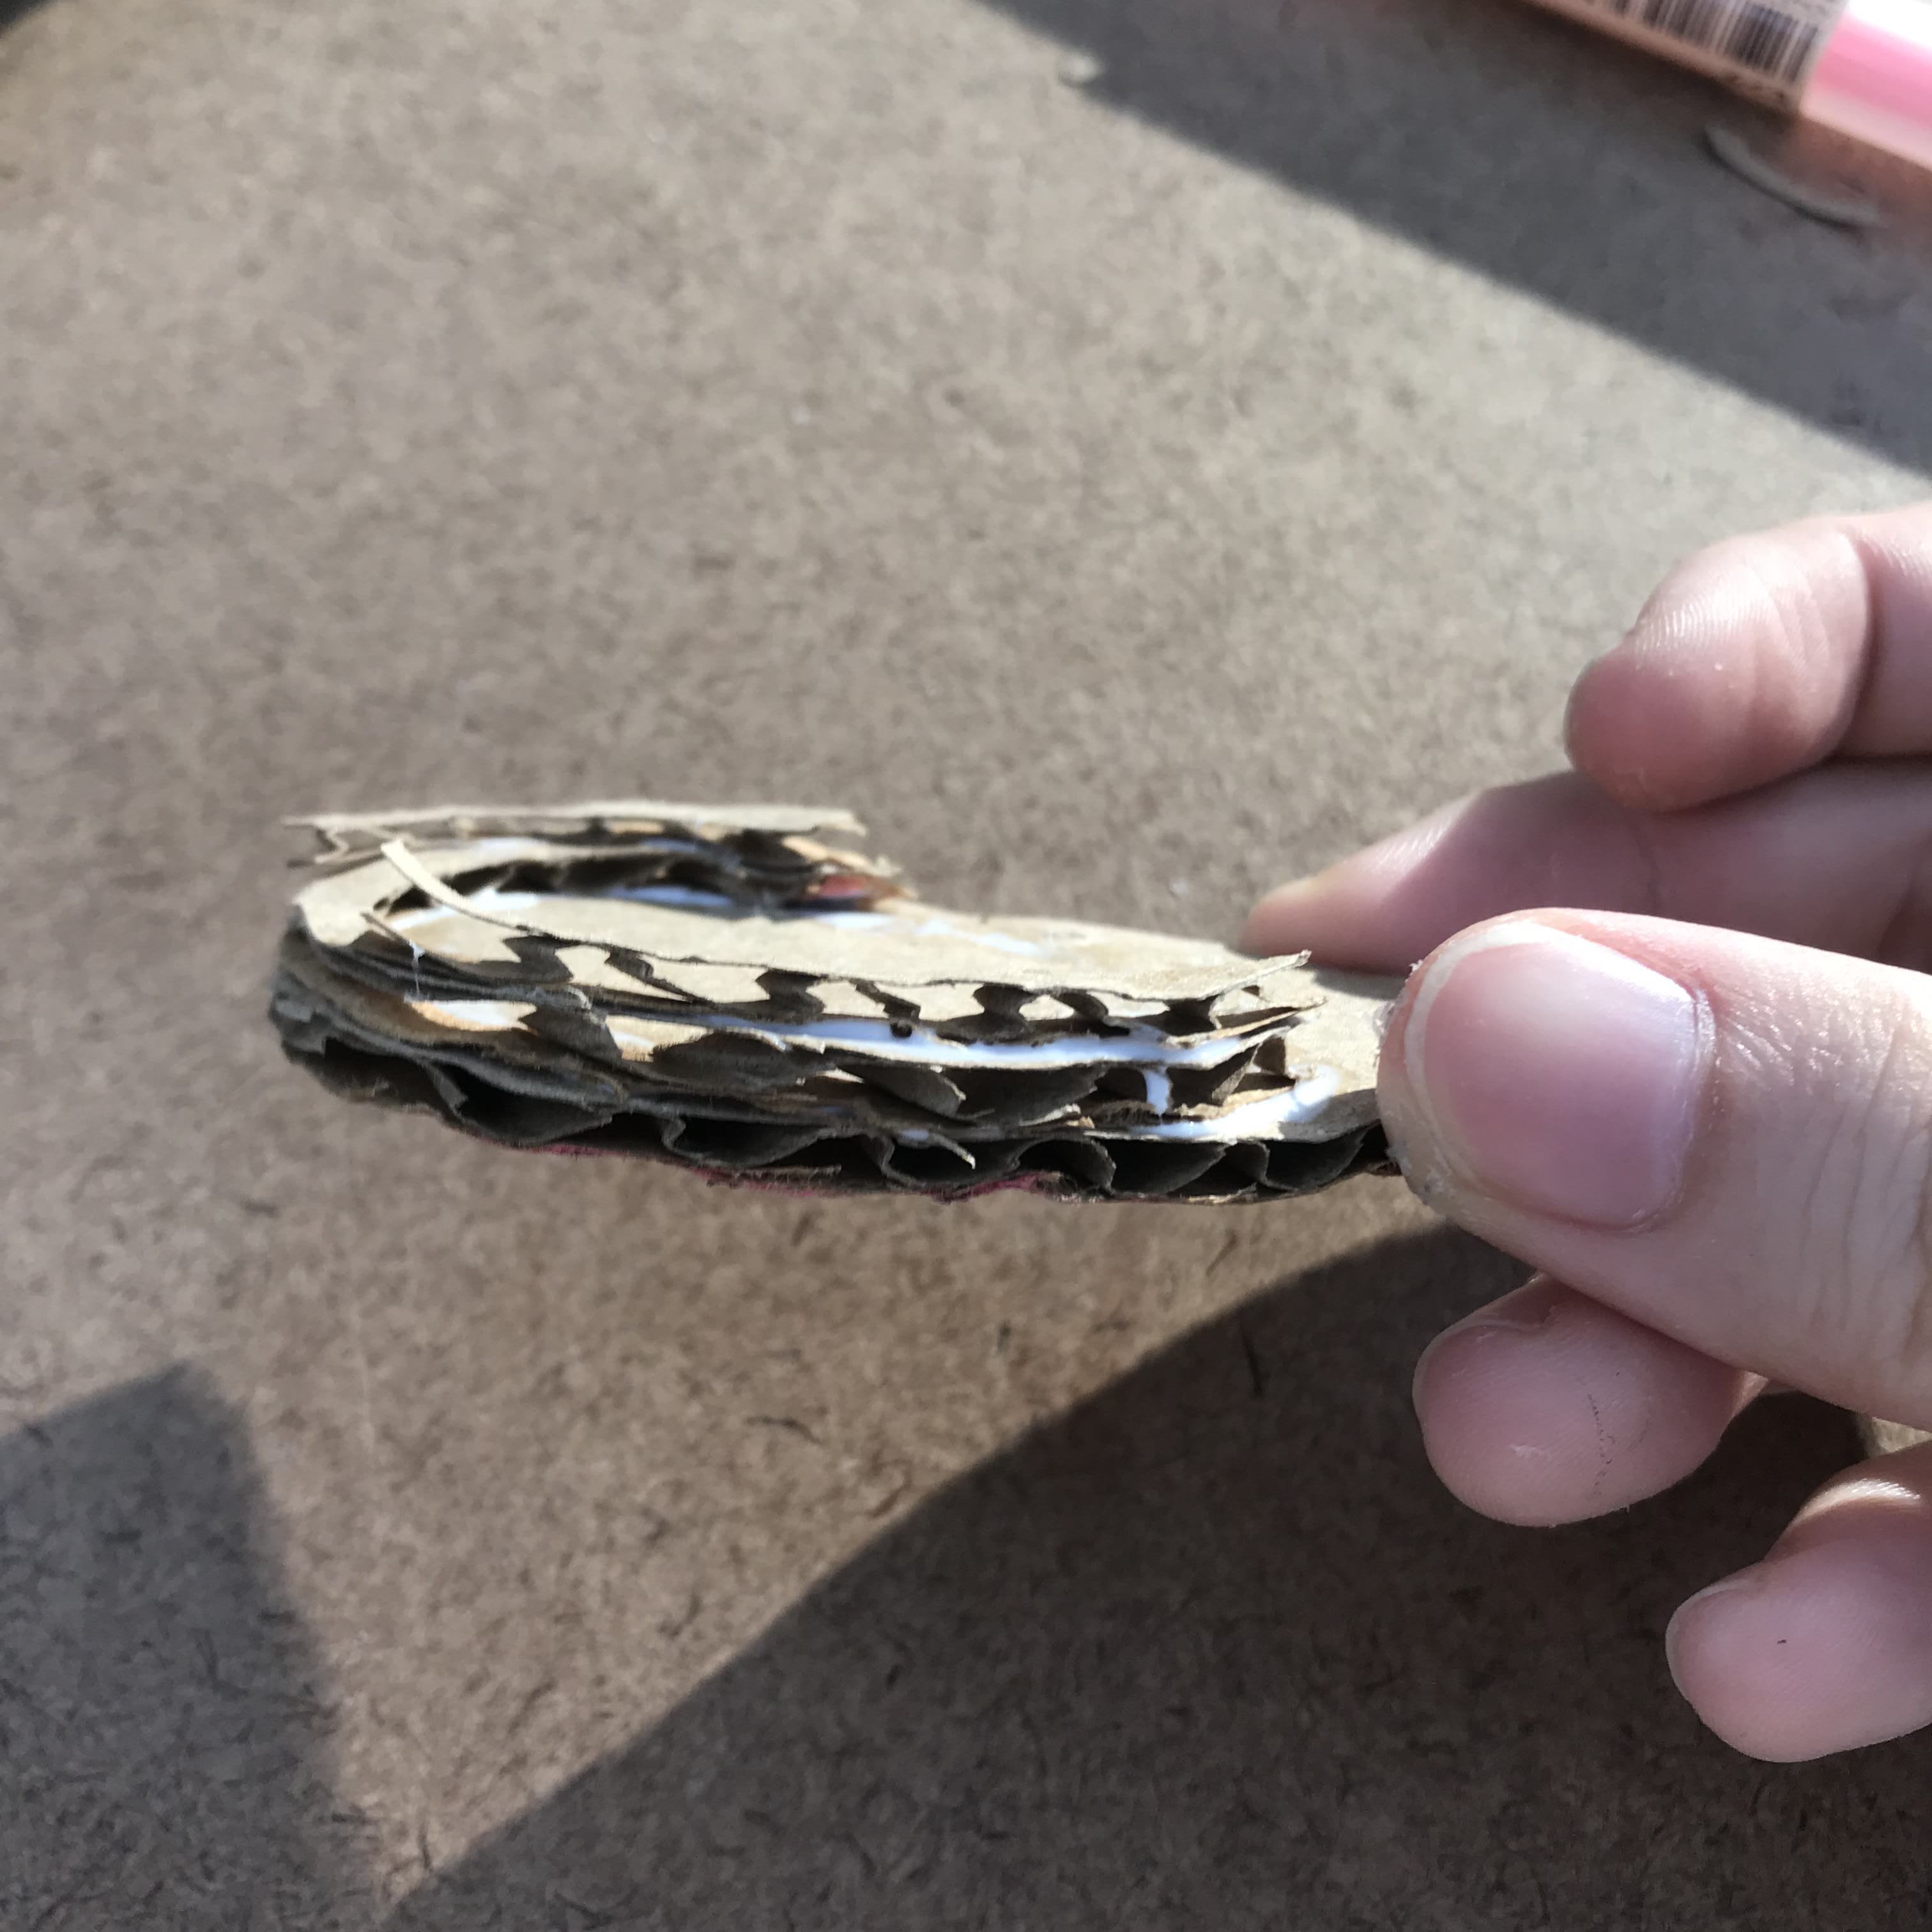
Cardboard Drafting
*There was an incident happened due to my mistake in setting the power and speed of the lasercutter, and almost cause a fire. I am very sorry and thankful for the help from the Shop staff, Ben and people that were they at the time.Ok, back to the topic.
I have all my parts ready:

And build it with glue
Need to make sure the holes are aligned.
Next, I need to design the slot tha can fit in my tray, and from Ben's advicing, I designed it in 3D first:
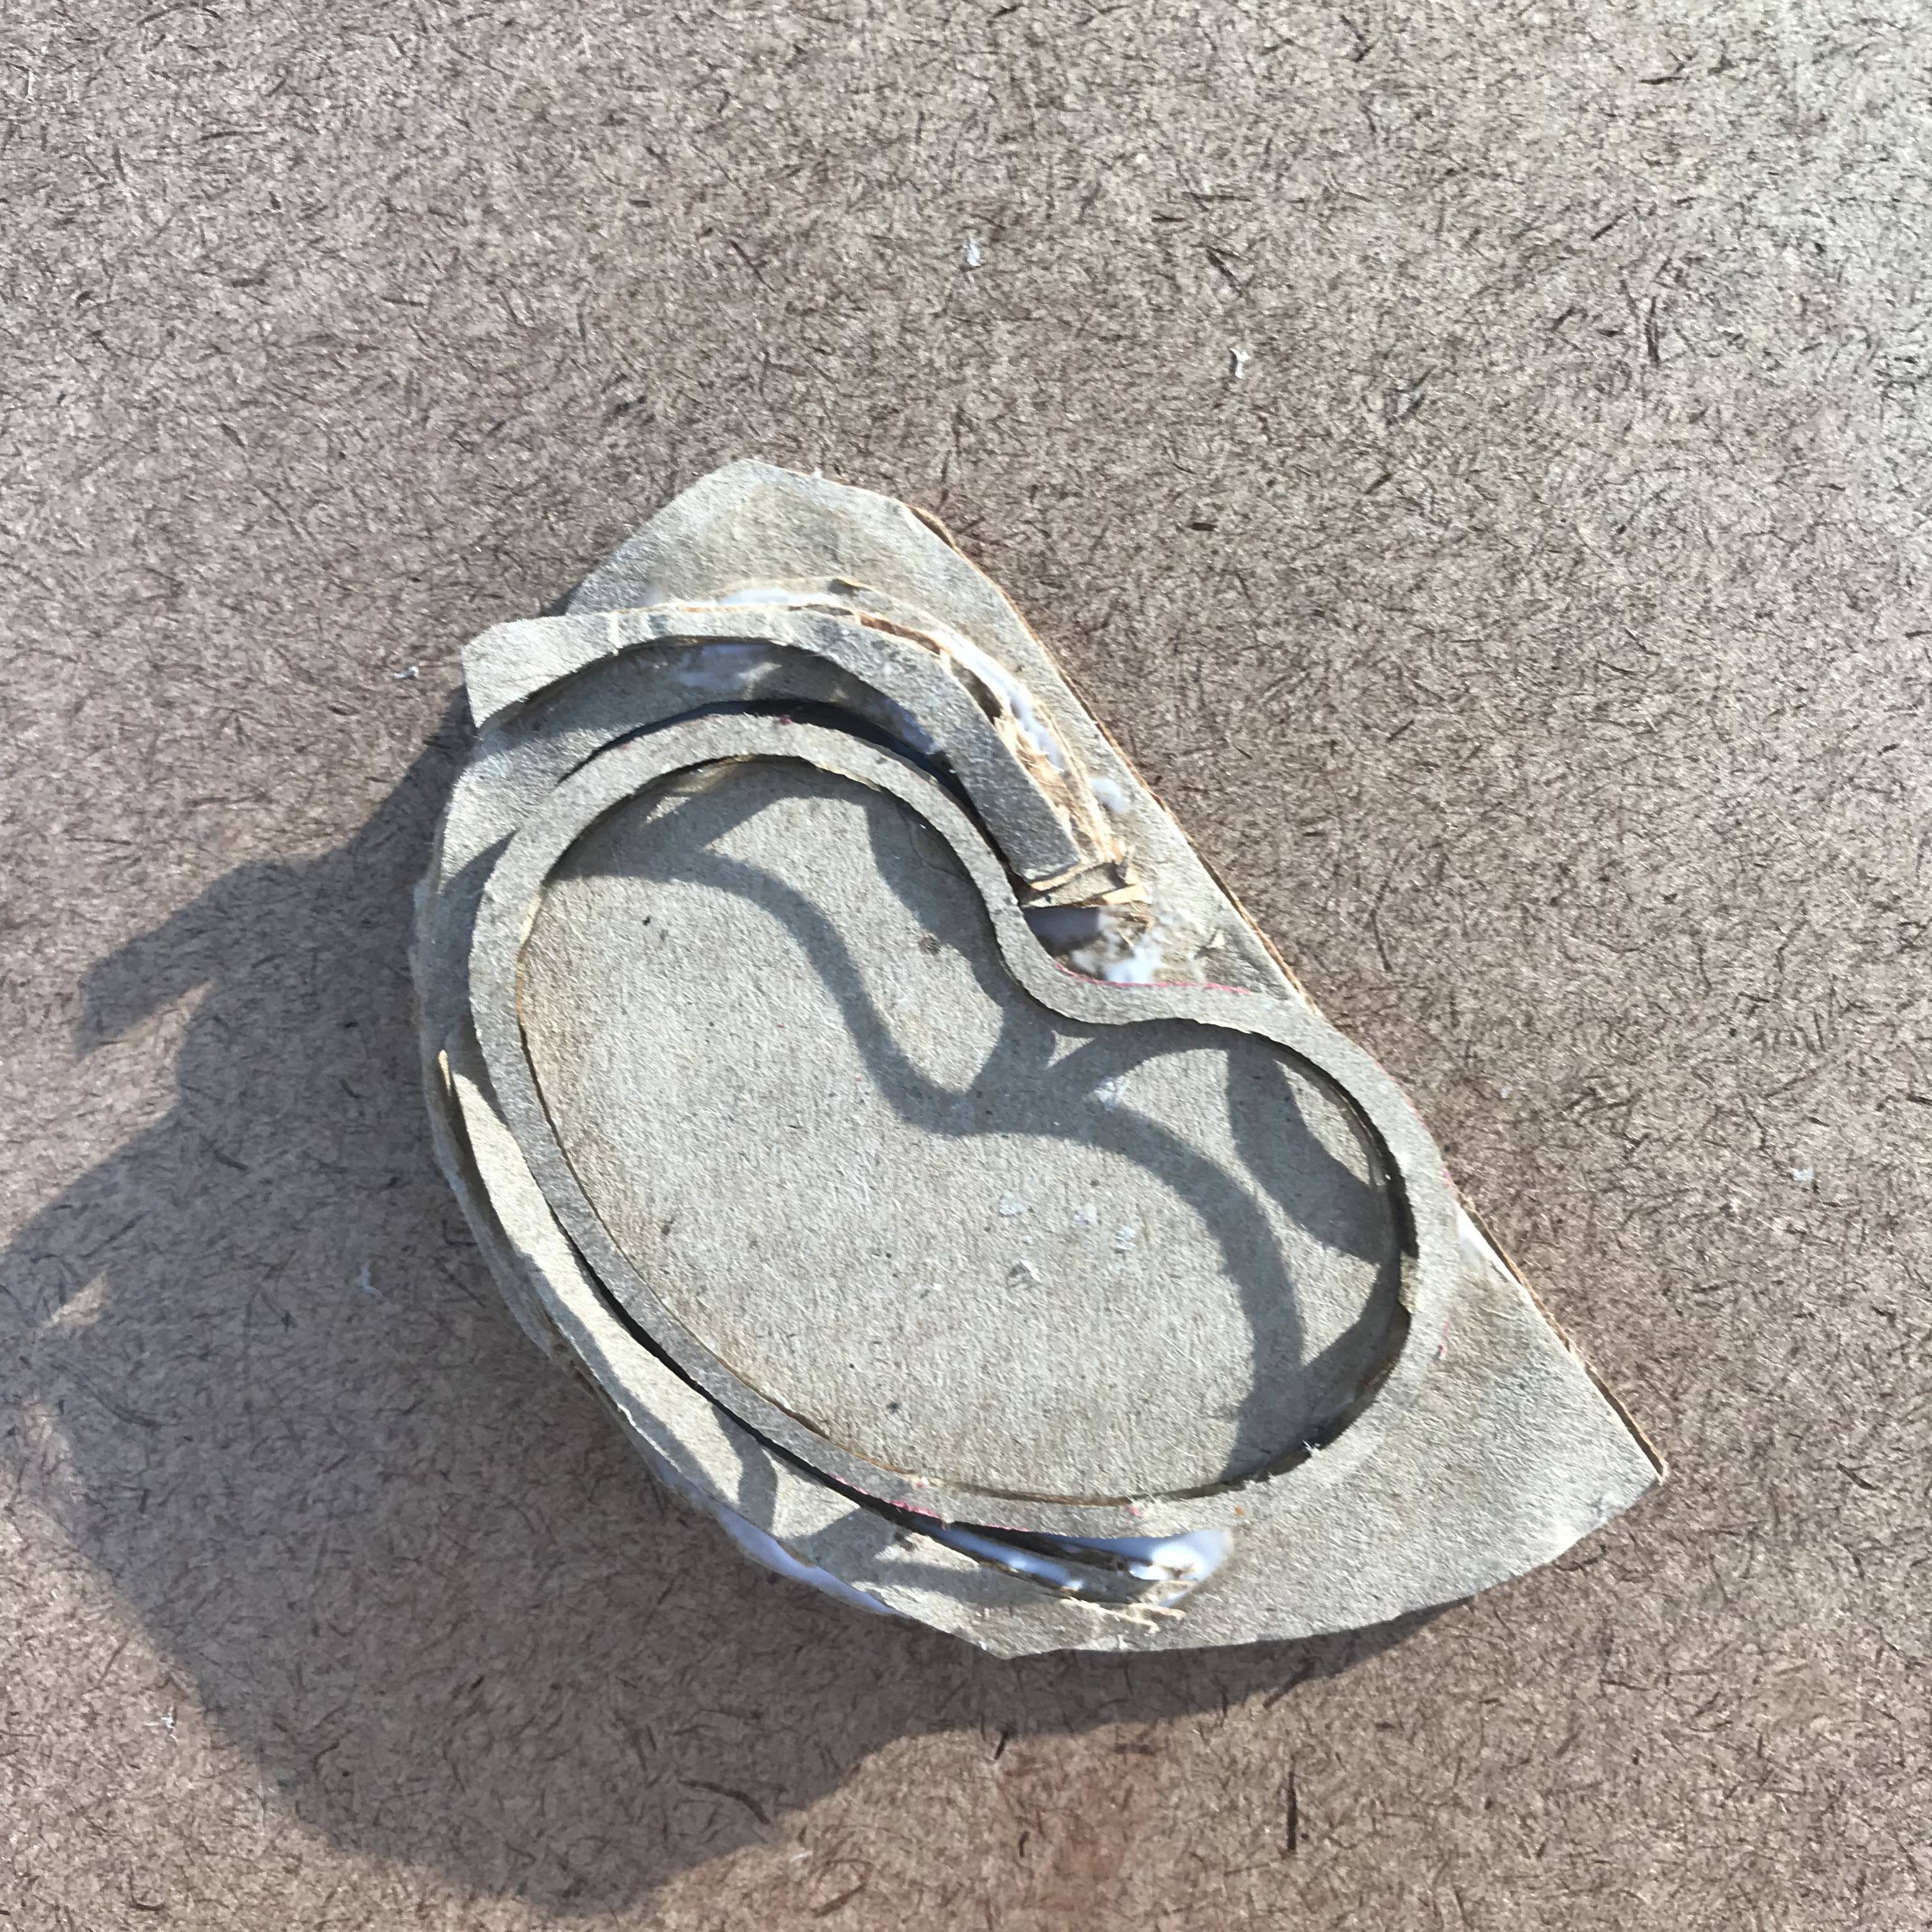
Also, I tested the size and position of the holes:
After the UX testing, I adjust the position and size a little, and I think I like it very much.
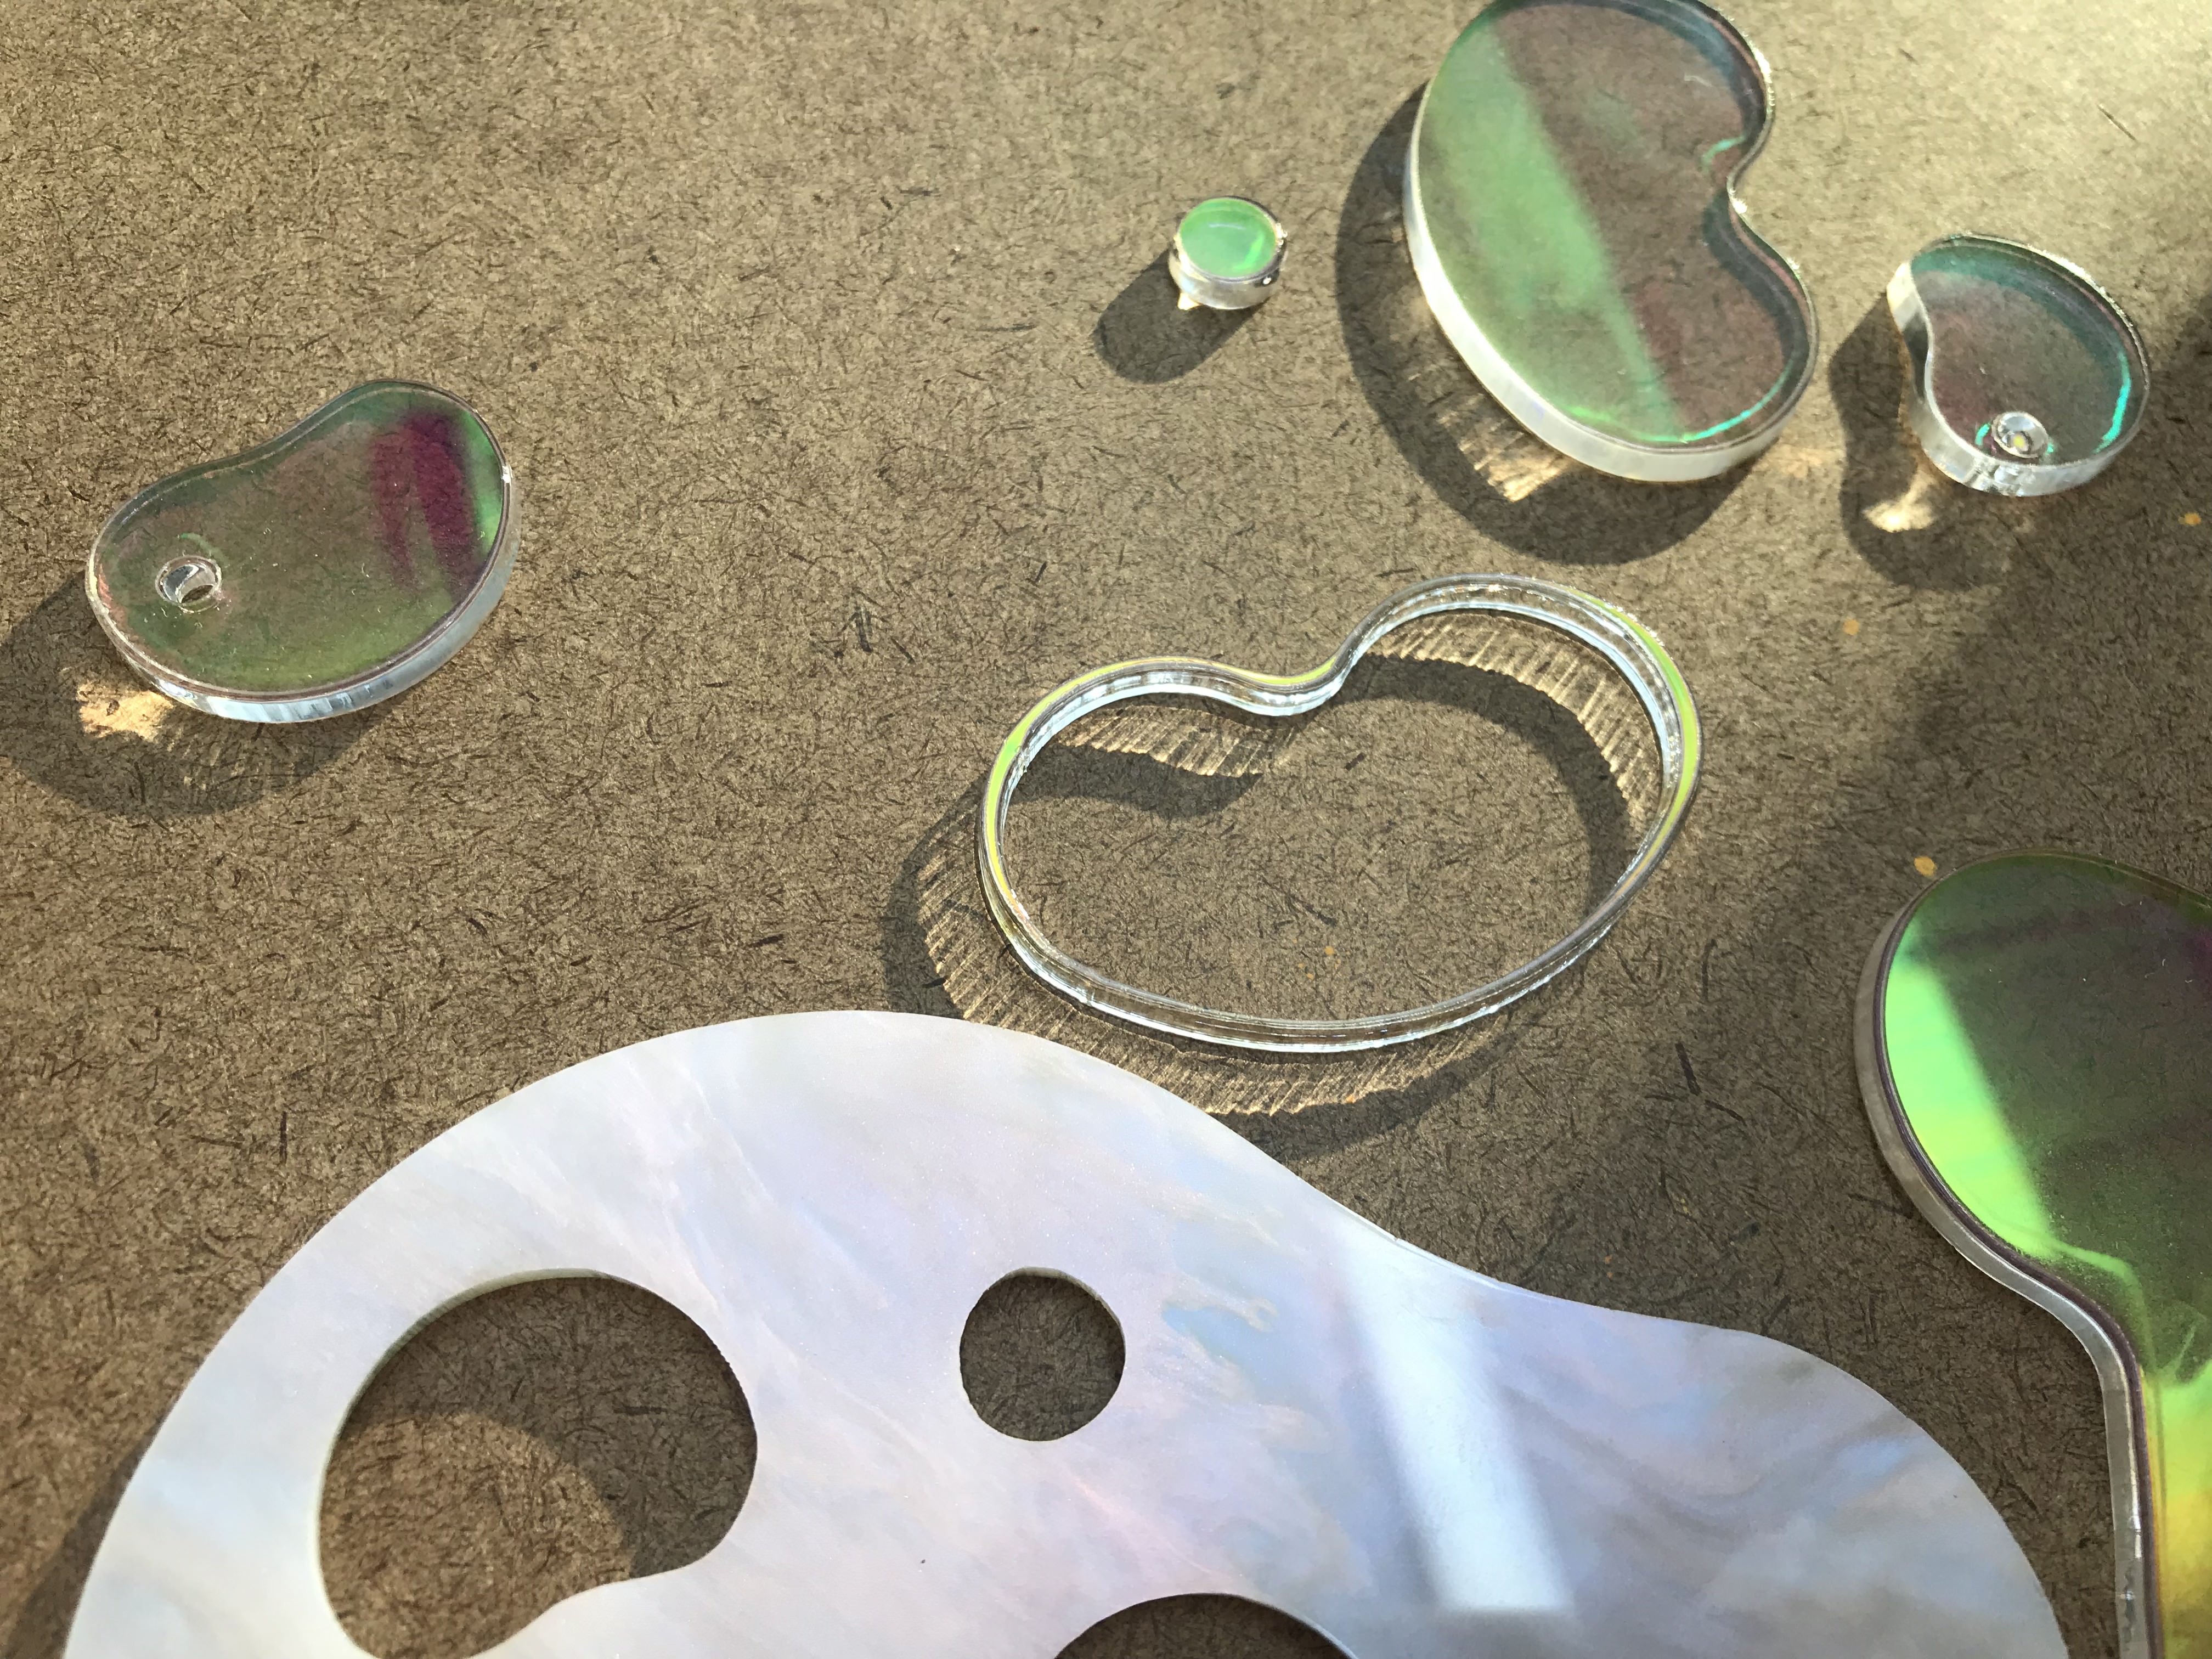
The Real Thing - Arcylic
AI File-
Below is how I organized my files and how file that's been sent to the lasercutter looks like:
Materials
-
I bought two color that I have never used before: pearl and holography.

Also, I bought all the best buddies for arcylics:
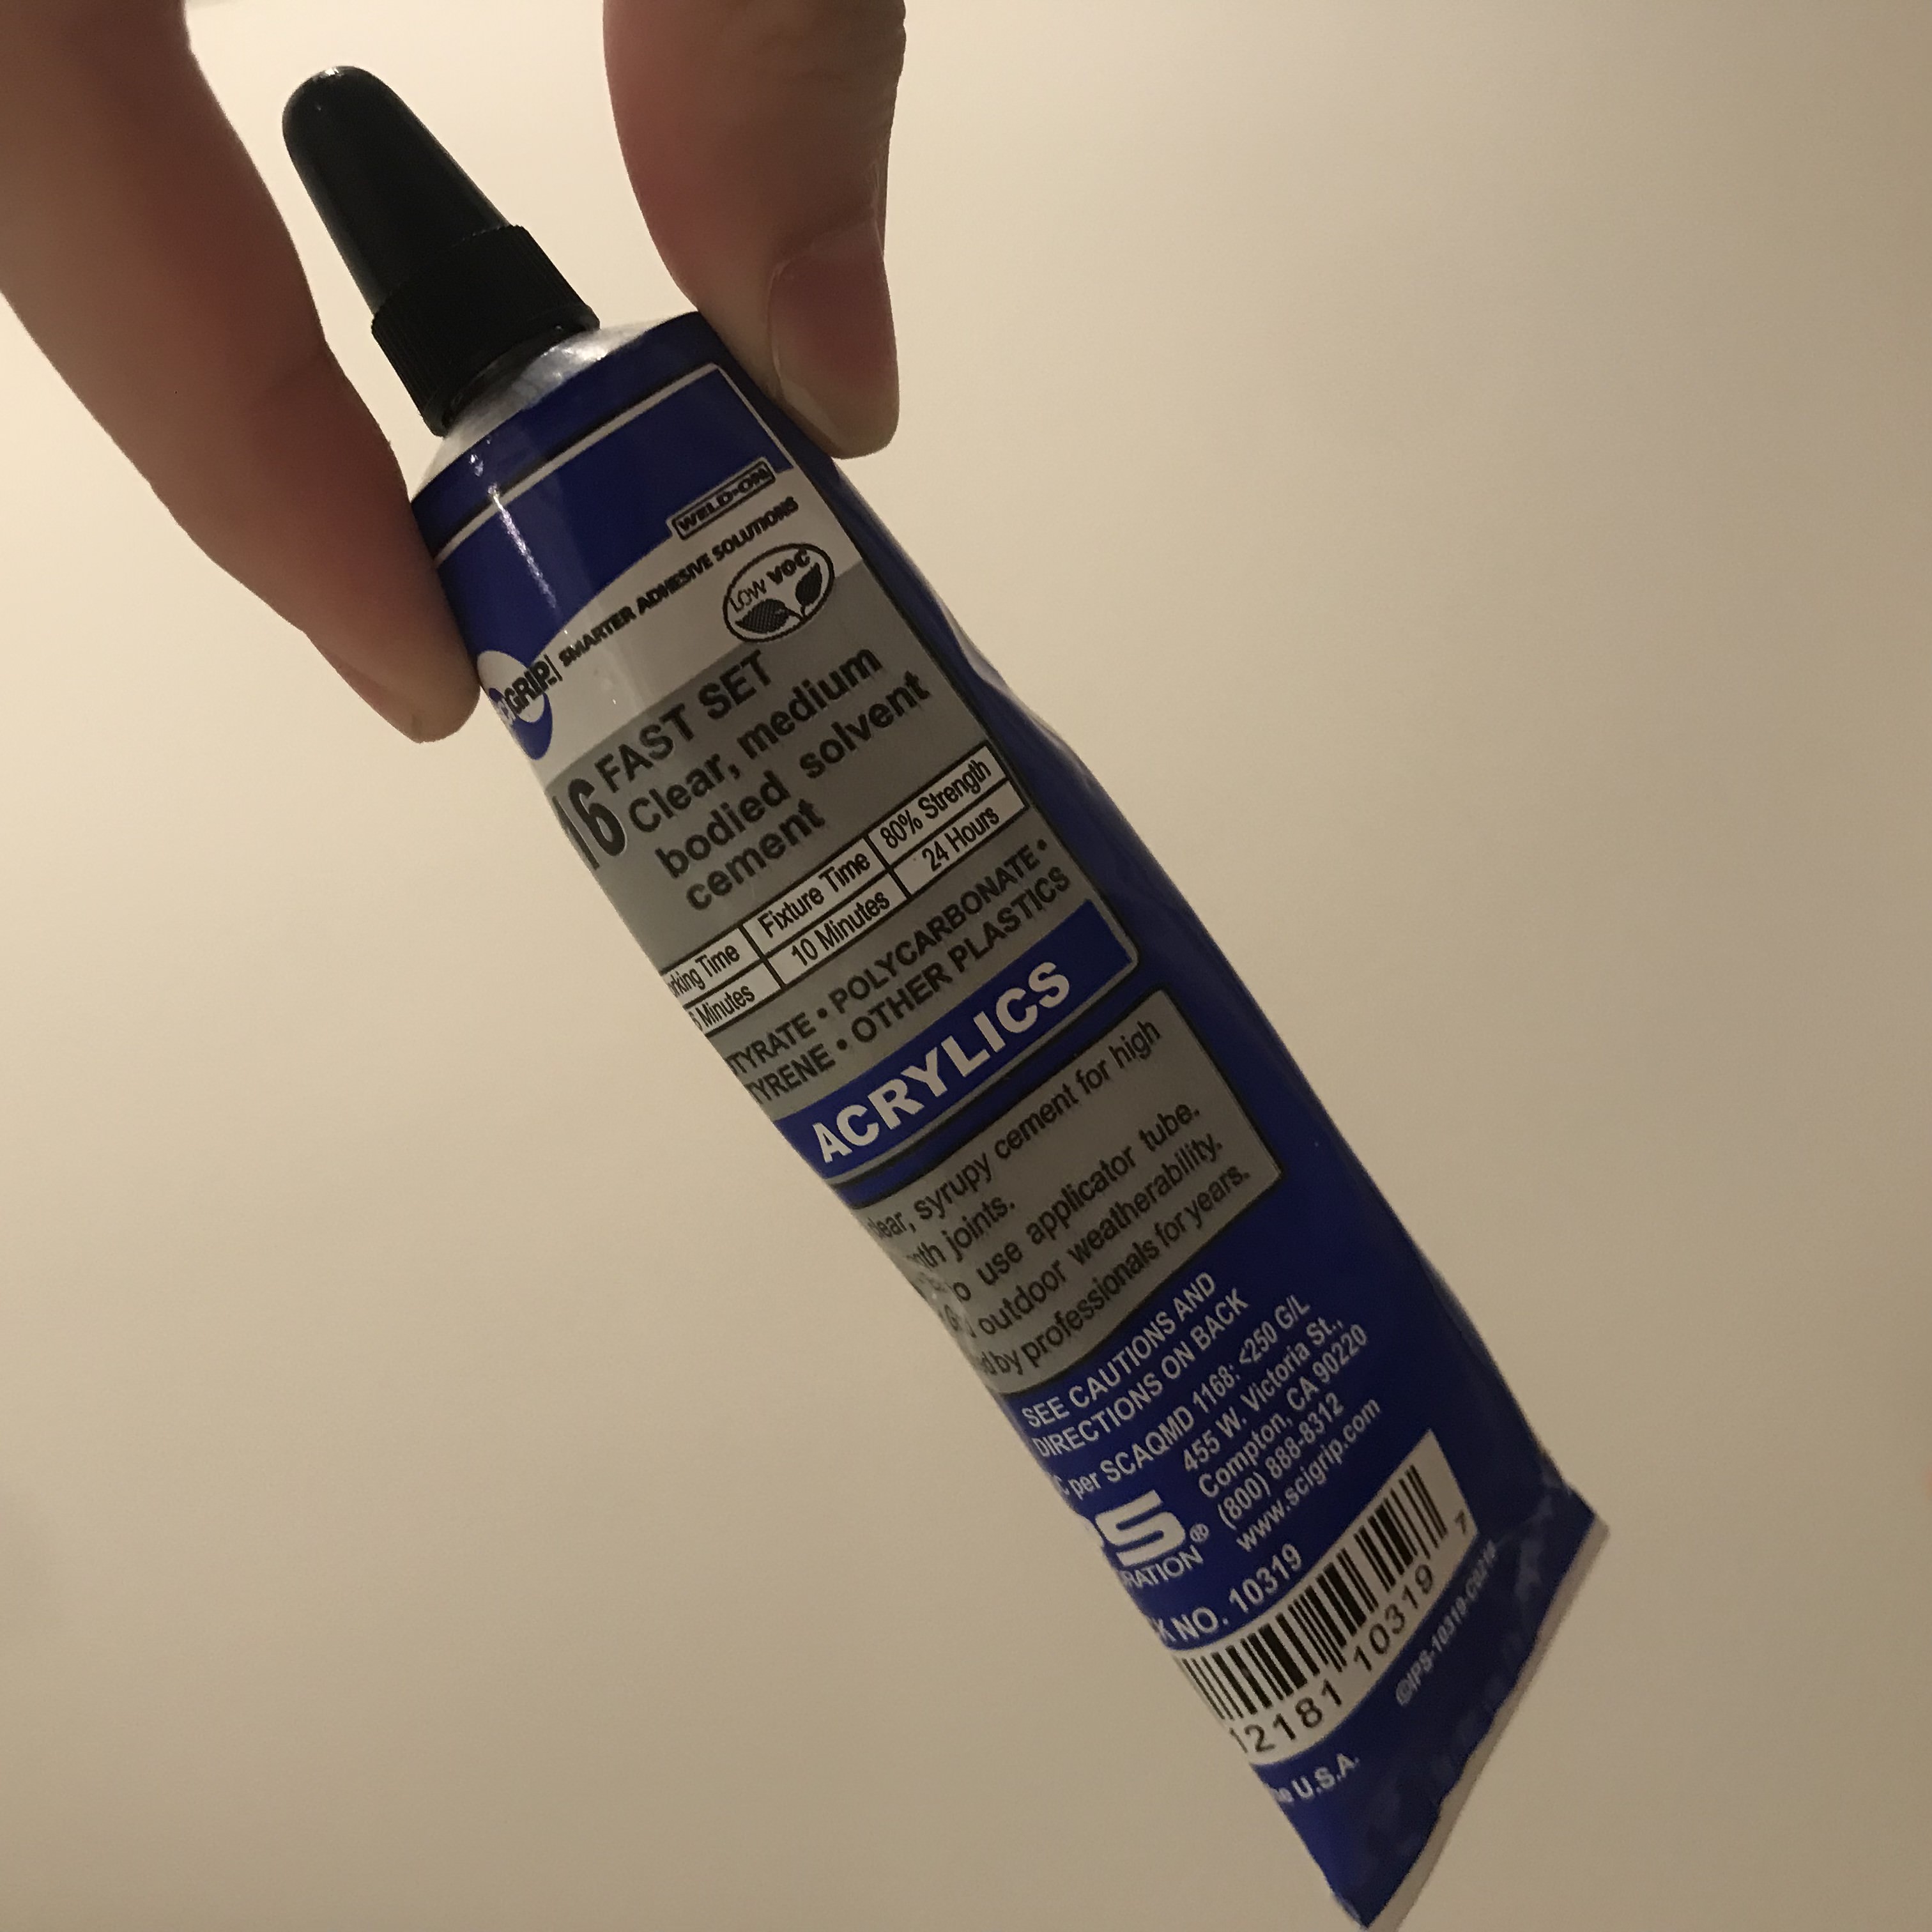
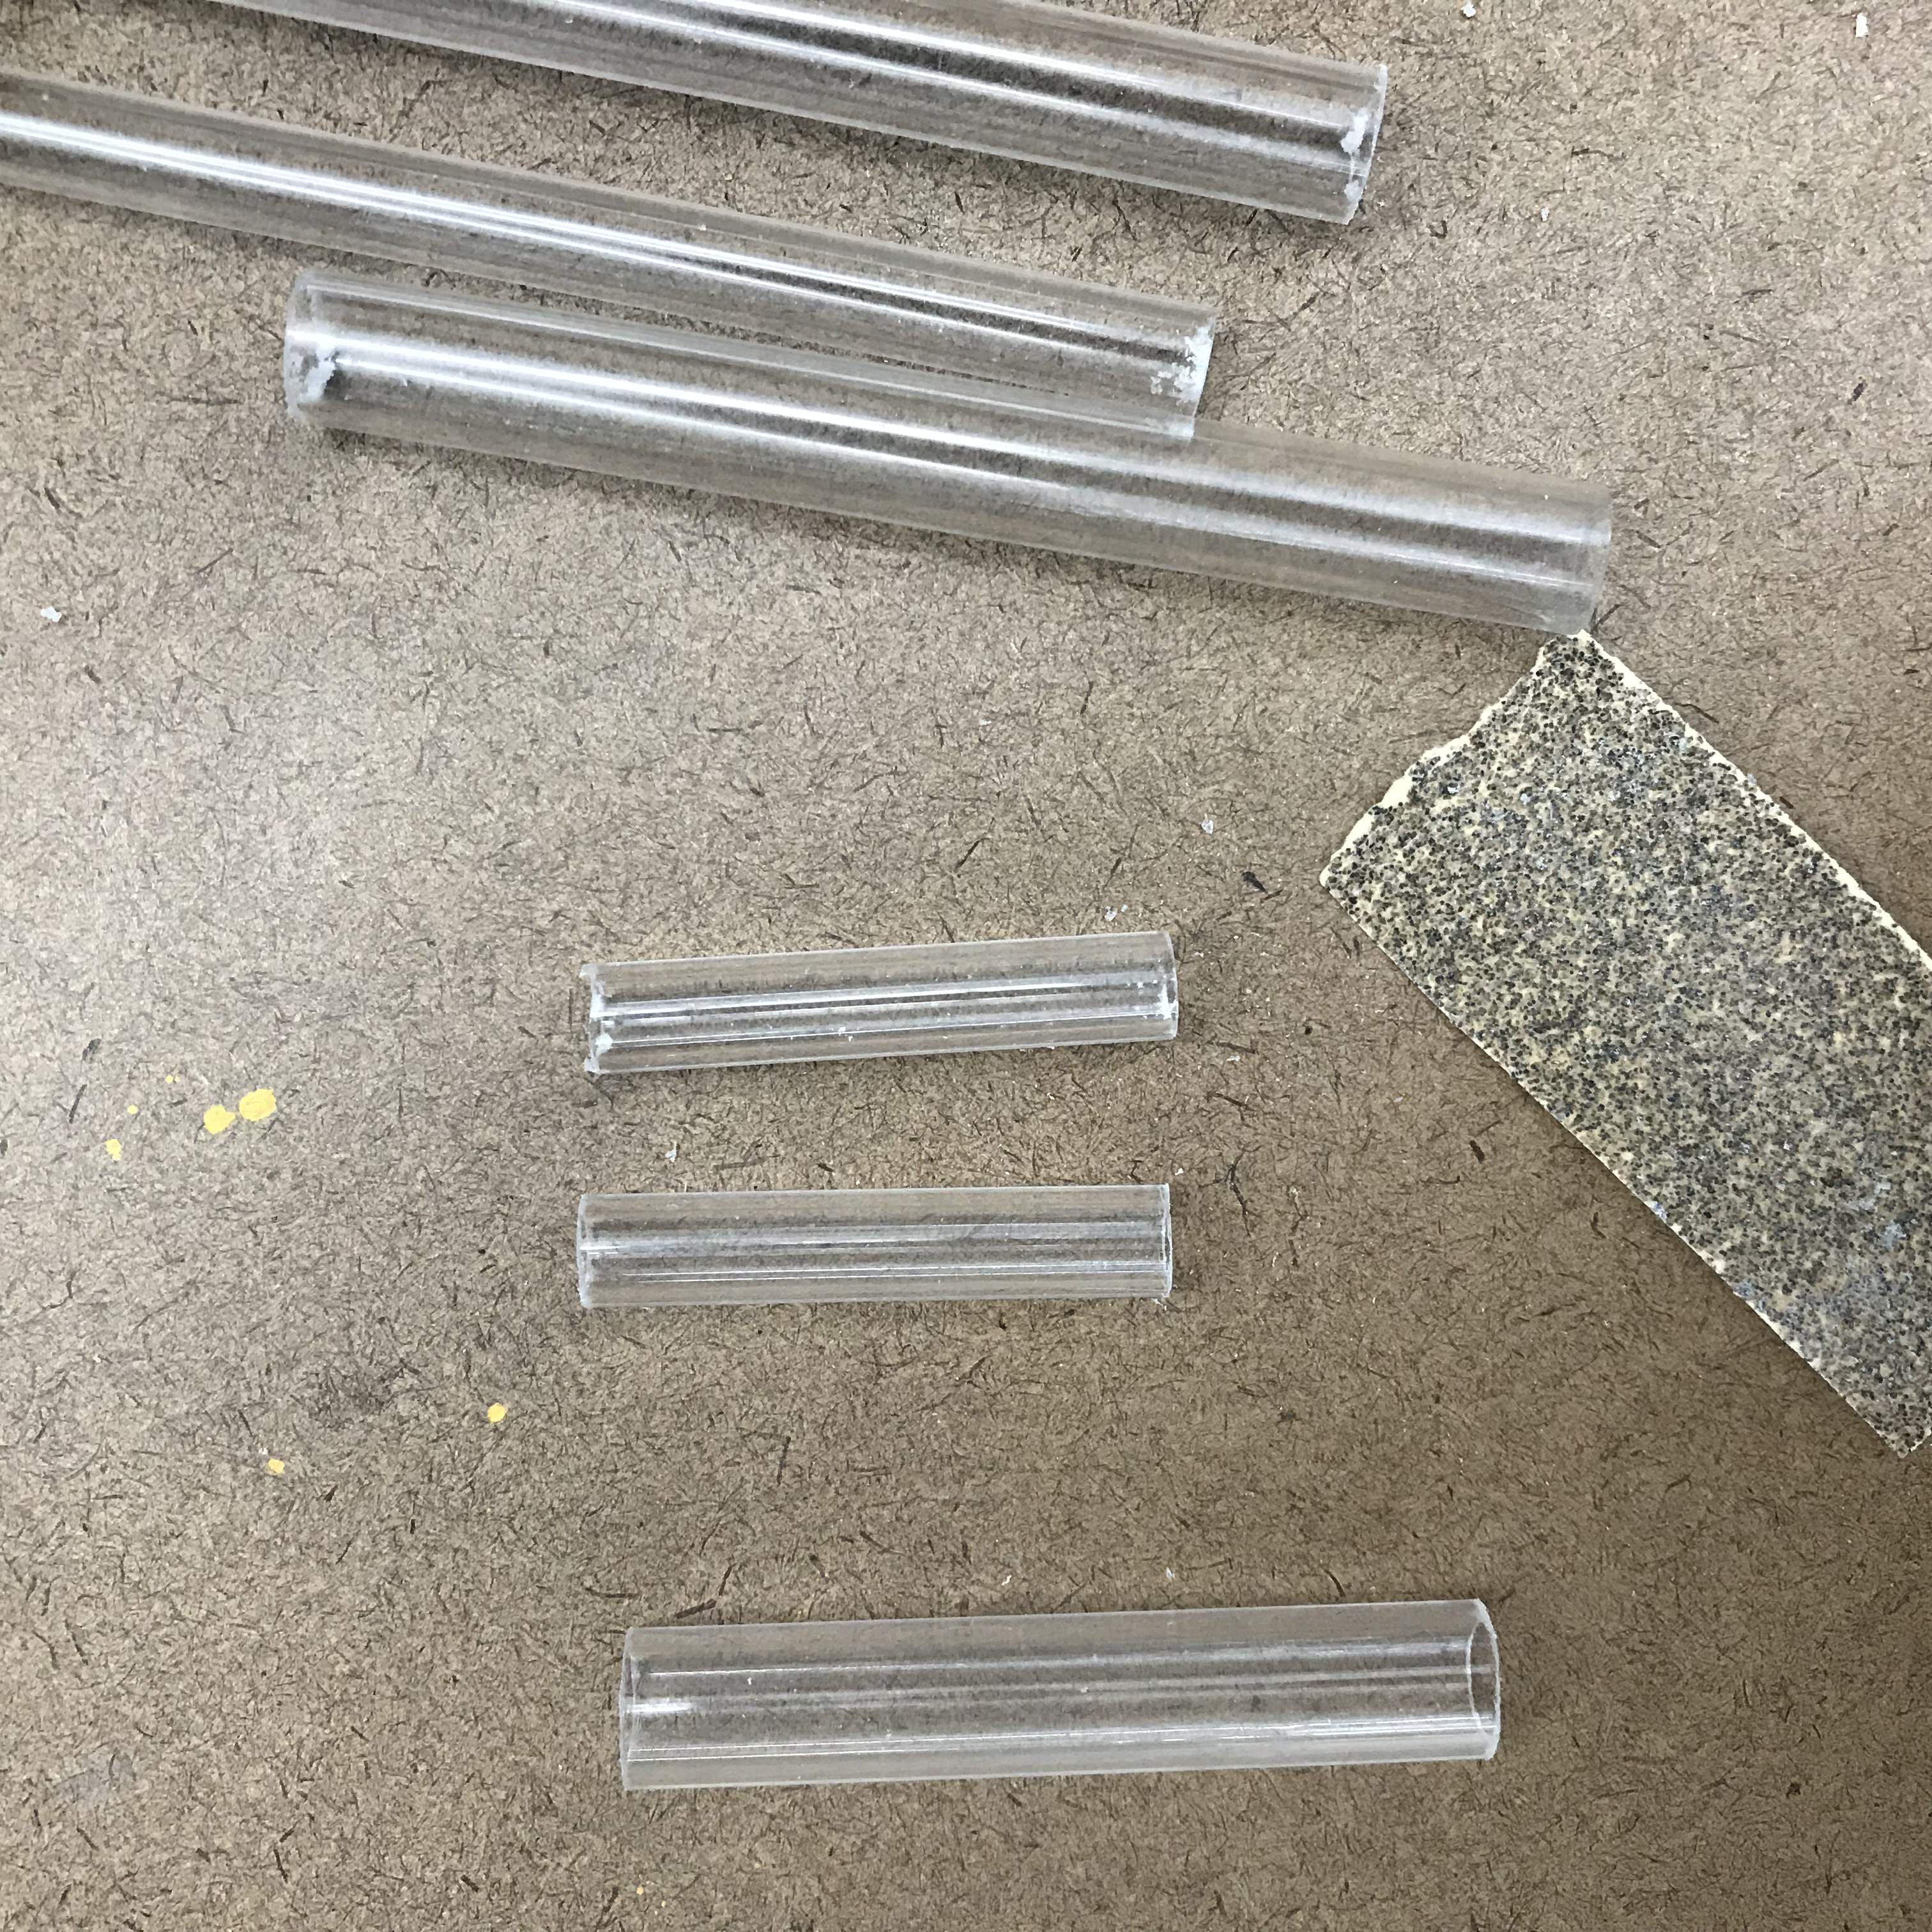
For the removeable vase, I bought the cylinder arcylics from Canal Plastic and cut it into smaller sizes with saw, and sanded it down with sand paper:

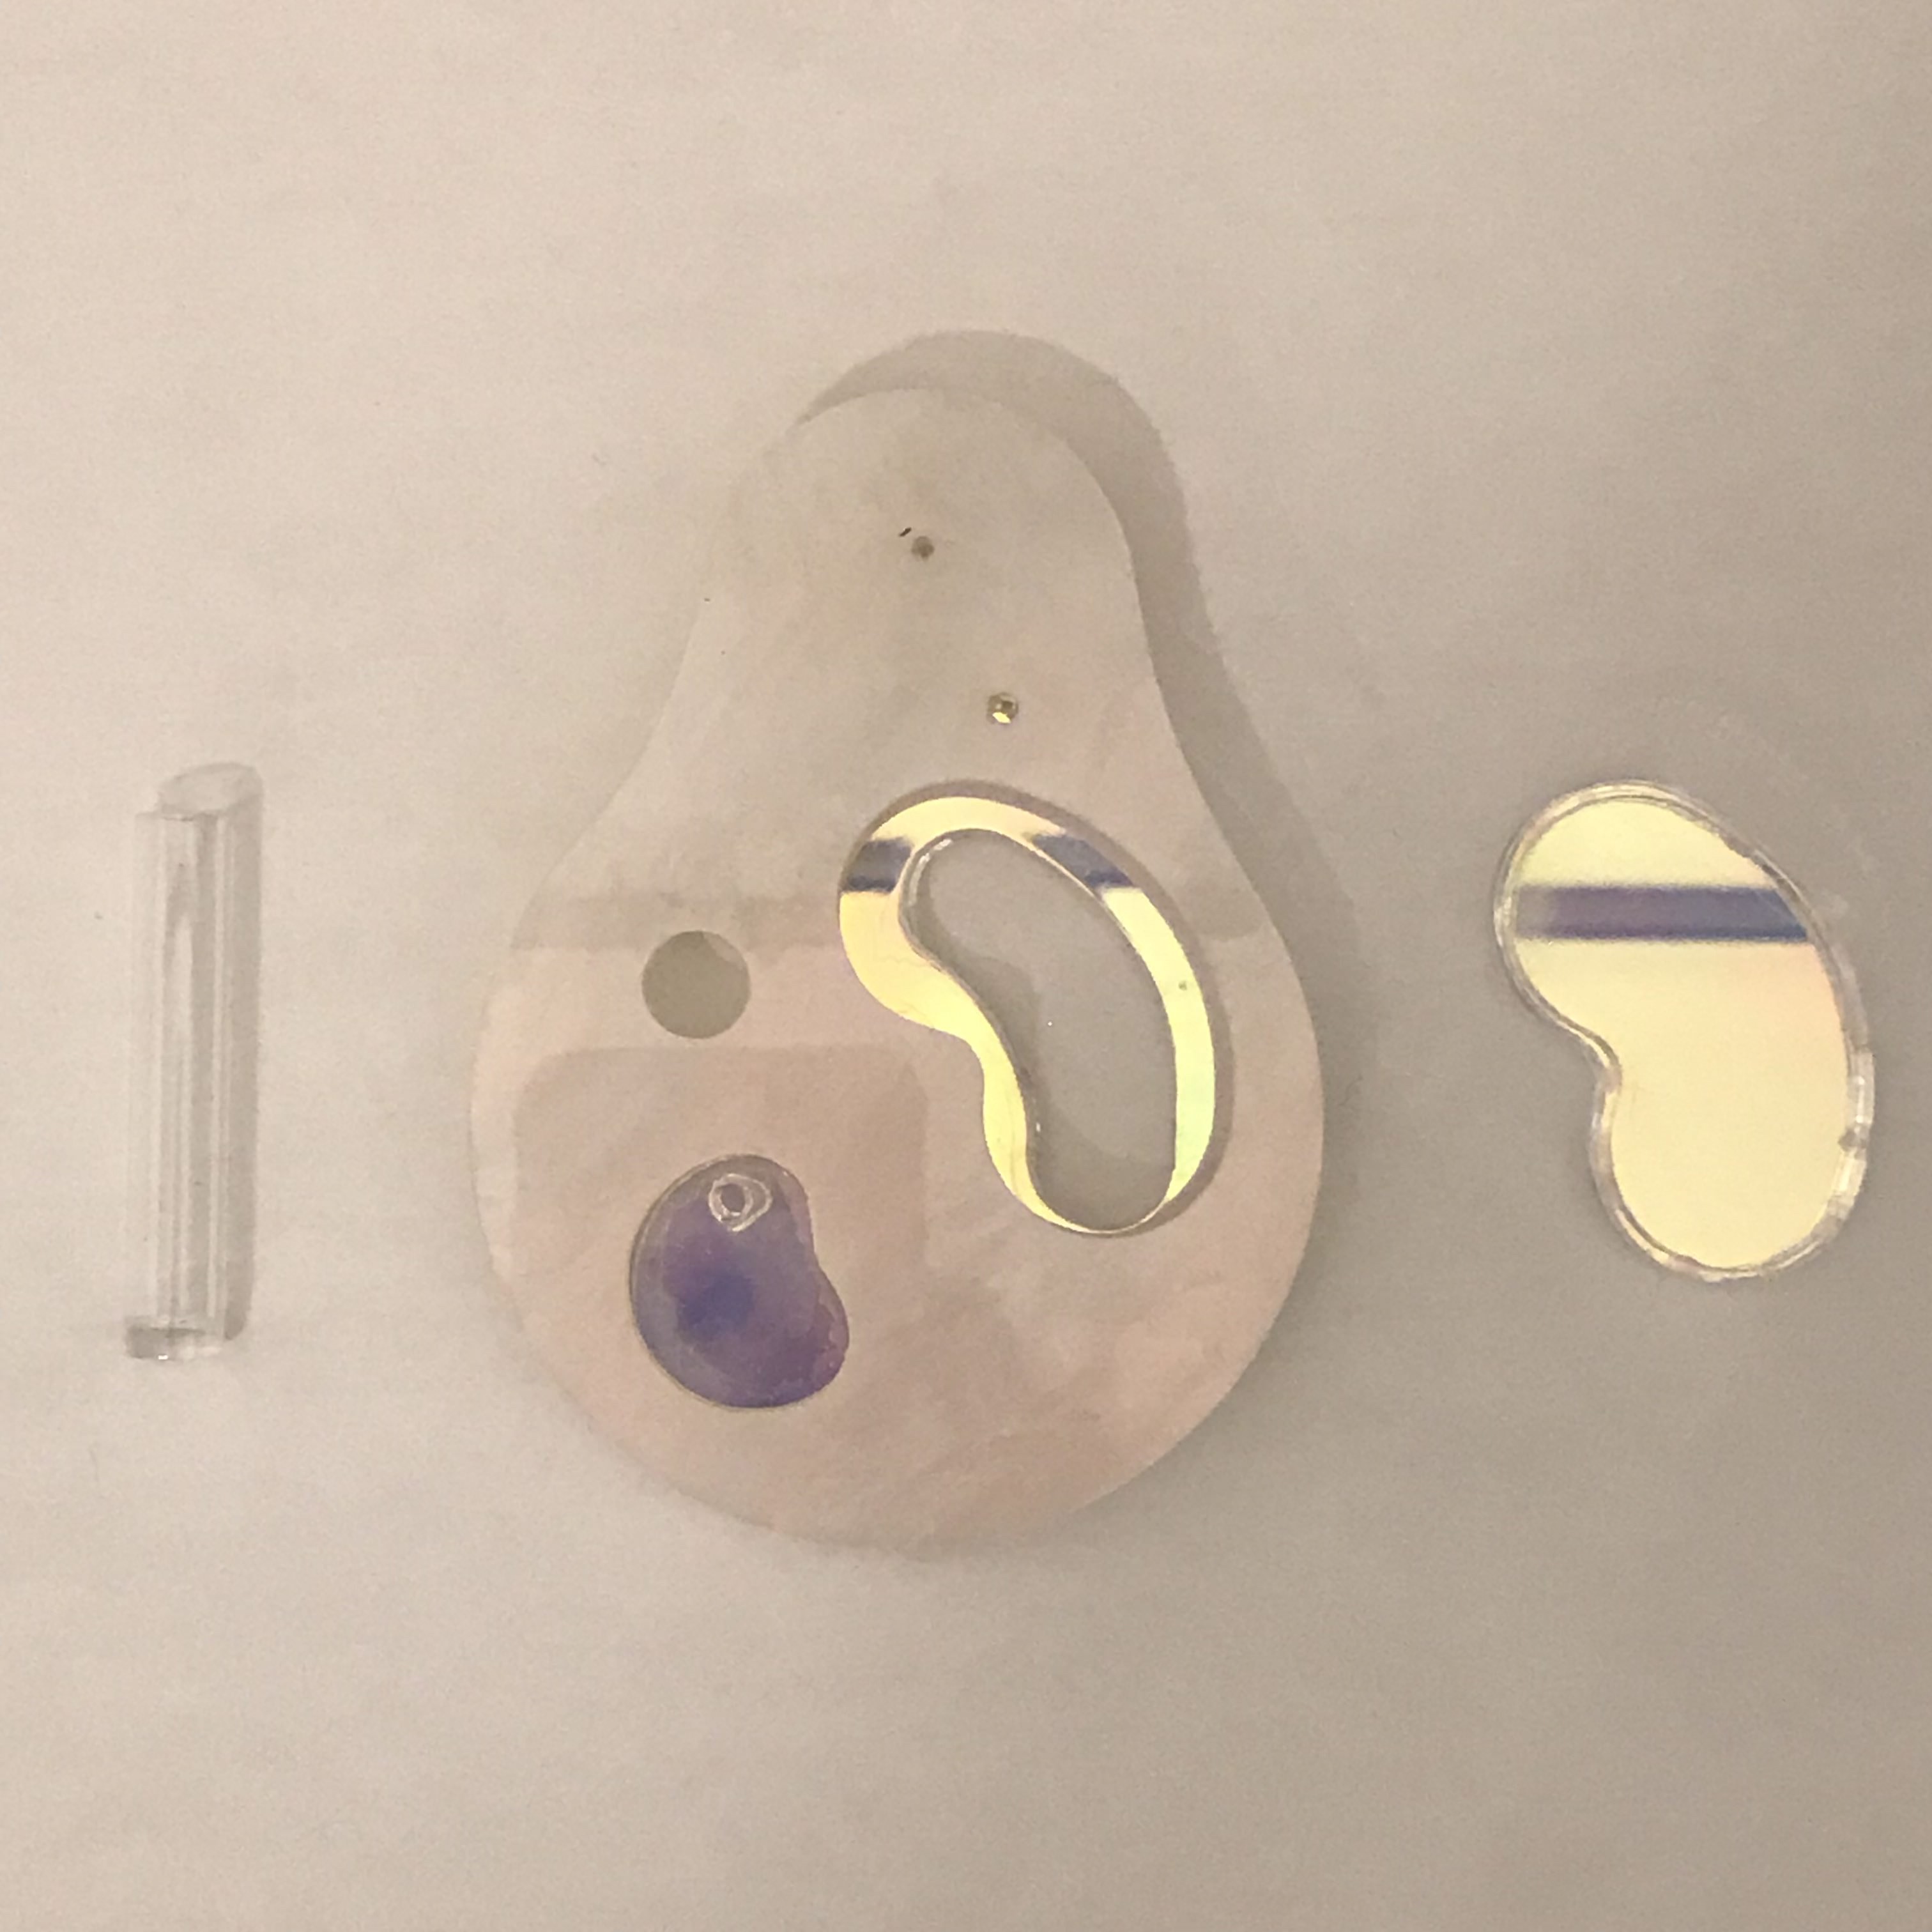
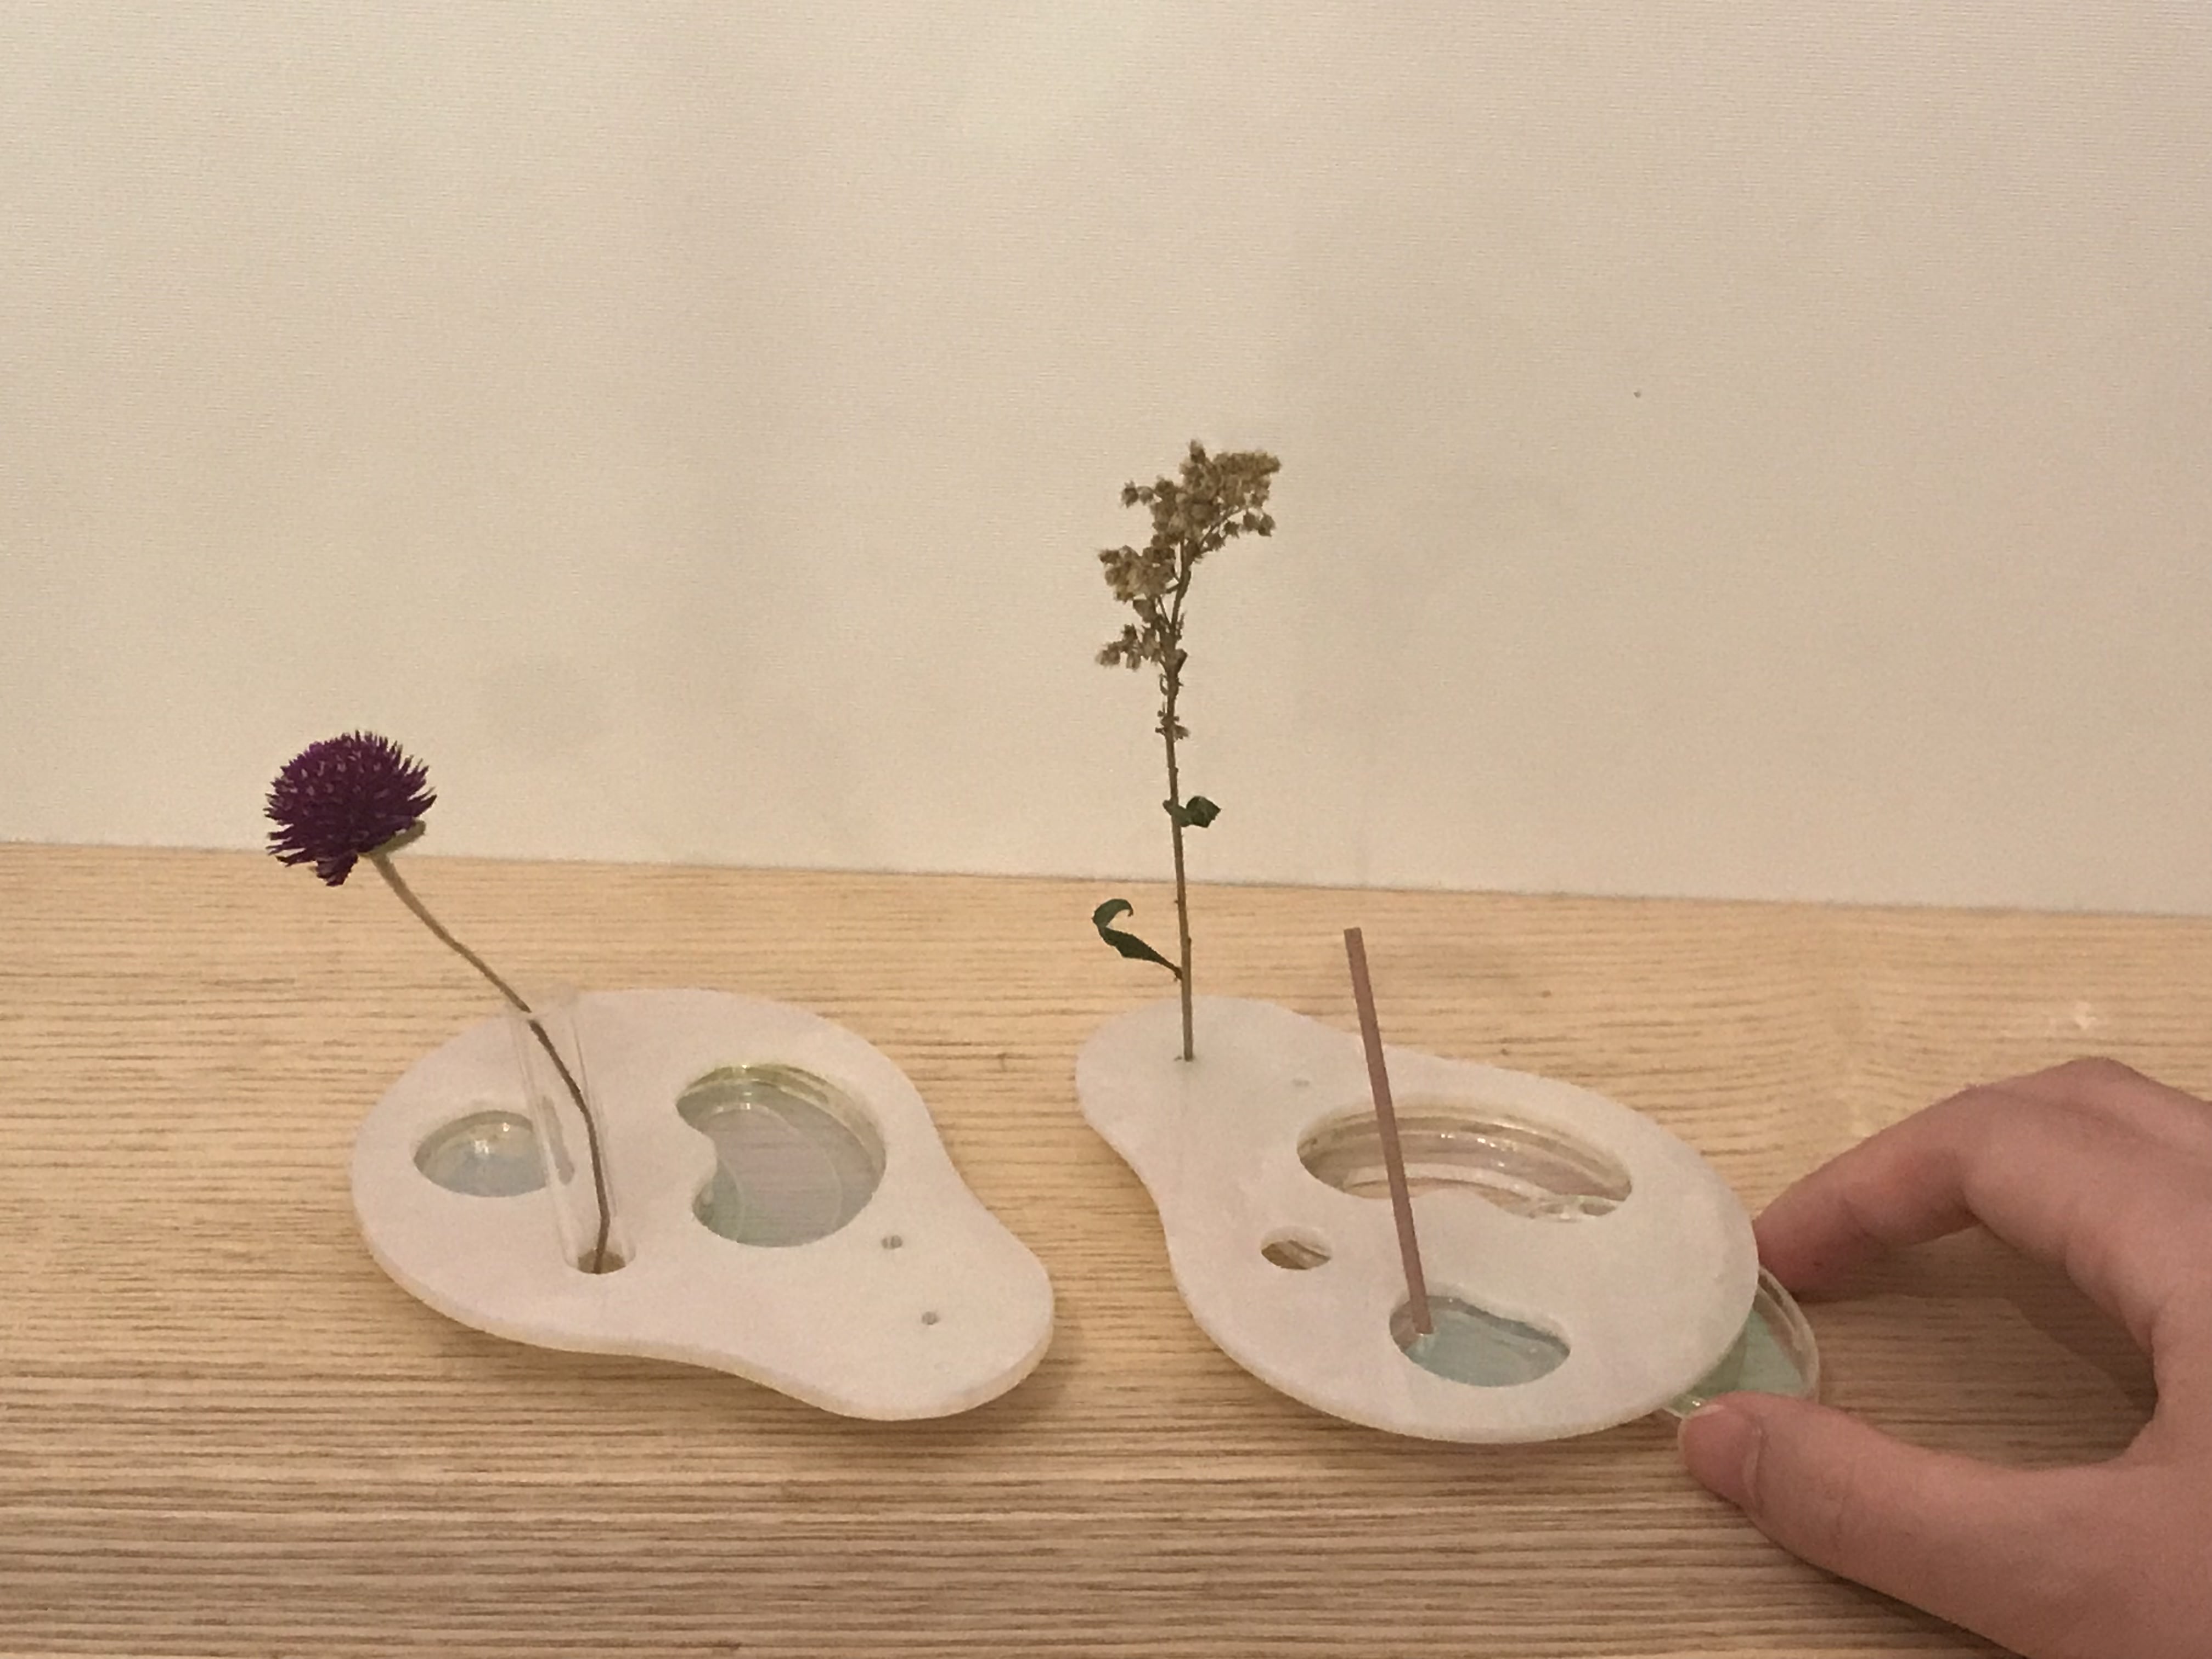
And this is how the final product looks like:


Some details I like about the holography arcylic is that the reflection really reminds me of the pond:

The parts:

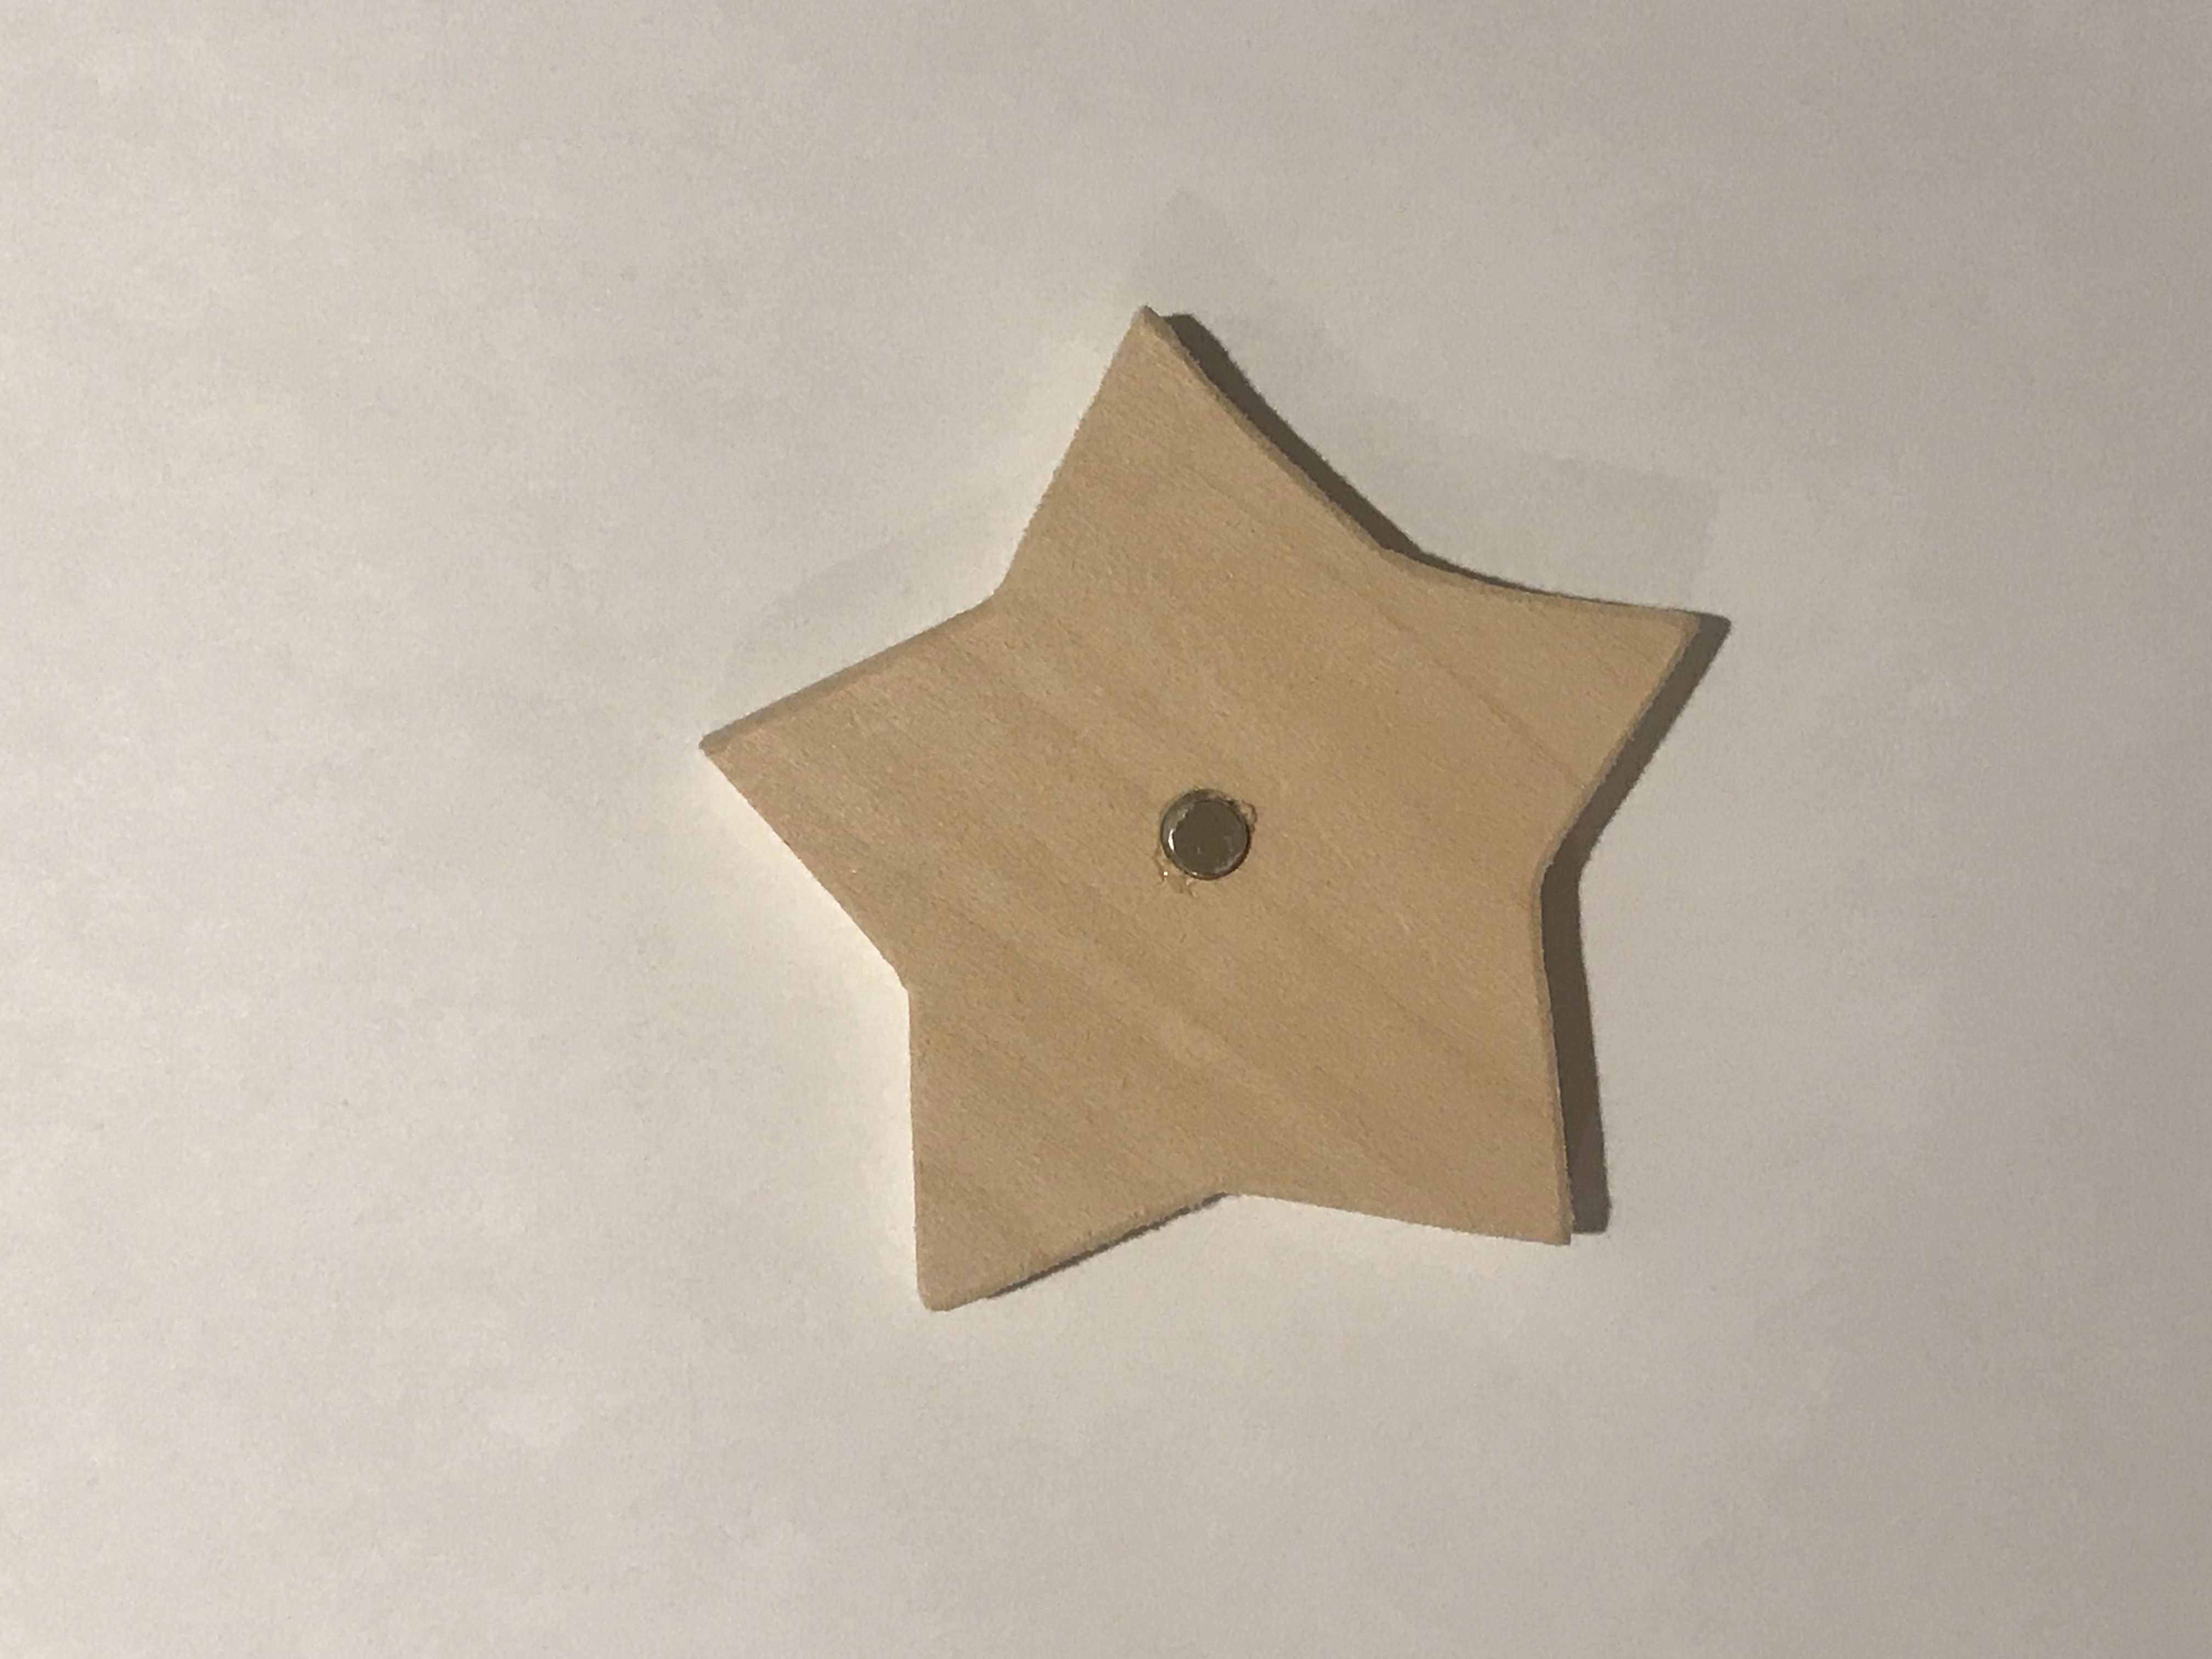
Week 2 - Star Fishing (REPEATABILITY)
For this repeatability project, I want to be as zerowaste as possible, so it also means that I want all 5 objects to be useful.
I had two directions:
1. Something for myself
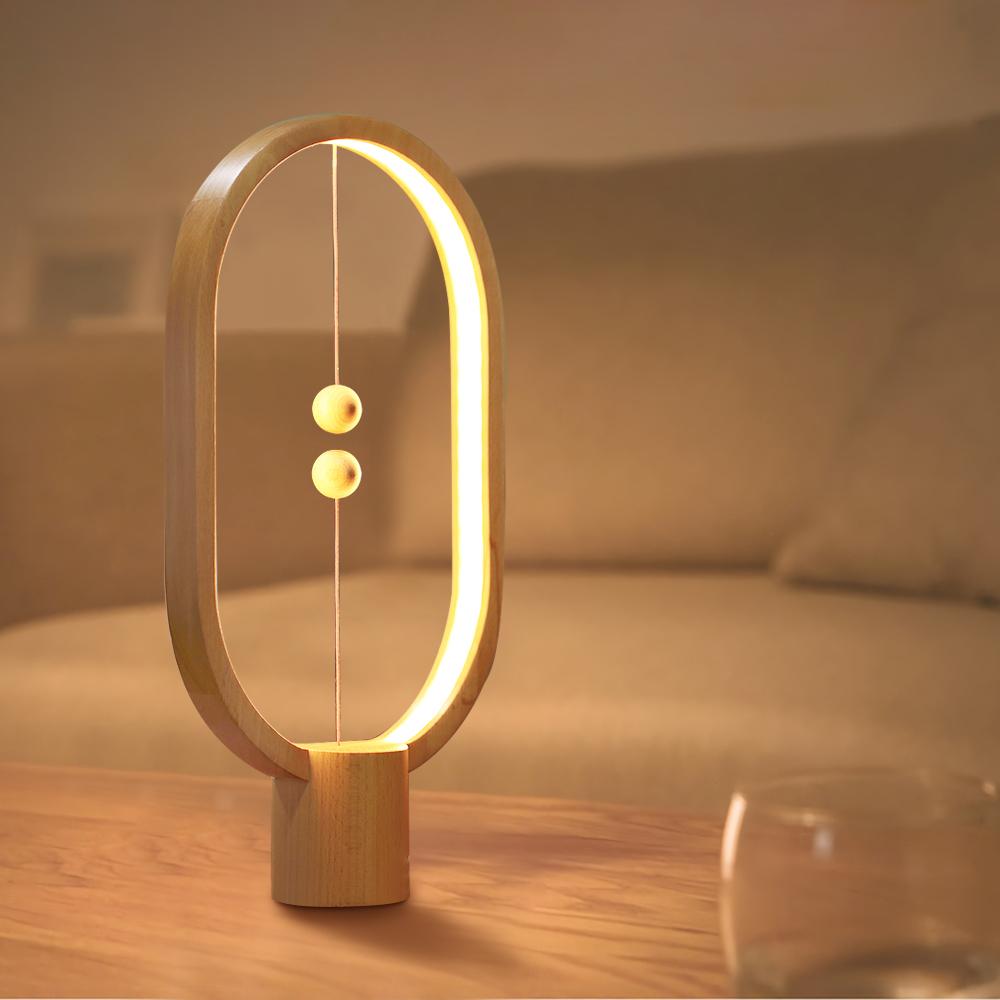
I always wanted a white modern lantern that looked somehow like this:
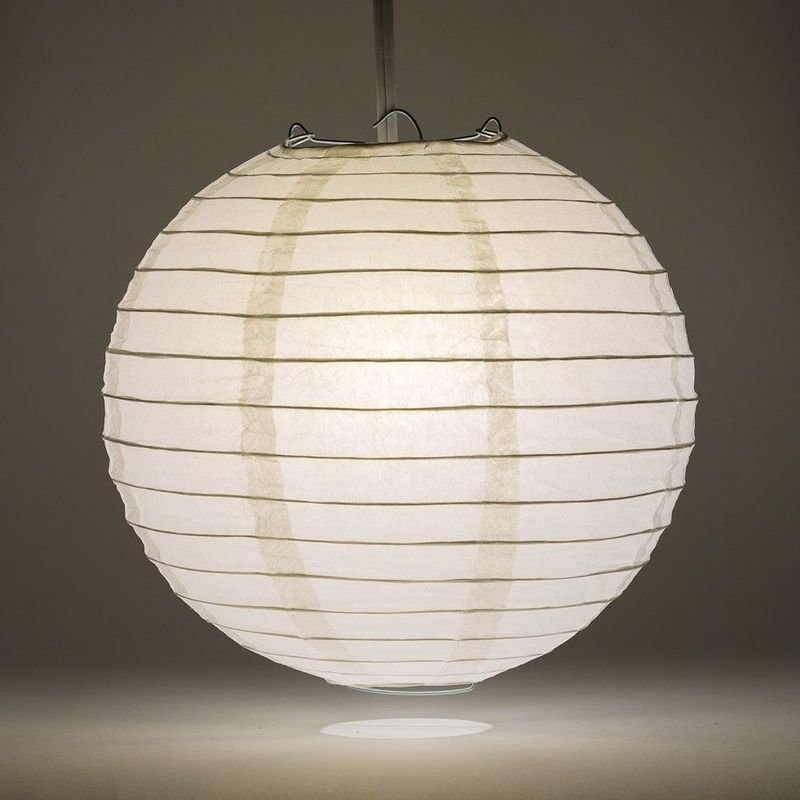

The materials will probably be rice paper, wire, lighting system (experience from the flashlight assignment) and wood as the base.
However, not only it is time consuming, but also do I really need 5 of them?
So I went into the second direction:
1. Something for my friend's kid
One of my college friend, Nina having this baby, called Arya, has the same birthday as I do. (Not to mention it because it's my birthday, but) It's less than a month to her birthday! I want to make something for this special baby. So I get some inspirations on web and had some sketches:
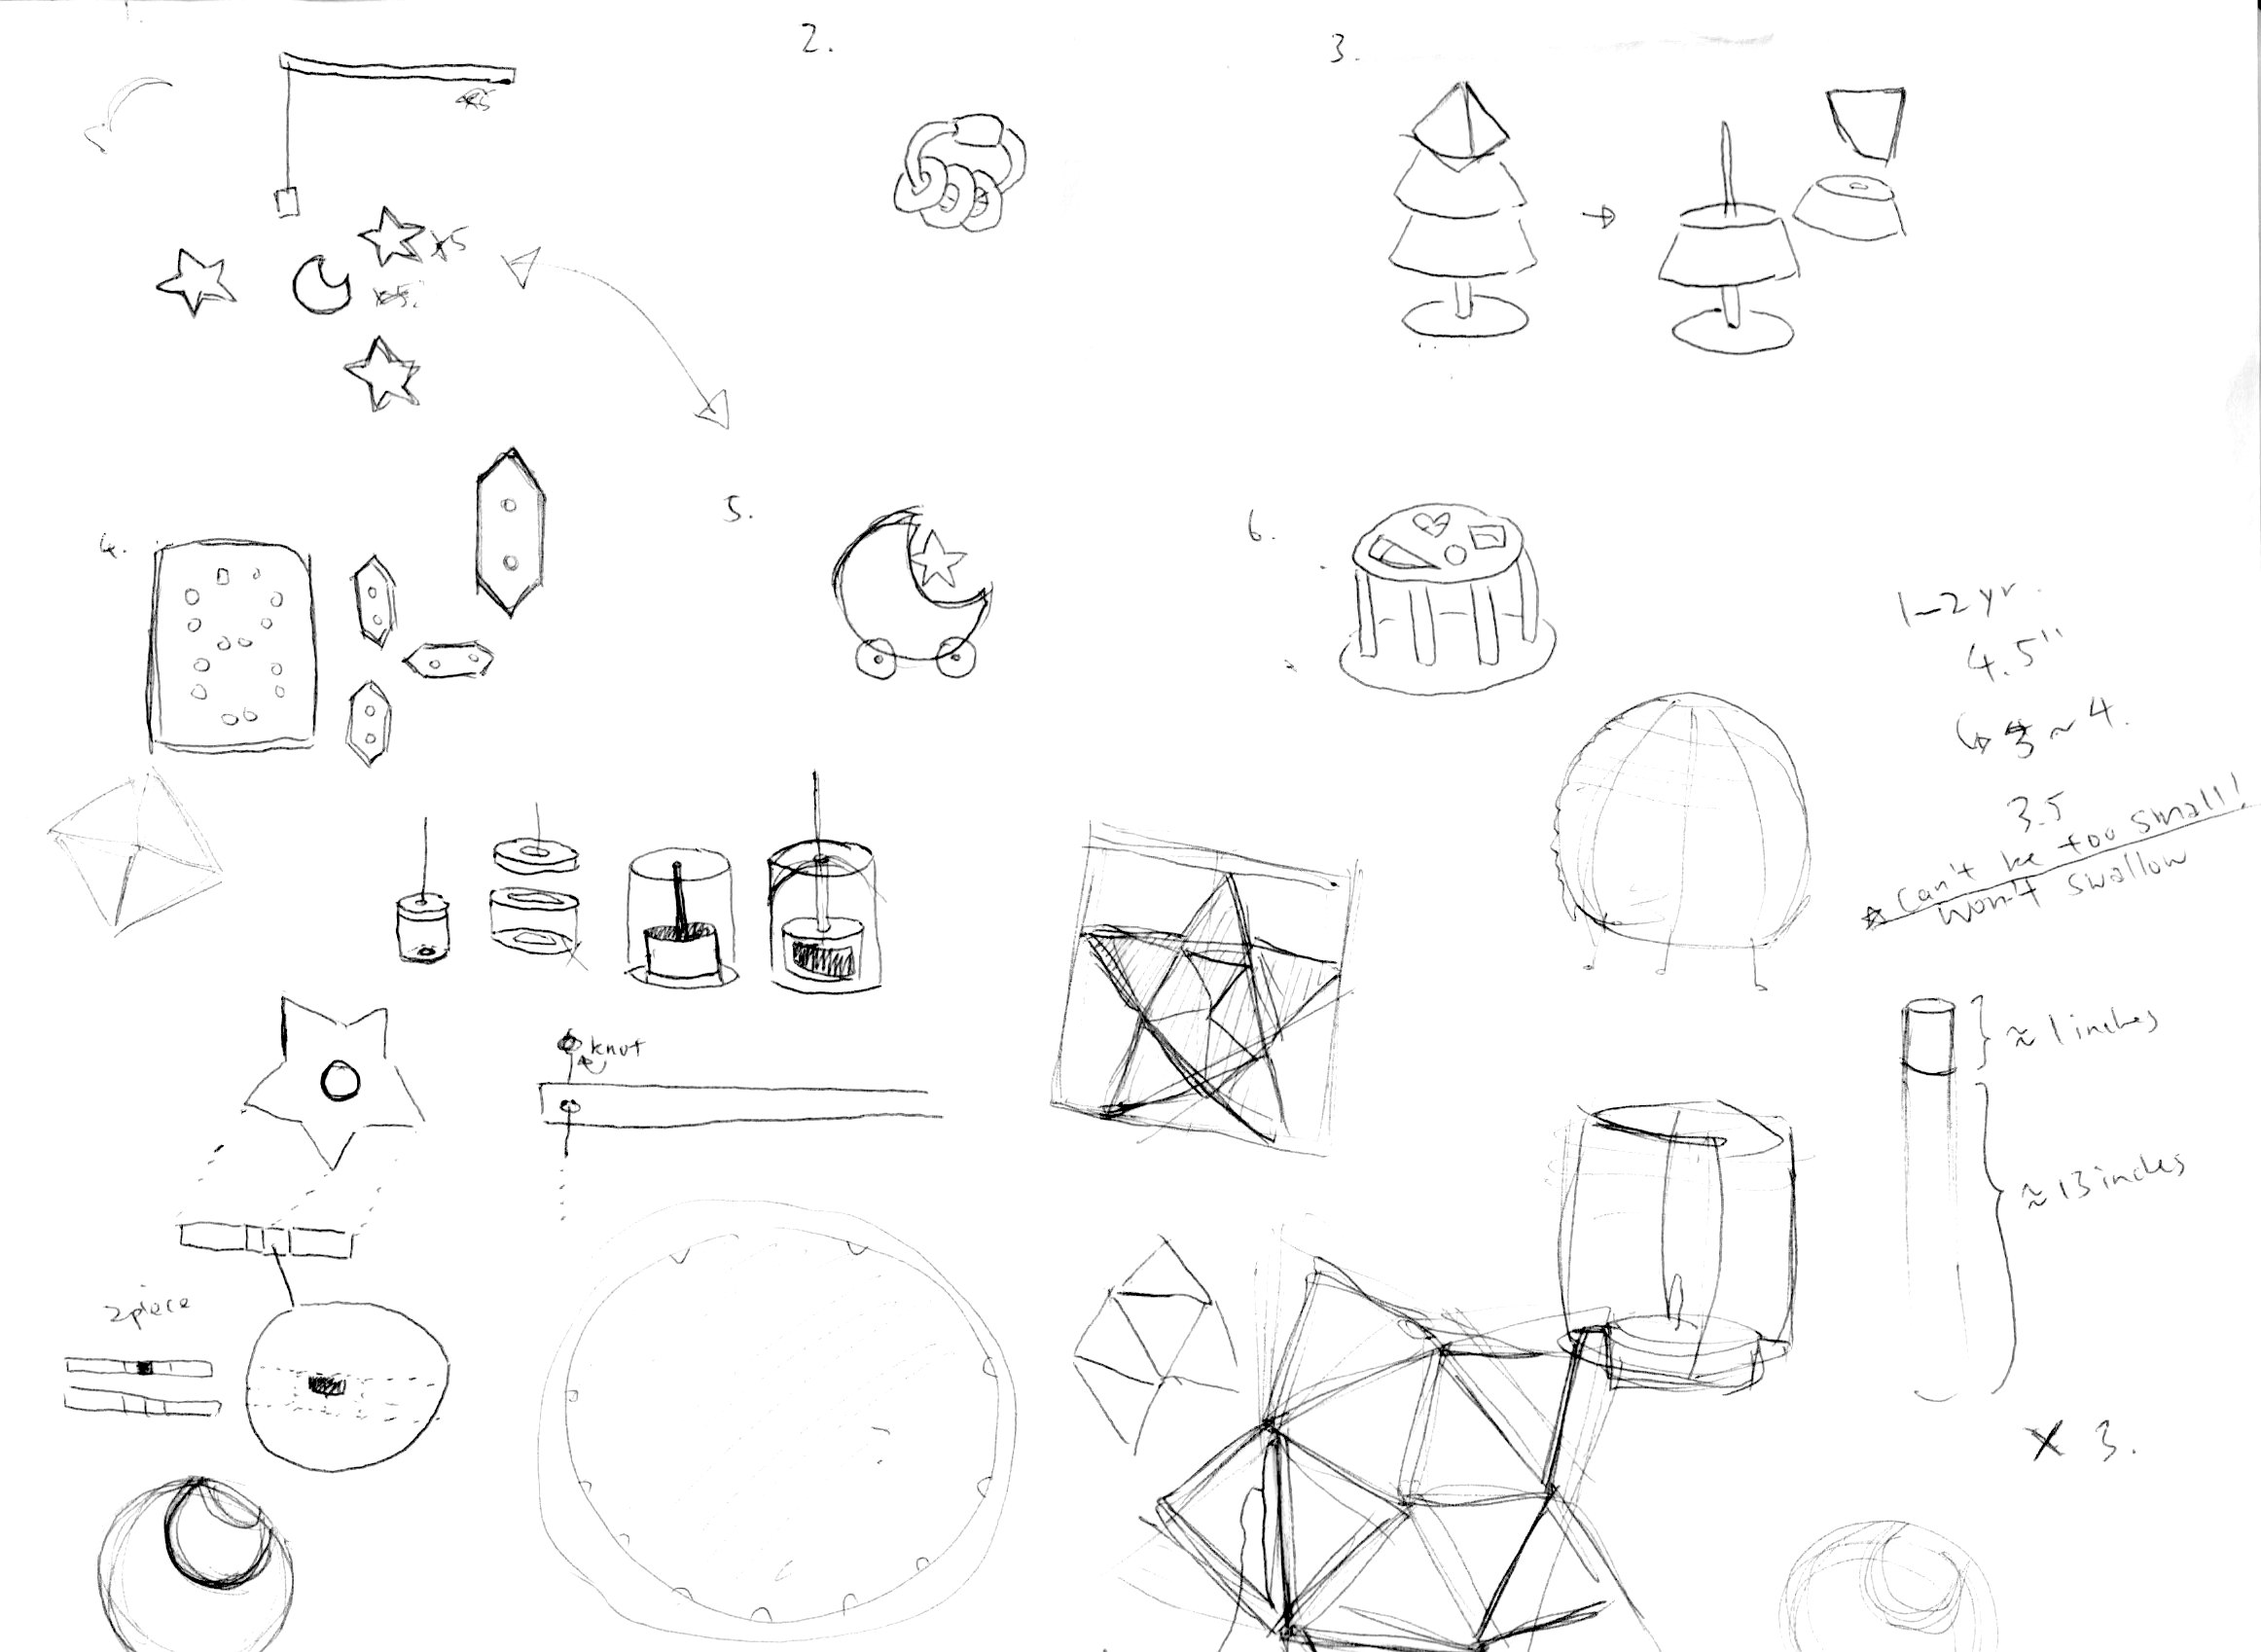
From here I figured among all, there's one game that all 5 objects can be used, and that is: The Fishing Game!
I am always amazed by the univers and stars, so instead of fishing fish, I want to create a star fishing game! Also reminded me the DreamWorks Logo:
So here is how I make it--
STEP 1 - Construction of the Star Shape
Inspired by Ben's story on the wooden houses, I want to also create a system that can help me to get a star shape easily. So I was thinking to do this triangle system: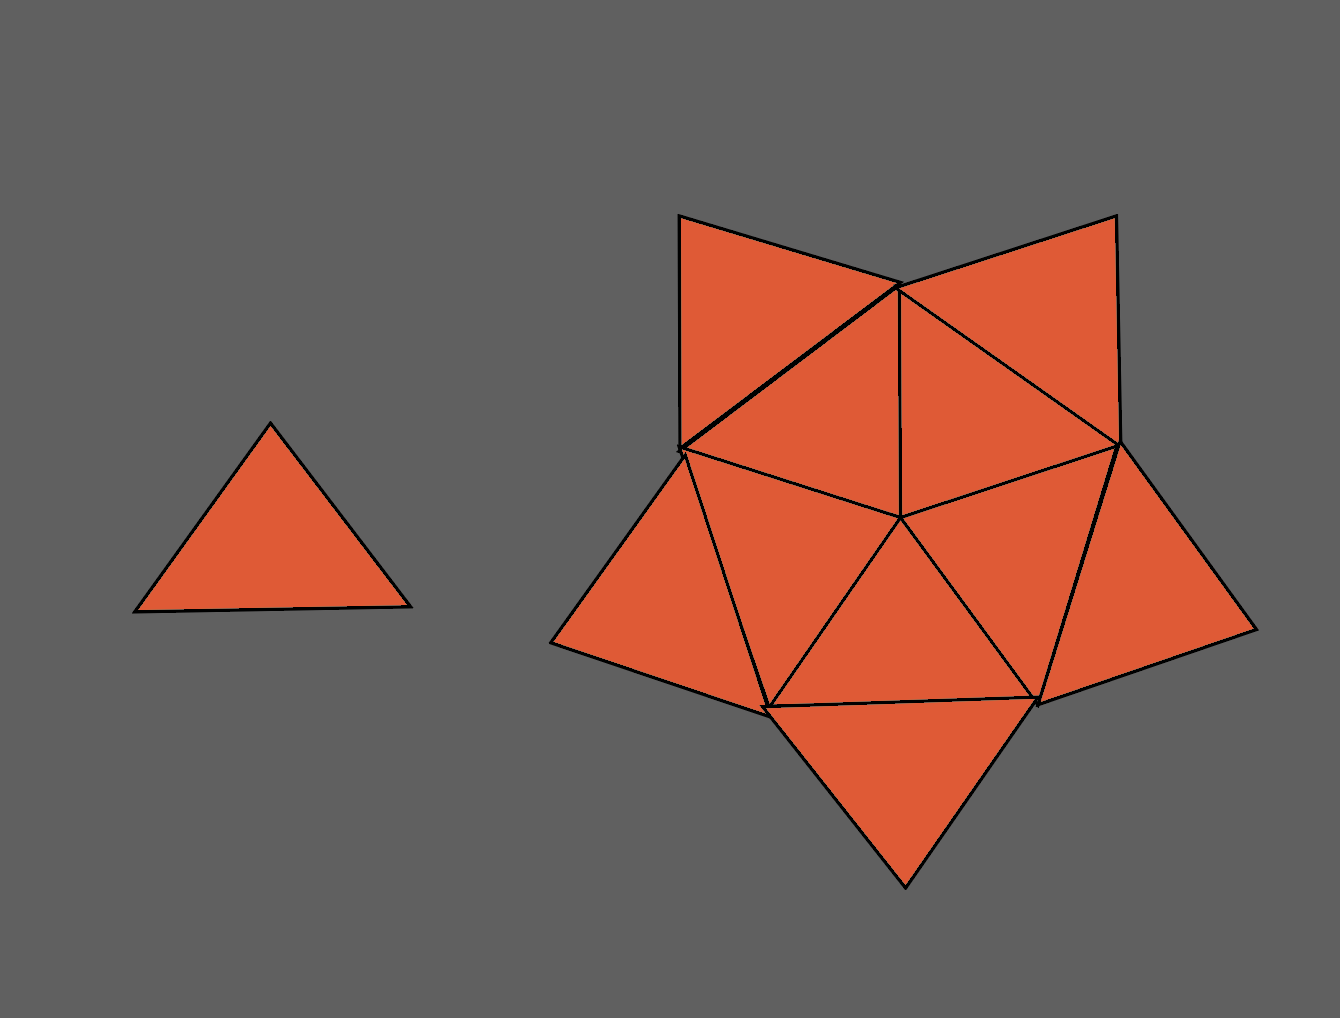
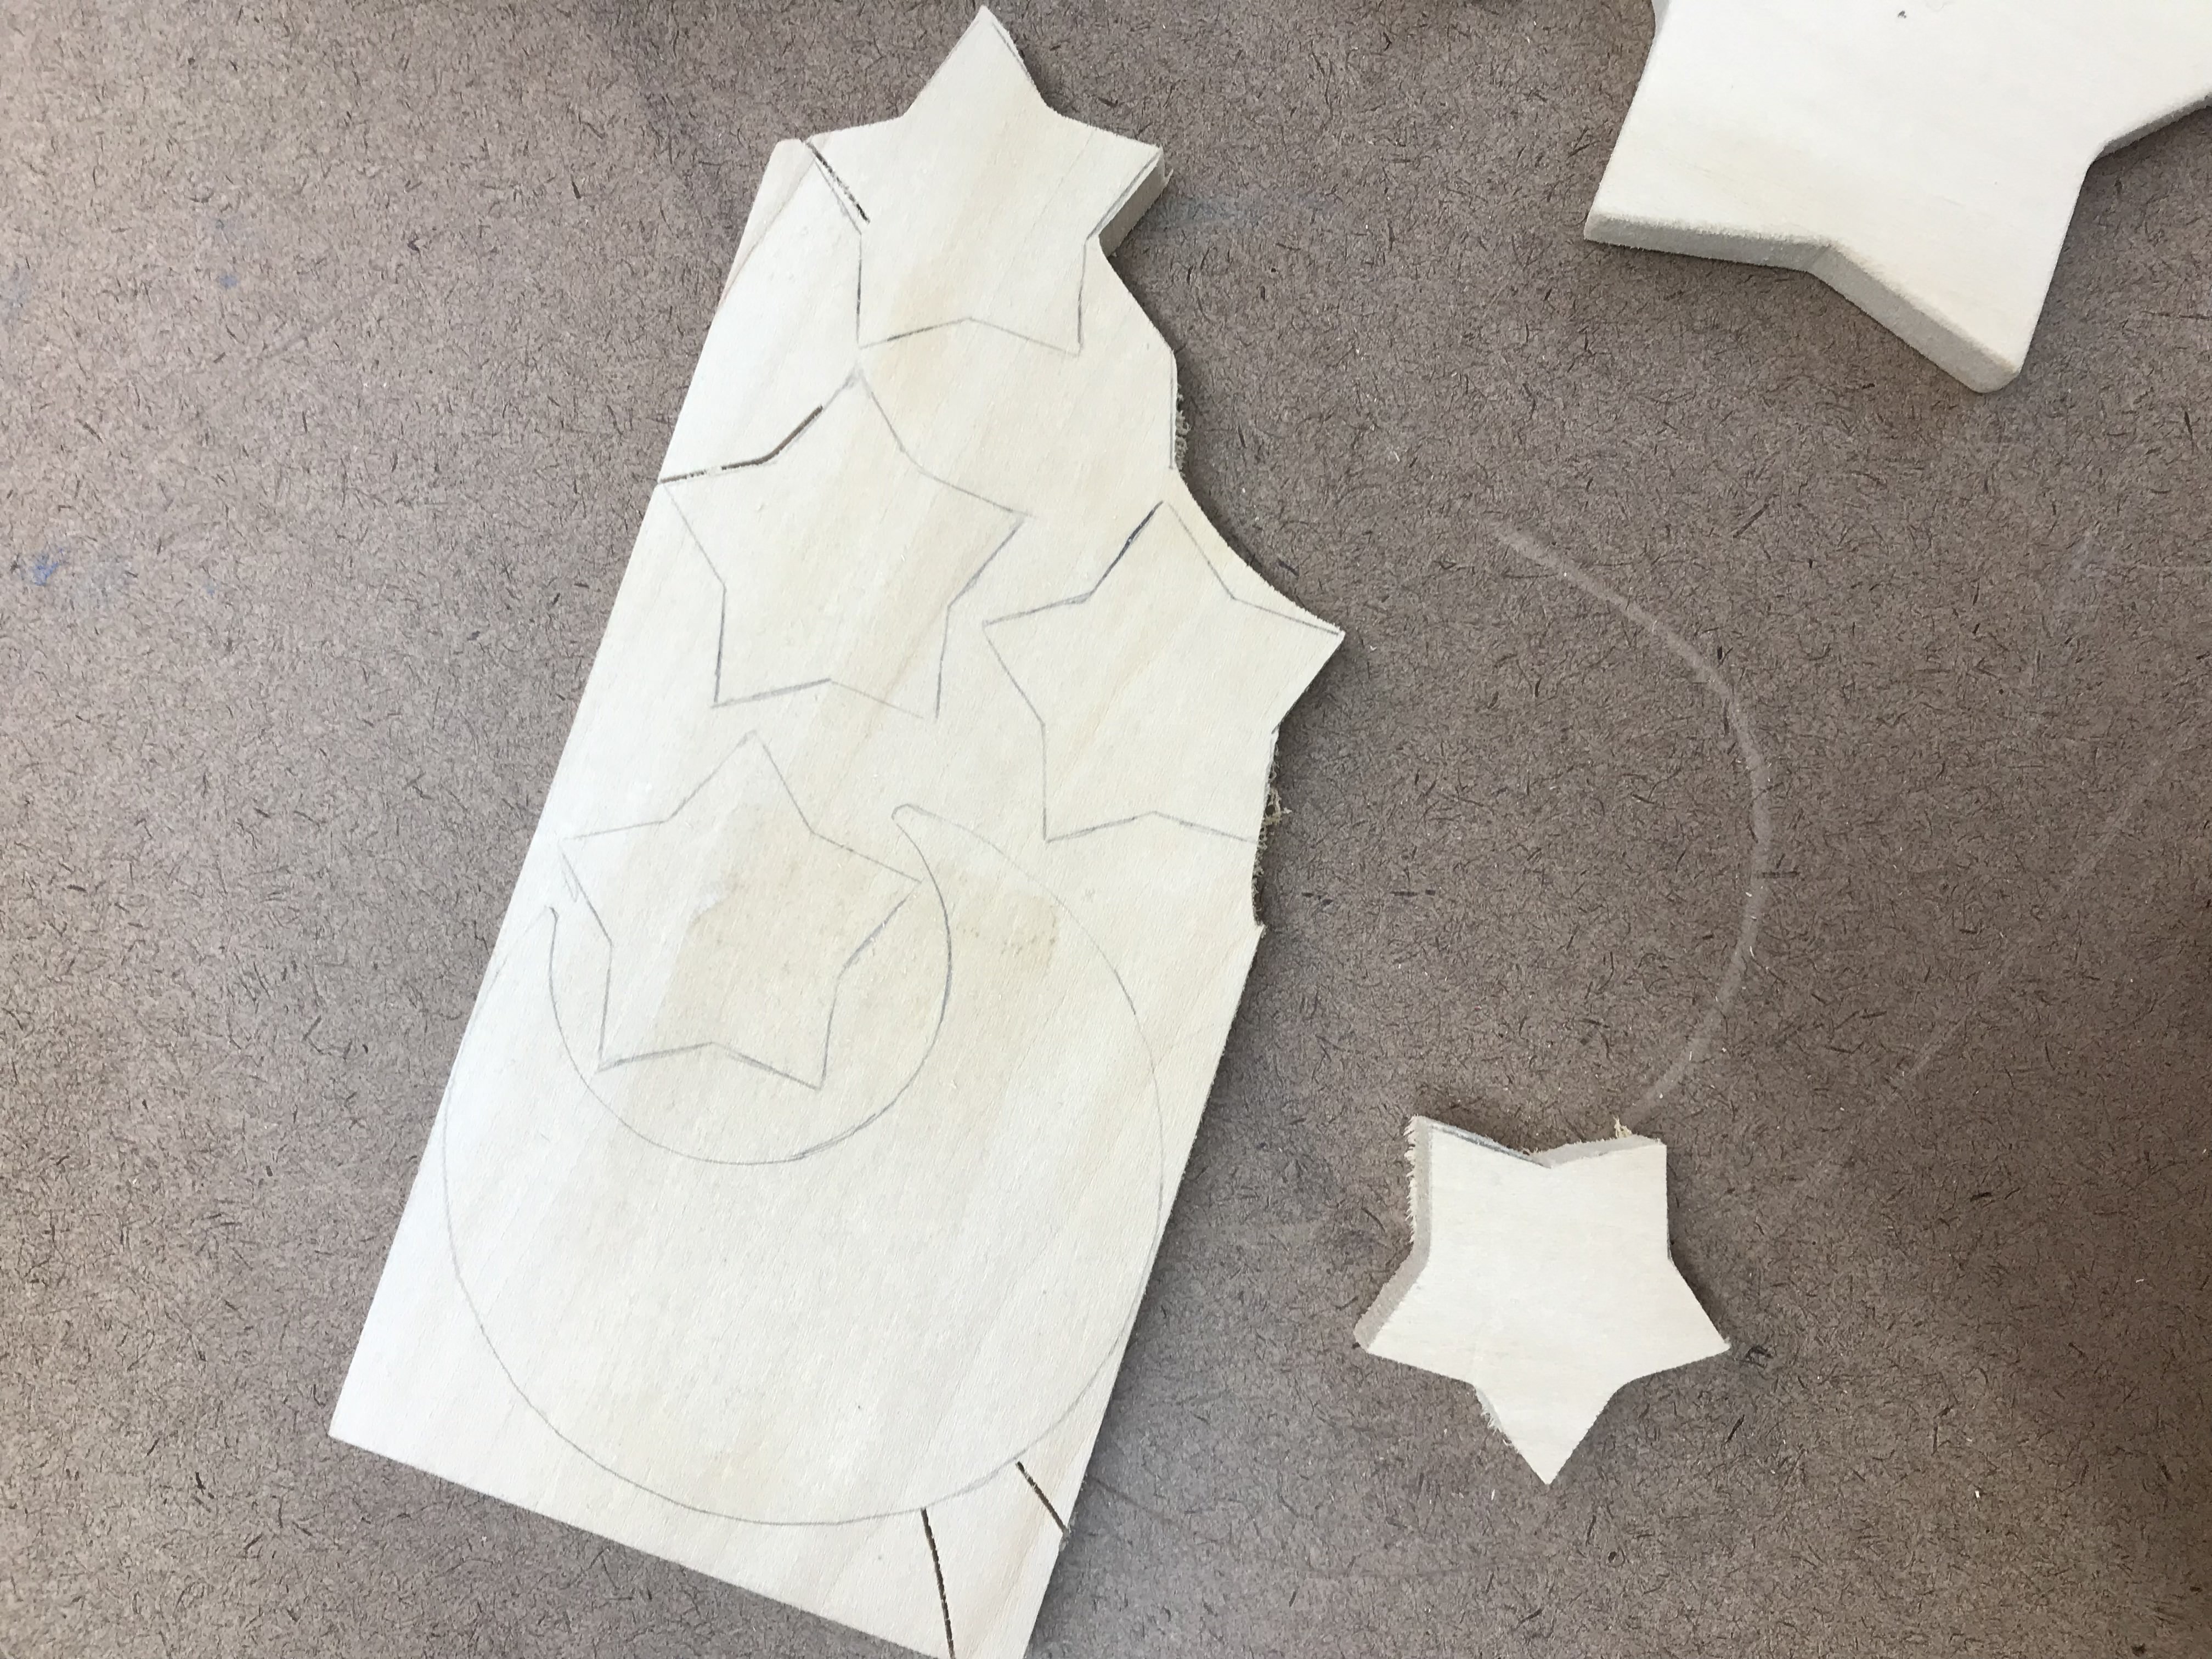
However, when I was really trying to buy the woods, I figured that 5 is still a fairly low quantaty. If I am really going to do the triangle system, it is actually more cutting that 5 individually cutted stars. So I go for the stupid but simplier way: trace and cut.
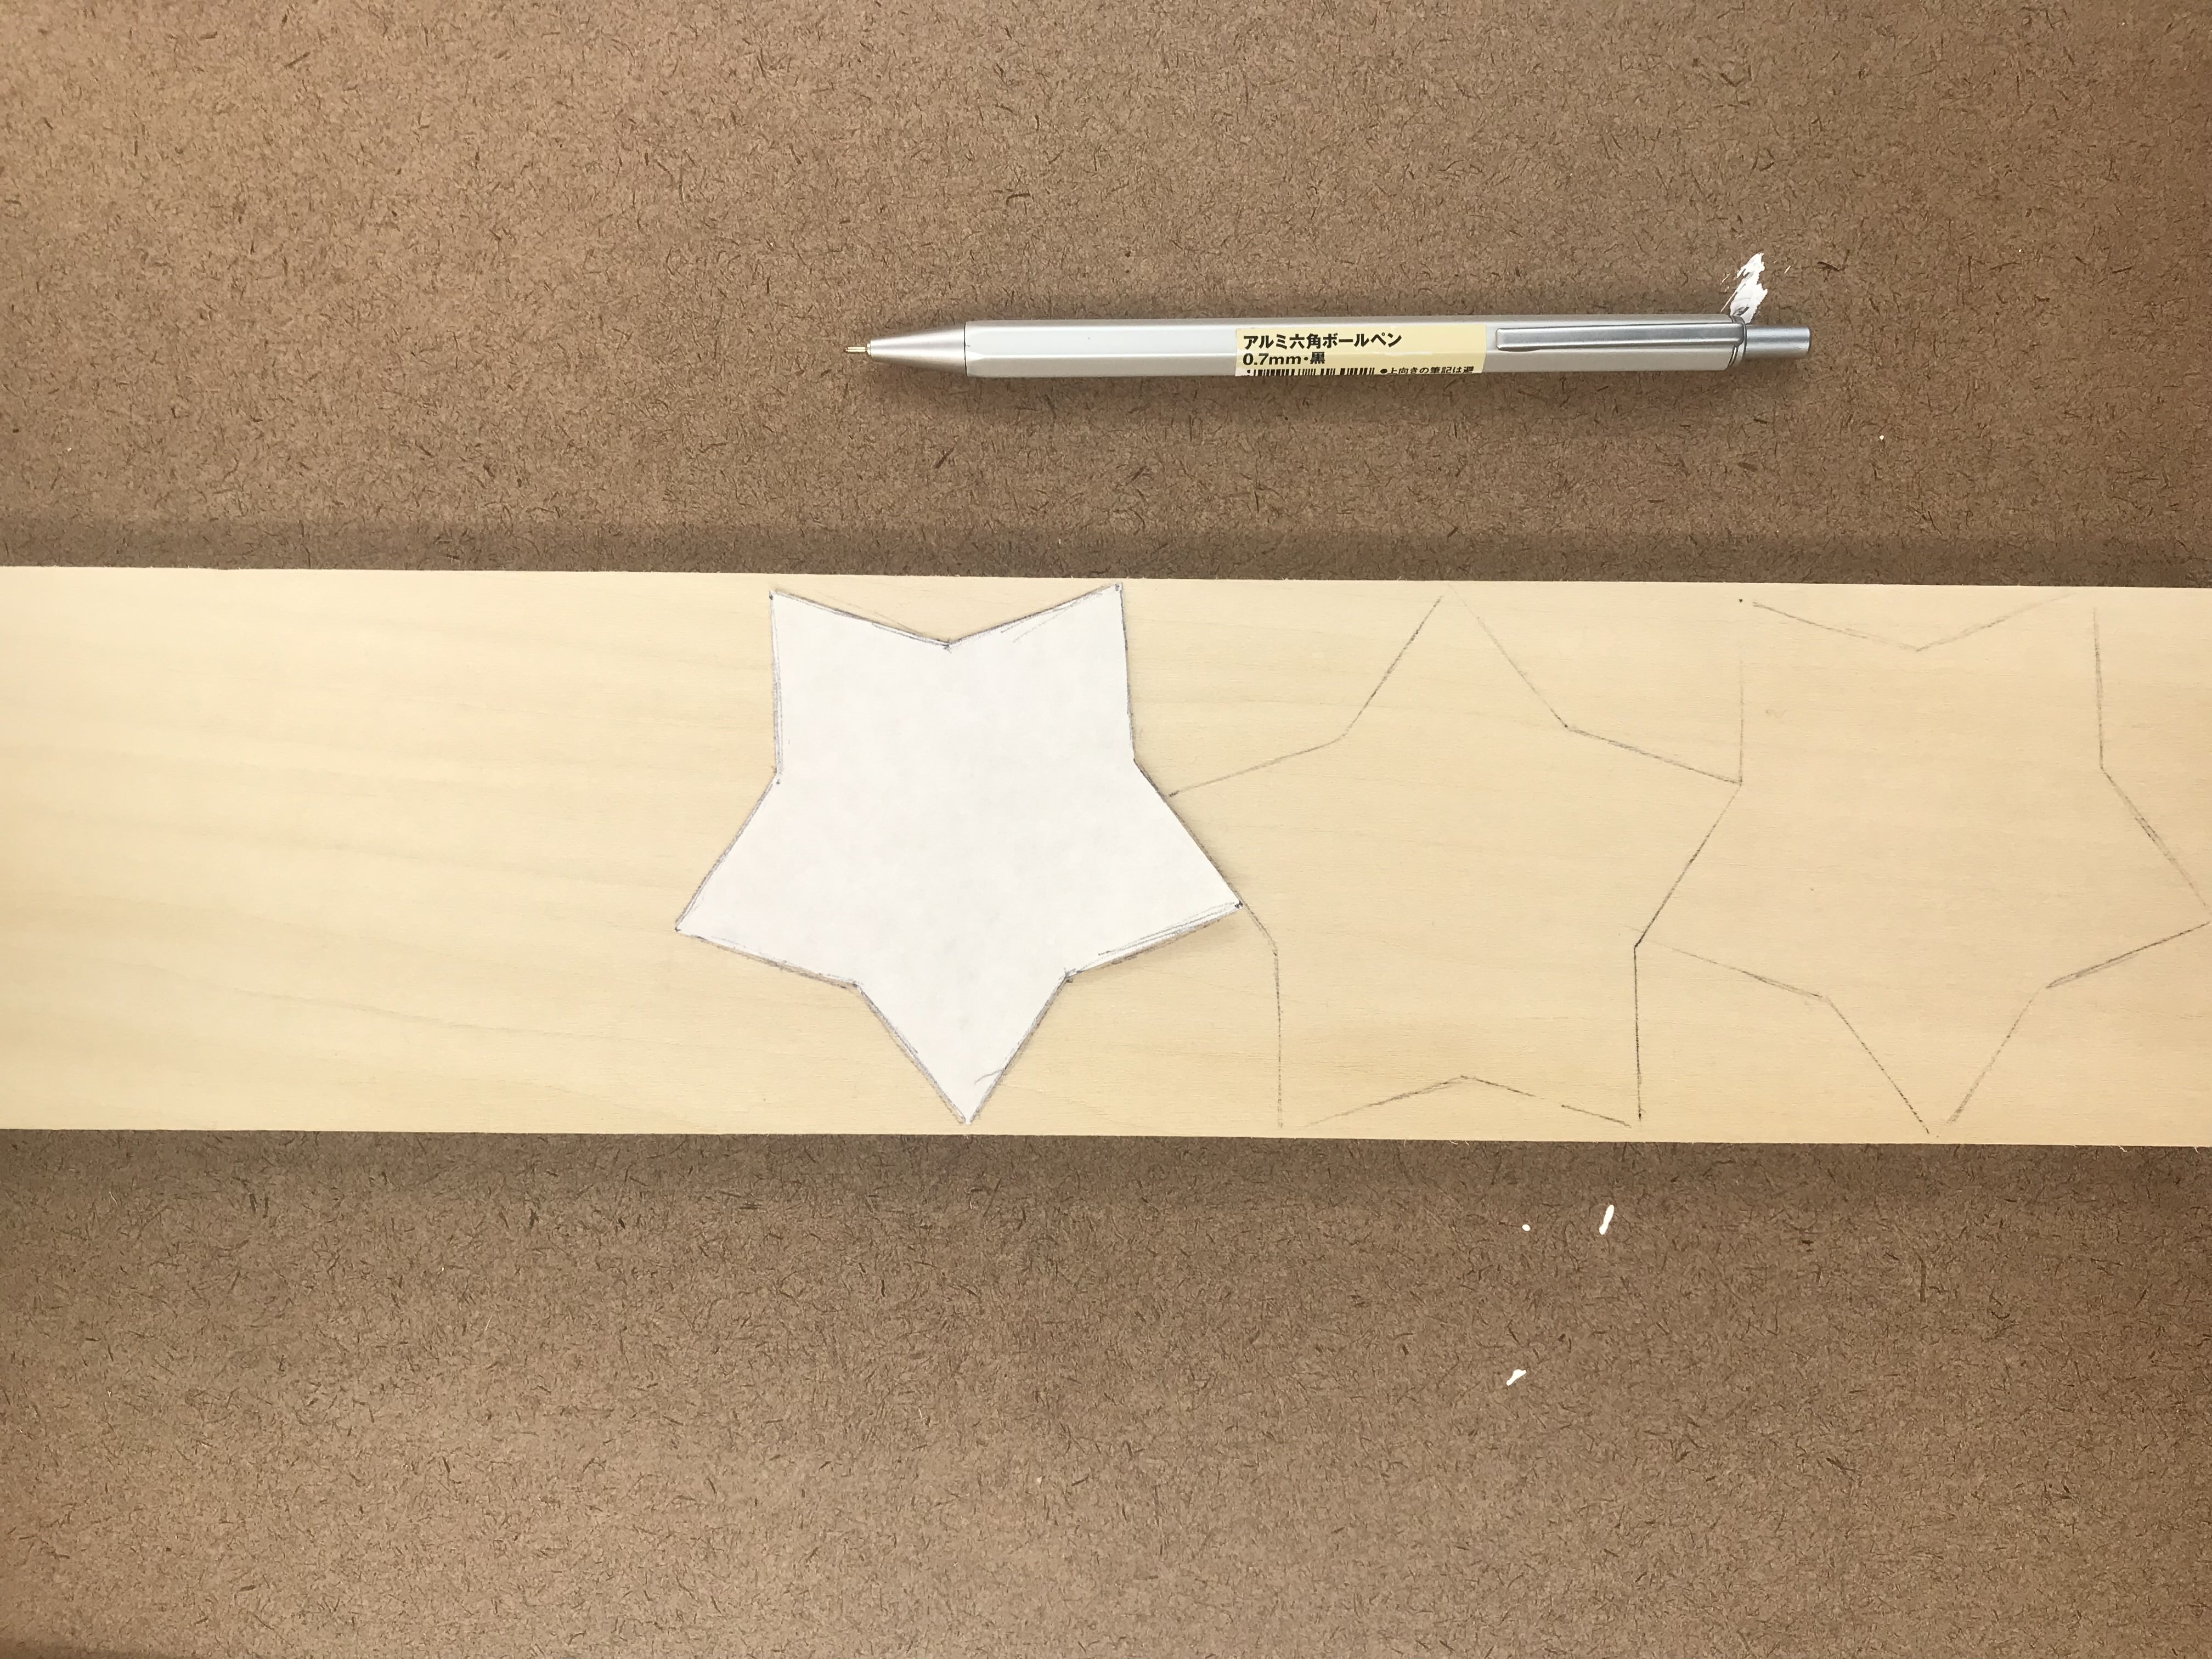
STEP 2 - Cutting the Shape
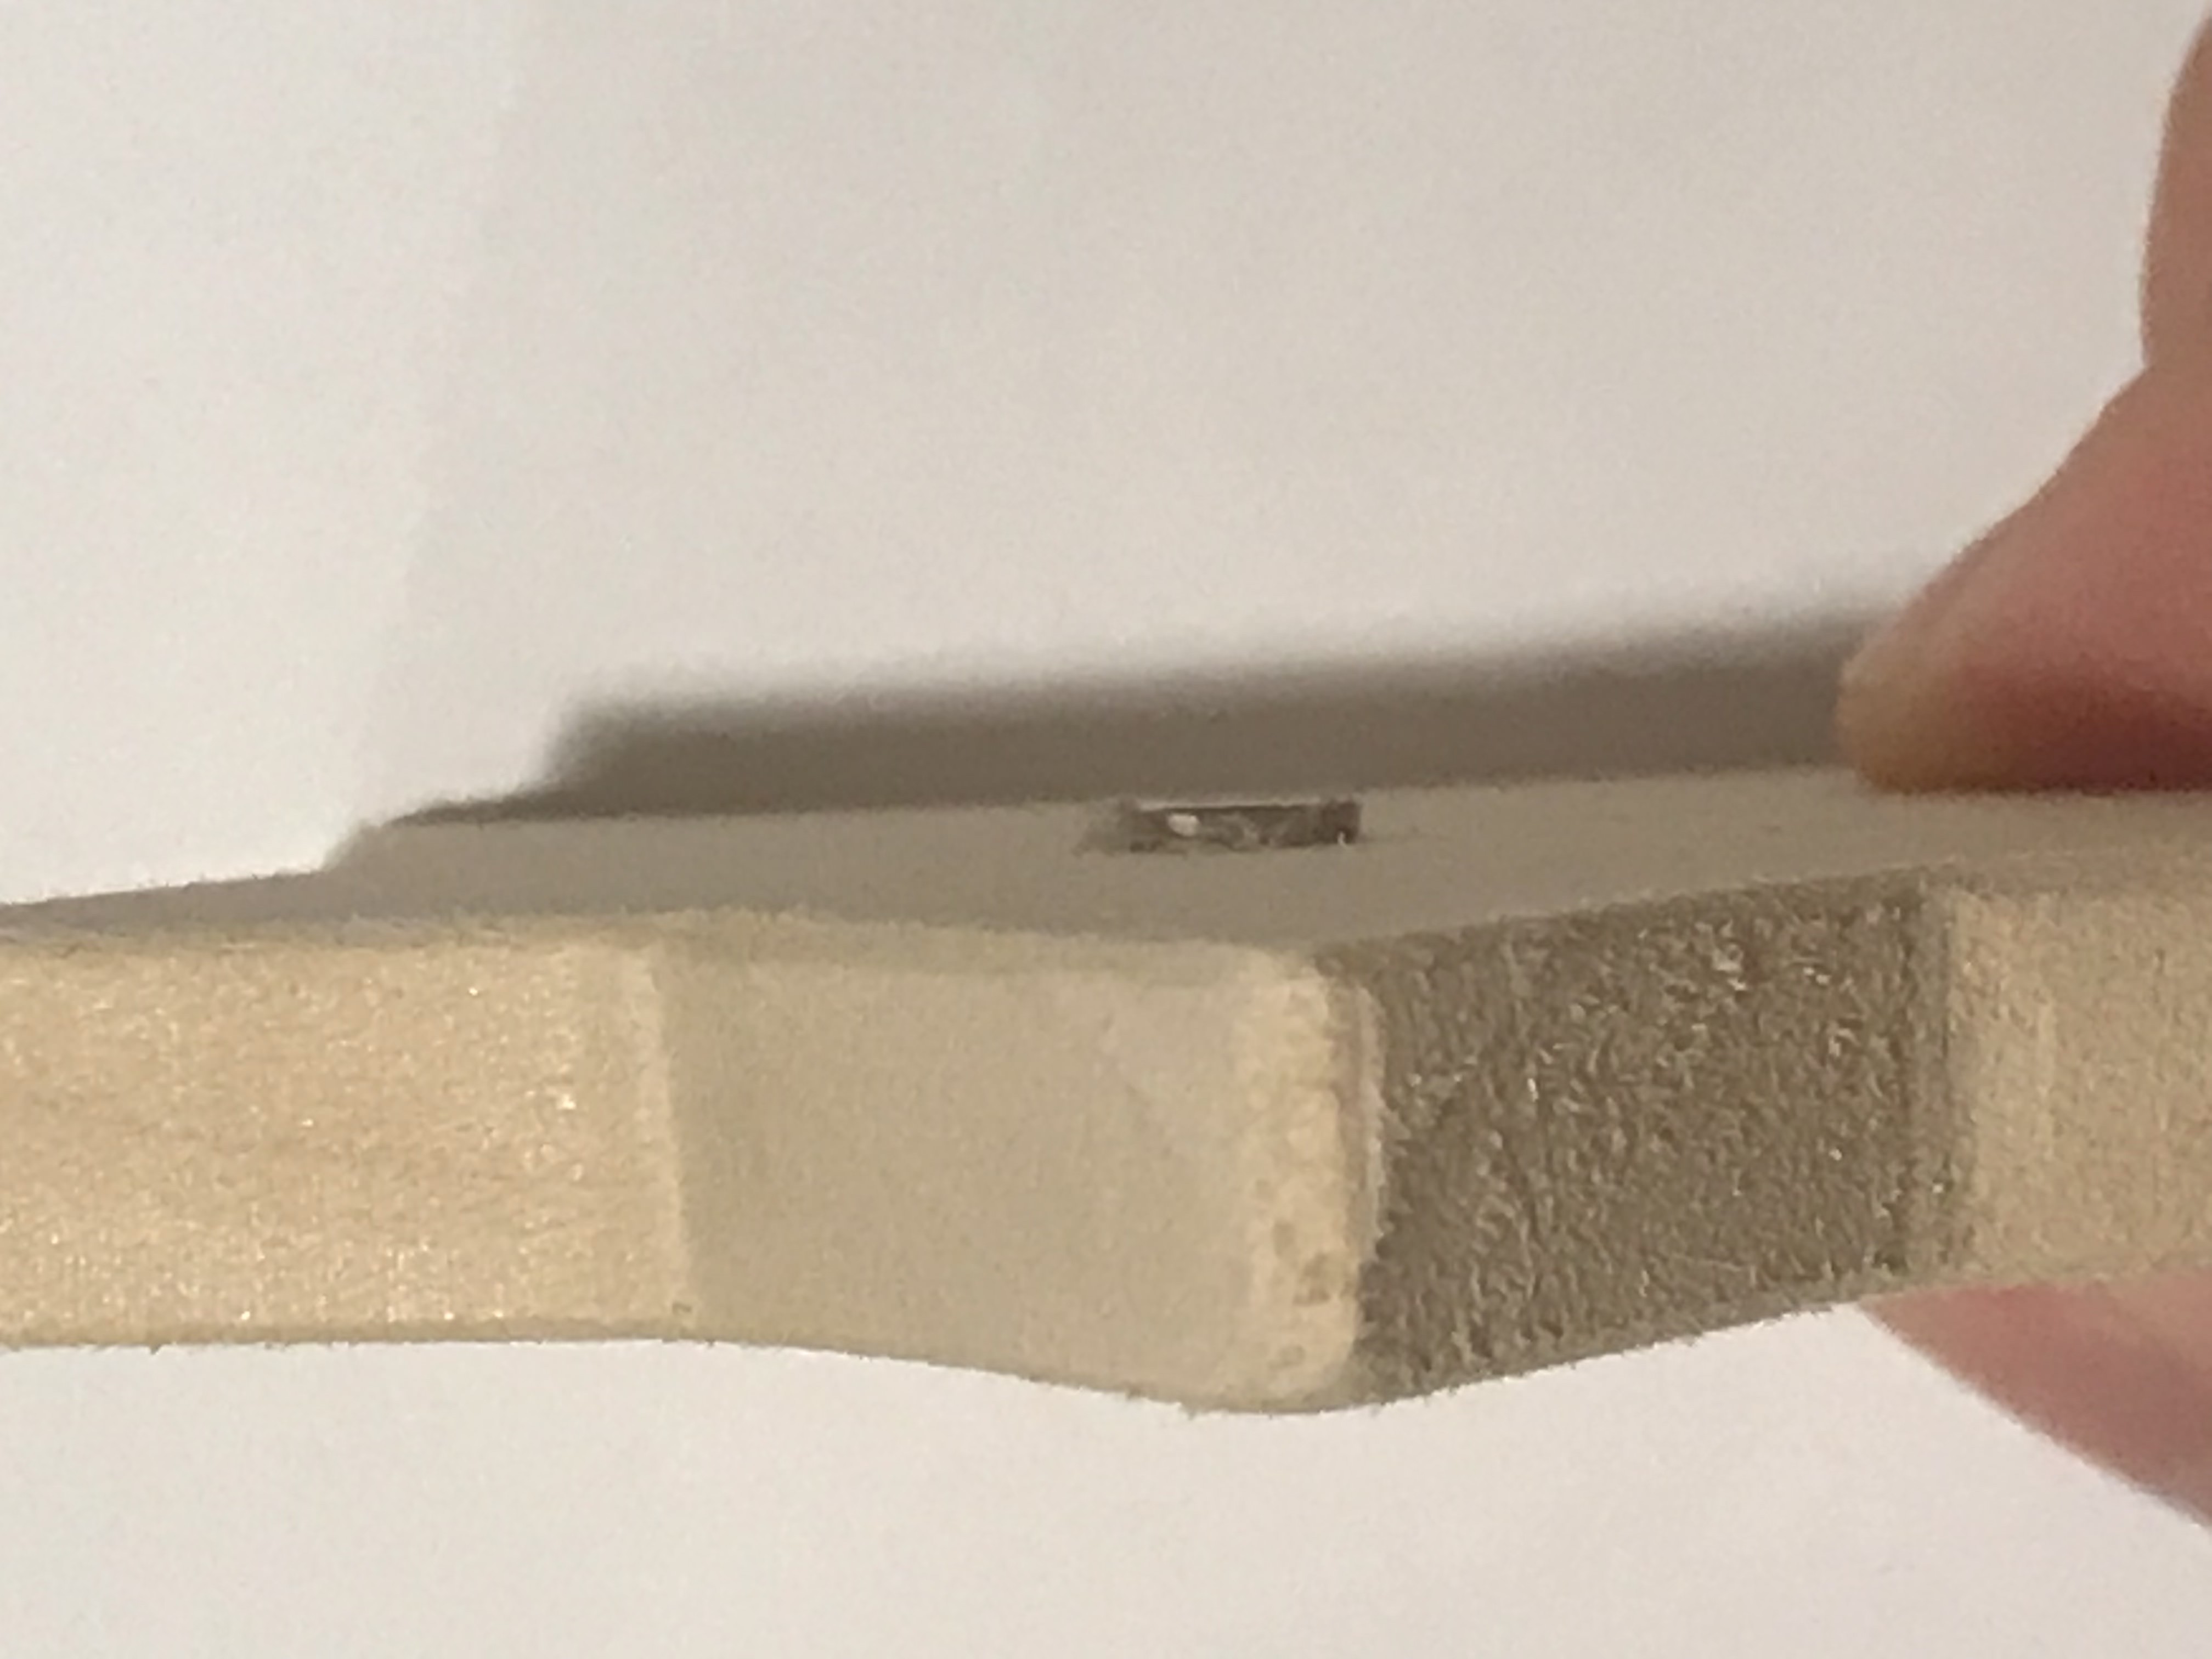
It was not the first time that I had ever done something in the woodshop, but it was the first time in five years. The first star definitly sacrificed due to my out-of-practice hands. And here is my 5 stars before sanding: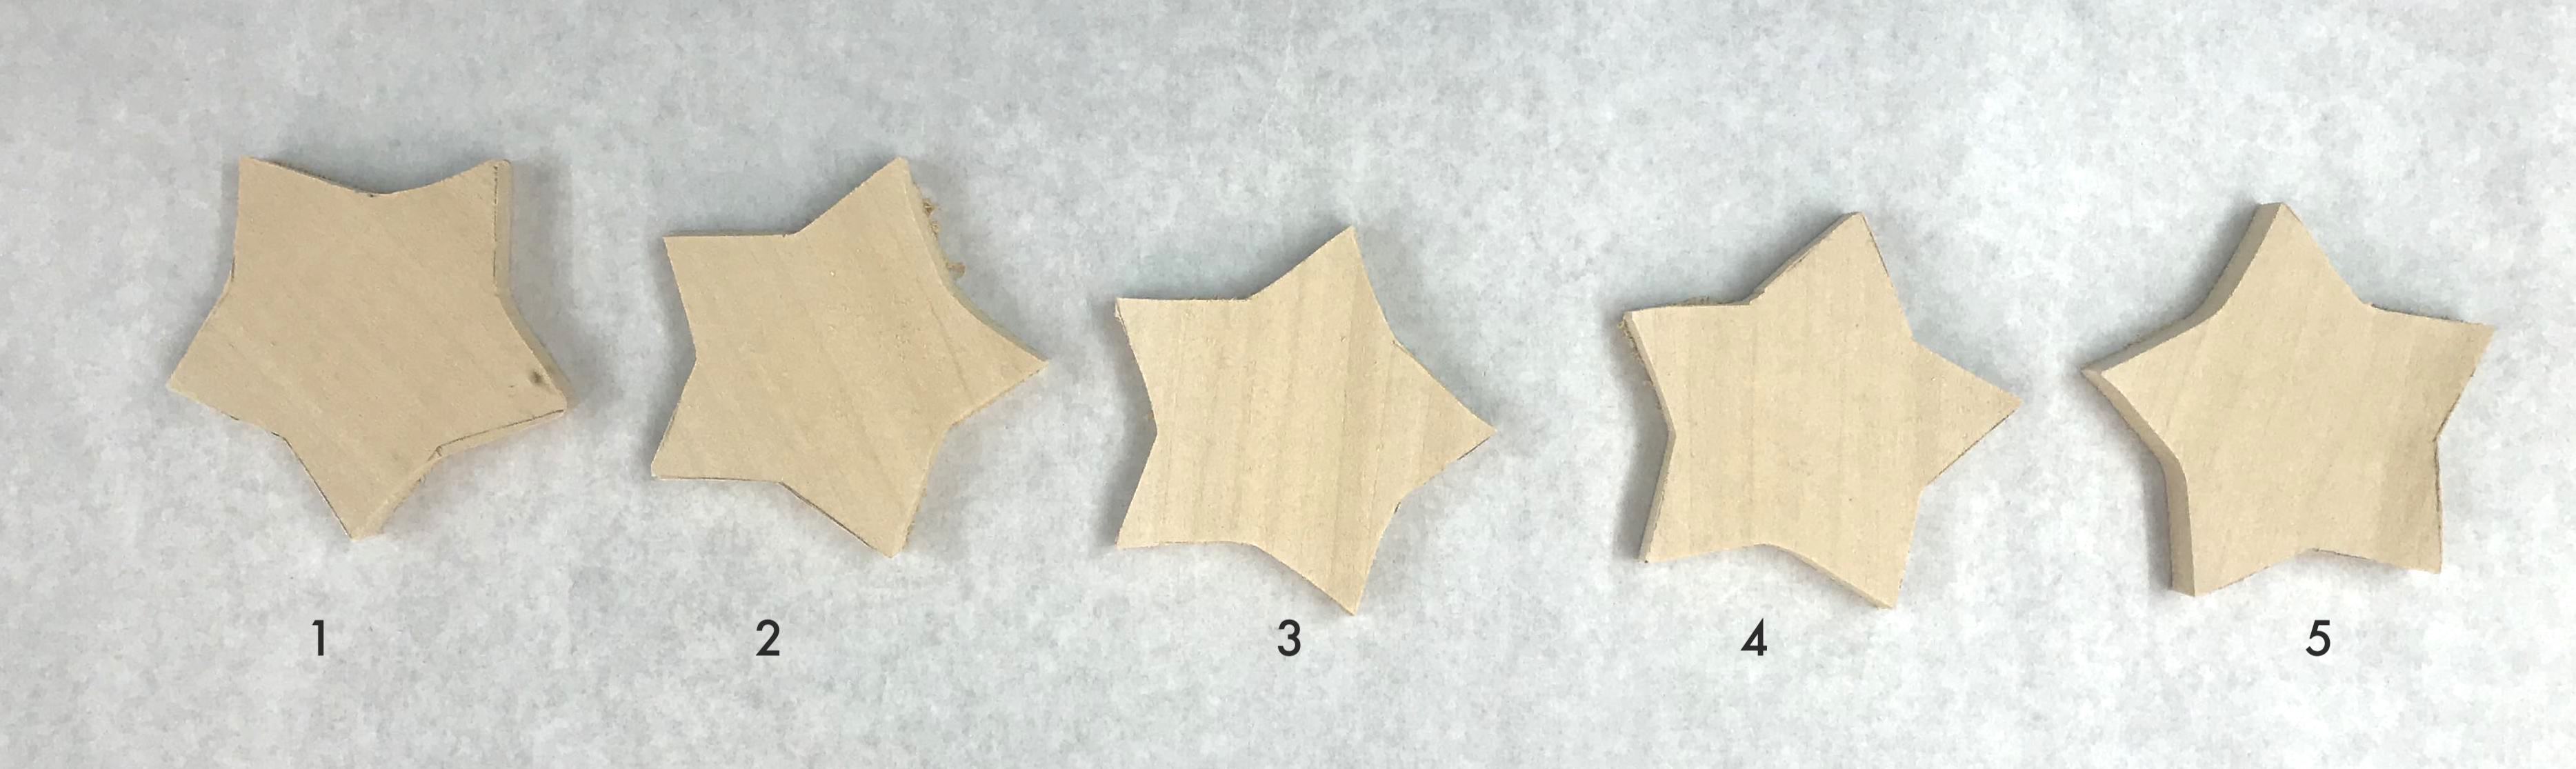
The Star No.1 is really the one that's more off from the trace mark than the others, however, I found out is that my No. 5 isn't in the best, instead, No. 4 seems to be the best in shape. I think I also figured something interesting about myself: I get tired when it comes to the last one.
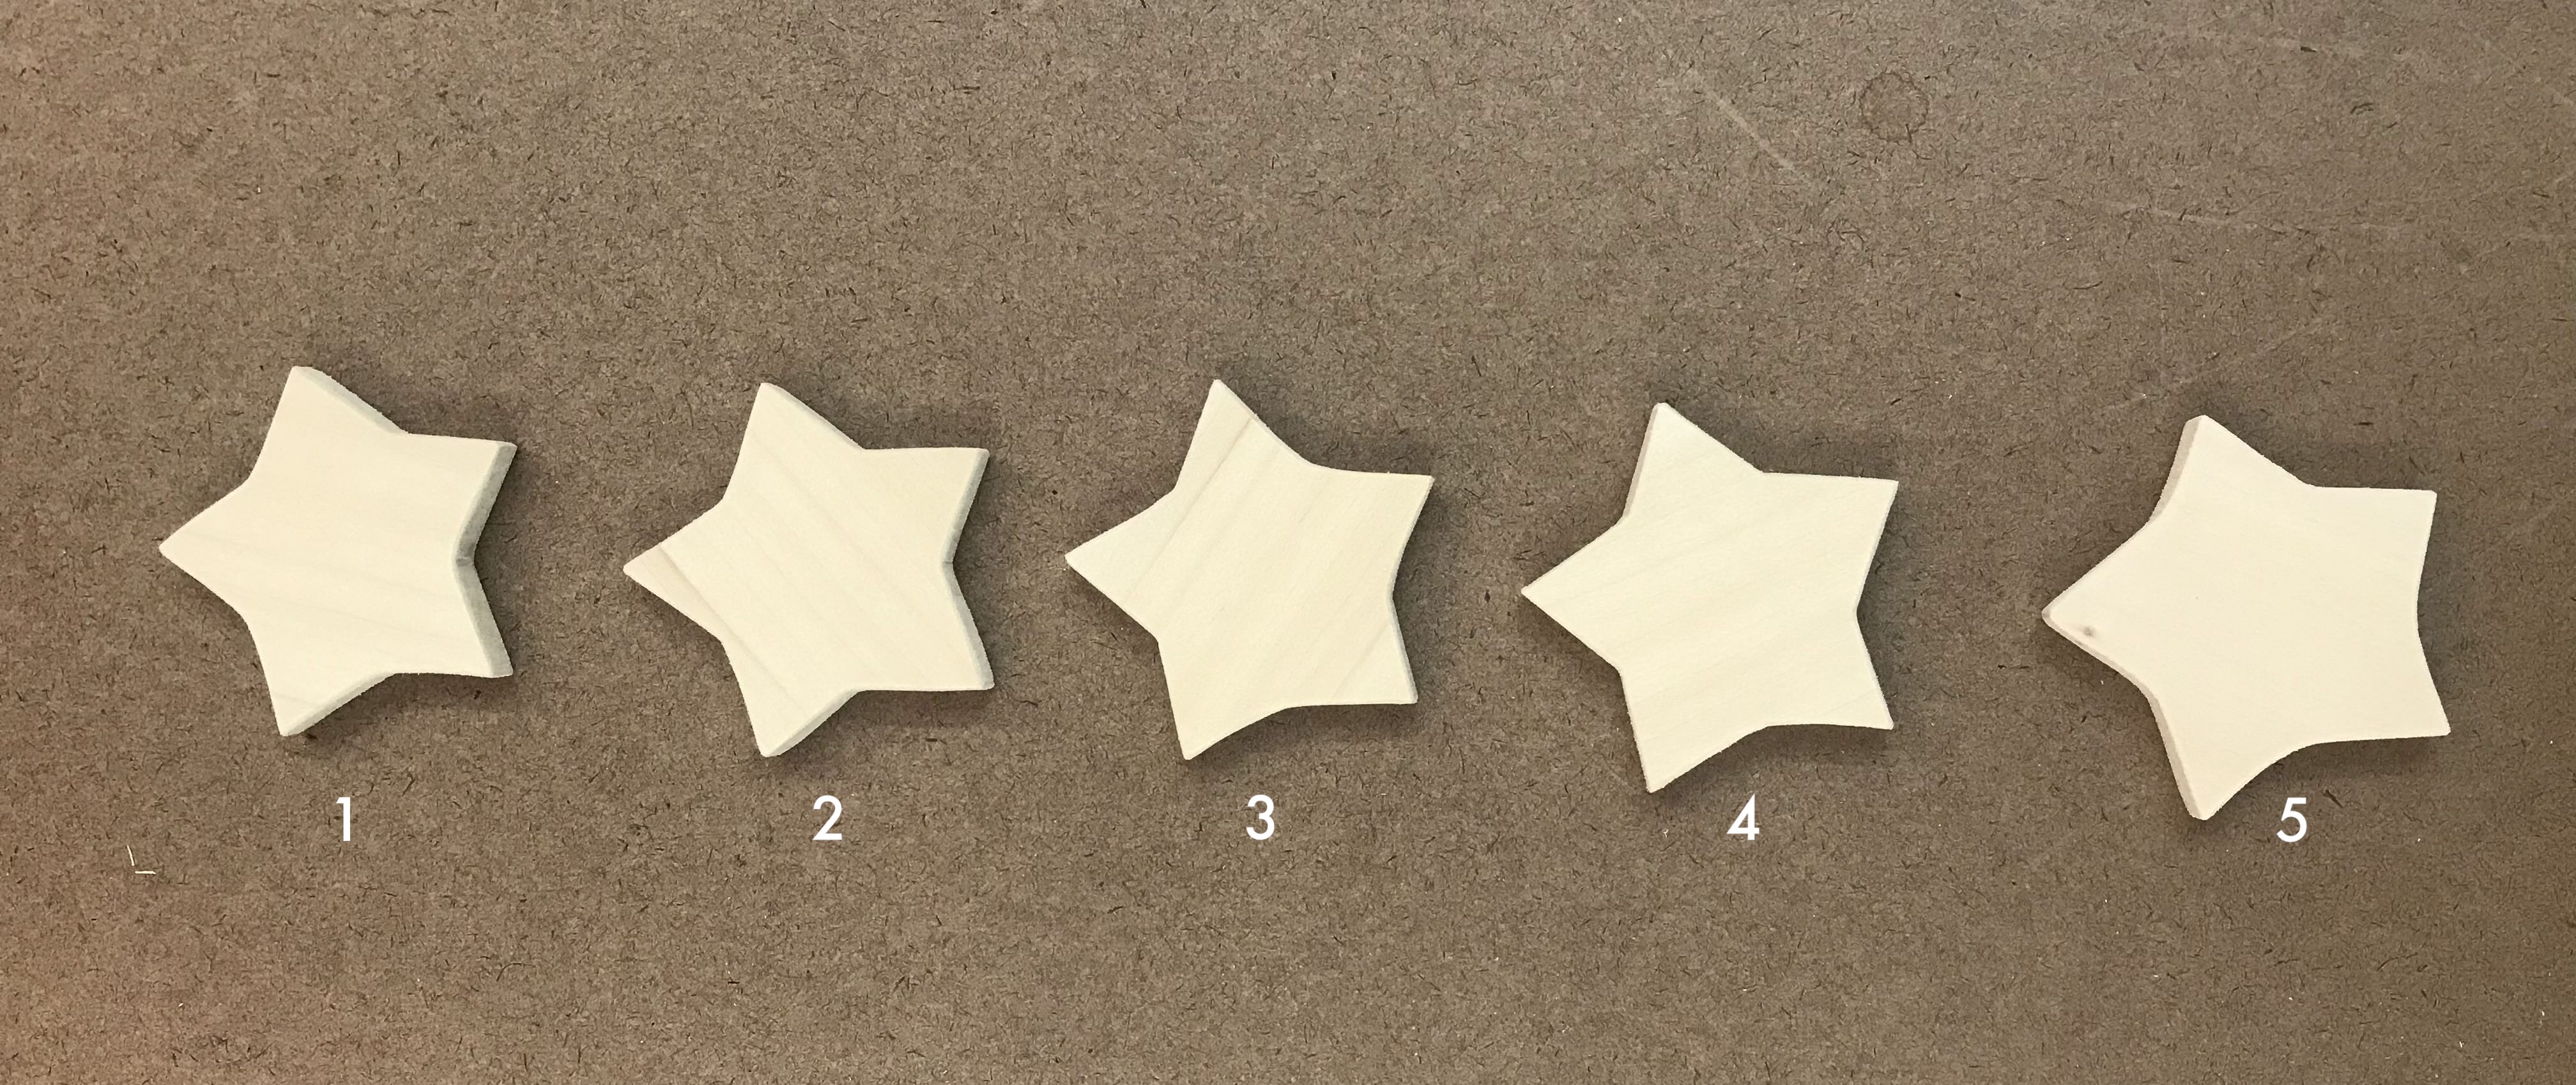
Same for sanding:
STEP 3 - Sanding
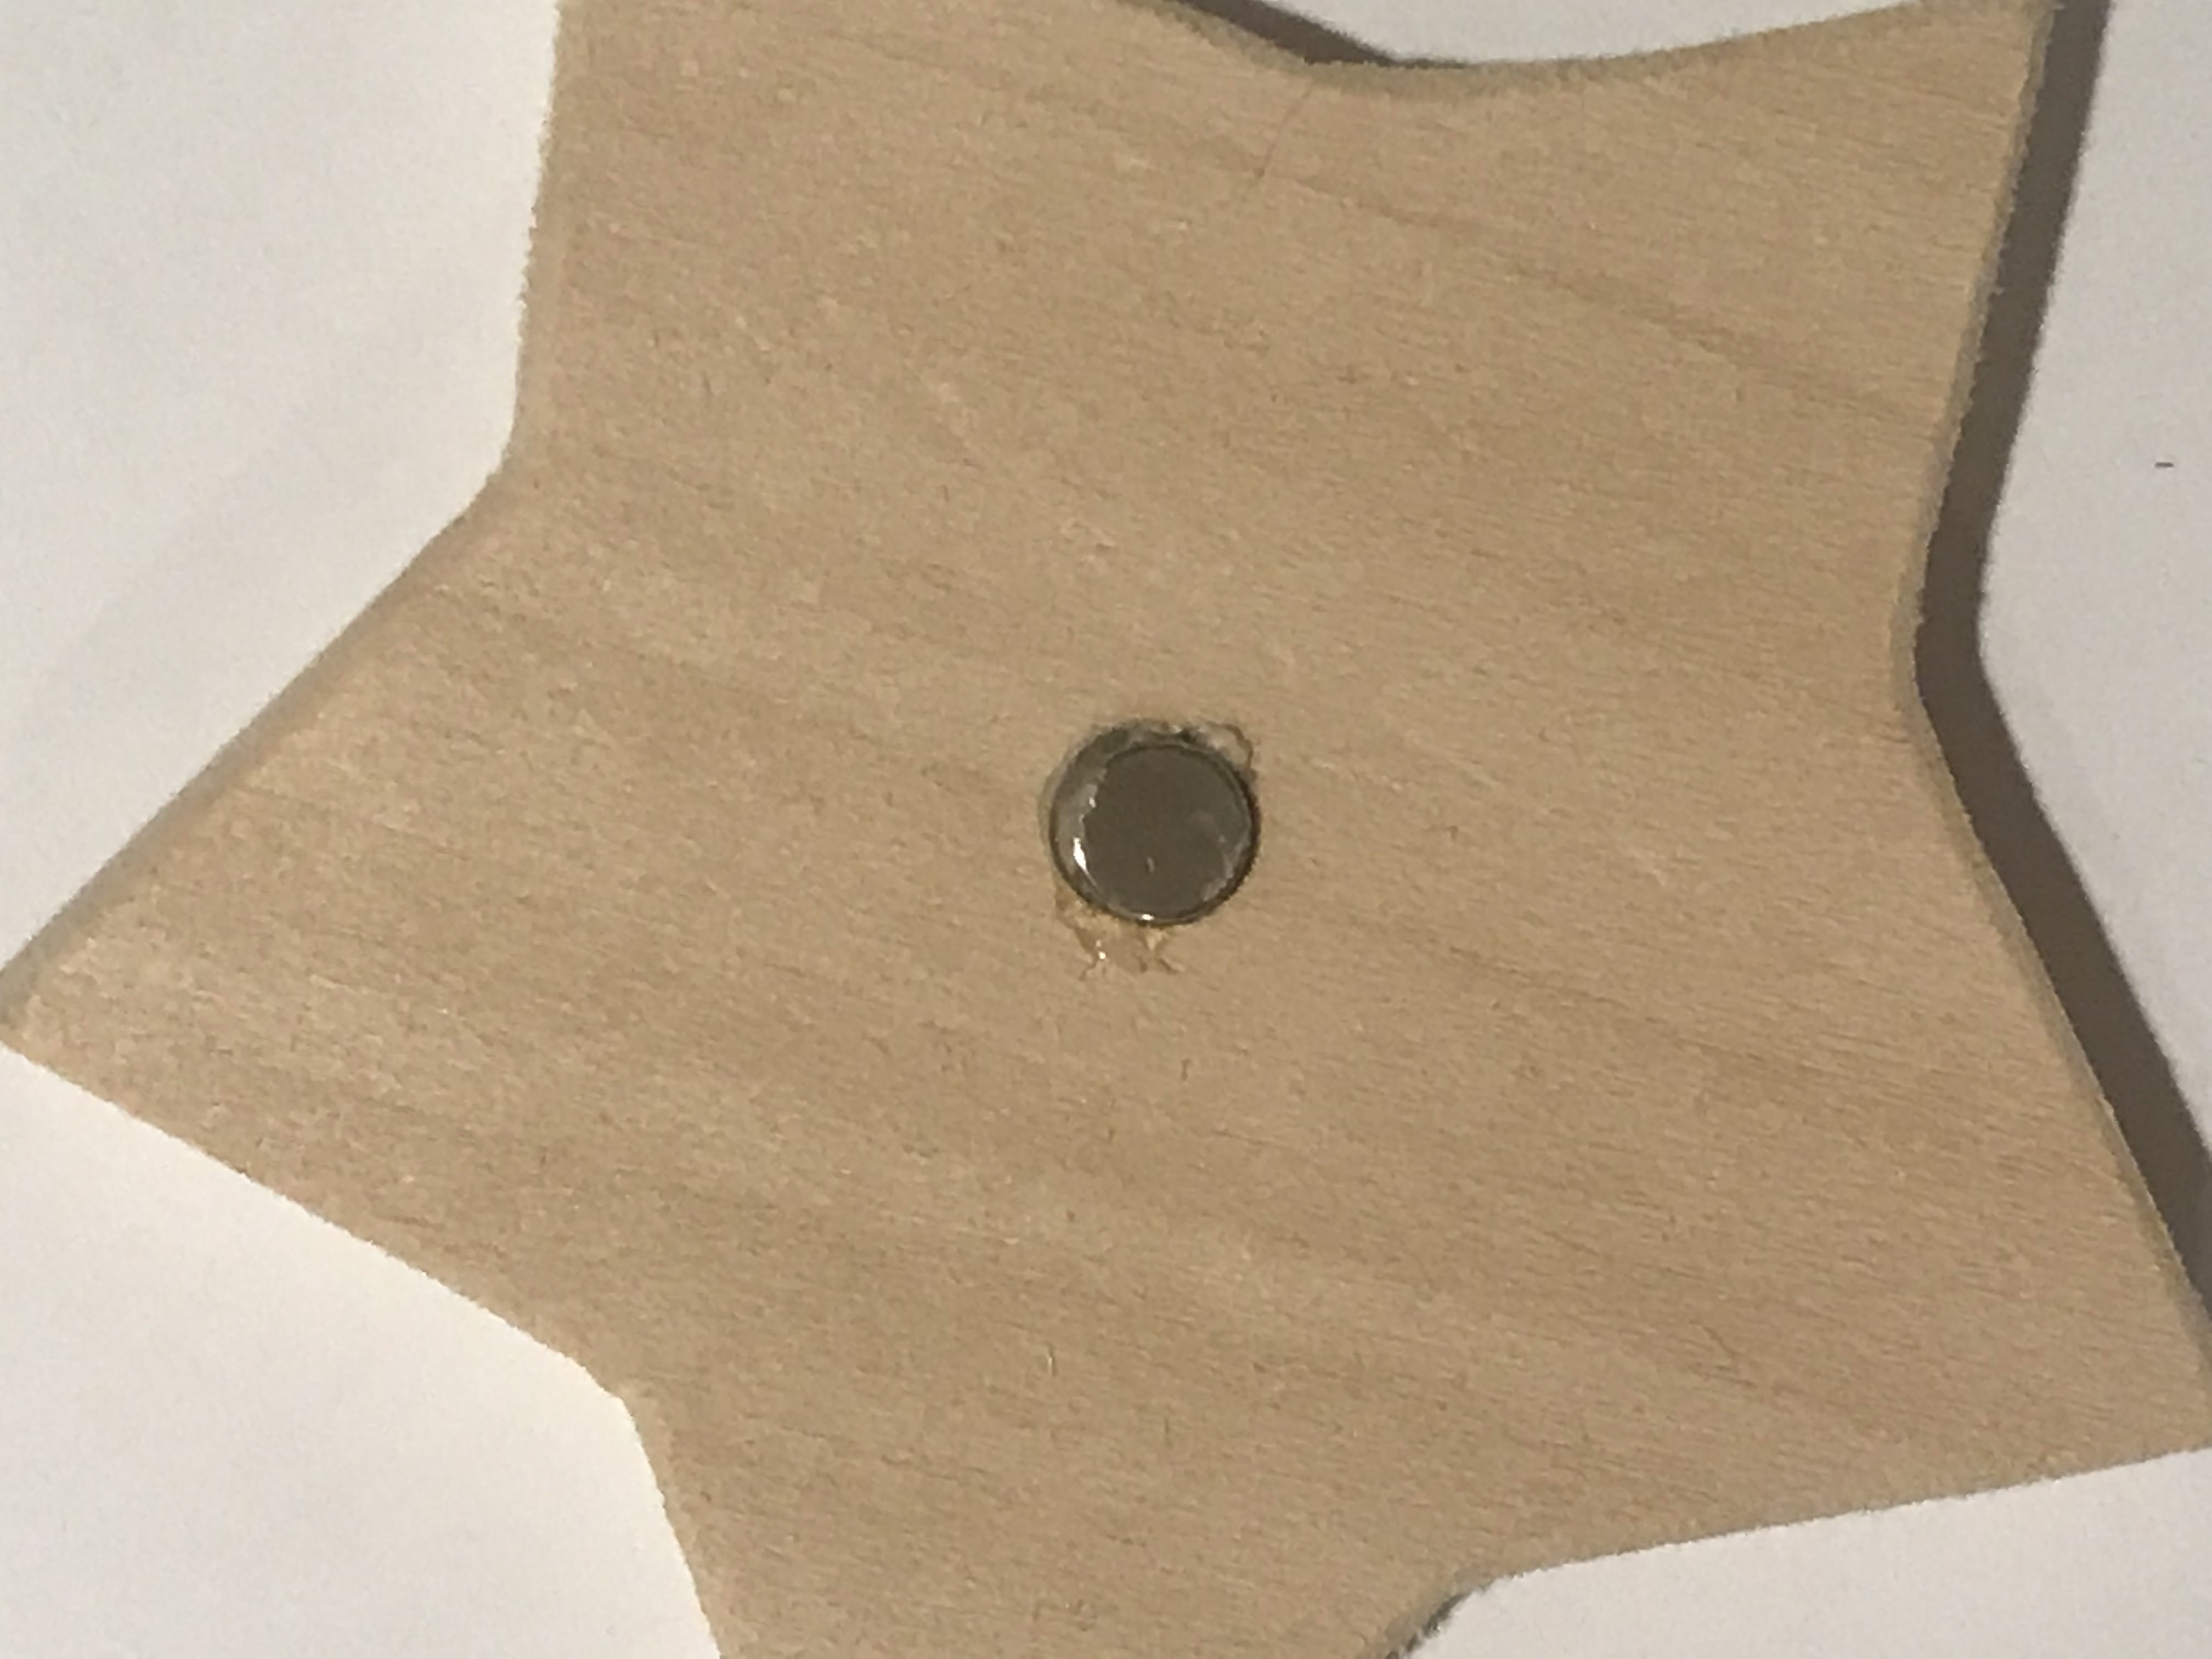
STEP 4 - Drilling
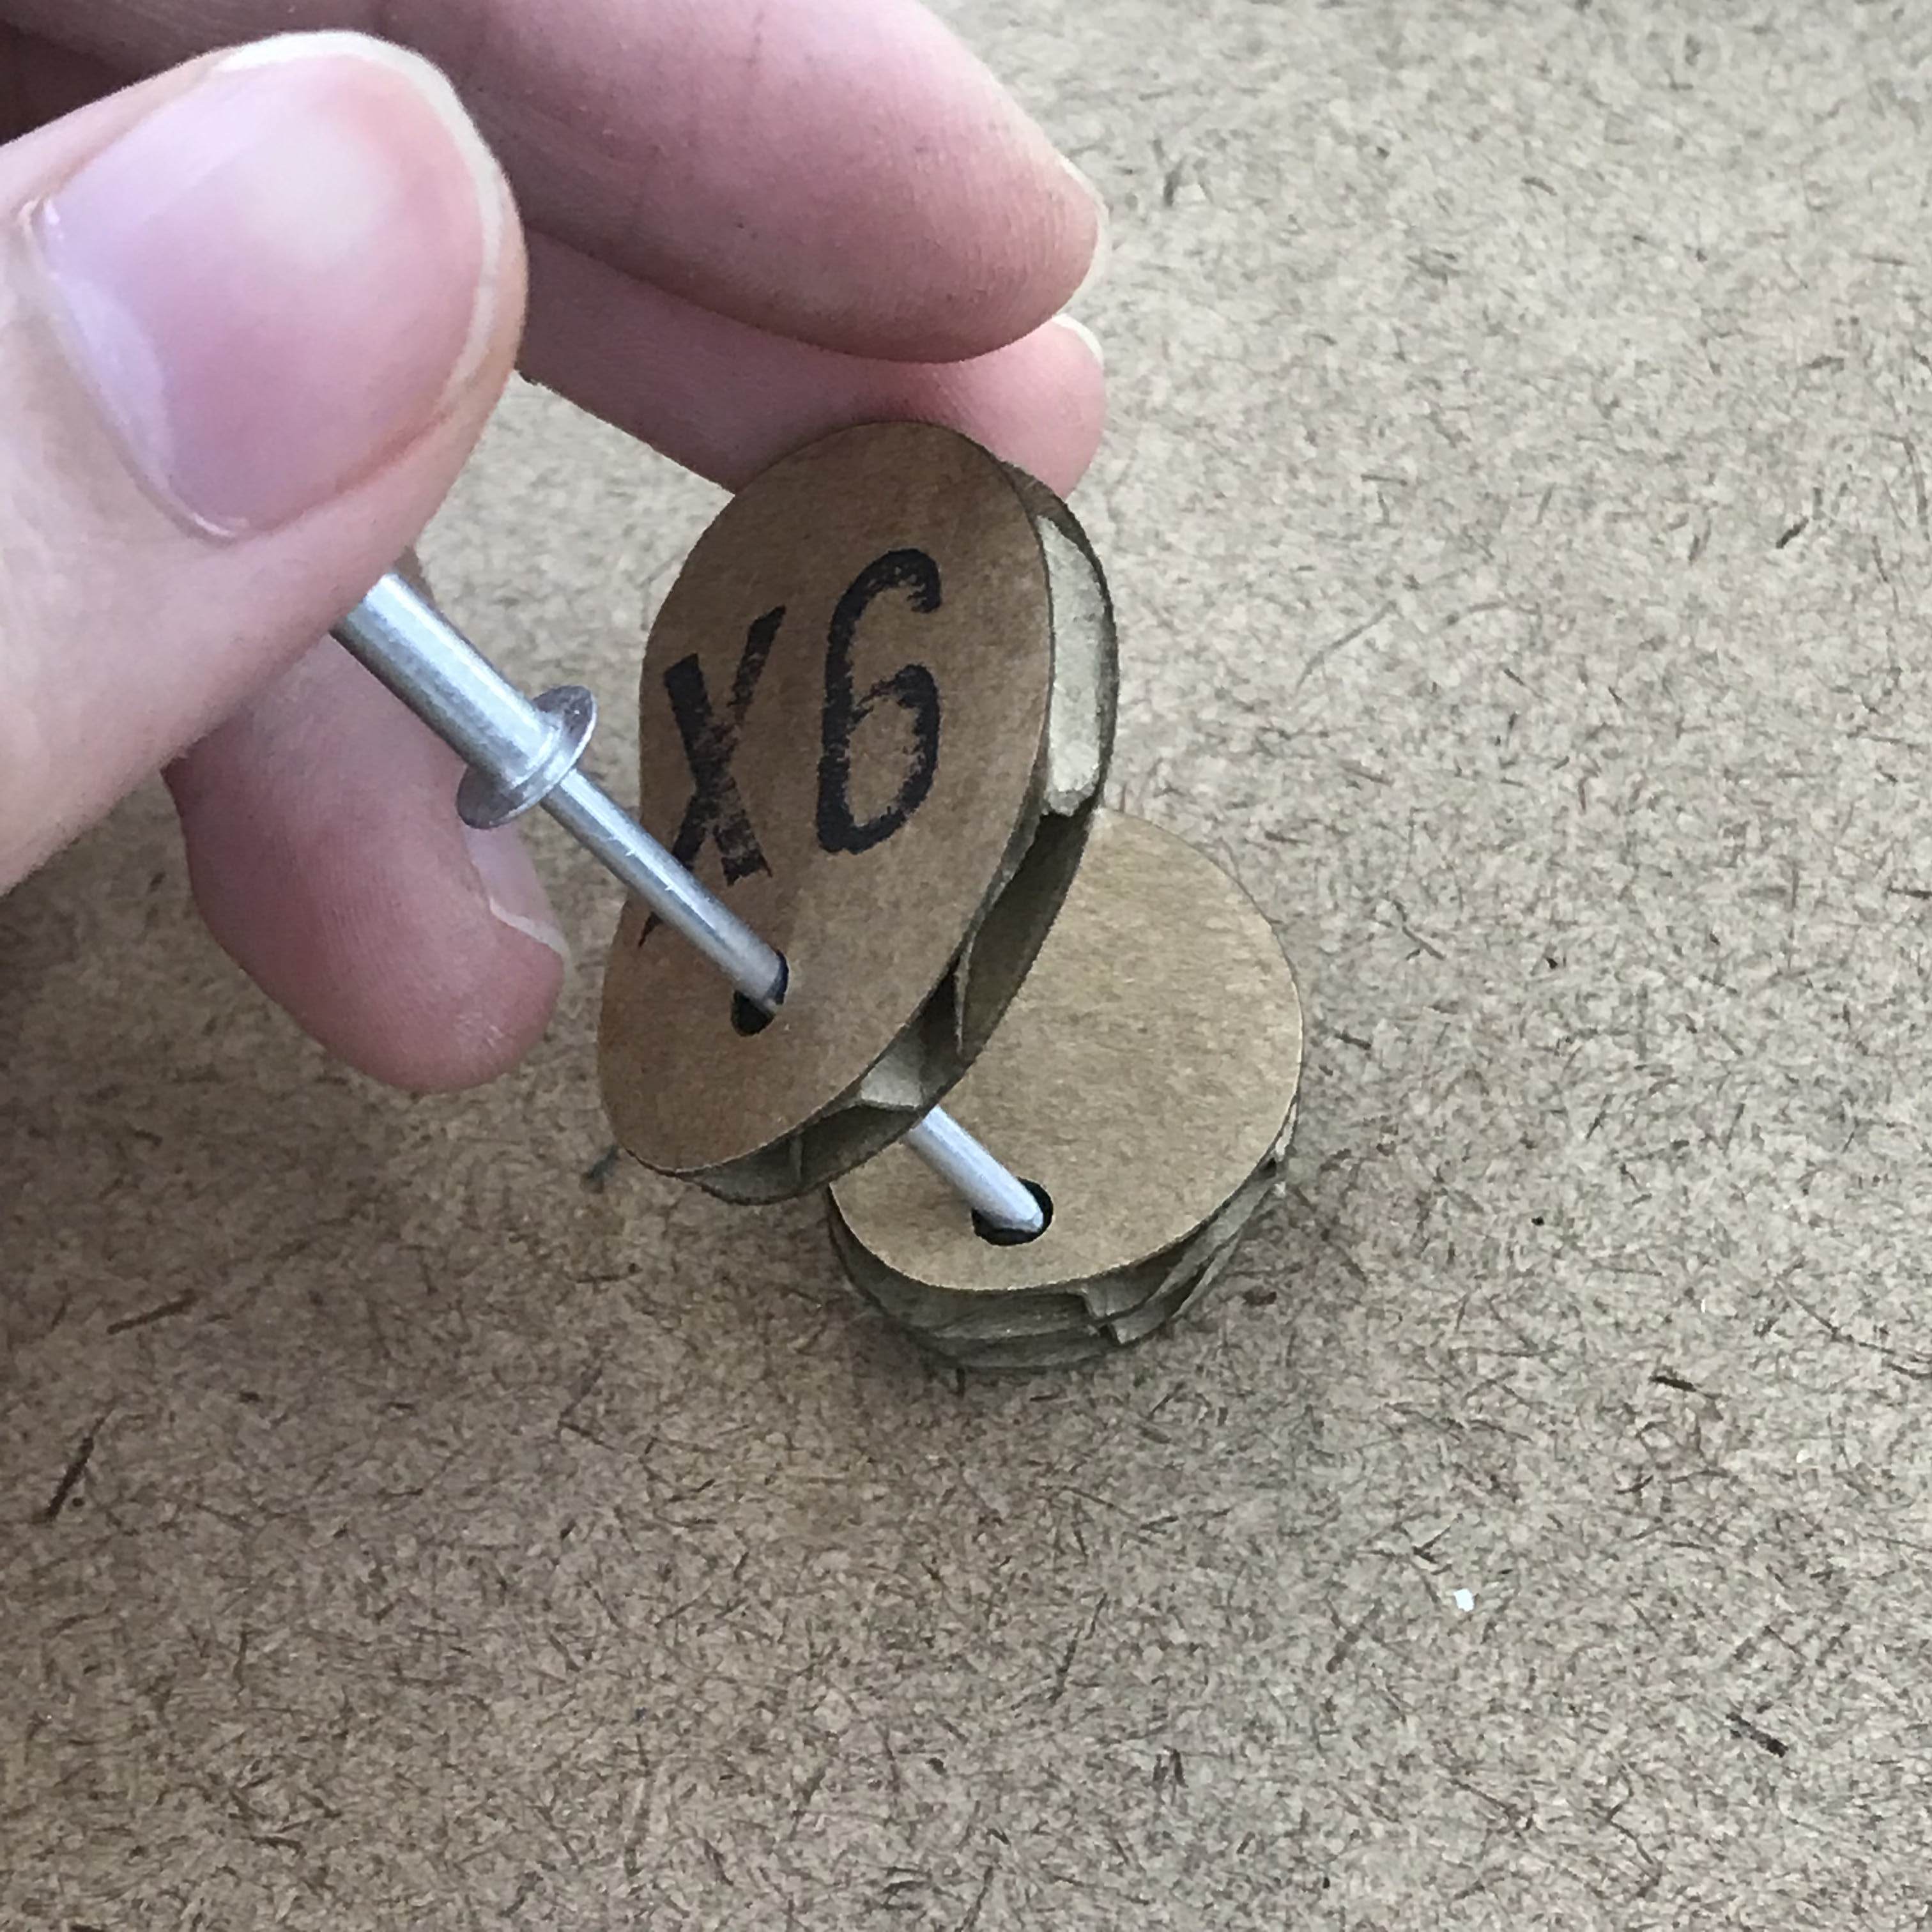
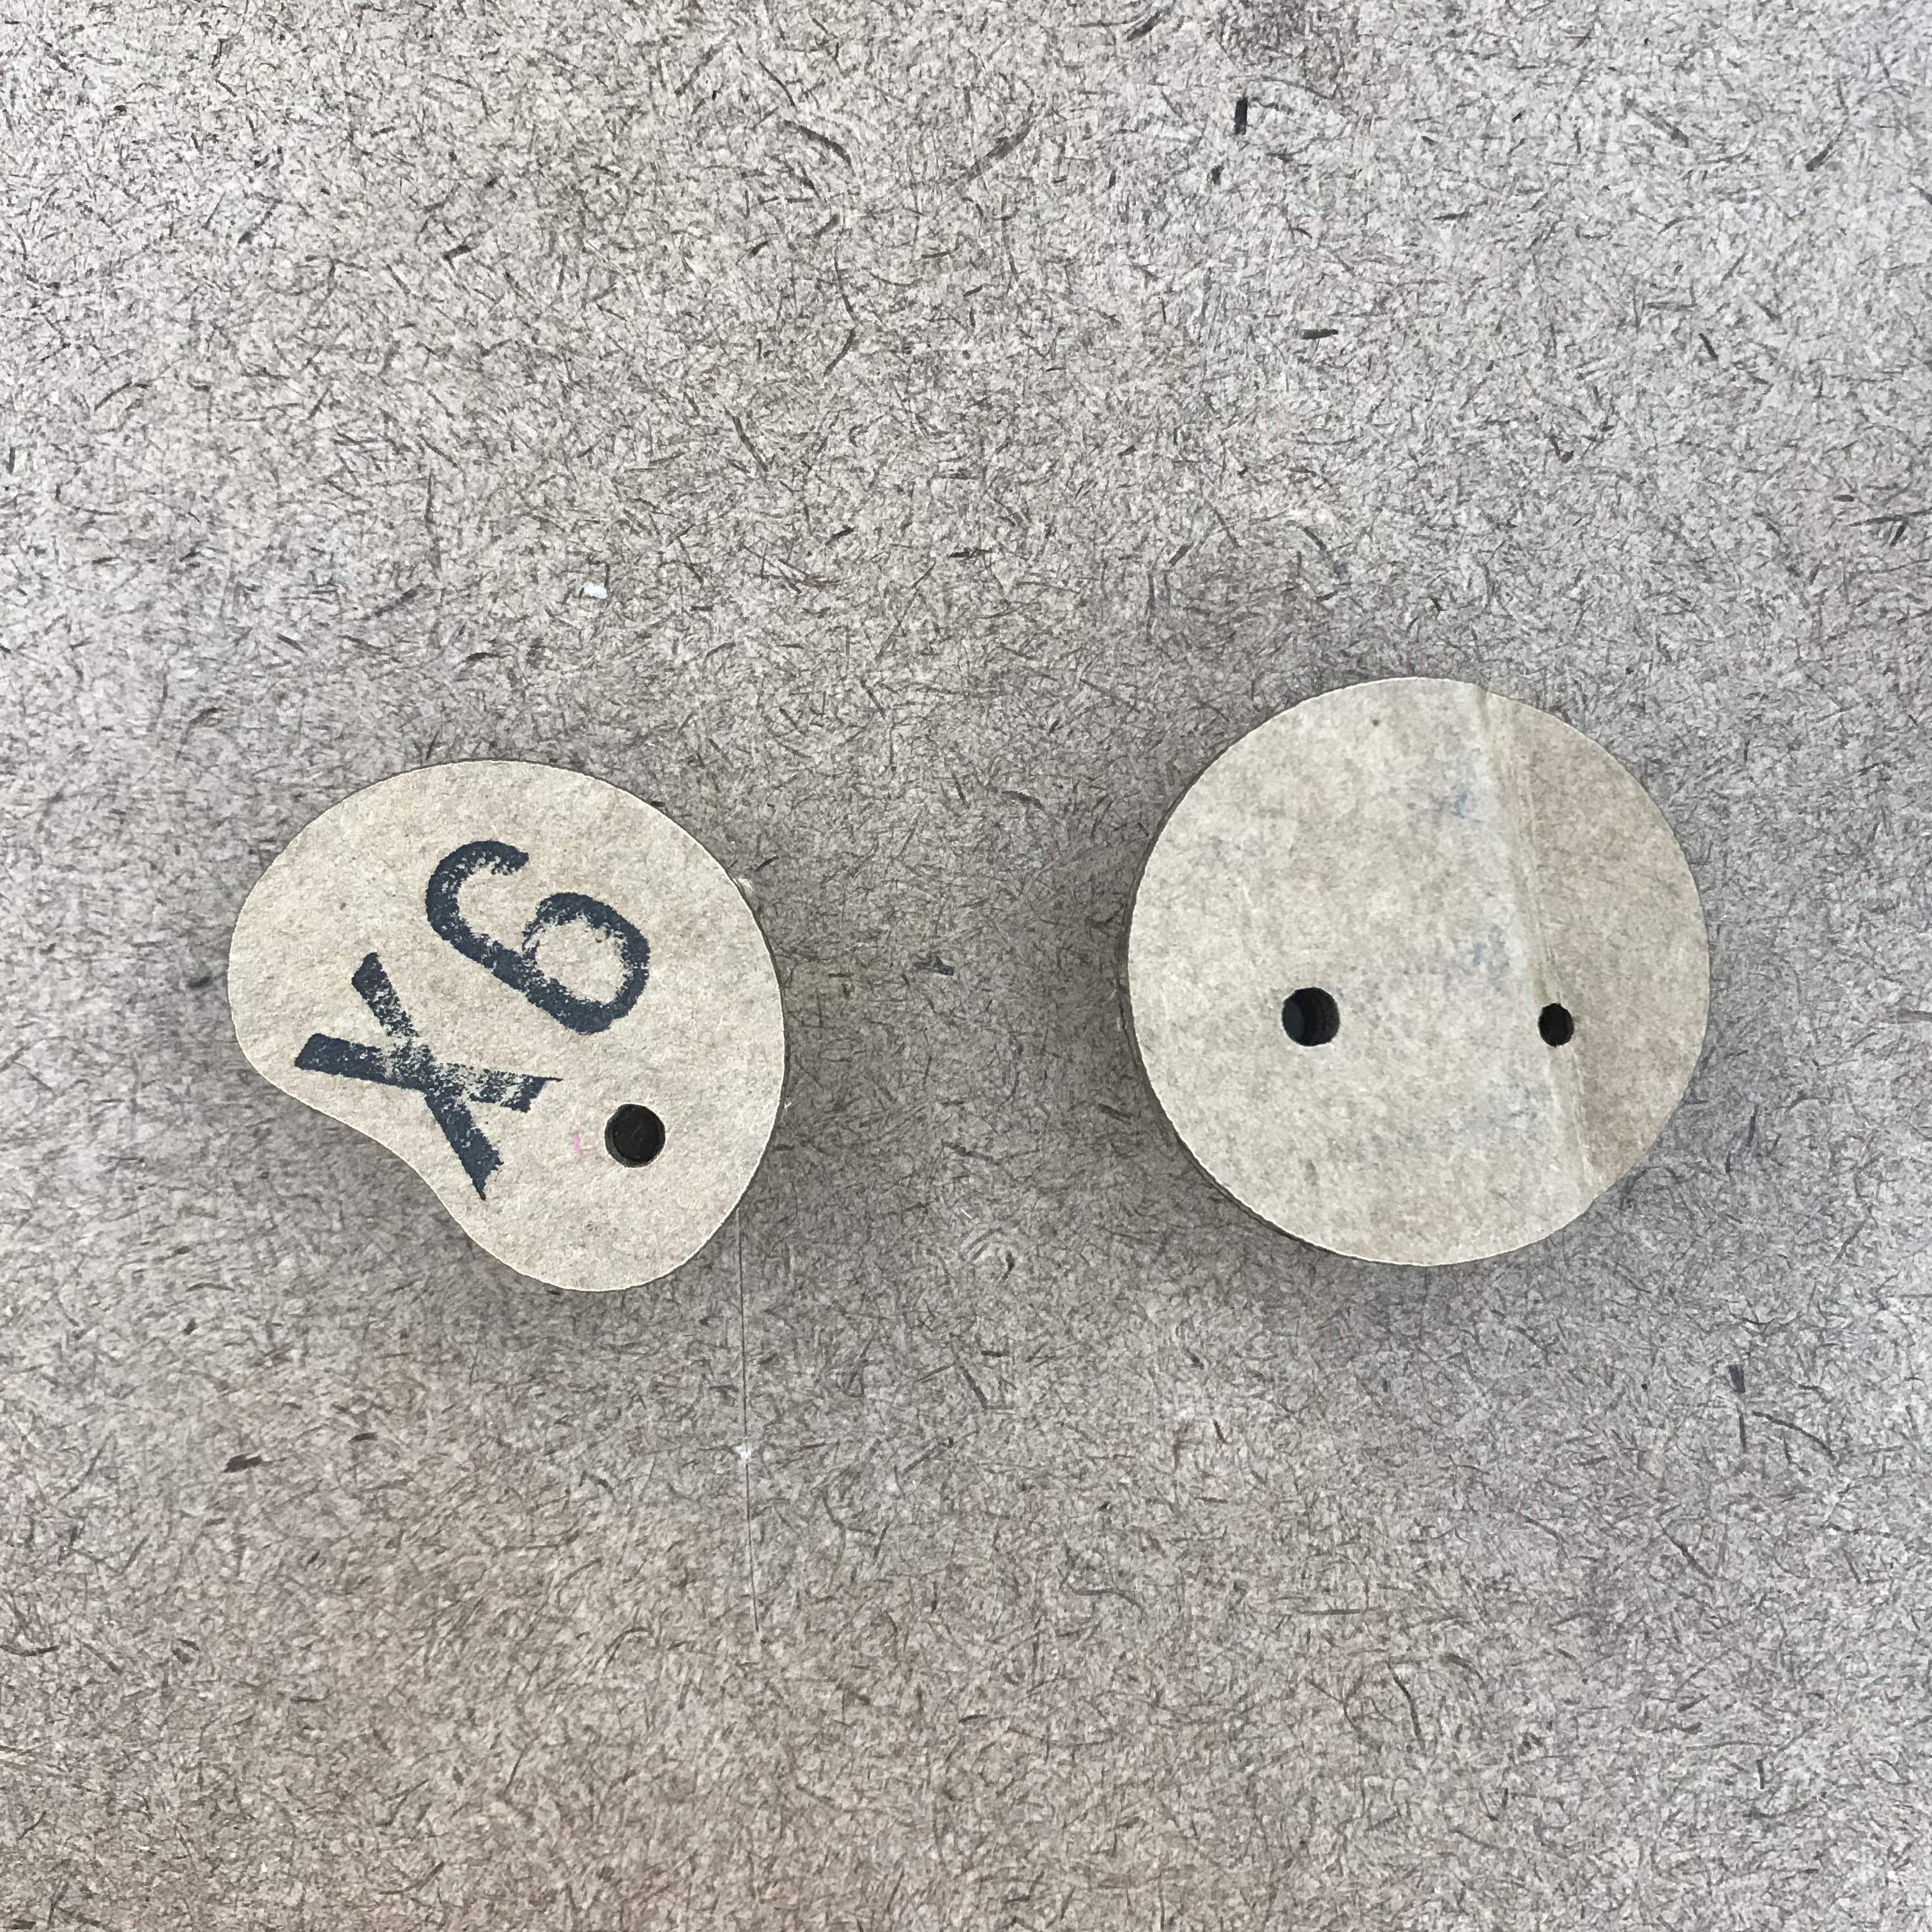
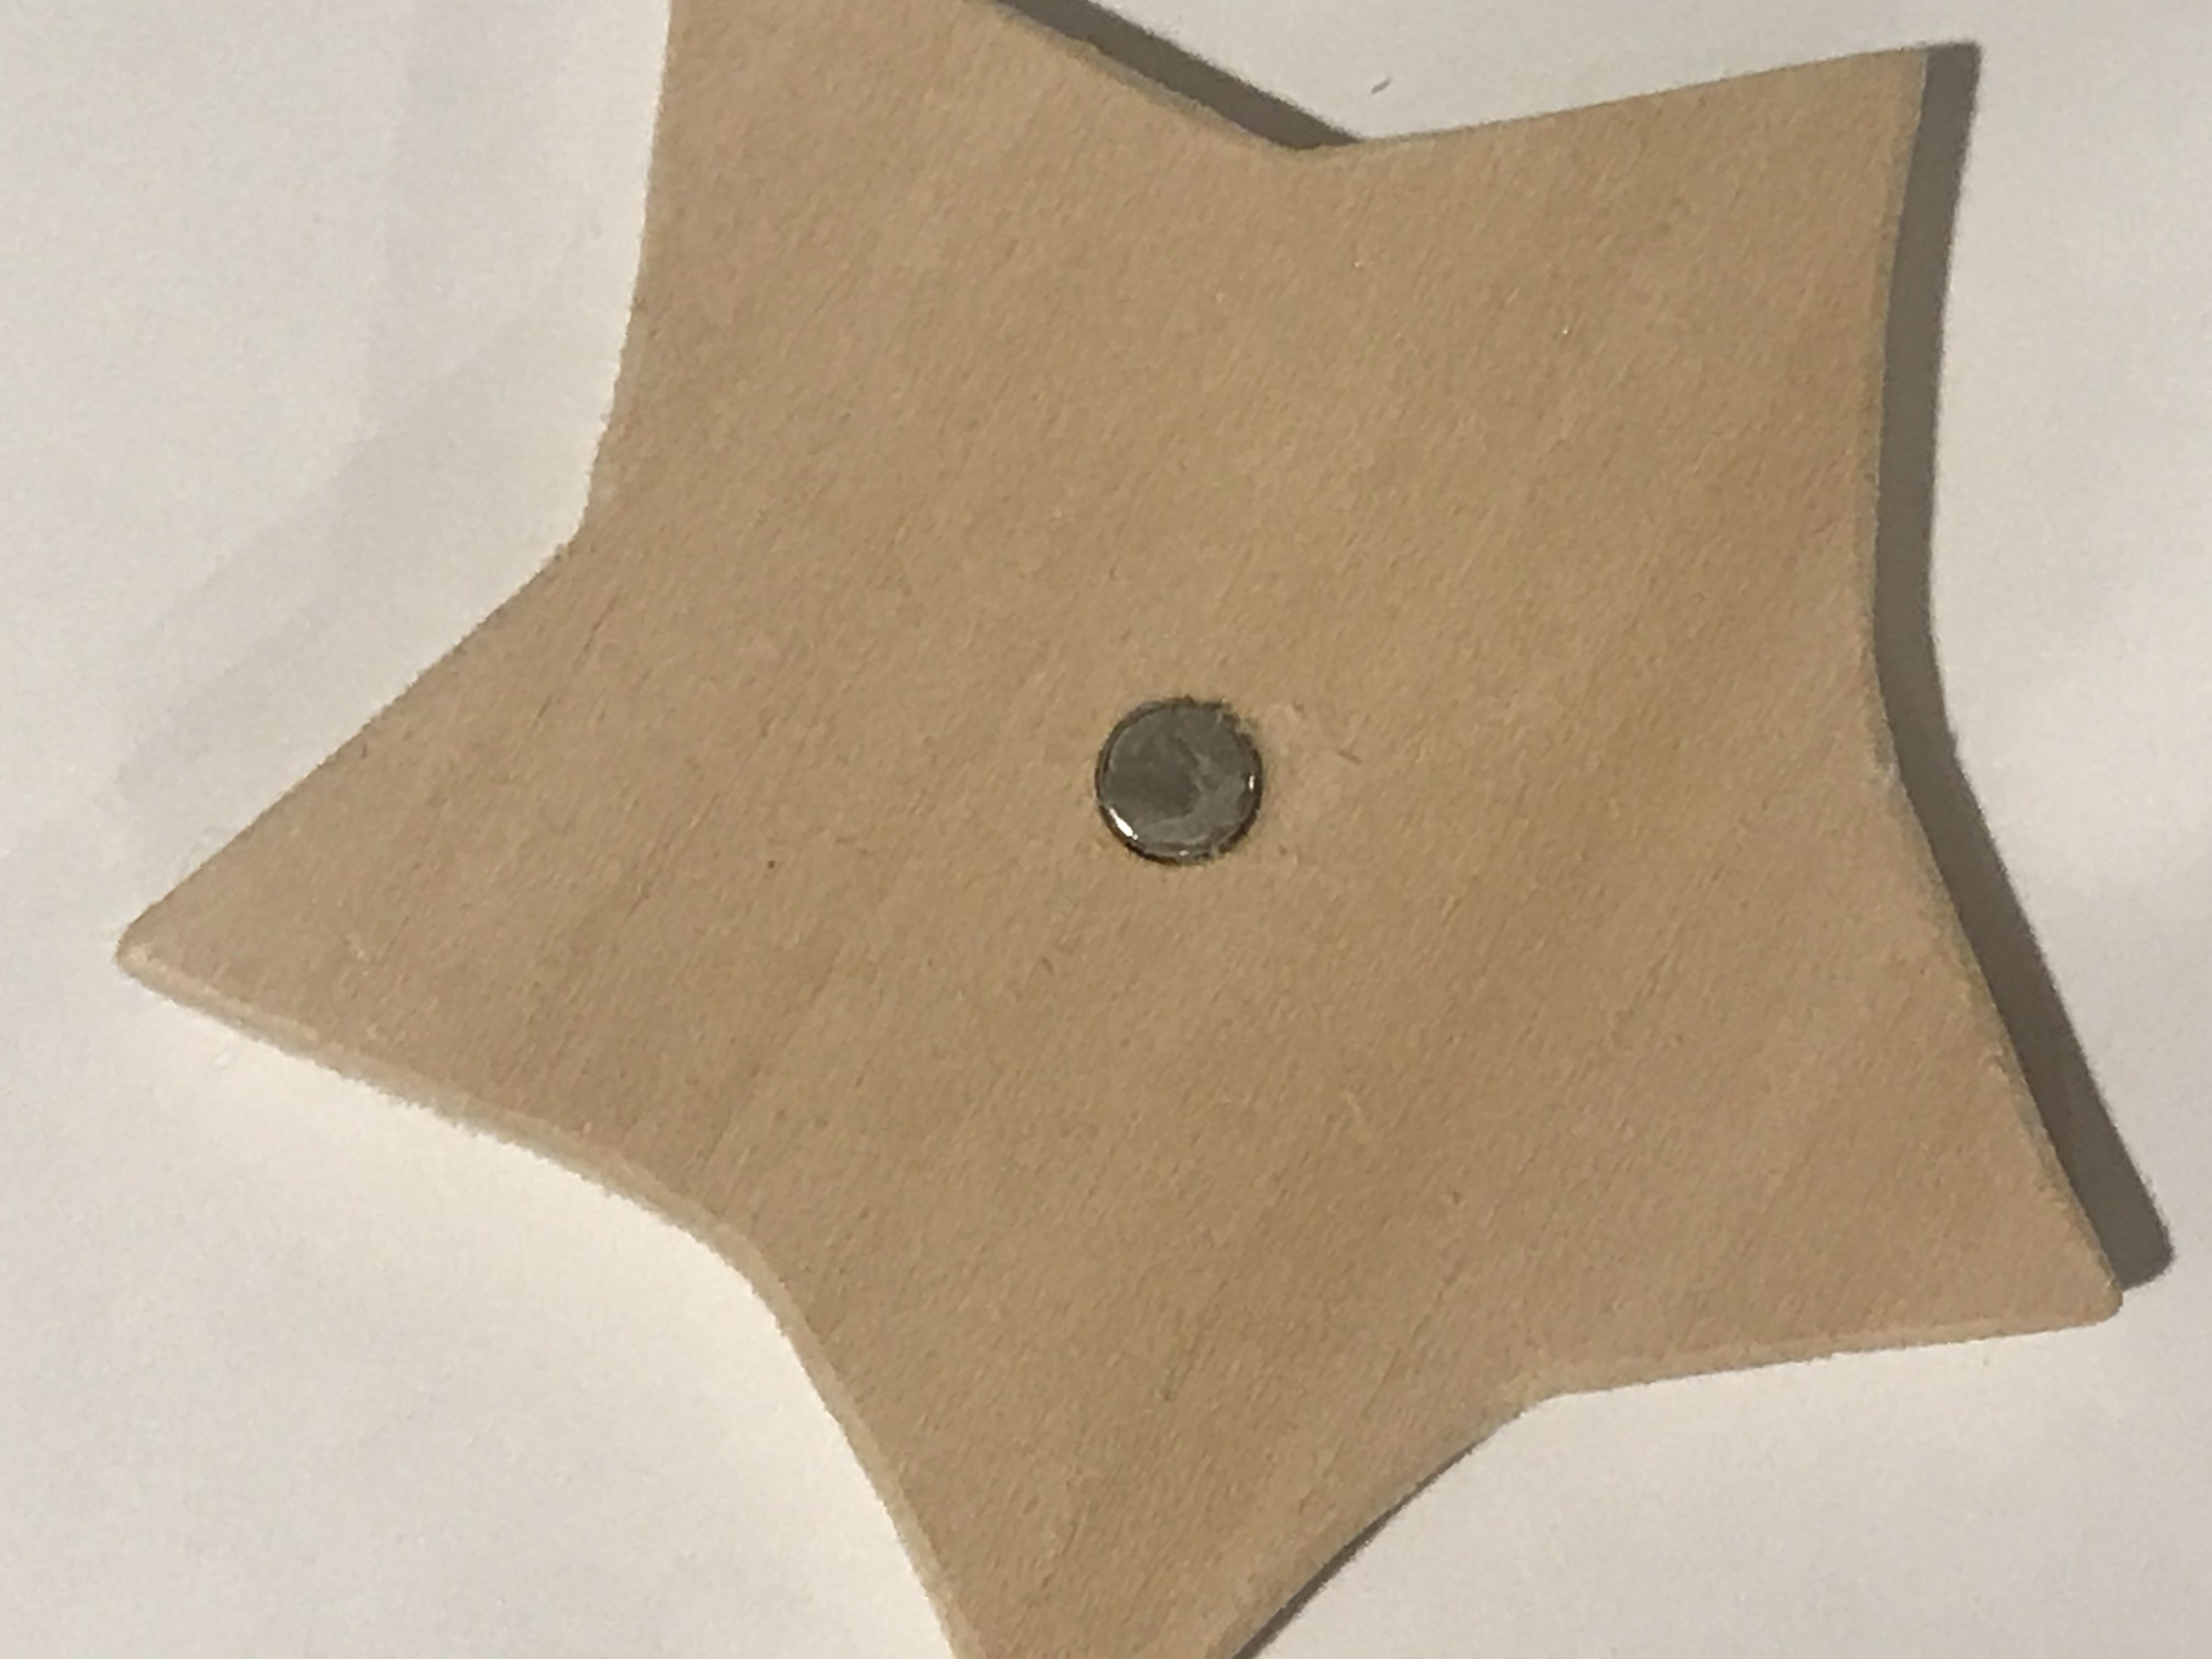
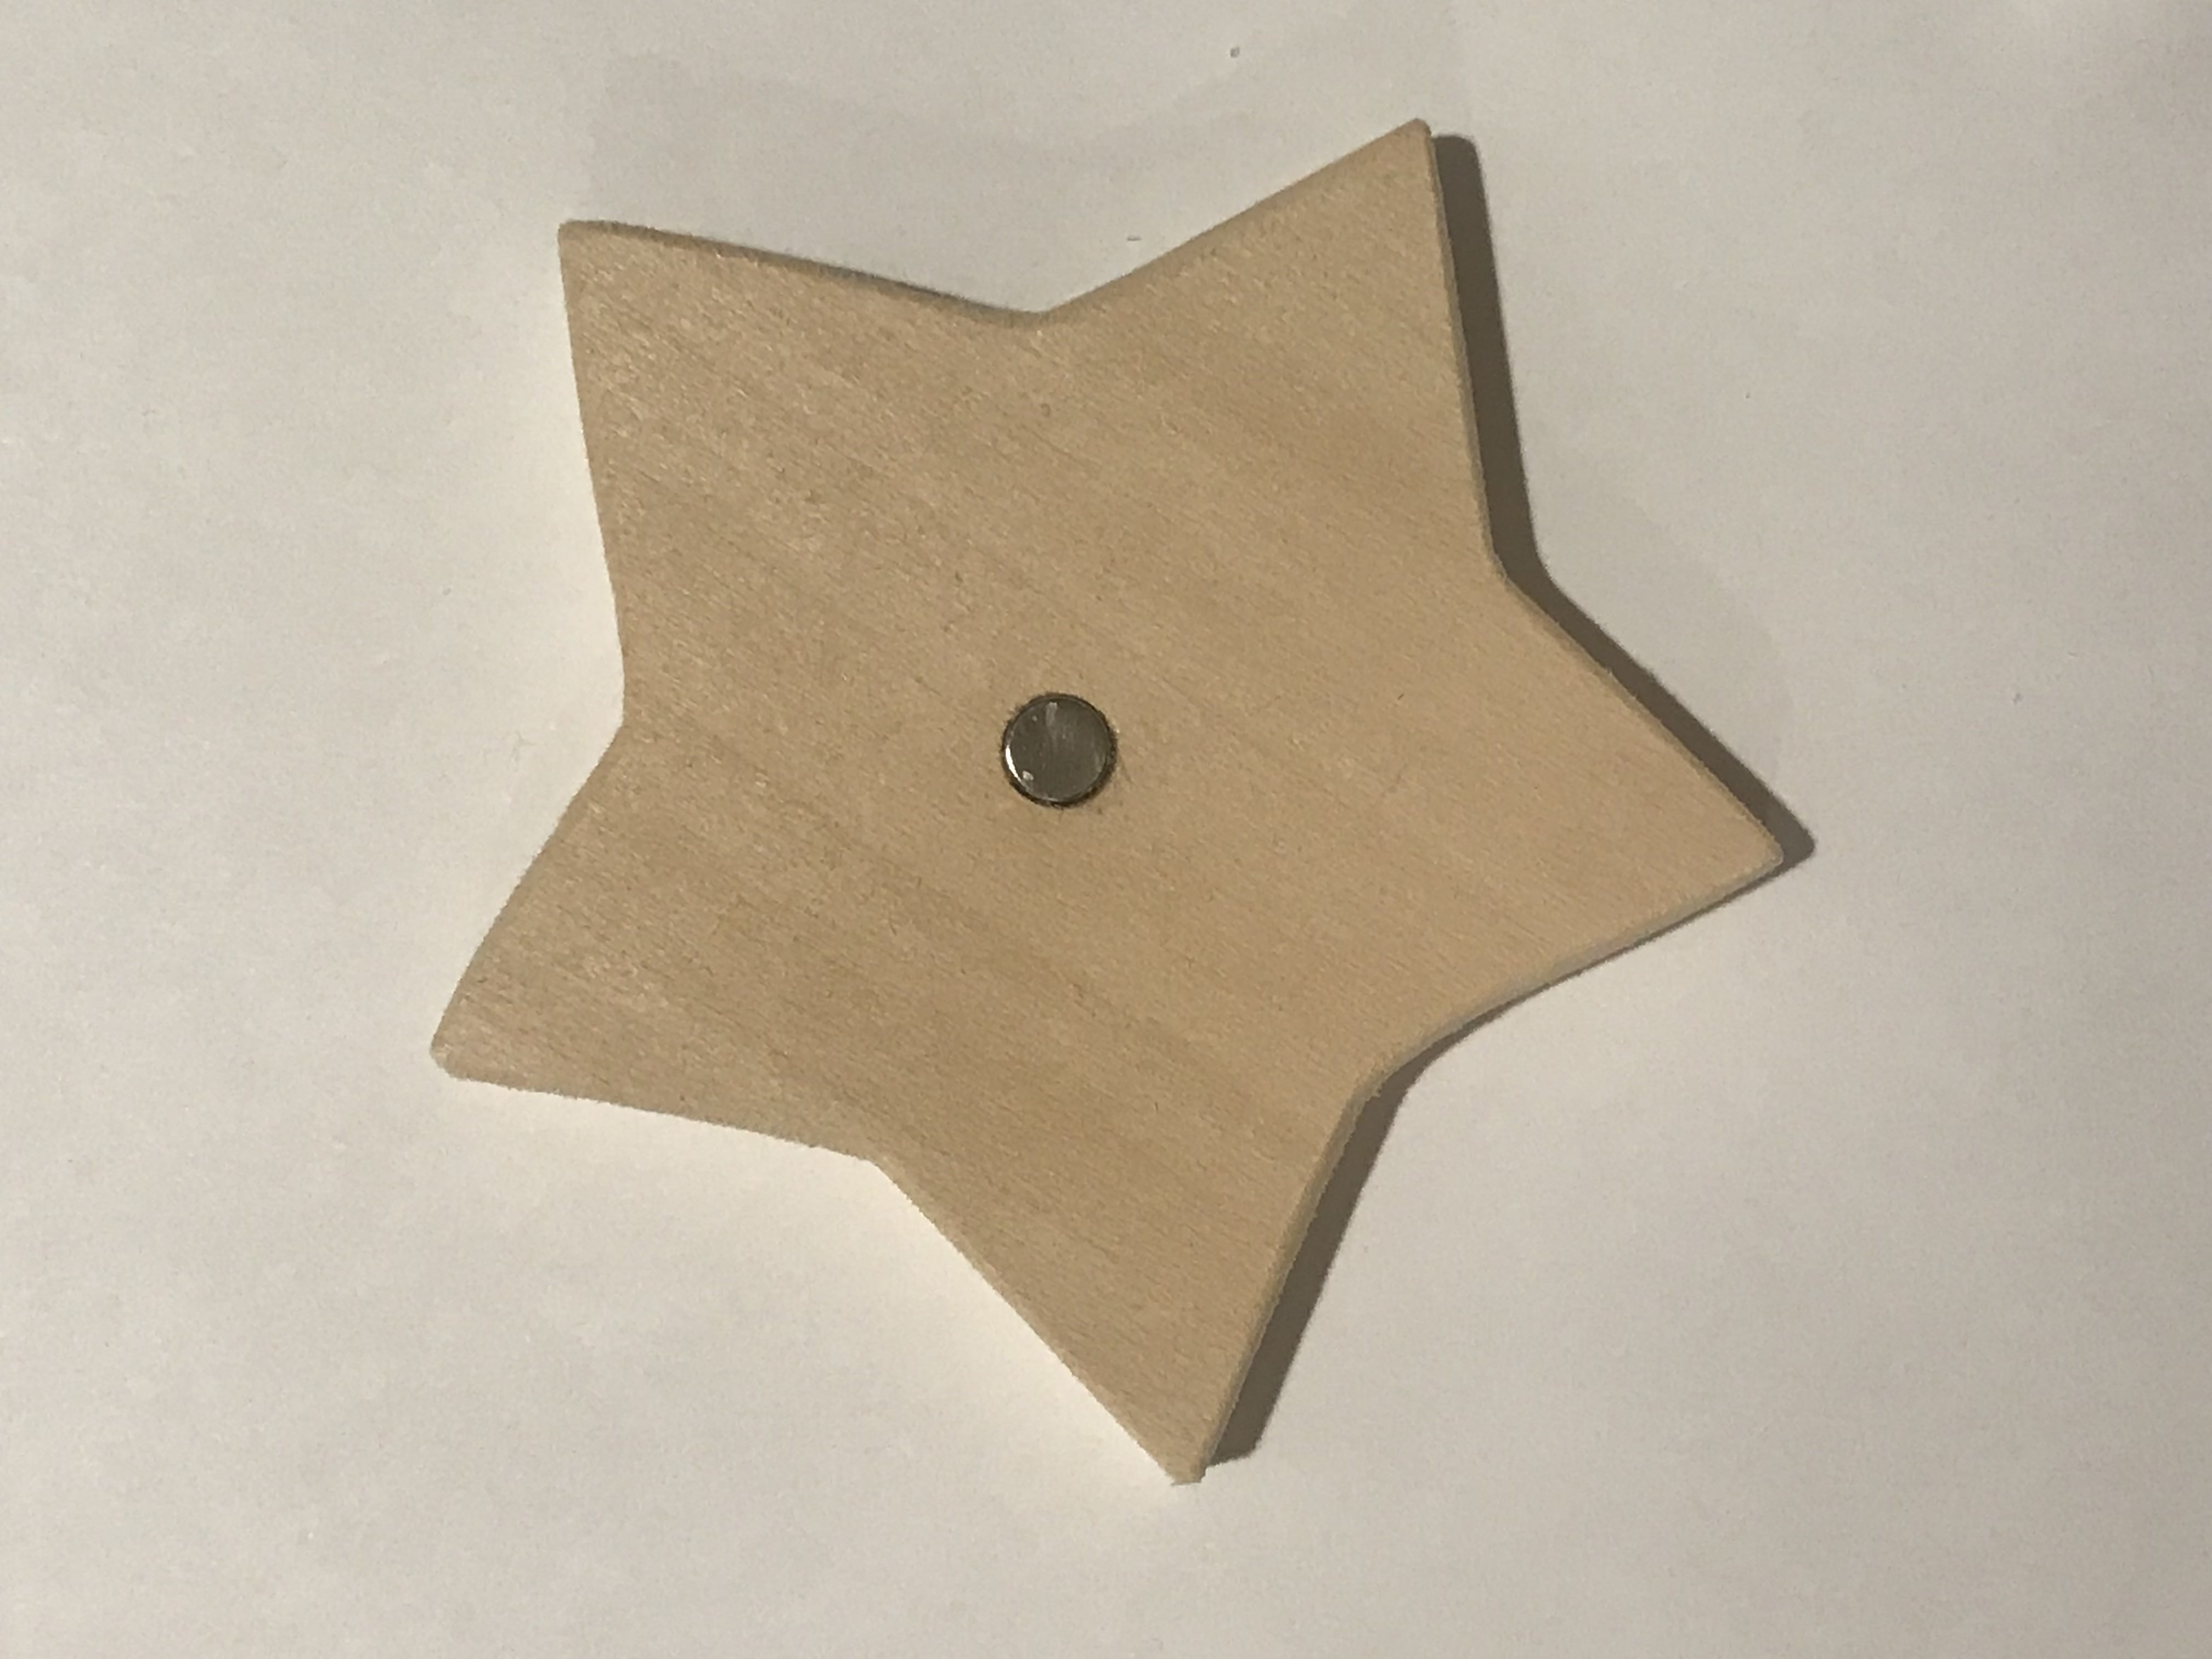
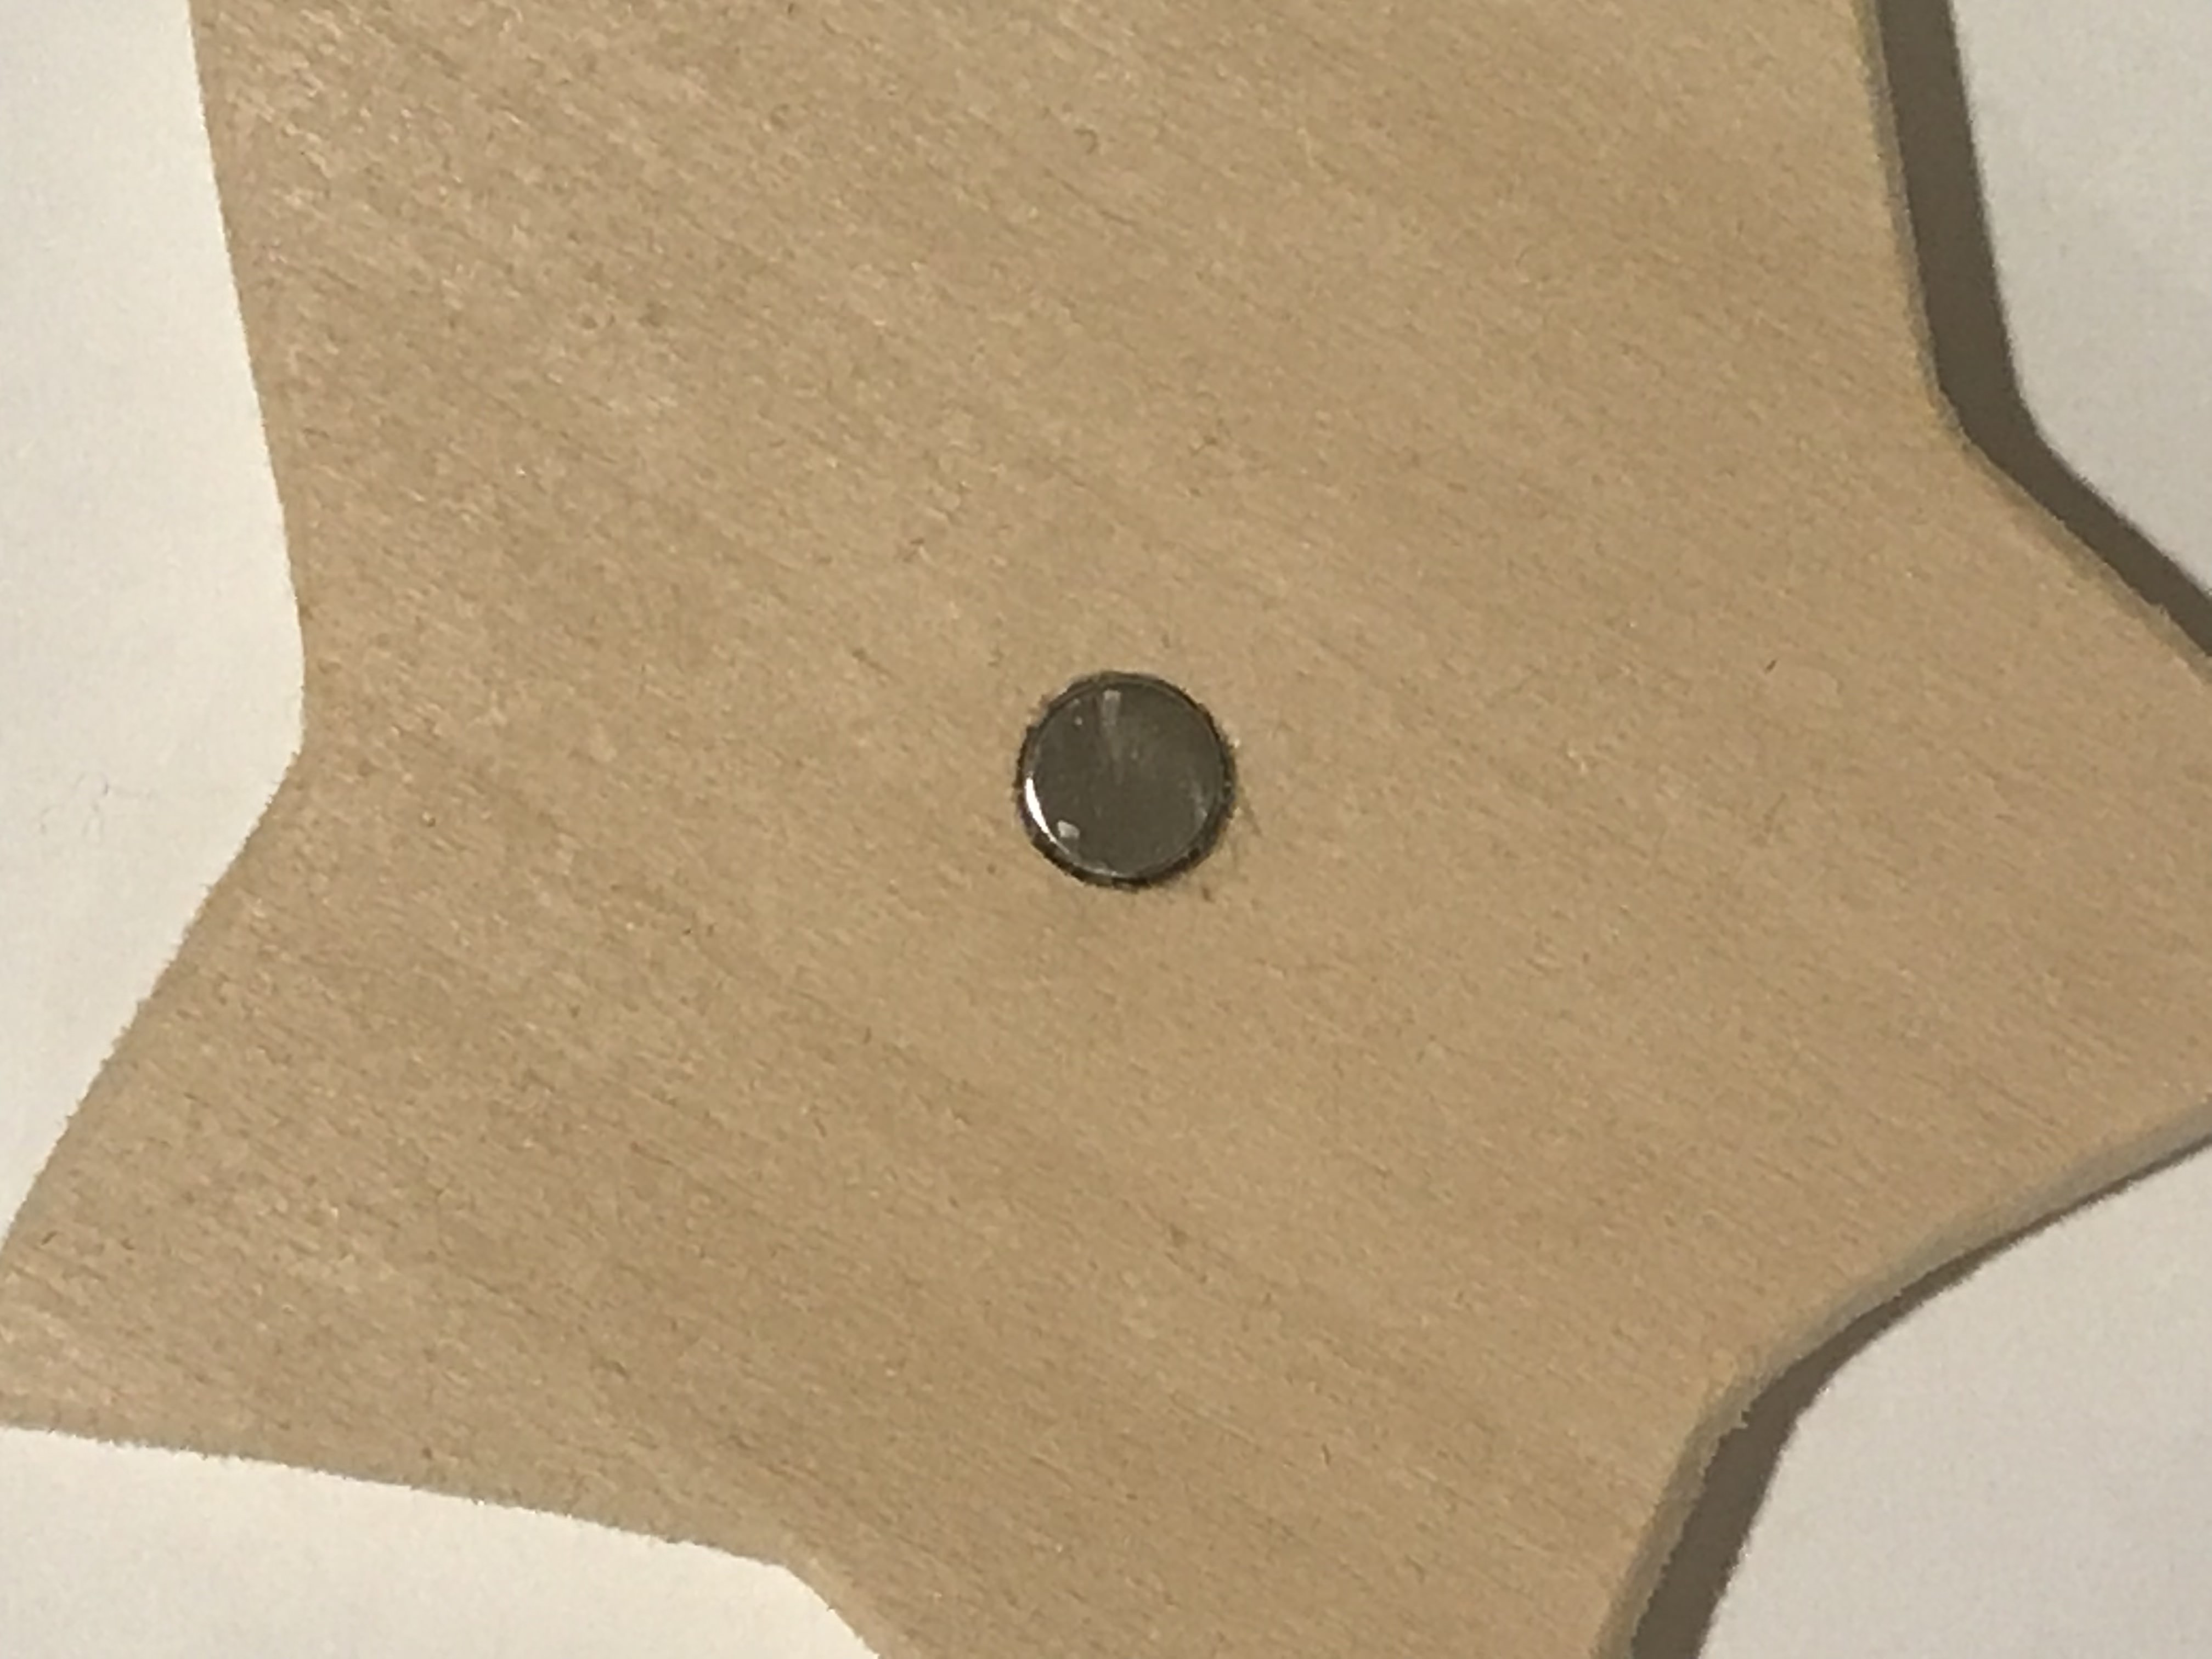
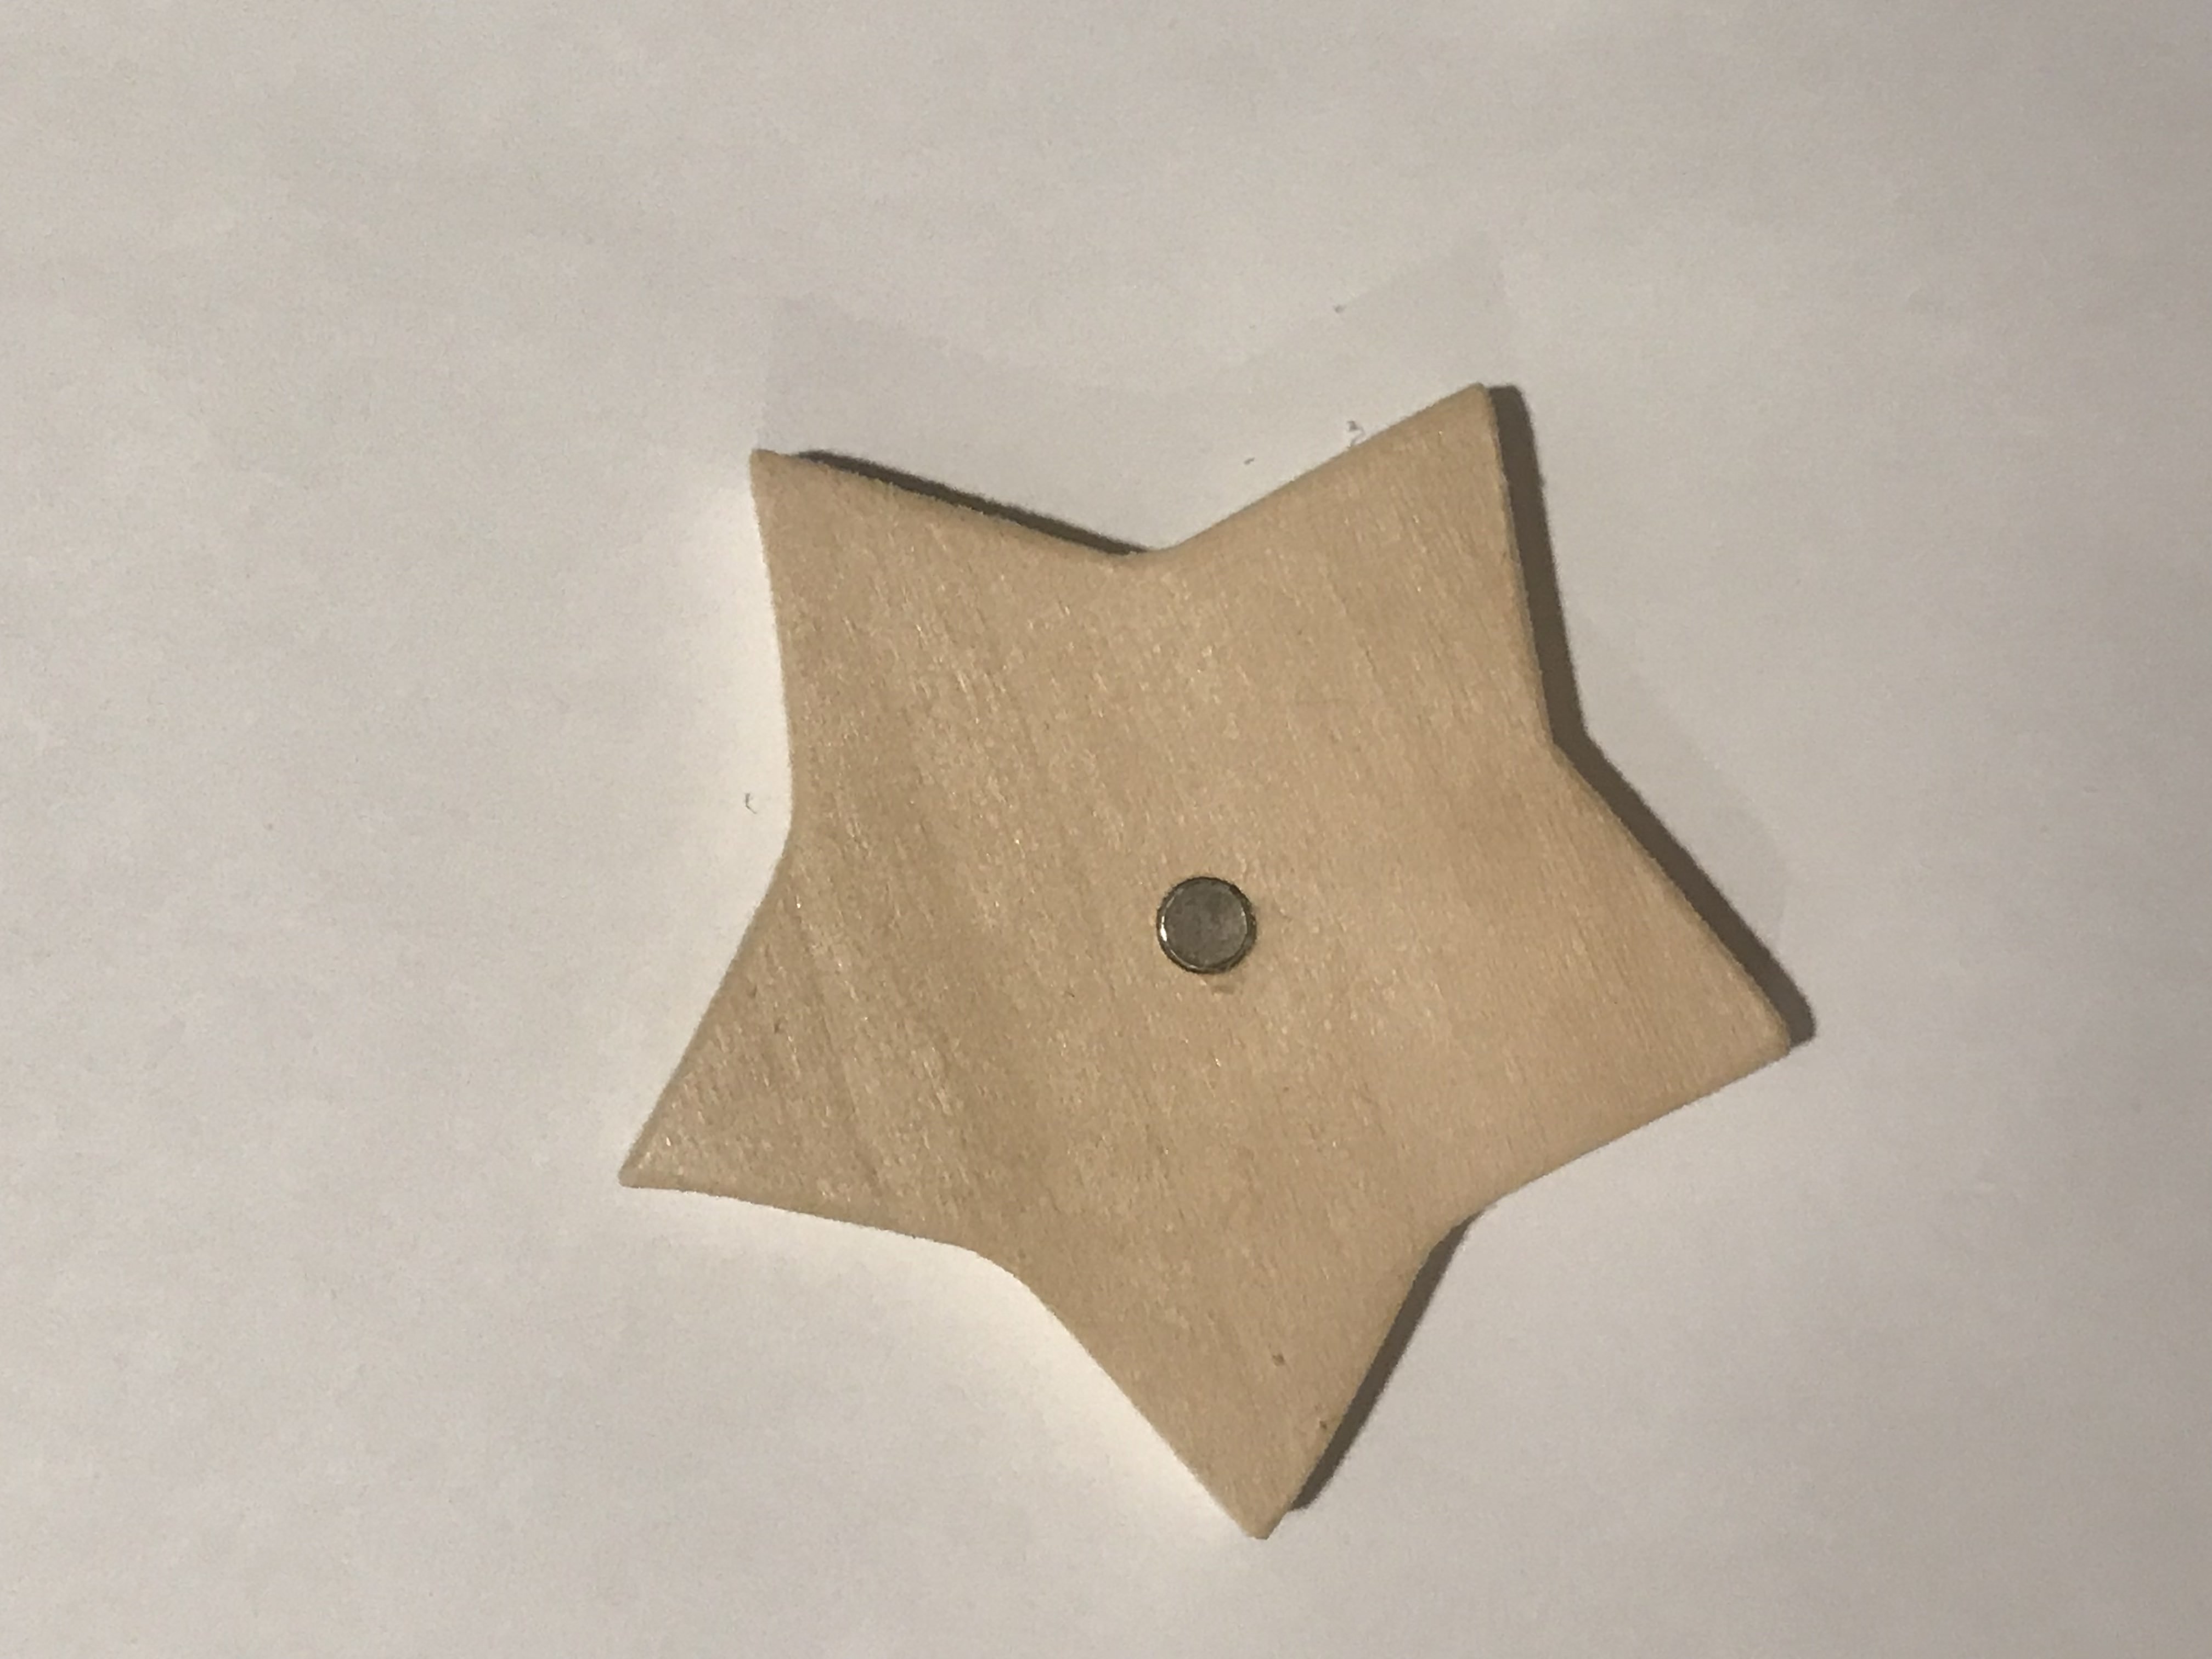
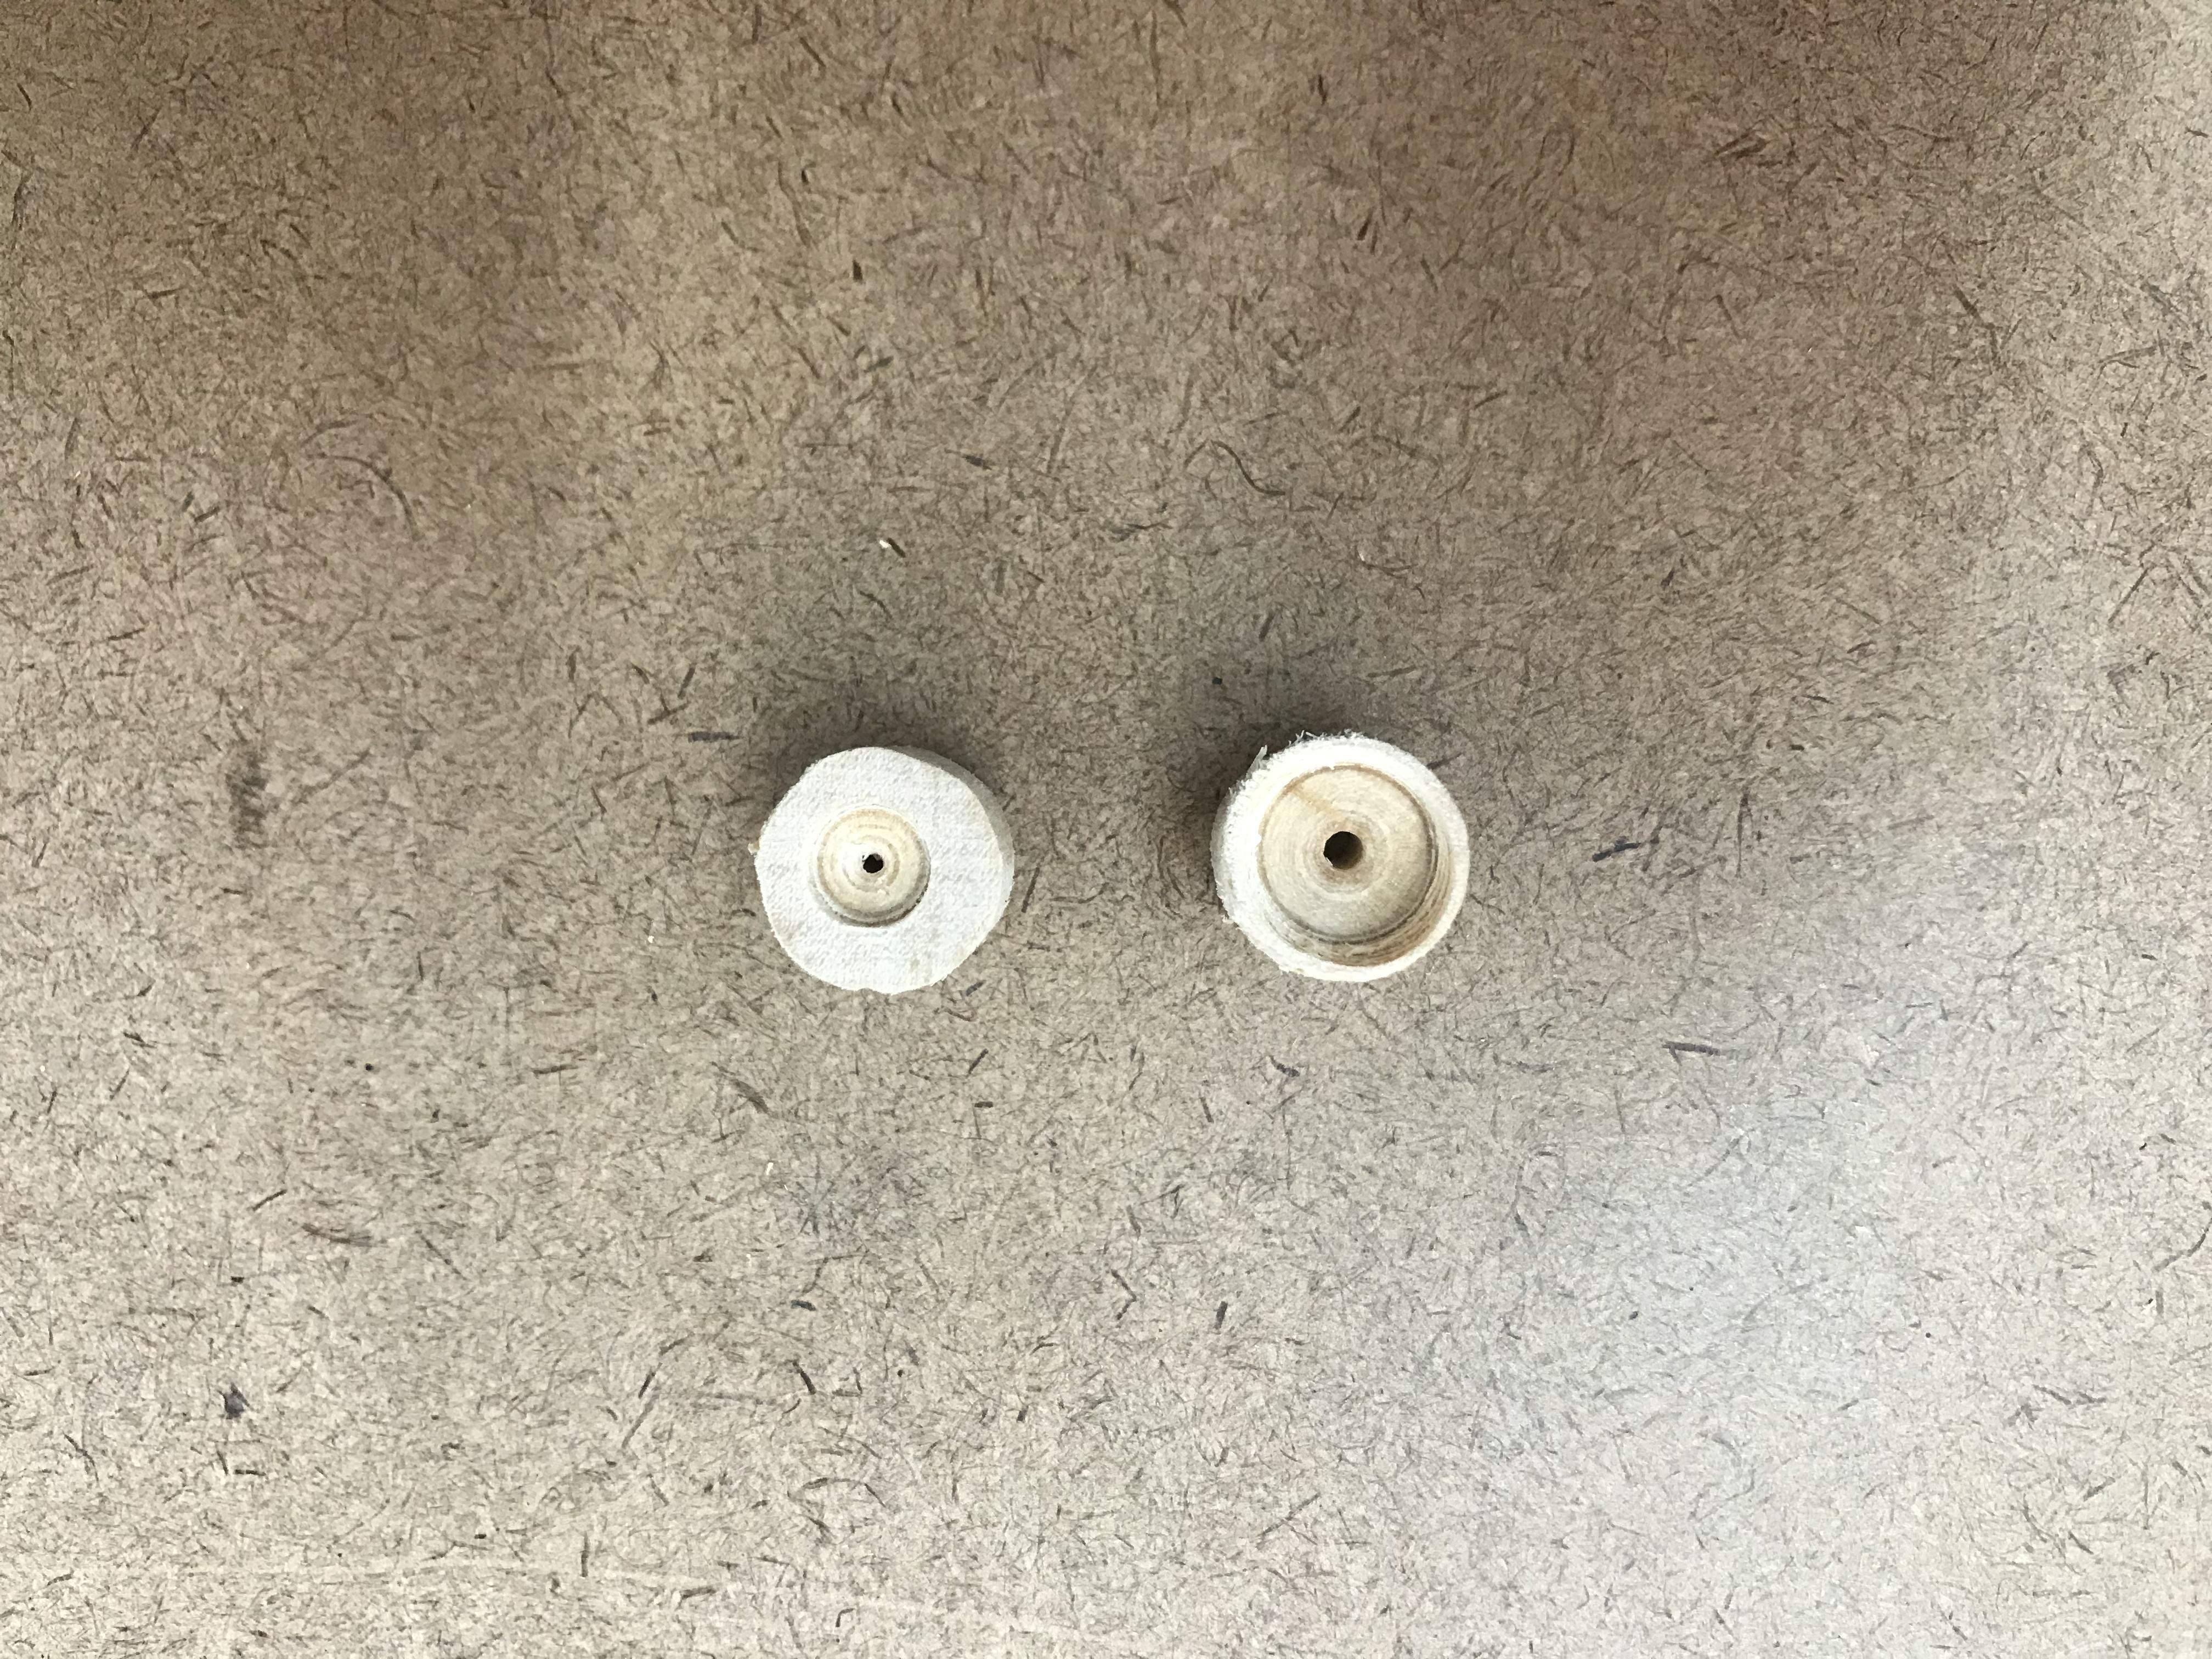
Now I have to apply magnet onto my stars. I found this package that came in 5 different sizes (mm) of magnets: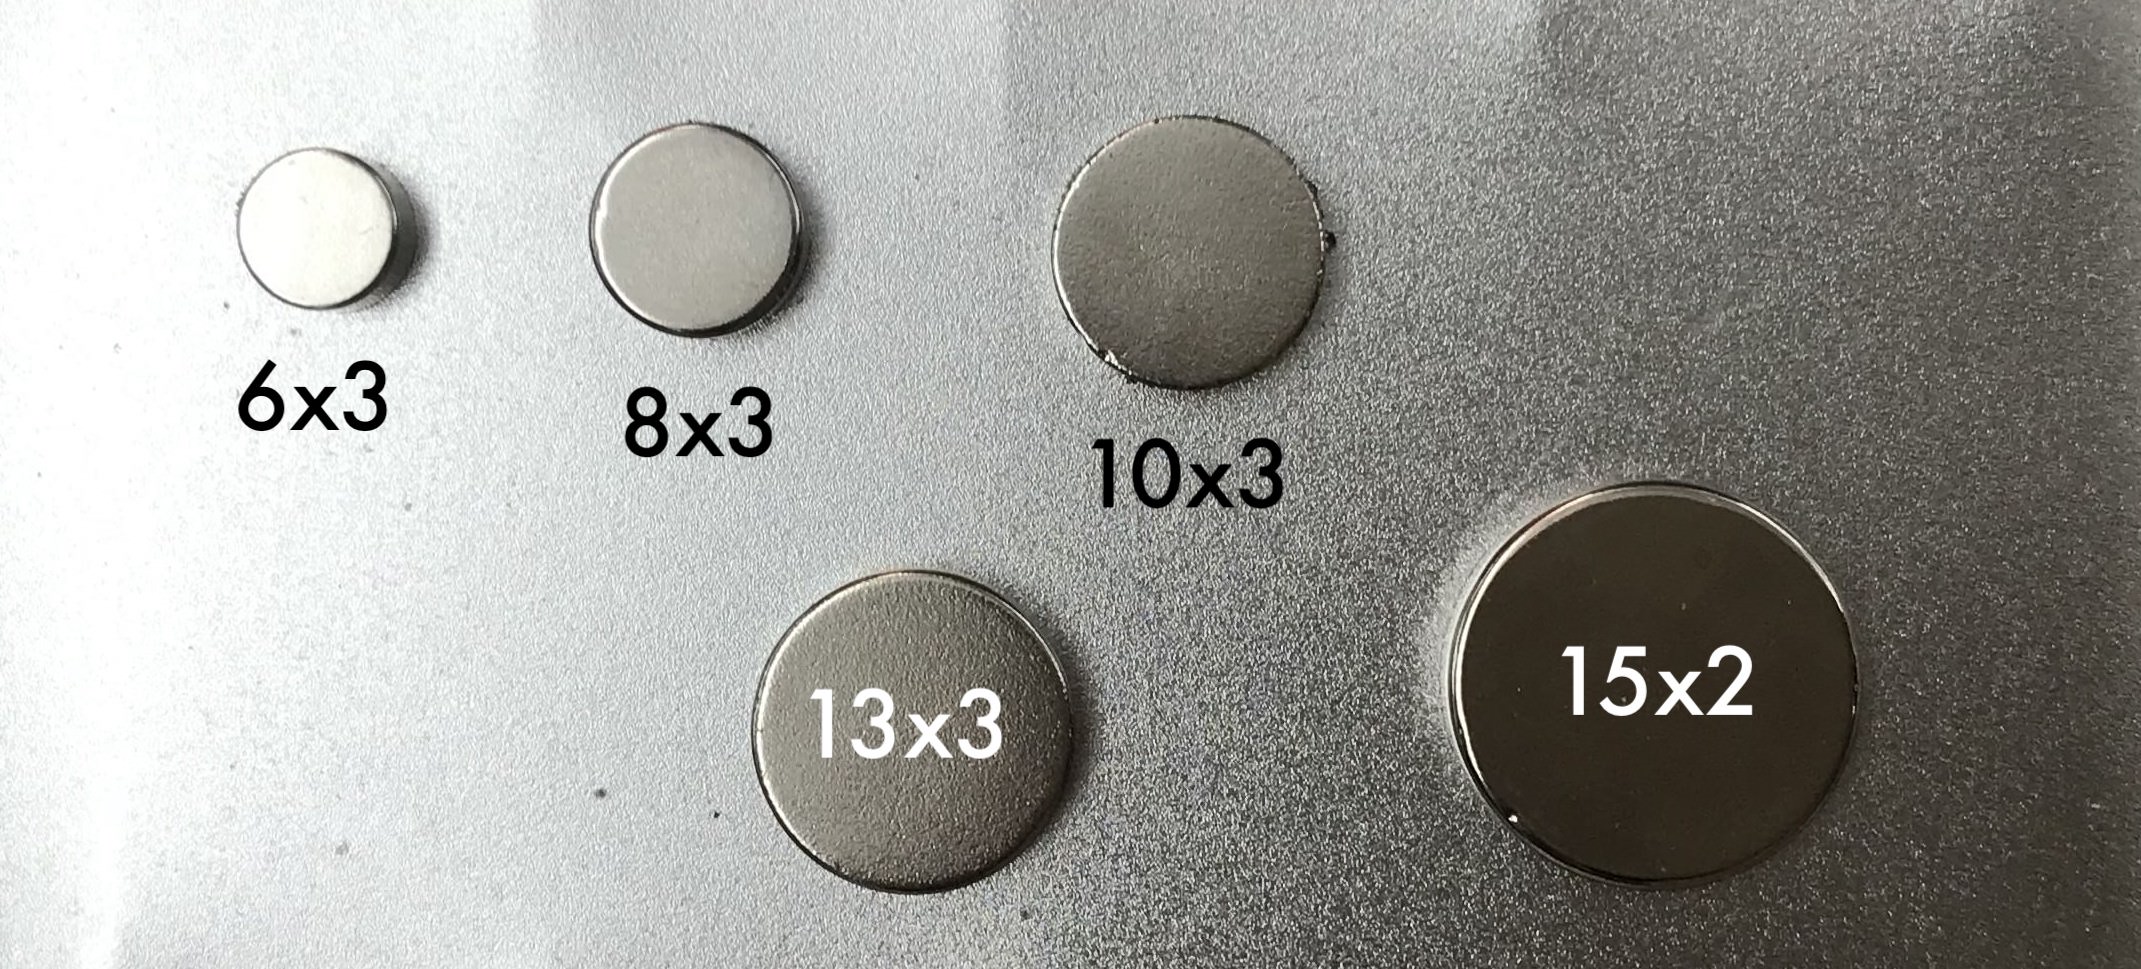
Before drilling it onto my precious stars (lordofthering-myprecious.gif) I tried the 3 different sizes of the drill bits, which have the closest sizes compare to my magnets, onto the scrap wood:
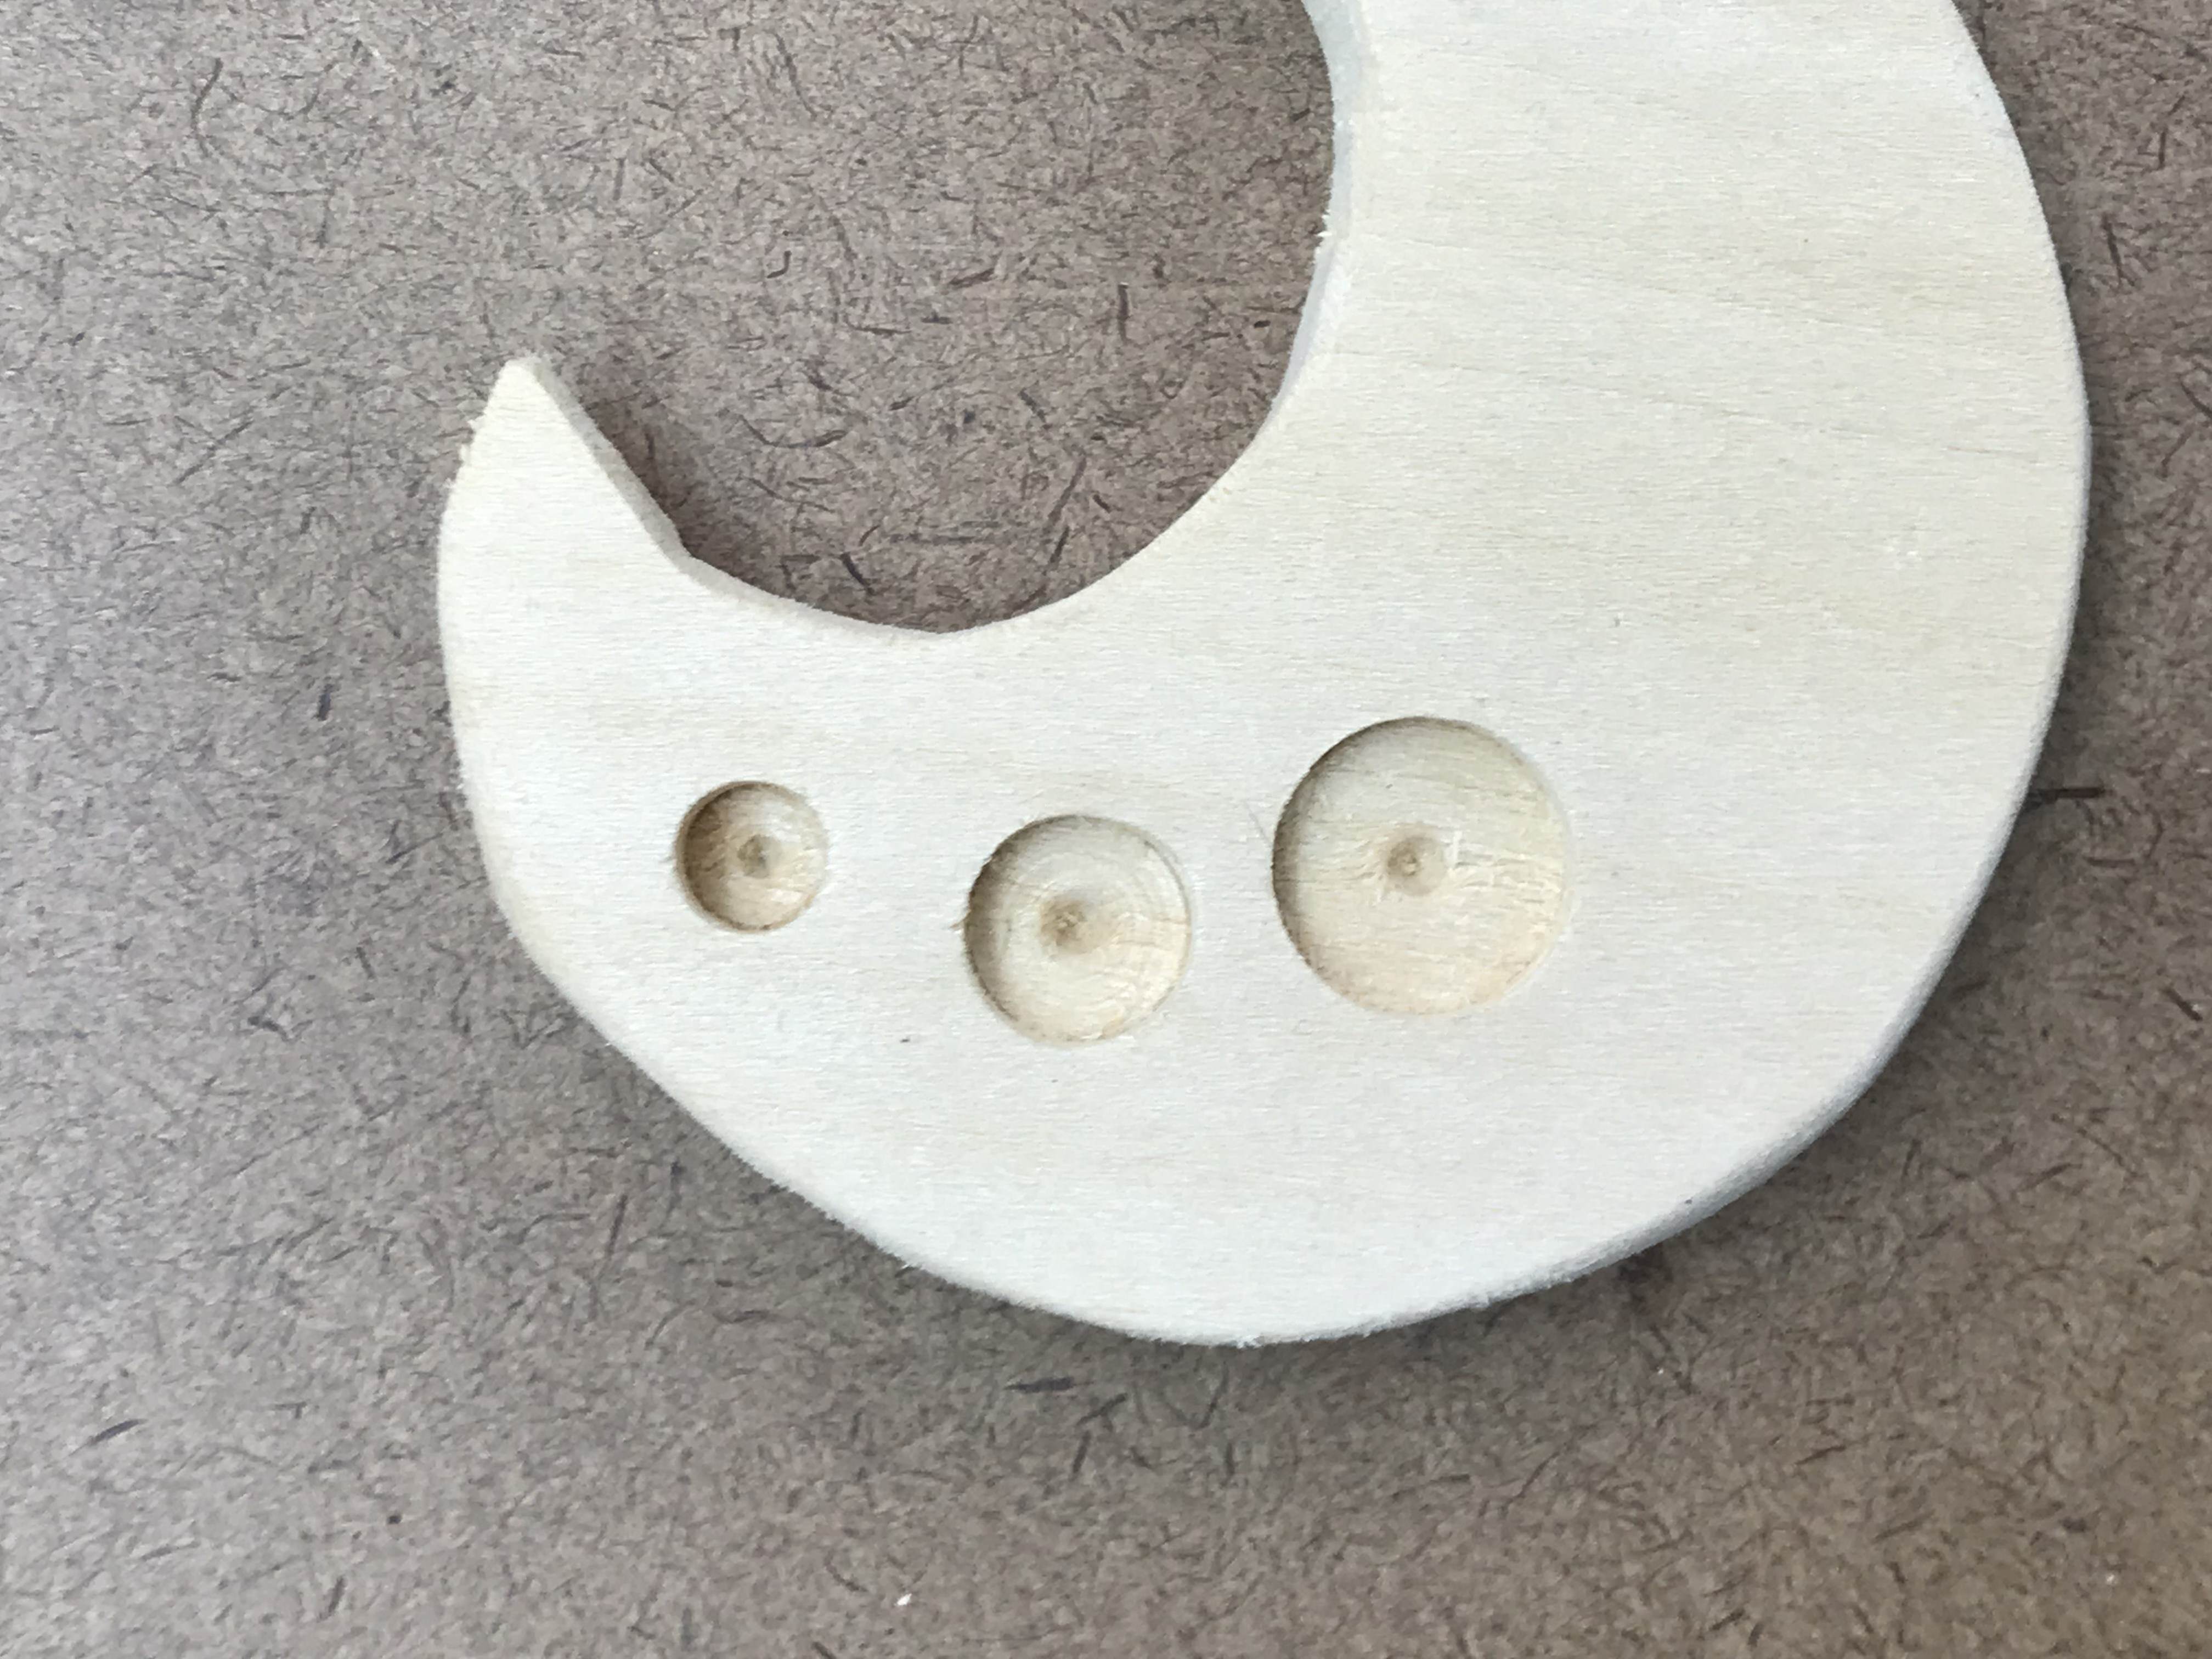
But because the sizes of the magnets that I got were in mm instead of inches, some fit well but some are slightly awkward:
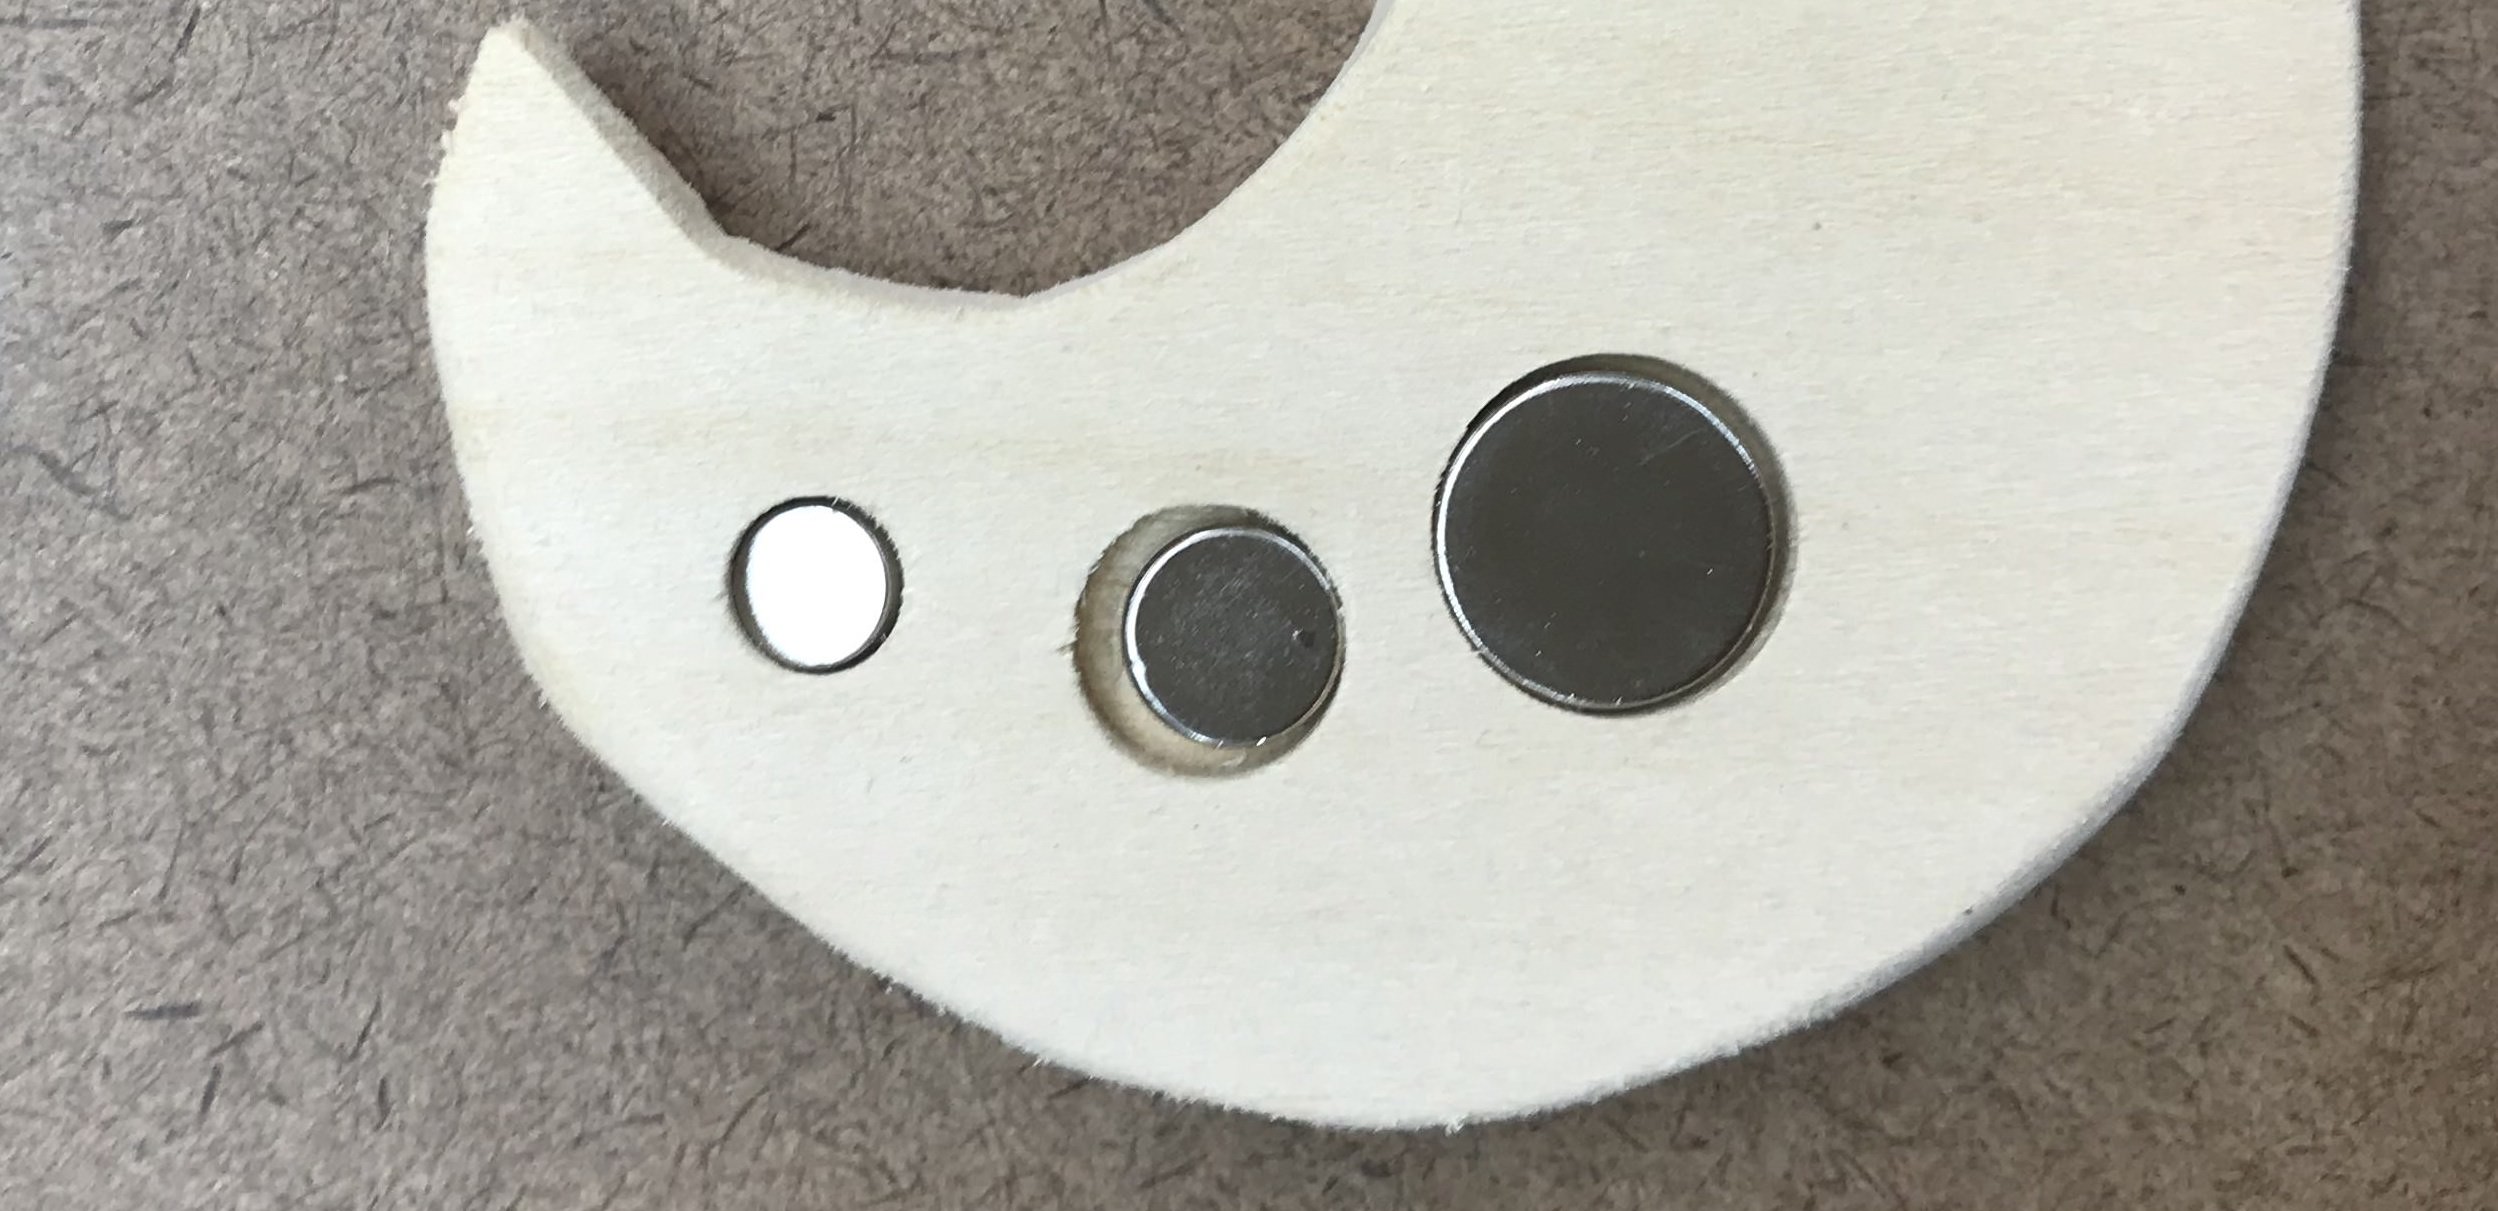
Since the force of the magnets are pretty strong, I don't want the baby to get hurt by it, I chose the smallest one in the package (6*3mm), which fit perfectly in a 1/4inch hole. It was a little difficult to defined the depth of the hole.
(img-of-drilled-holes-on-stars.jpg)
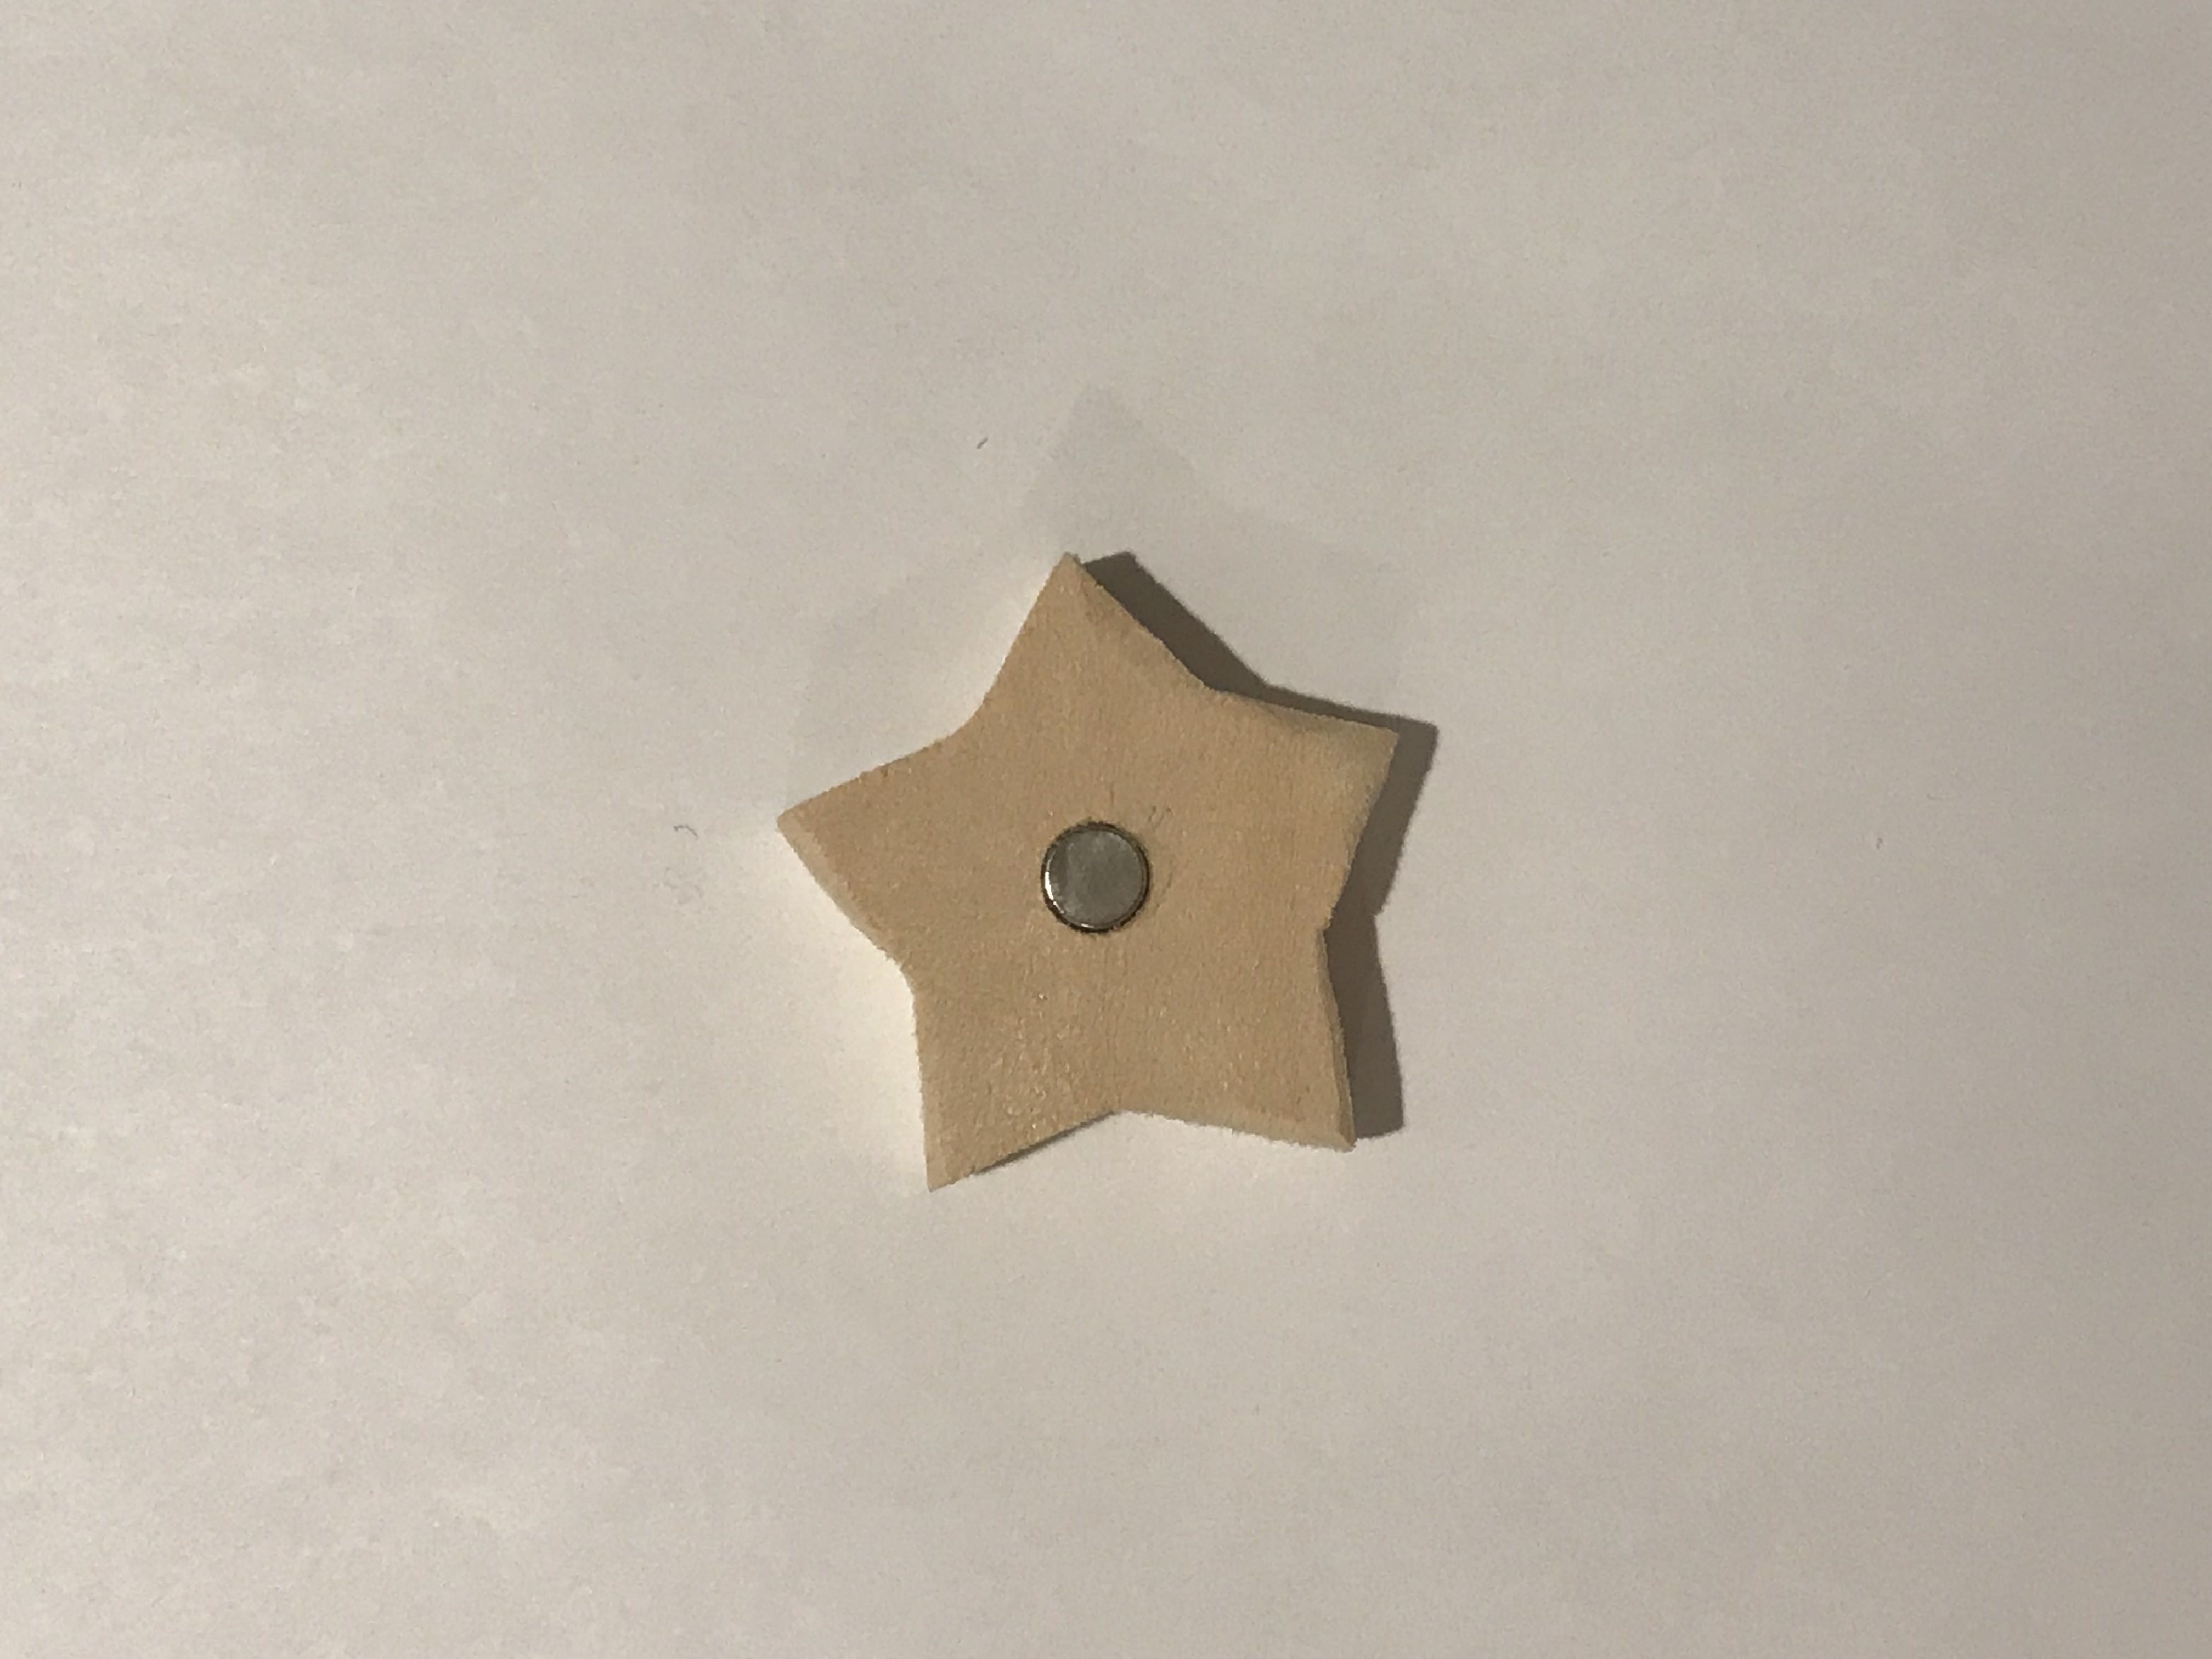
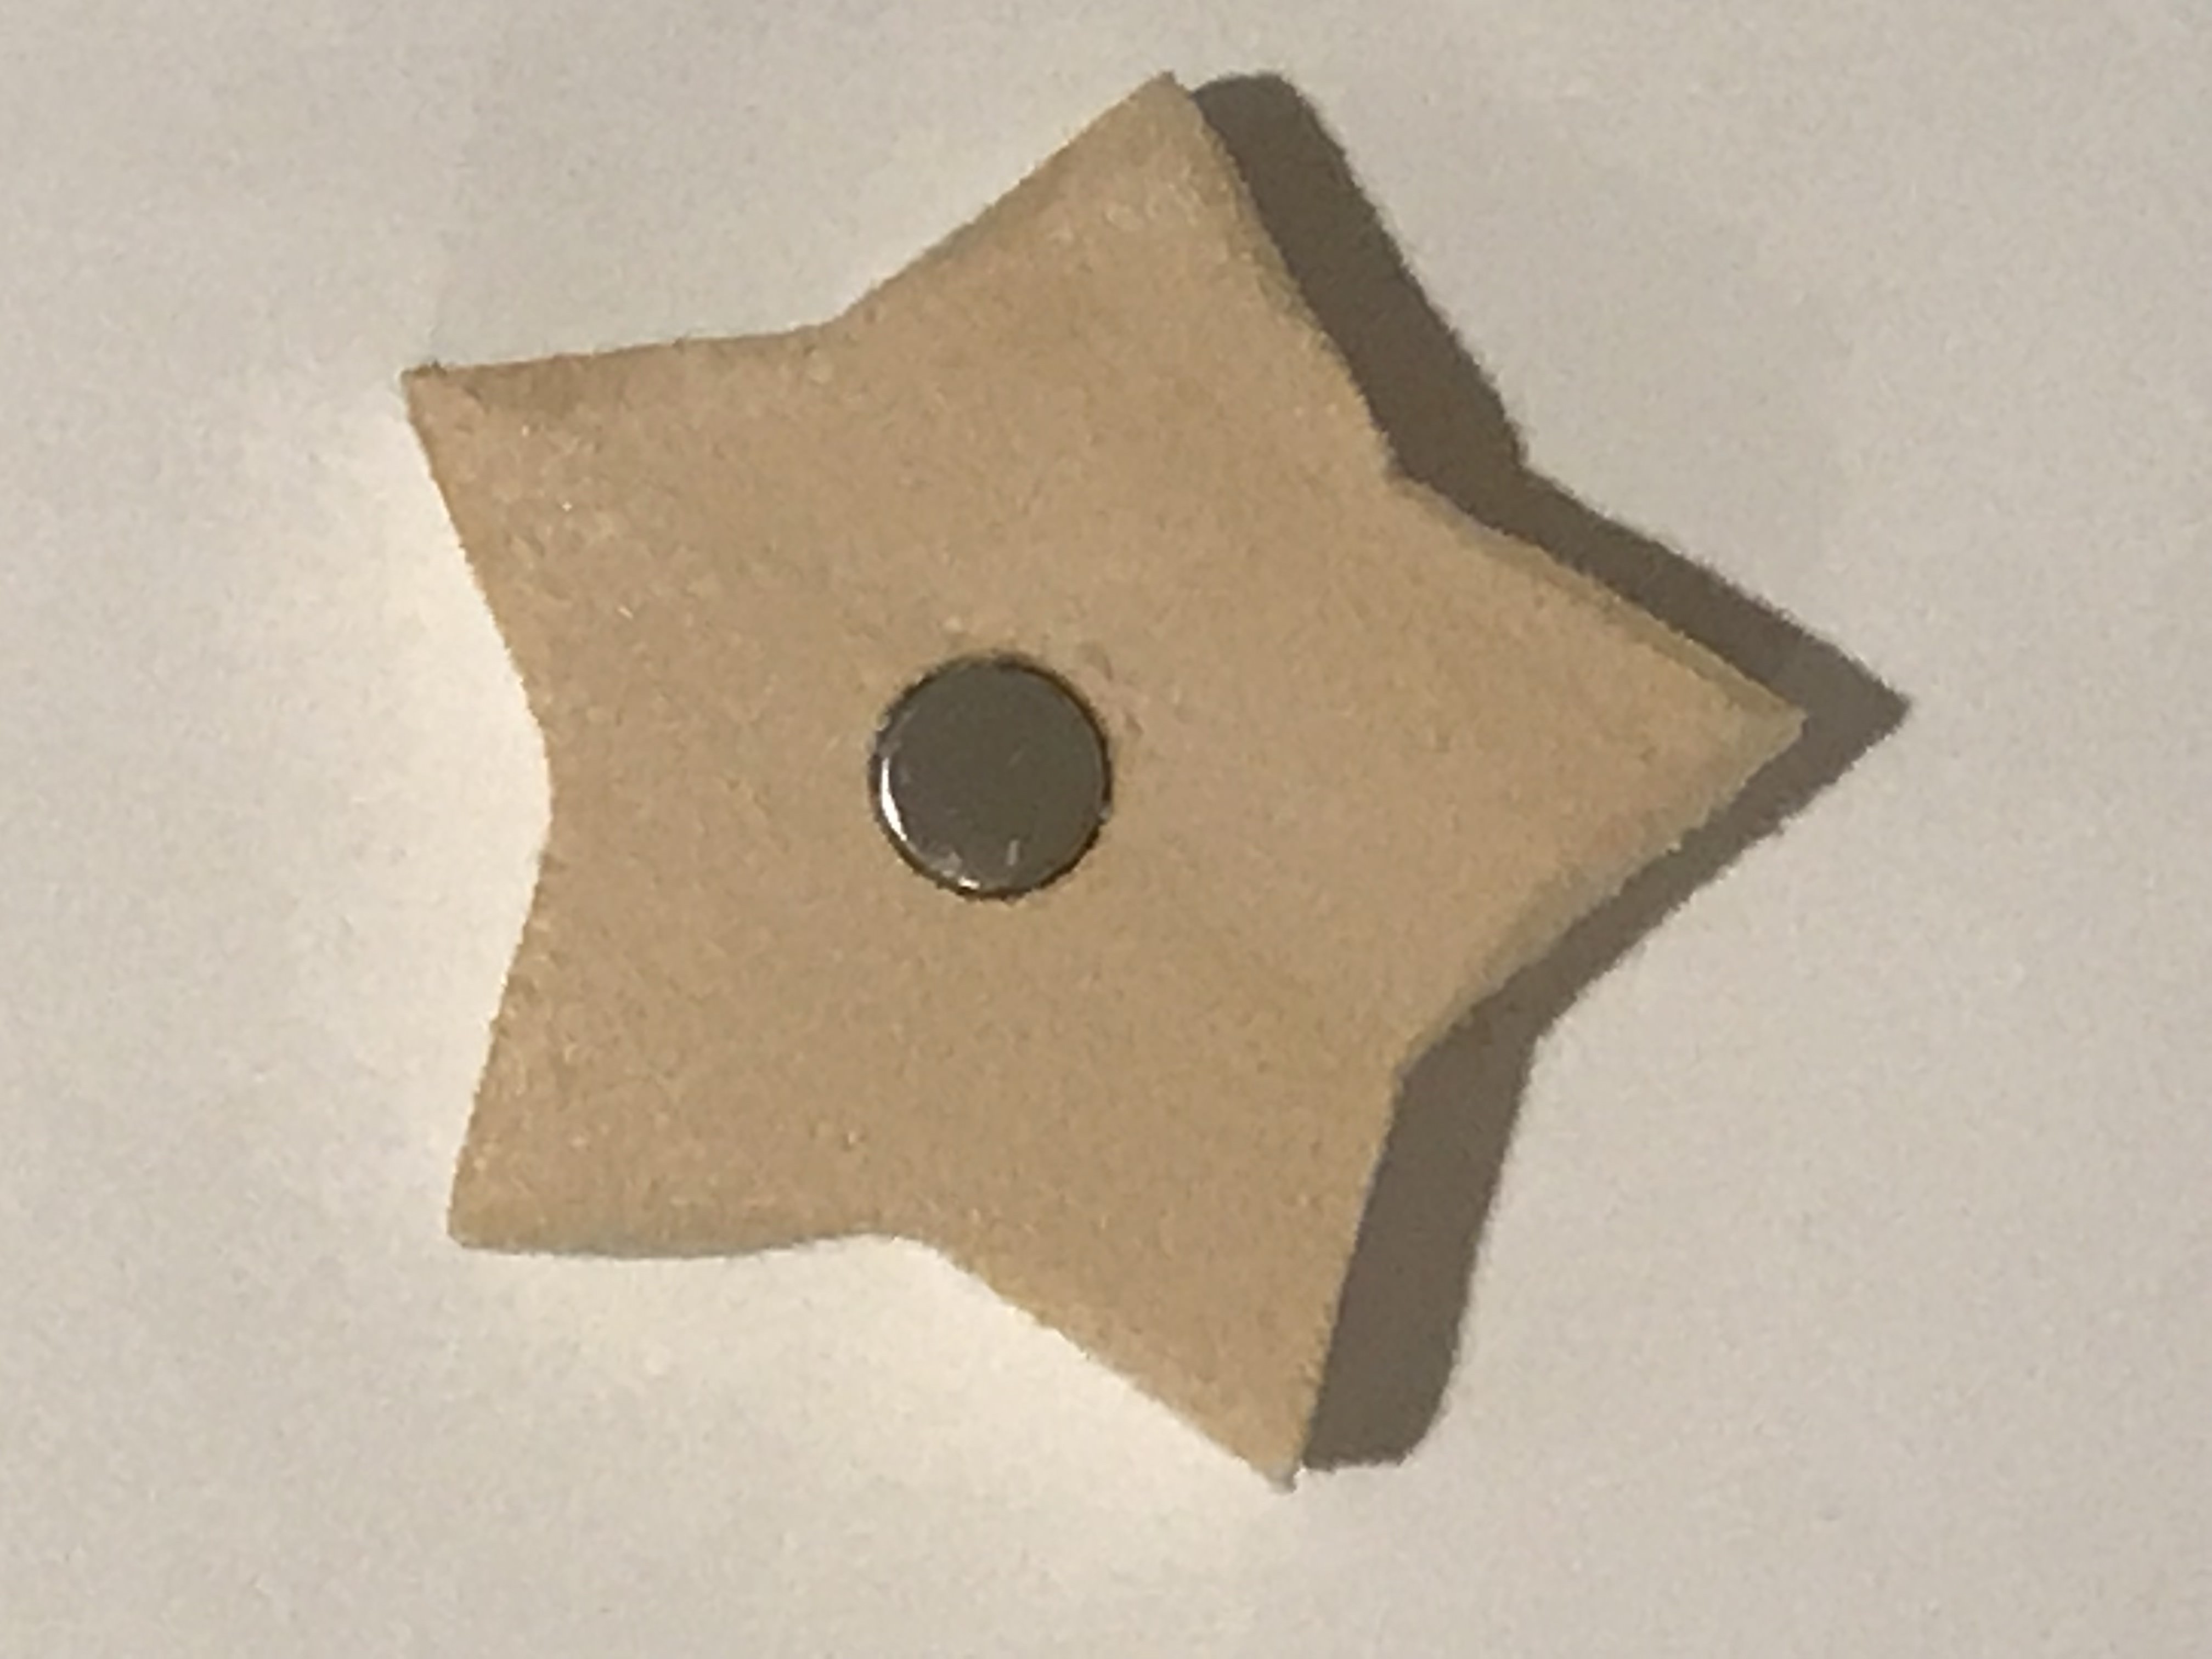
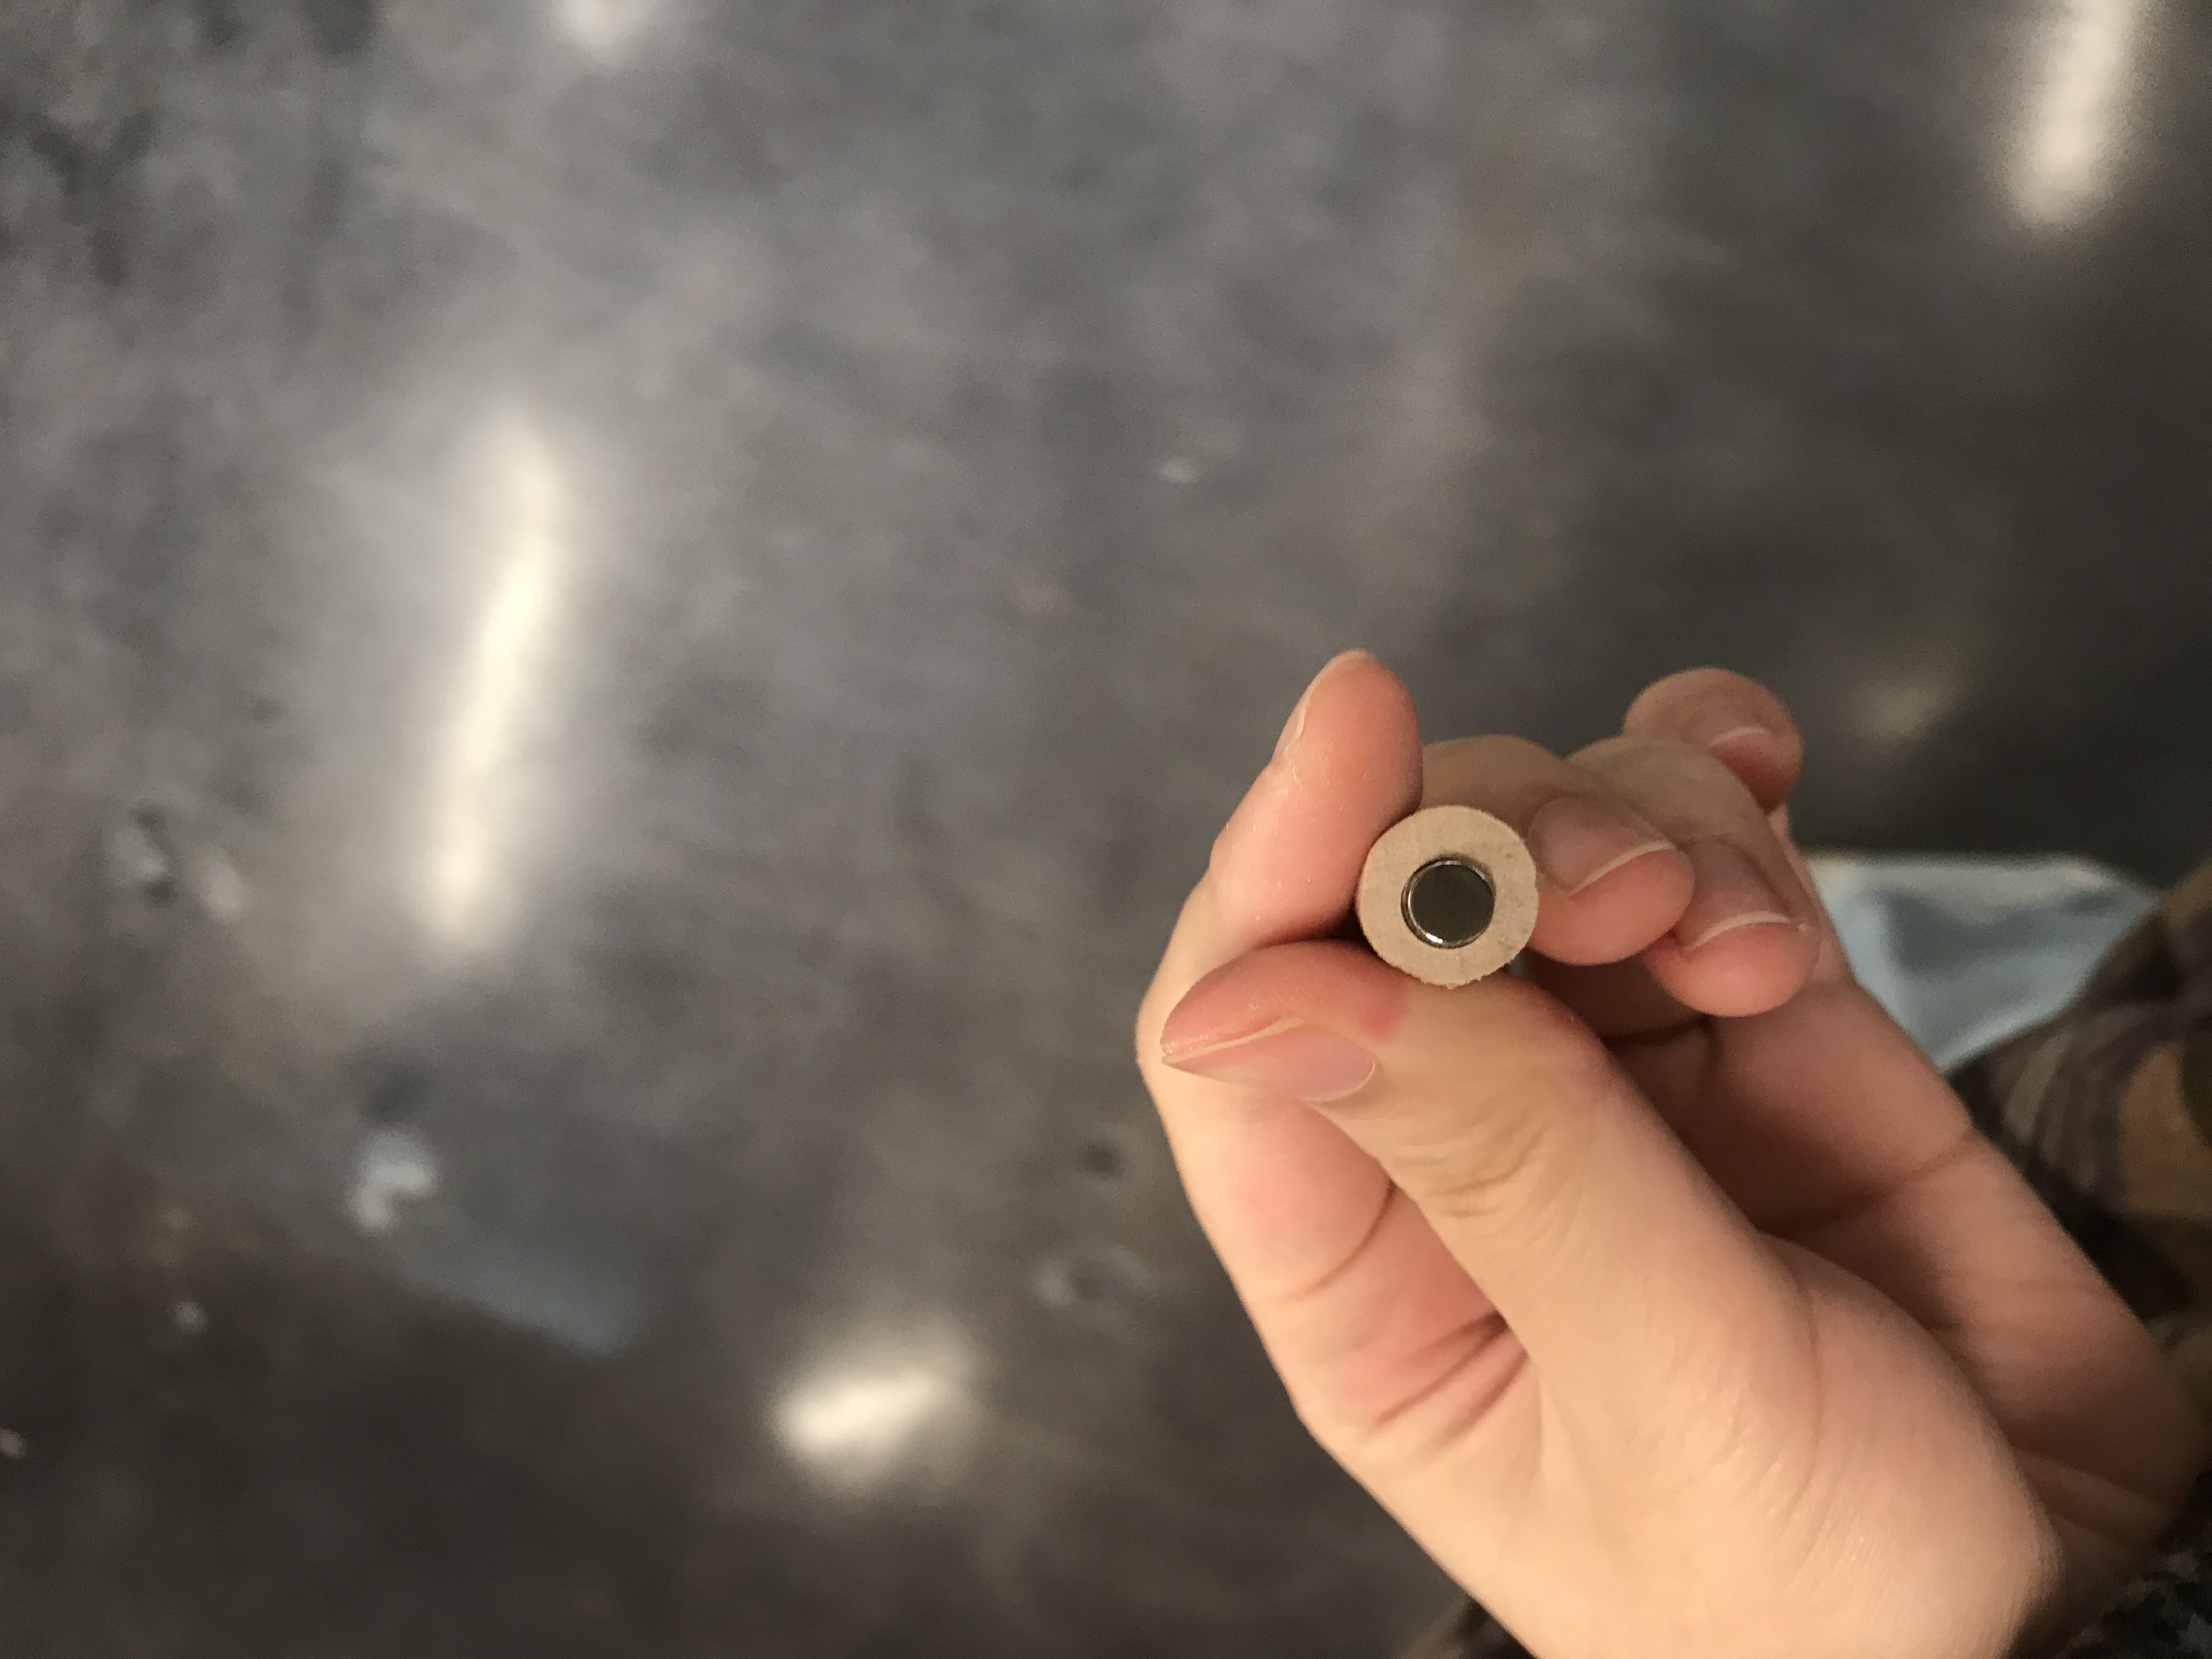
STEP 5 - Gluing the Magnets
I was thinking to use super glue for this--it applys fast, strong, and most importantly, it is very thin. However, after my first star and my hand were covered in super glue and the magnet still live on its own, I took out my hot glue gun. The hot glue gun worked for wood and magnet, however, it is very thick, which my drill wasn't prepared for this, that the glue was kind of flooding over the star, yet,the magnet is still not entirly in the hole: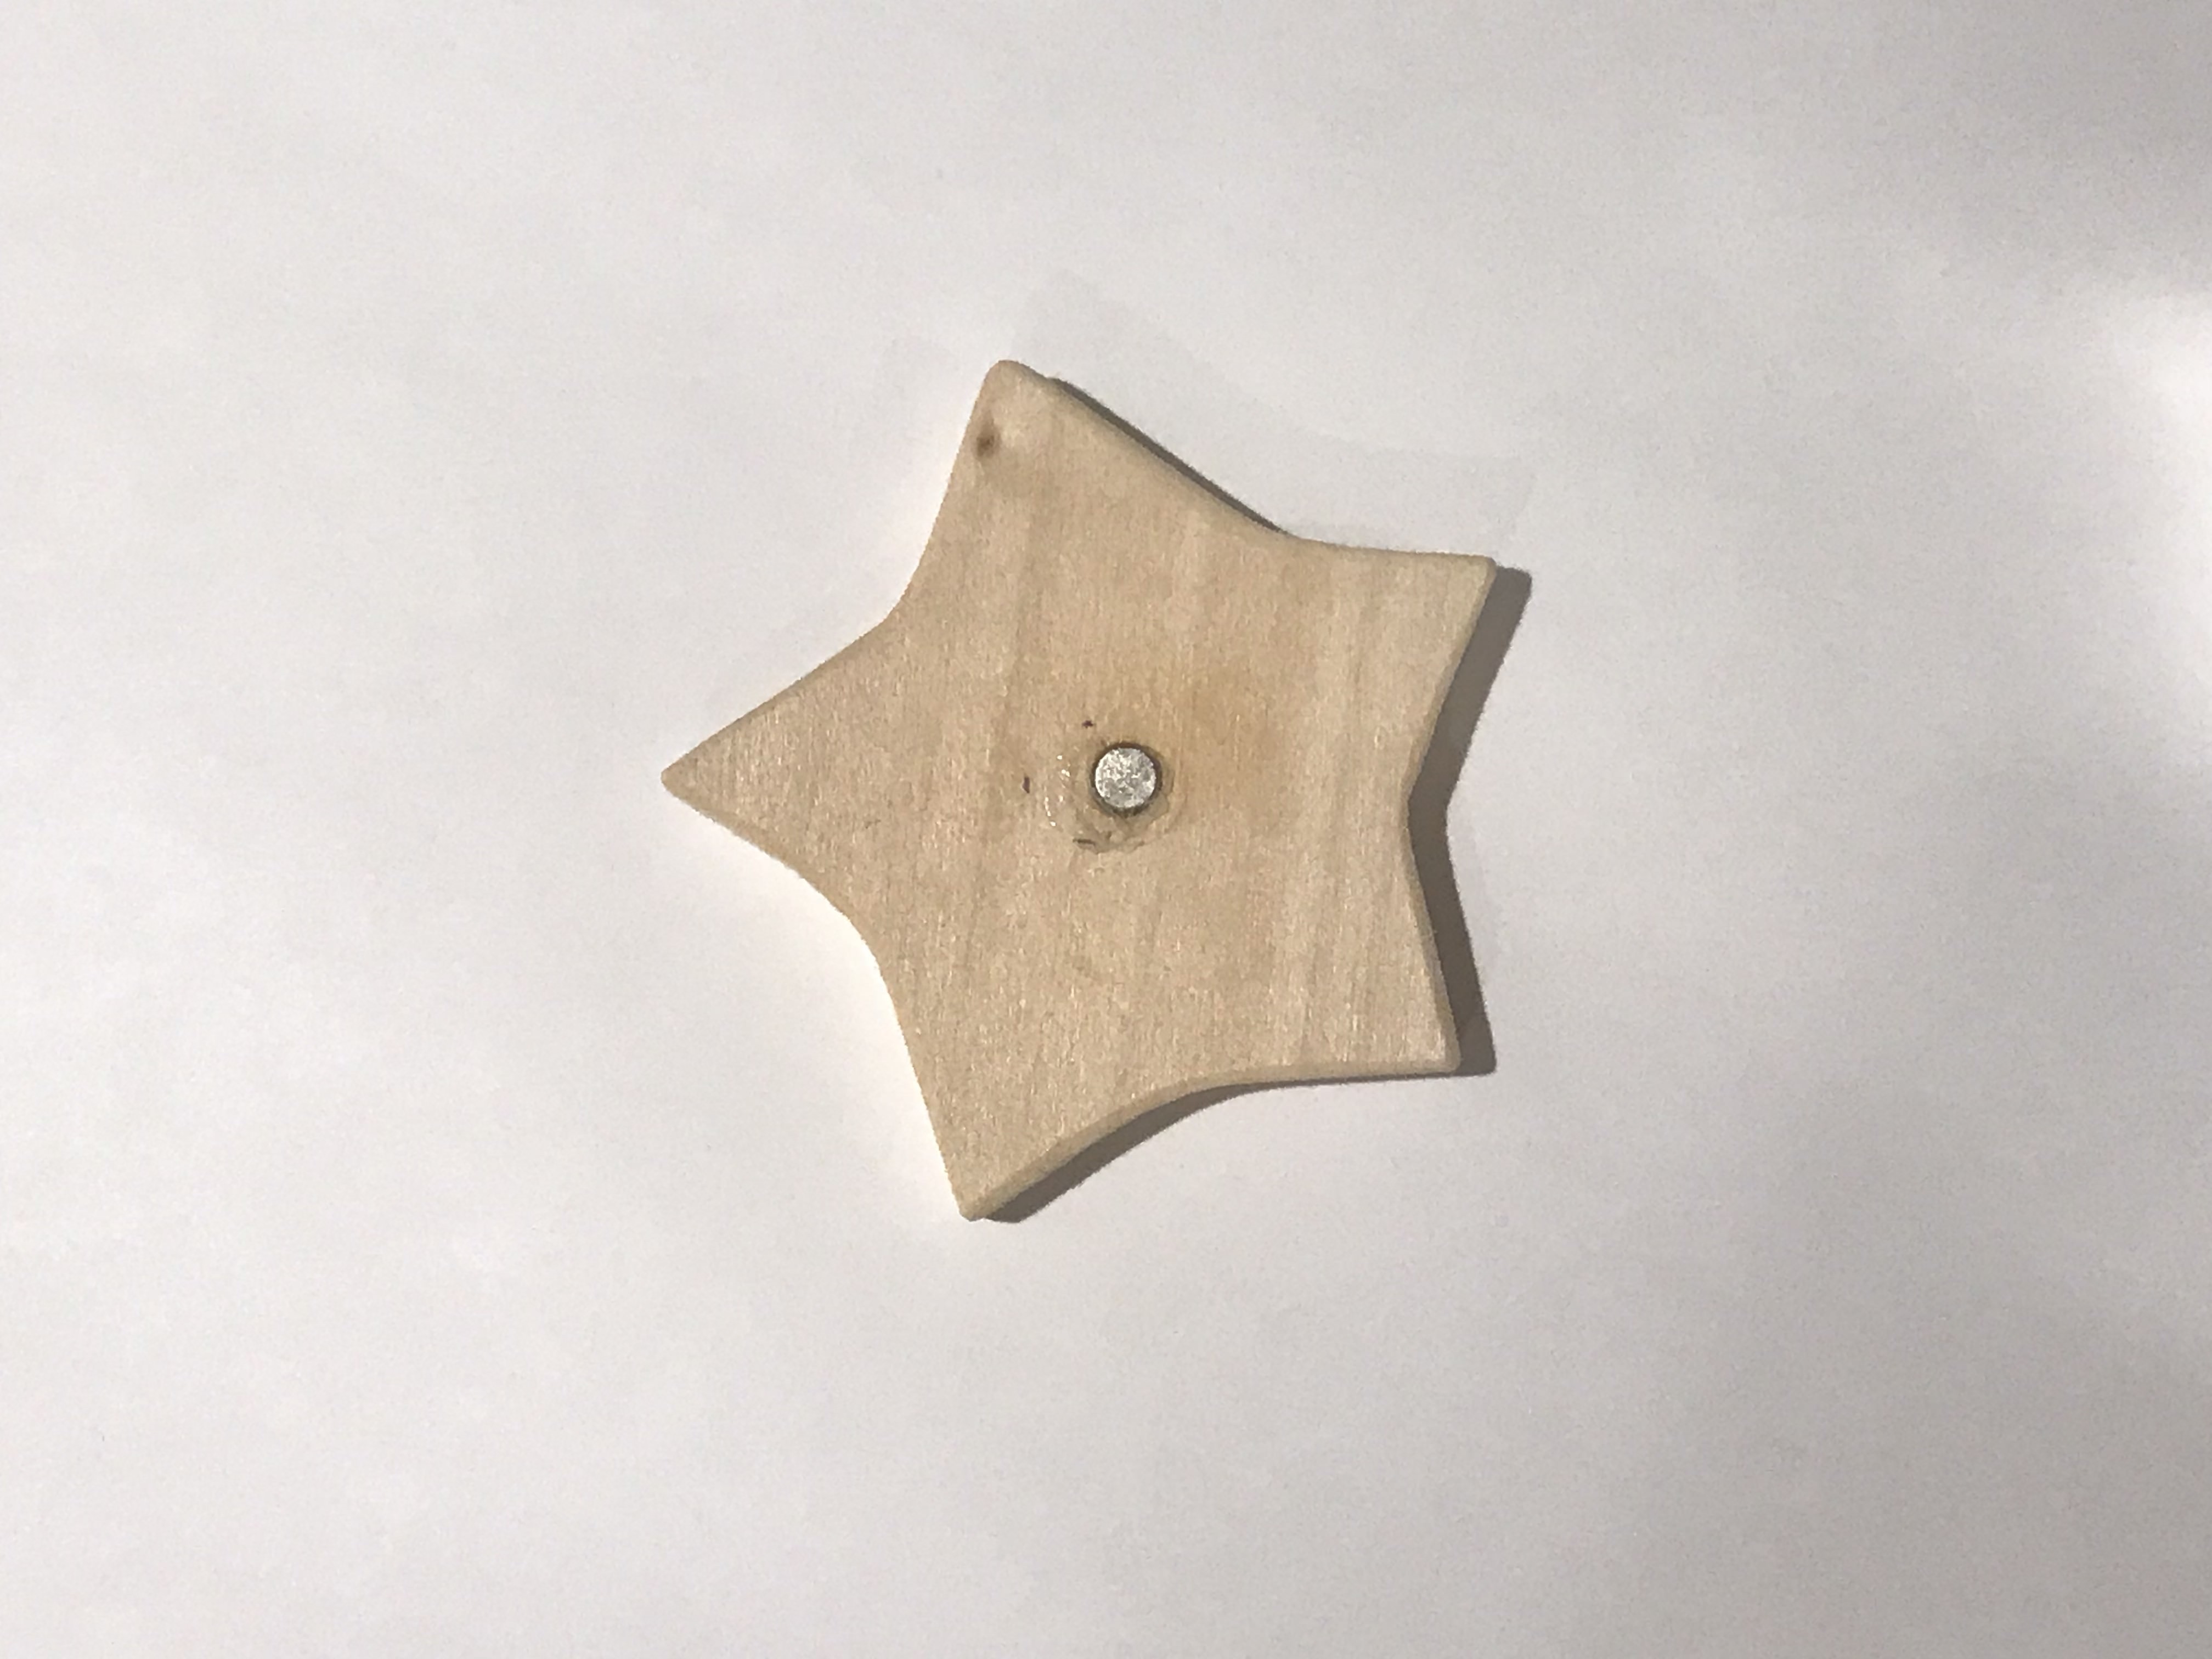
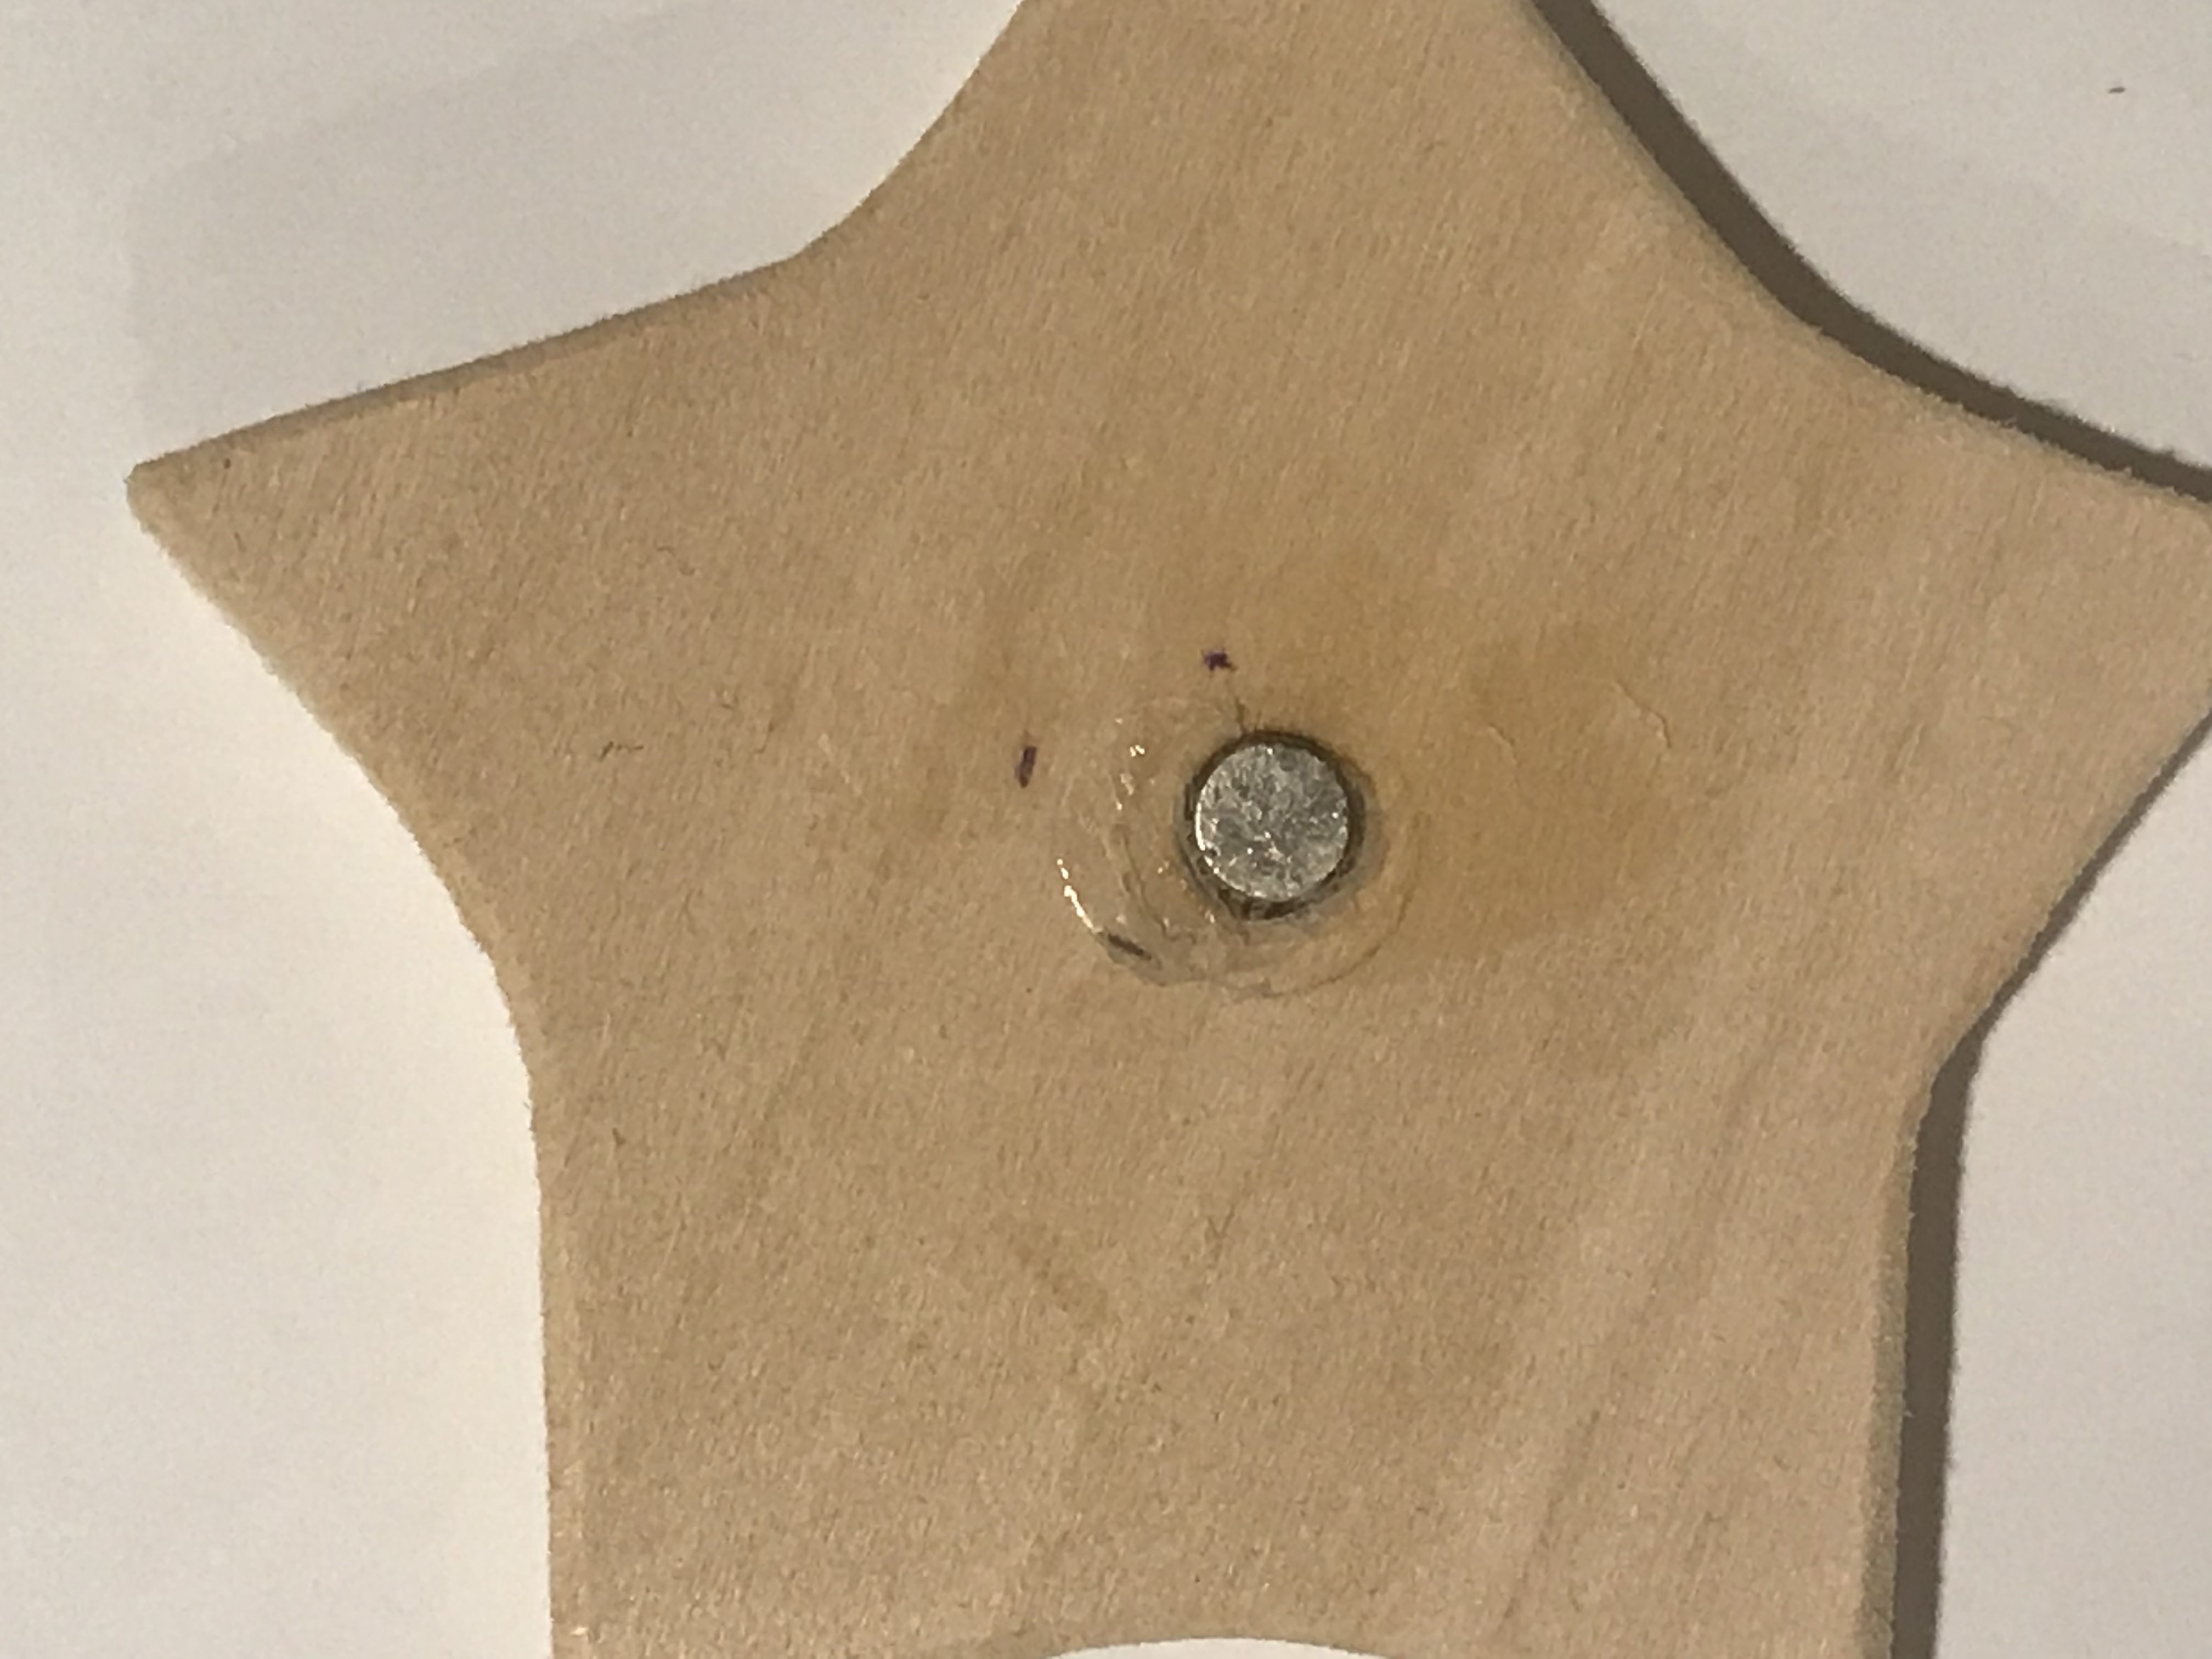
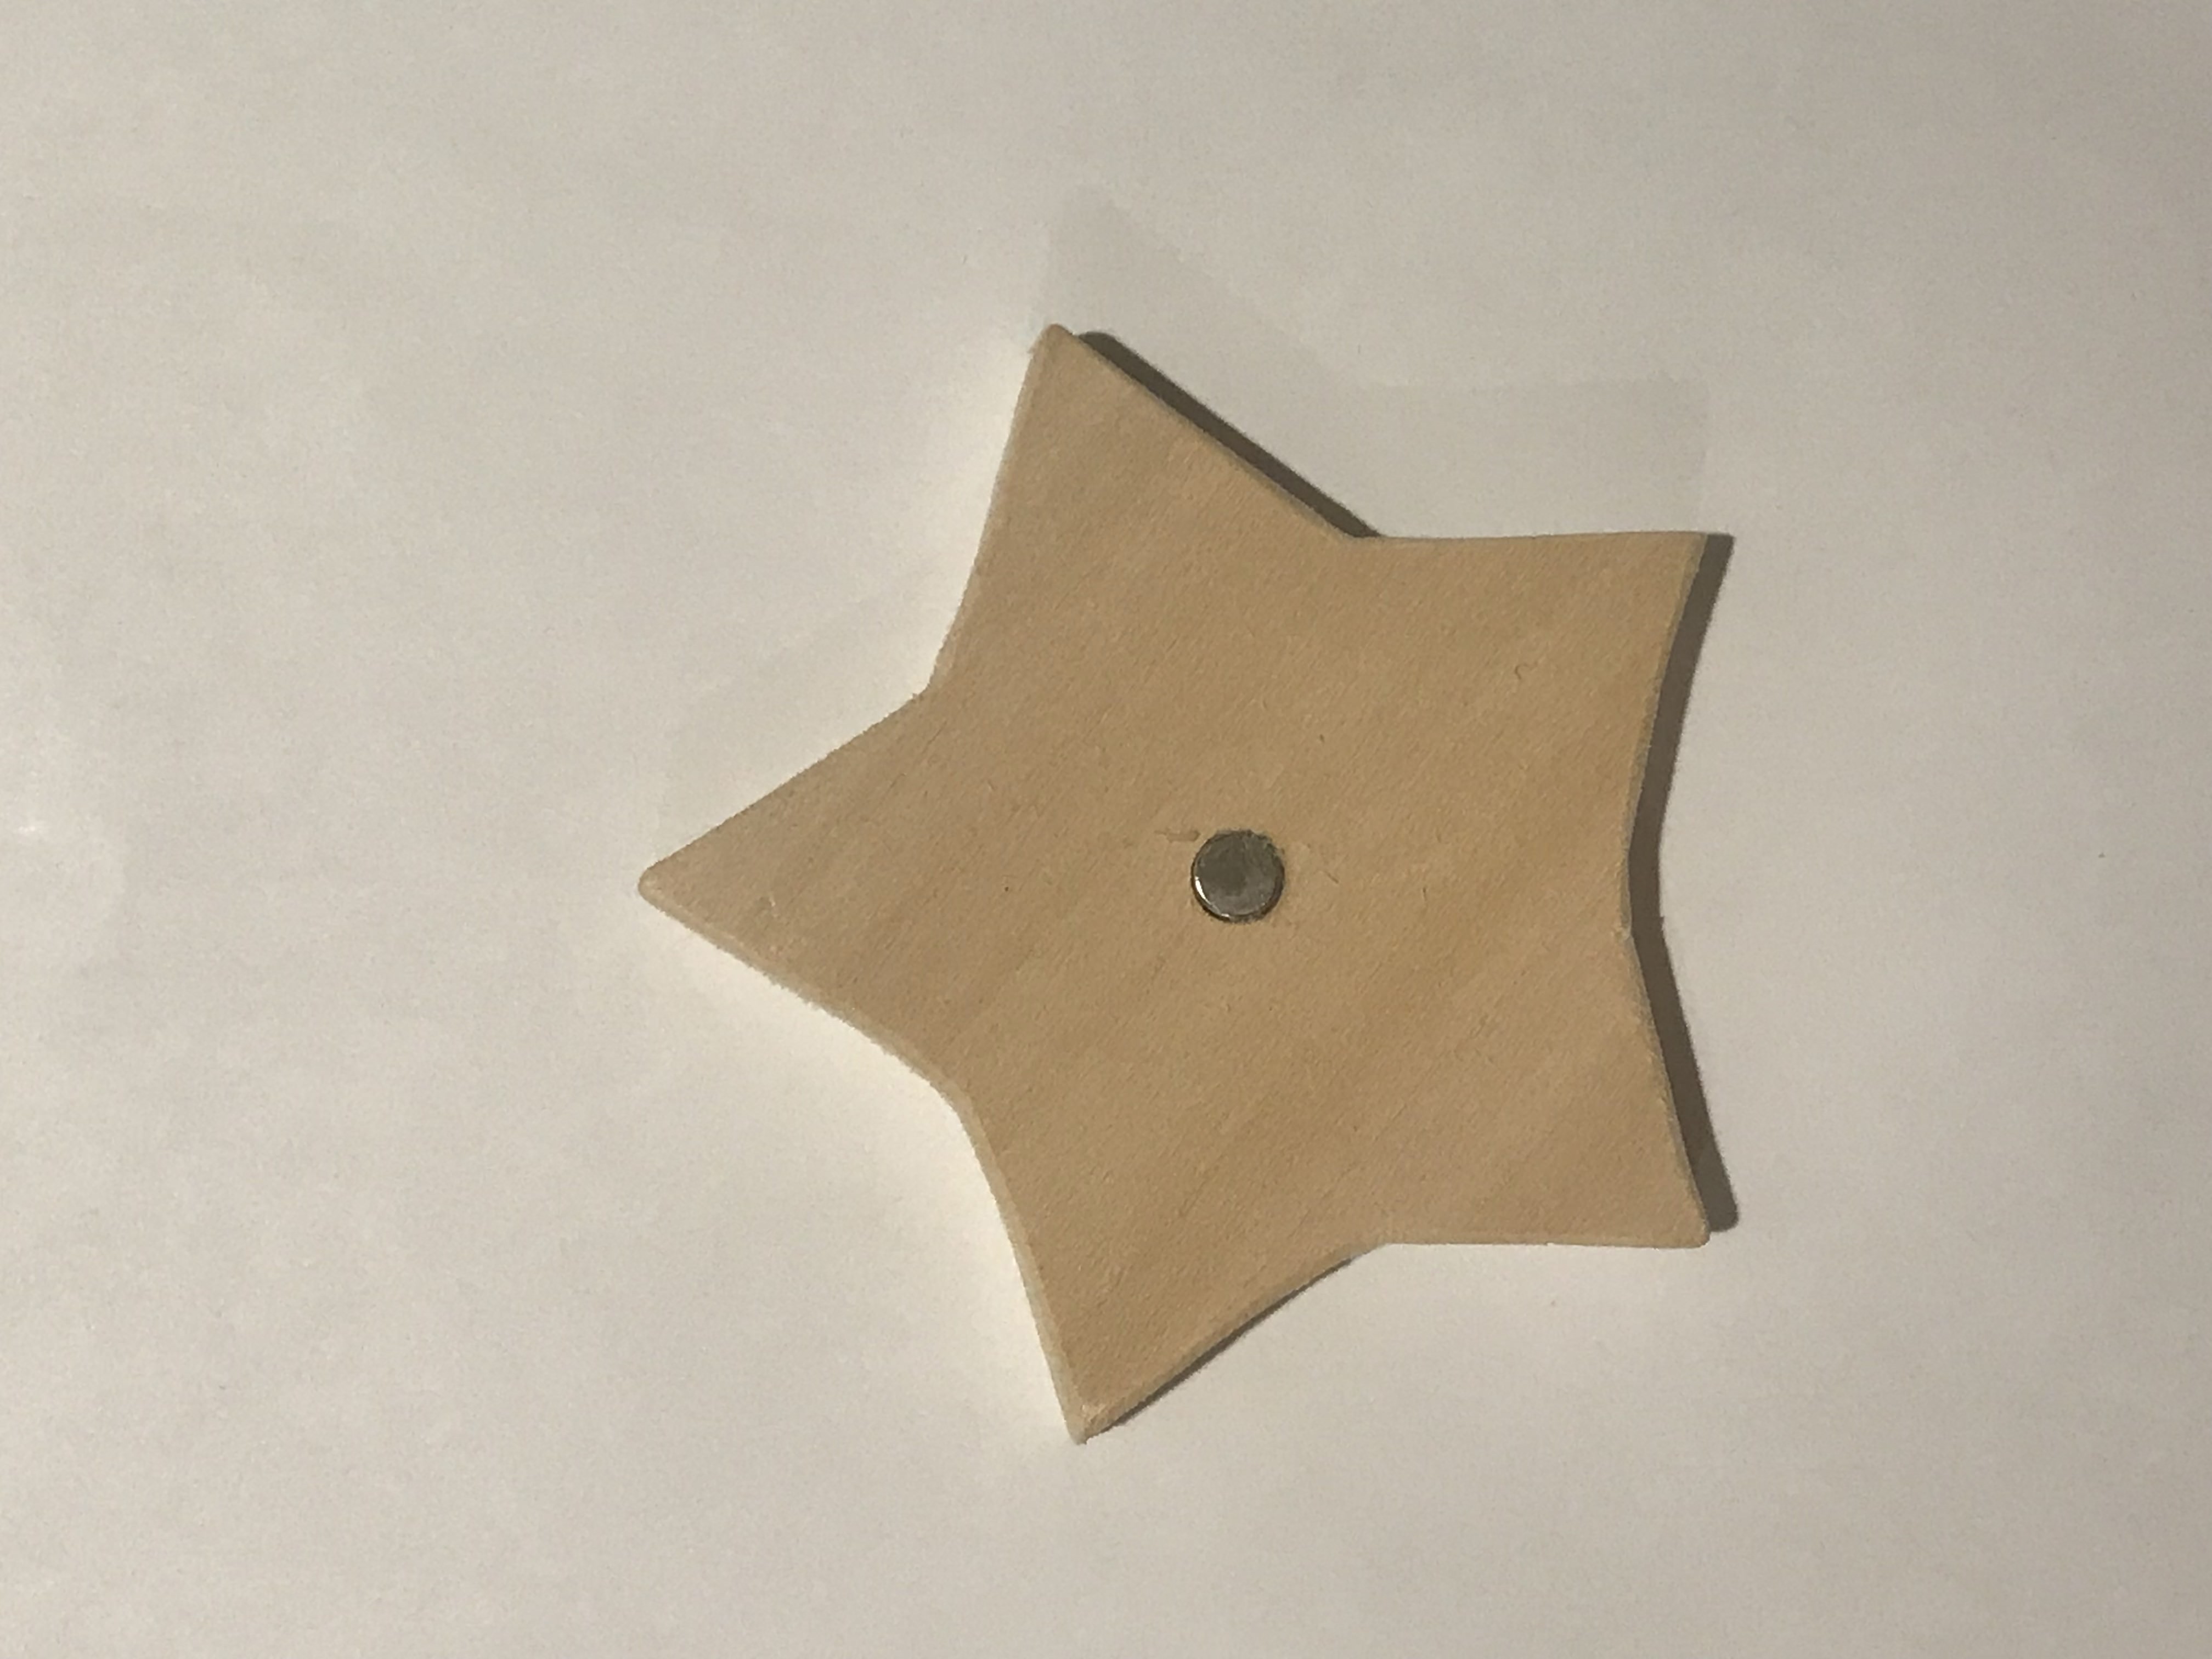
I also made a smaller version of the star:
The Fishing Rod
The head of the fishing rod are done by two drills:A. a thin hole where the string goes through
B. a wider hole for the magnet
I tried two different sizes of magnets:
1. the smallest magnet so that it is the safest on such a small piece
2. the largest magnet that can fit into the radius of this wood.

Week 1 - Flashlight
Documentation


The Sound of Communications, Data 'Music-lizing' June 9th, 2019
This is a project collaborating with Zeyao, working on the data the New York Times collected on HK Protest:
As a "Taiwan Chinese", my identy seemed never to be freed from political topics. My background is, as what I termed it, a multi-chinese-culture. I grew up in Shanghai, my mom is from Beijing, and I am a Taiwan Passport holder. I found myself uncomfortable to either call myself a Taiwanese or Chinese infront of a crowd. I always call myself as Chinese Taipei.
When the HK just started, I see how a tiny snow ball slowly became a large one that could be dangerous.
Why is the snow ball getting larger and larger but no one notice it could happen, or stopping it.
By reading both sides' social media posts, I see both sides are not understanding each other (Maybe not they just can't but they don't even want to understand.)
Inspired by this, what if we put this data into a music piece, as a way to communicate. Since no one will say no to music.
Week 7 - 20 - 60'' composition
After I updated my Mac, nothing's working... I tried to reinstalled the Soundflower but it still didn't work.
But I think the shape of the envolope is also intriguing.
Week 6 - Melody: Design and Code / Pcomp - Coin Piano
Design

Inspired by my sketch last week--the melody sketch of the song 'Haru-yo, Koi'--I started with playing around the tutorial by changing the values of the octave, bars, beats and etc.
And I came up with this:
Also, I have a version with guitar chords (I wish I could've recorded my own samples since I couldn't find better ones, but I lent my guitar to my younger brother...) >> SKETCH
And then I want to move forward to the real thing from scratch, but after this line of code, my p5 stopped working (only for that very bottom line of code):
So, instead, I move on to a similar idea...
Lines that play sound: and here's the real thing A.k.a the code
I simplified my previous code (which is already pretty simple...) and which it reminds me of a guitar... so I think why not a p5 Guitar...
Concluding and Reflection
Compare to my last assignment, which was more playful and less informative, I figure that I'm having for fun when the pattern is obvious for melody. For each chord, I try to show the position of the fingers. I take this as a warmup for my original idea, since it is now only playing notes instead of a continuous melody. A major thing that's also missing now is the fingerpicking. The next step will definitly be having a play button that toggles a demonstration or a select DOM that you can choose which of the fingerpicking you want to play.
Week 5 - Melody Sketch, Interact and Code
interface Sketch for Haru-yo, koi
This is an old song that was used in a Japanese drama with a scene of falling cherry blossom that the music fits the speed of the falling flower.I do not want to be effect by the visual elements too much, so I listen to it again without any visual interruption, noticing that the opening notes are very recognizable individually. It make me feels like it is glass balls that's tied to strings hanging somewhere and it will ring if someone touches it (I know it physically cannot happen just by tocuhing it, but). The Oblique Strategy I got is "decorate, decorate", so I might want to develope this into something space-like. Maybe turning the hanging glasses into stars? So that it make more sense for it to be floating.
Interact with Kandinsky and Baseline
KandinskyI've learned piano and a little bit of guitar when I was young, so I know some basic relationship of notes. When I was interacting with this interface, I first found interesting since as I mentioned before, I want to do something related to drawing and painting, however, when I started to find the relationship of the melody and the painted line, there isn't much. Only the position (the height) will affect the notes, but neither the lenght nor the postion of x-axis affect any of the melody. I also do not know why the thickness of a line involved in this when it doesn’t belong to any attributes to the melody played. It will be fun for people who didn't notice it. After noticing the magic behind it is only the position of the y-axis it seems less fun. Also, not that educational.
Baseline
This one is more educational--all elements are stated clearly--each notes, bars, the source of the sound. There’s also preset melody that allow the user to base off from something. I like how only the selected elements in the entire page is in vivid color so that after some reading of the text, it feels like it’s saying “here comes the fun part”.
Week 3 - Sketches, and Documentation on Drawing Beats
7 Sketches
In n class I discussed with my classmates on what sort of interface or way of interact that has not usually seen. And we came up with these three: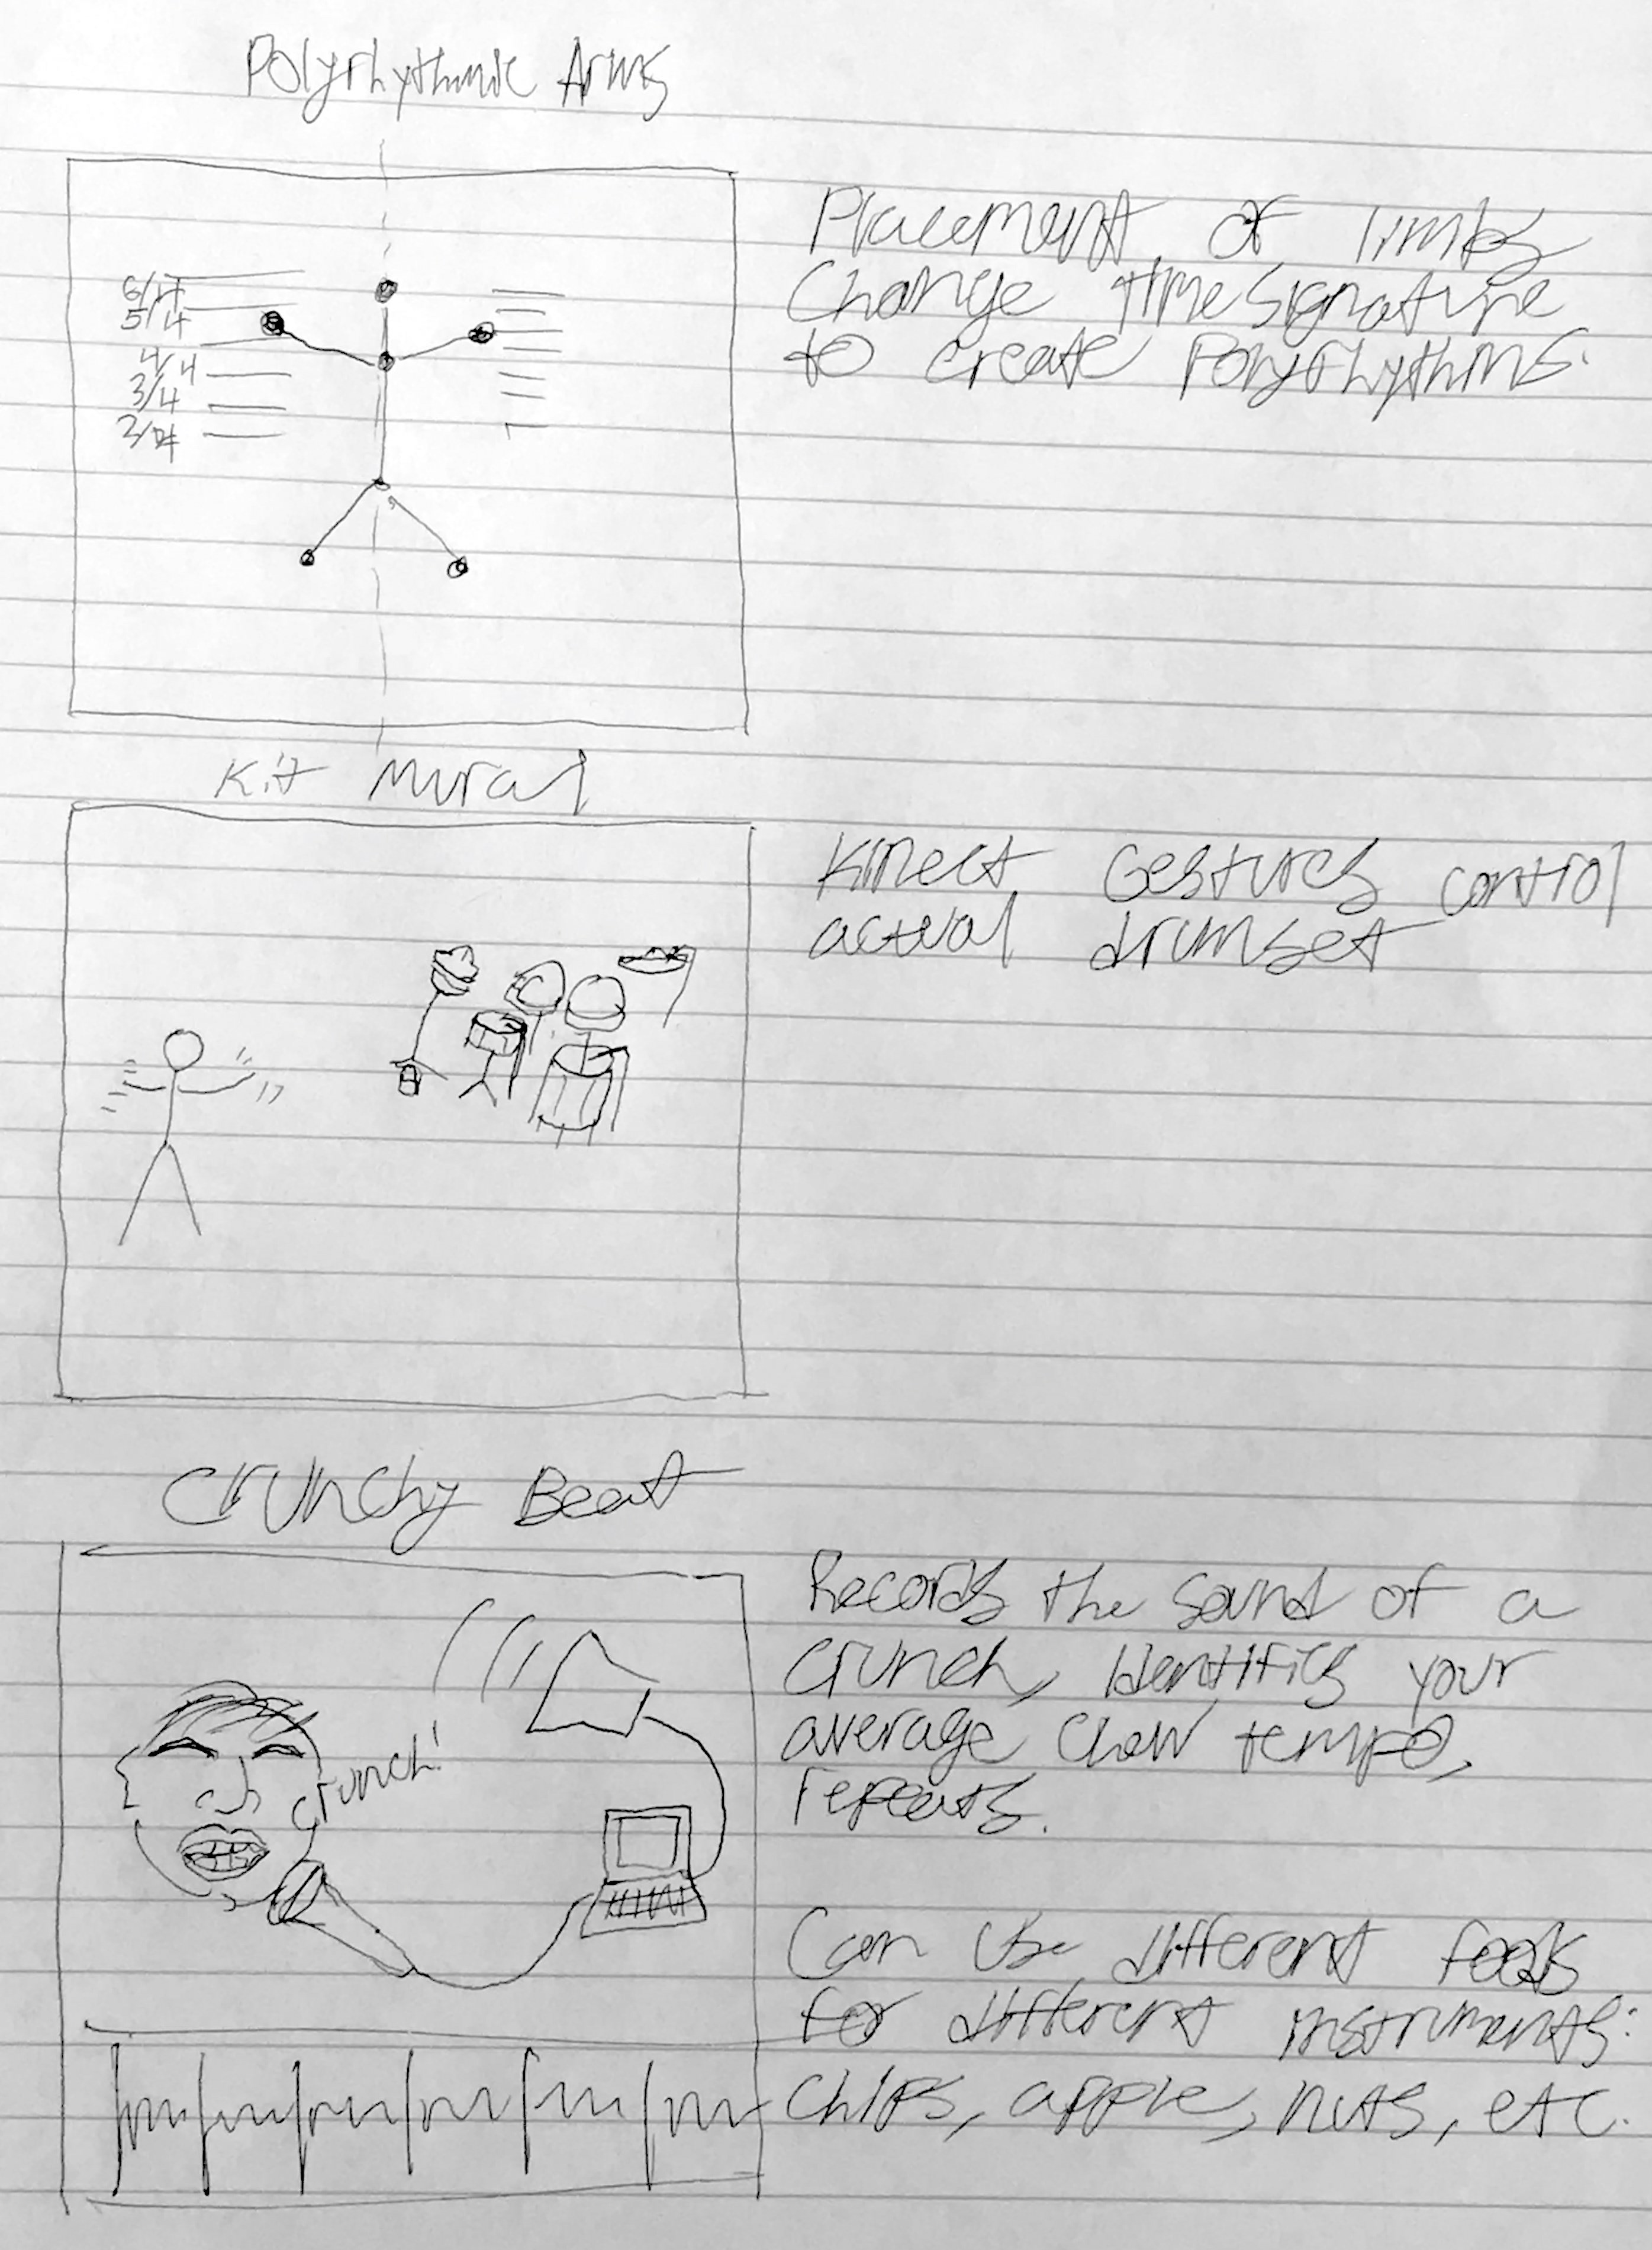
The very first one is when the hands are detected by the computer, and you are able to control one rhythm on each hand, so it allows you to simply understand cross-rhythm. The second one, thinking similarly, that the computer detect the human body, and turn each part of you body into the parts of an instrument, in this case the drum. We want to input and the output still be very physical and straight forward. In this interactivity, it also shows how the rhythms can be understood by our body. The third one is thinking about beats in real life, such as doing basketball, all kinds of sports and also the beat when we eat. In this interface, all different kinds of food in one category will be laid out (for example, only fruits / all sorts of chips / candies). So if we have fruits as our theme this time, every one who participated will be contributing one chewing sound, and each different kind of fruits will represent one track. (People who eats apple will all contribute one apple sound, and that will be the apple track.)
Here are some more thoughts that I had when I went back home, starting from top to bottom, left to right:
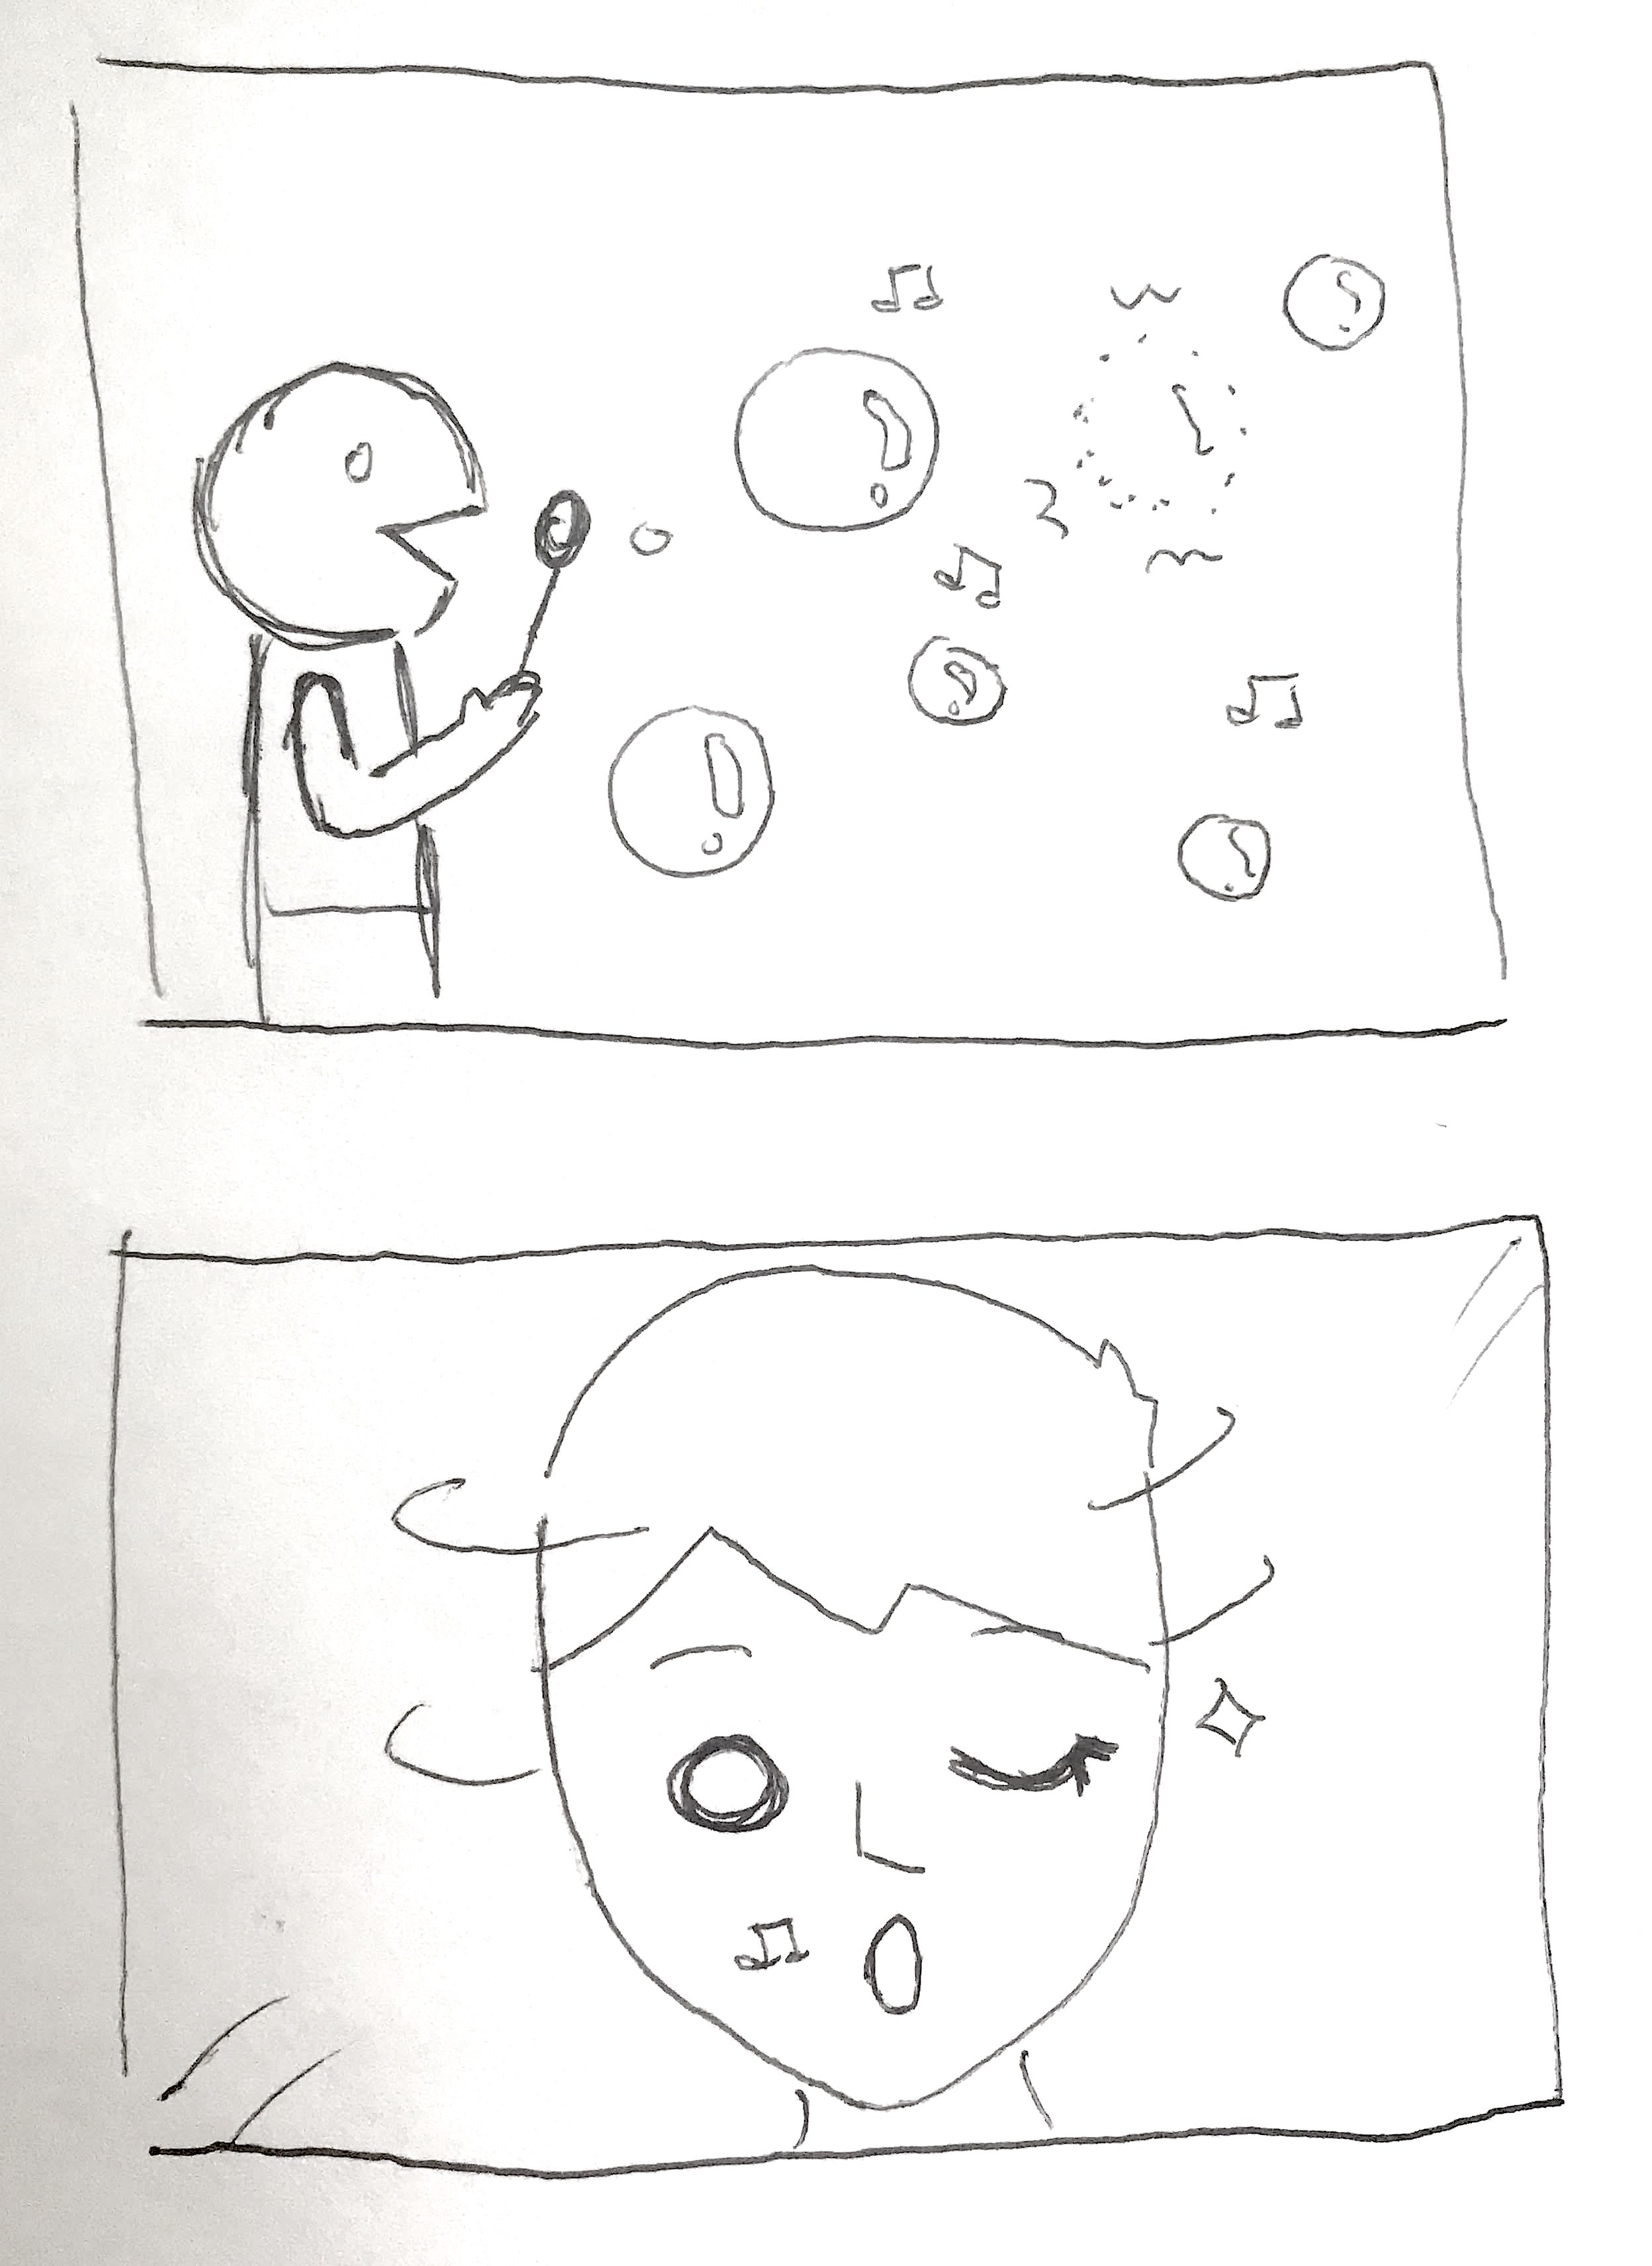
1. The Bubble Beat - where the size, position and state of the bubble decide the sound of beat. For example, the sound might be deep and slow if a bubble had just been blew and is big and near to the ground. When the bubble pops, it gives a slightly higher pitch and sharper beat.
2. Face as Instrument - as shown in the image, each part of the face will be attached to one sound, and when you move each part accordingly, it will create beats.
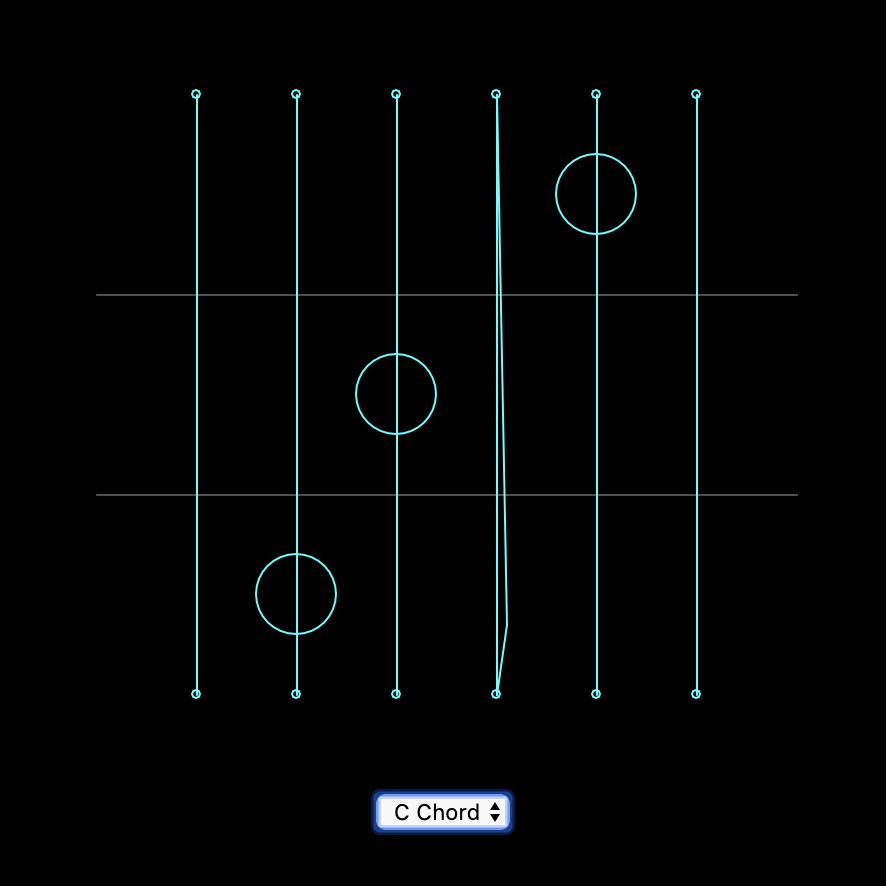
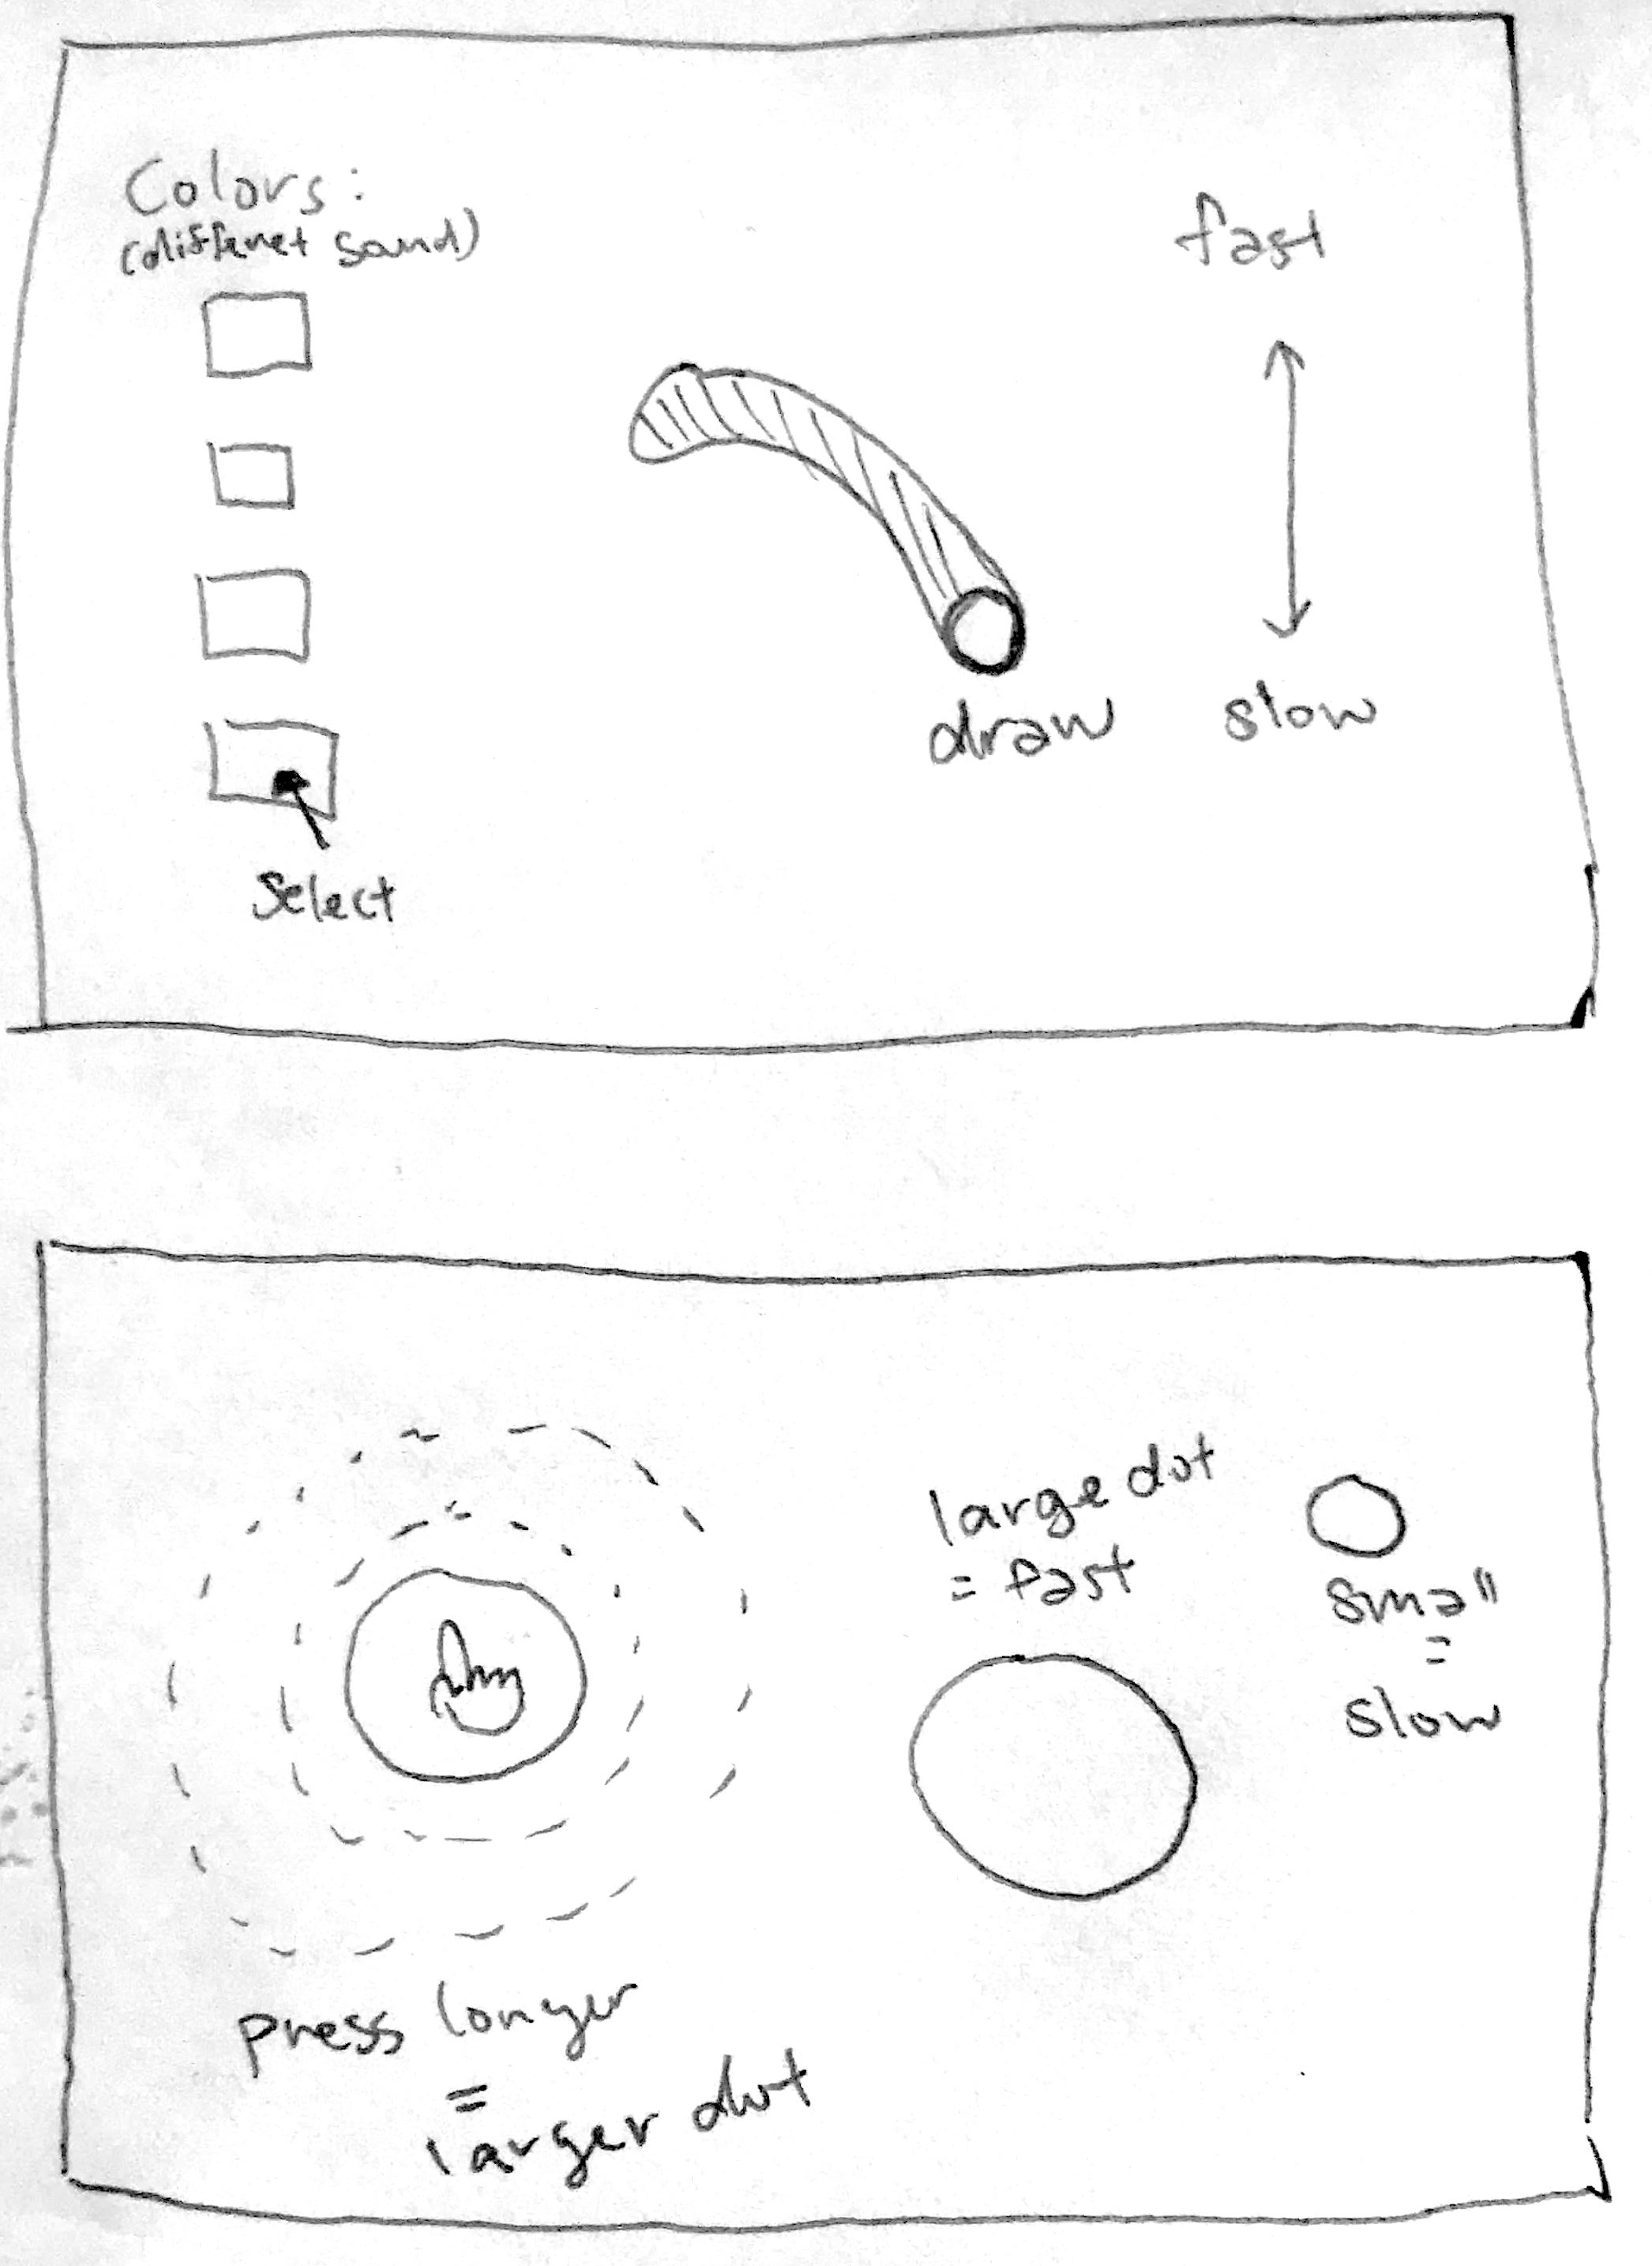
3. Drawing Beat - I always wanted to combine drawing and music within an interface. Different color each represent different sound of beats and the position our the mouse decide the bmp of the beats.
4. Balloons - This is also a web interface where when you press the mouse, the longer you press, the bigger the circle and faster the beat will be.
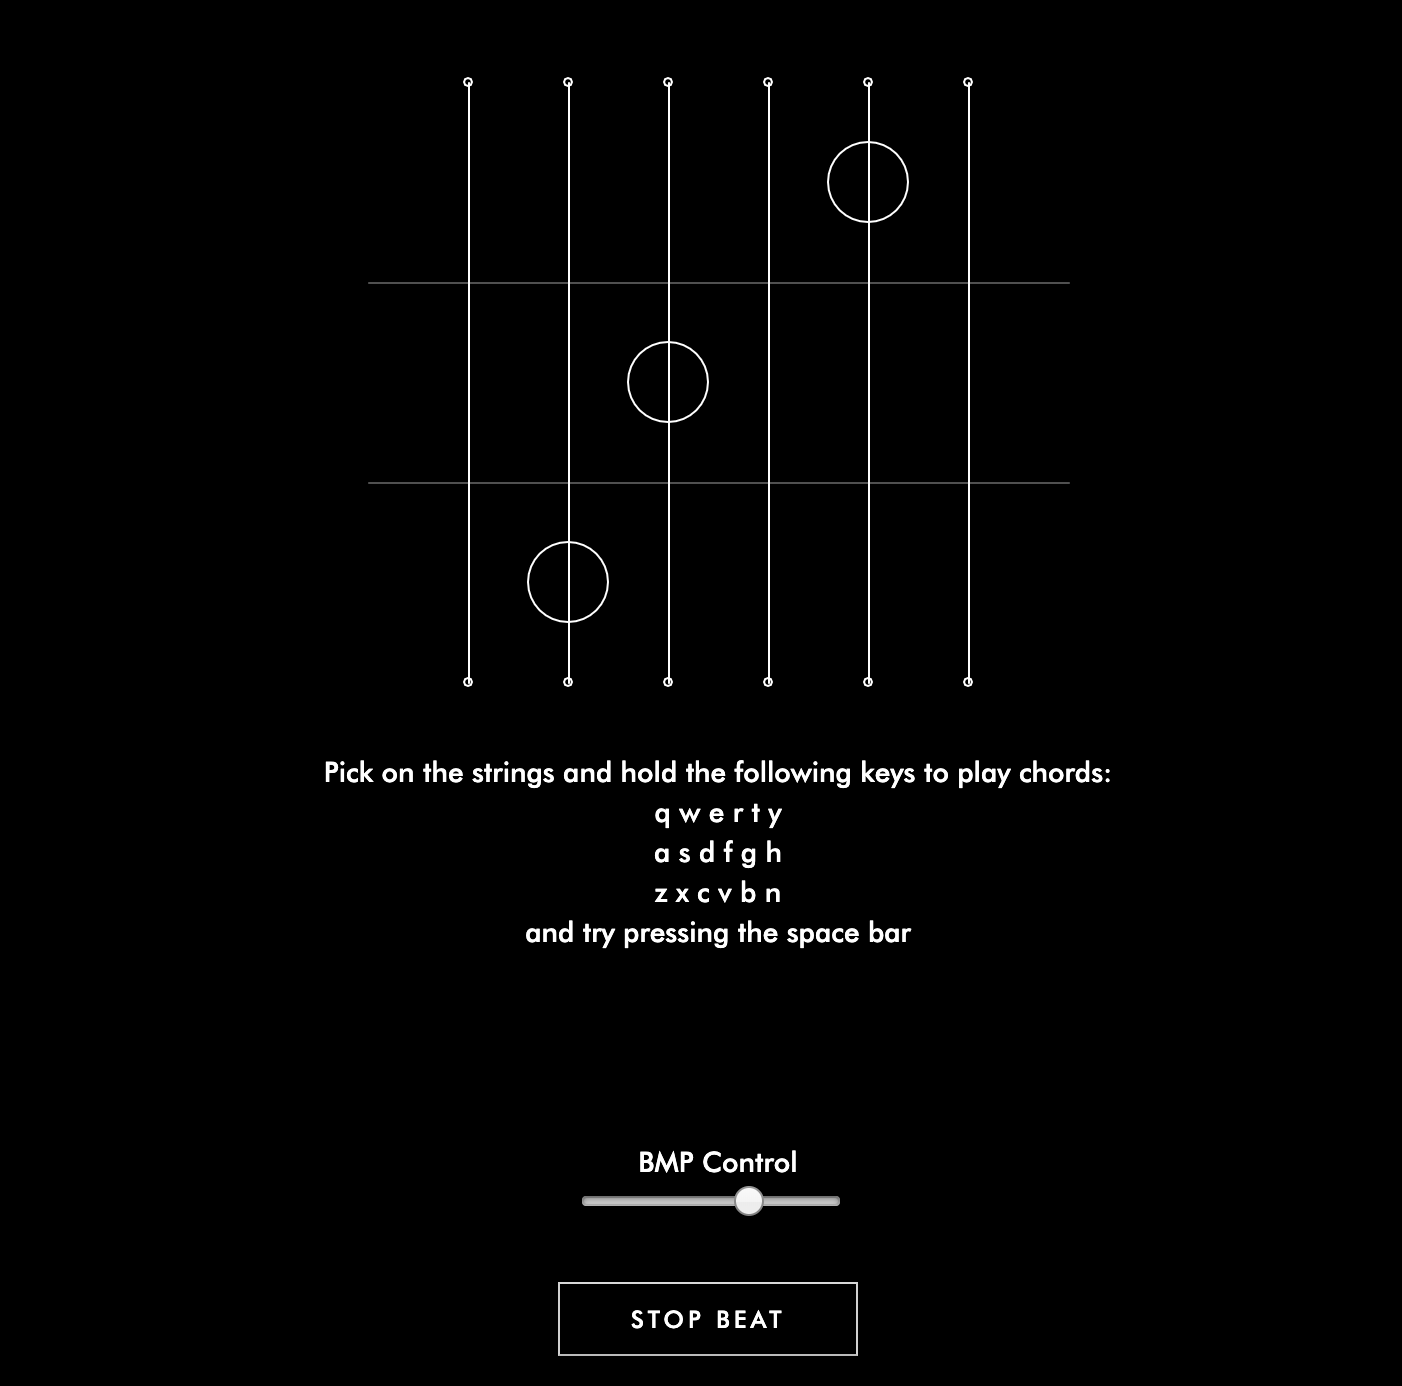
Drawing Beats
As I mentioned earlier, I always wanted to combine drawing and music into one interface. I want to connect colors, sizes and shapes to different attribute of music. I want to make beats to draw and to use the rythme music to create pattern in visuals.How it works:
1. Hihat - the background and 'd' on keyboard.2. Kick - 'a' on keyboard.
3. Synth - 's' on keyboard.
4. BPM - controlled by the slider, from slow to fast
5. Pause - button on the left bottom corner or space key
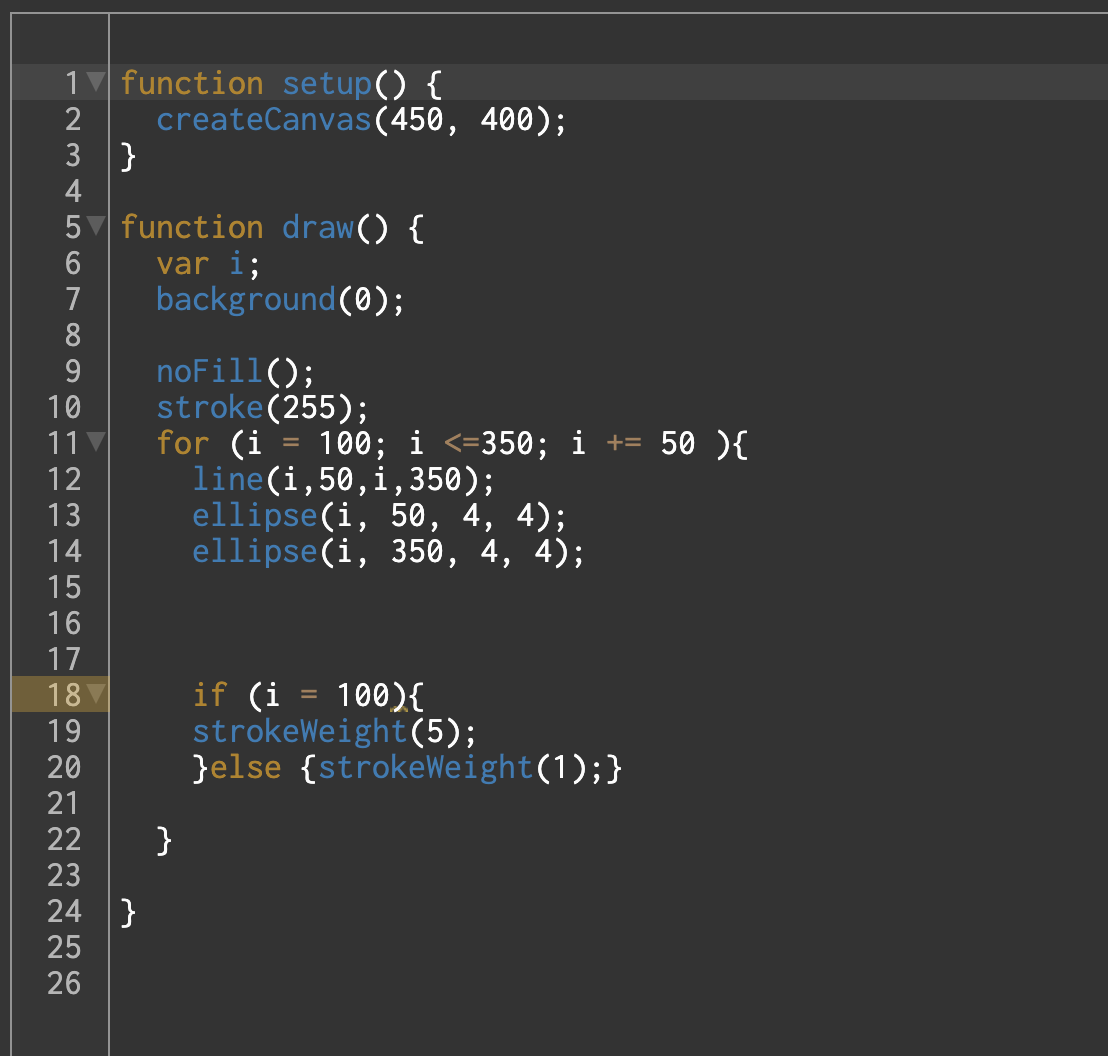
And I had this at first:
When you download the image
.png)
However, this is a little too much black, which make it hard to see the circles that represents the beats, so I changed the visual a little bit.
.png)
See the code here!
Week 2 - Analyze rhythm interfaces
I did four instead of two because I feel very uncertain on how to do this. I found myself constantly changing my standards as I moved on to the next interactive webpage. Below is a graph with my self understanding of each criteria:
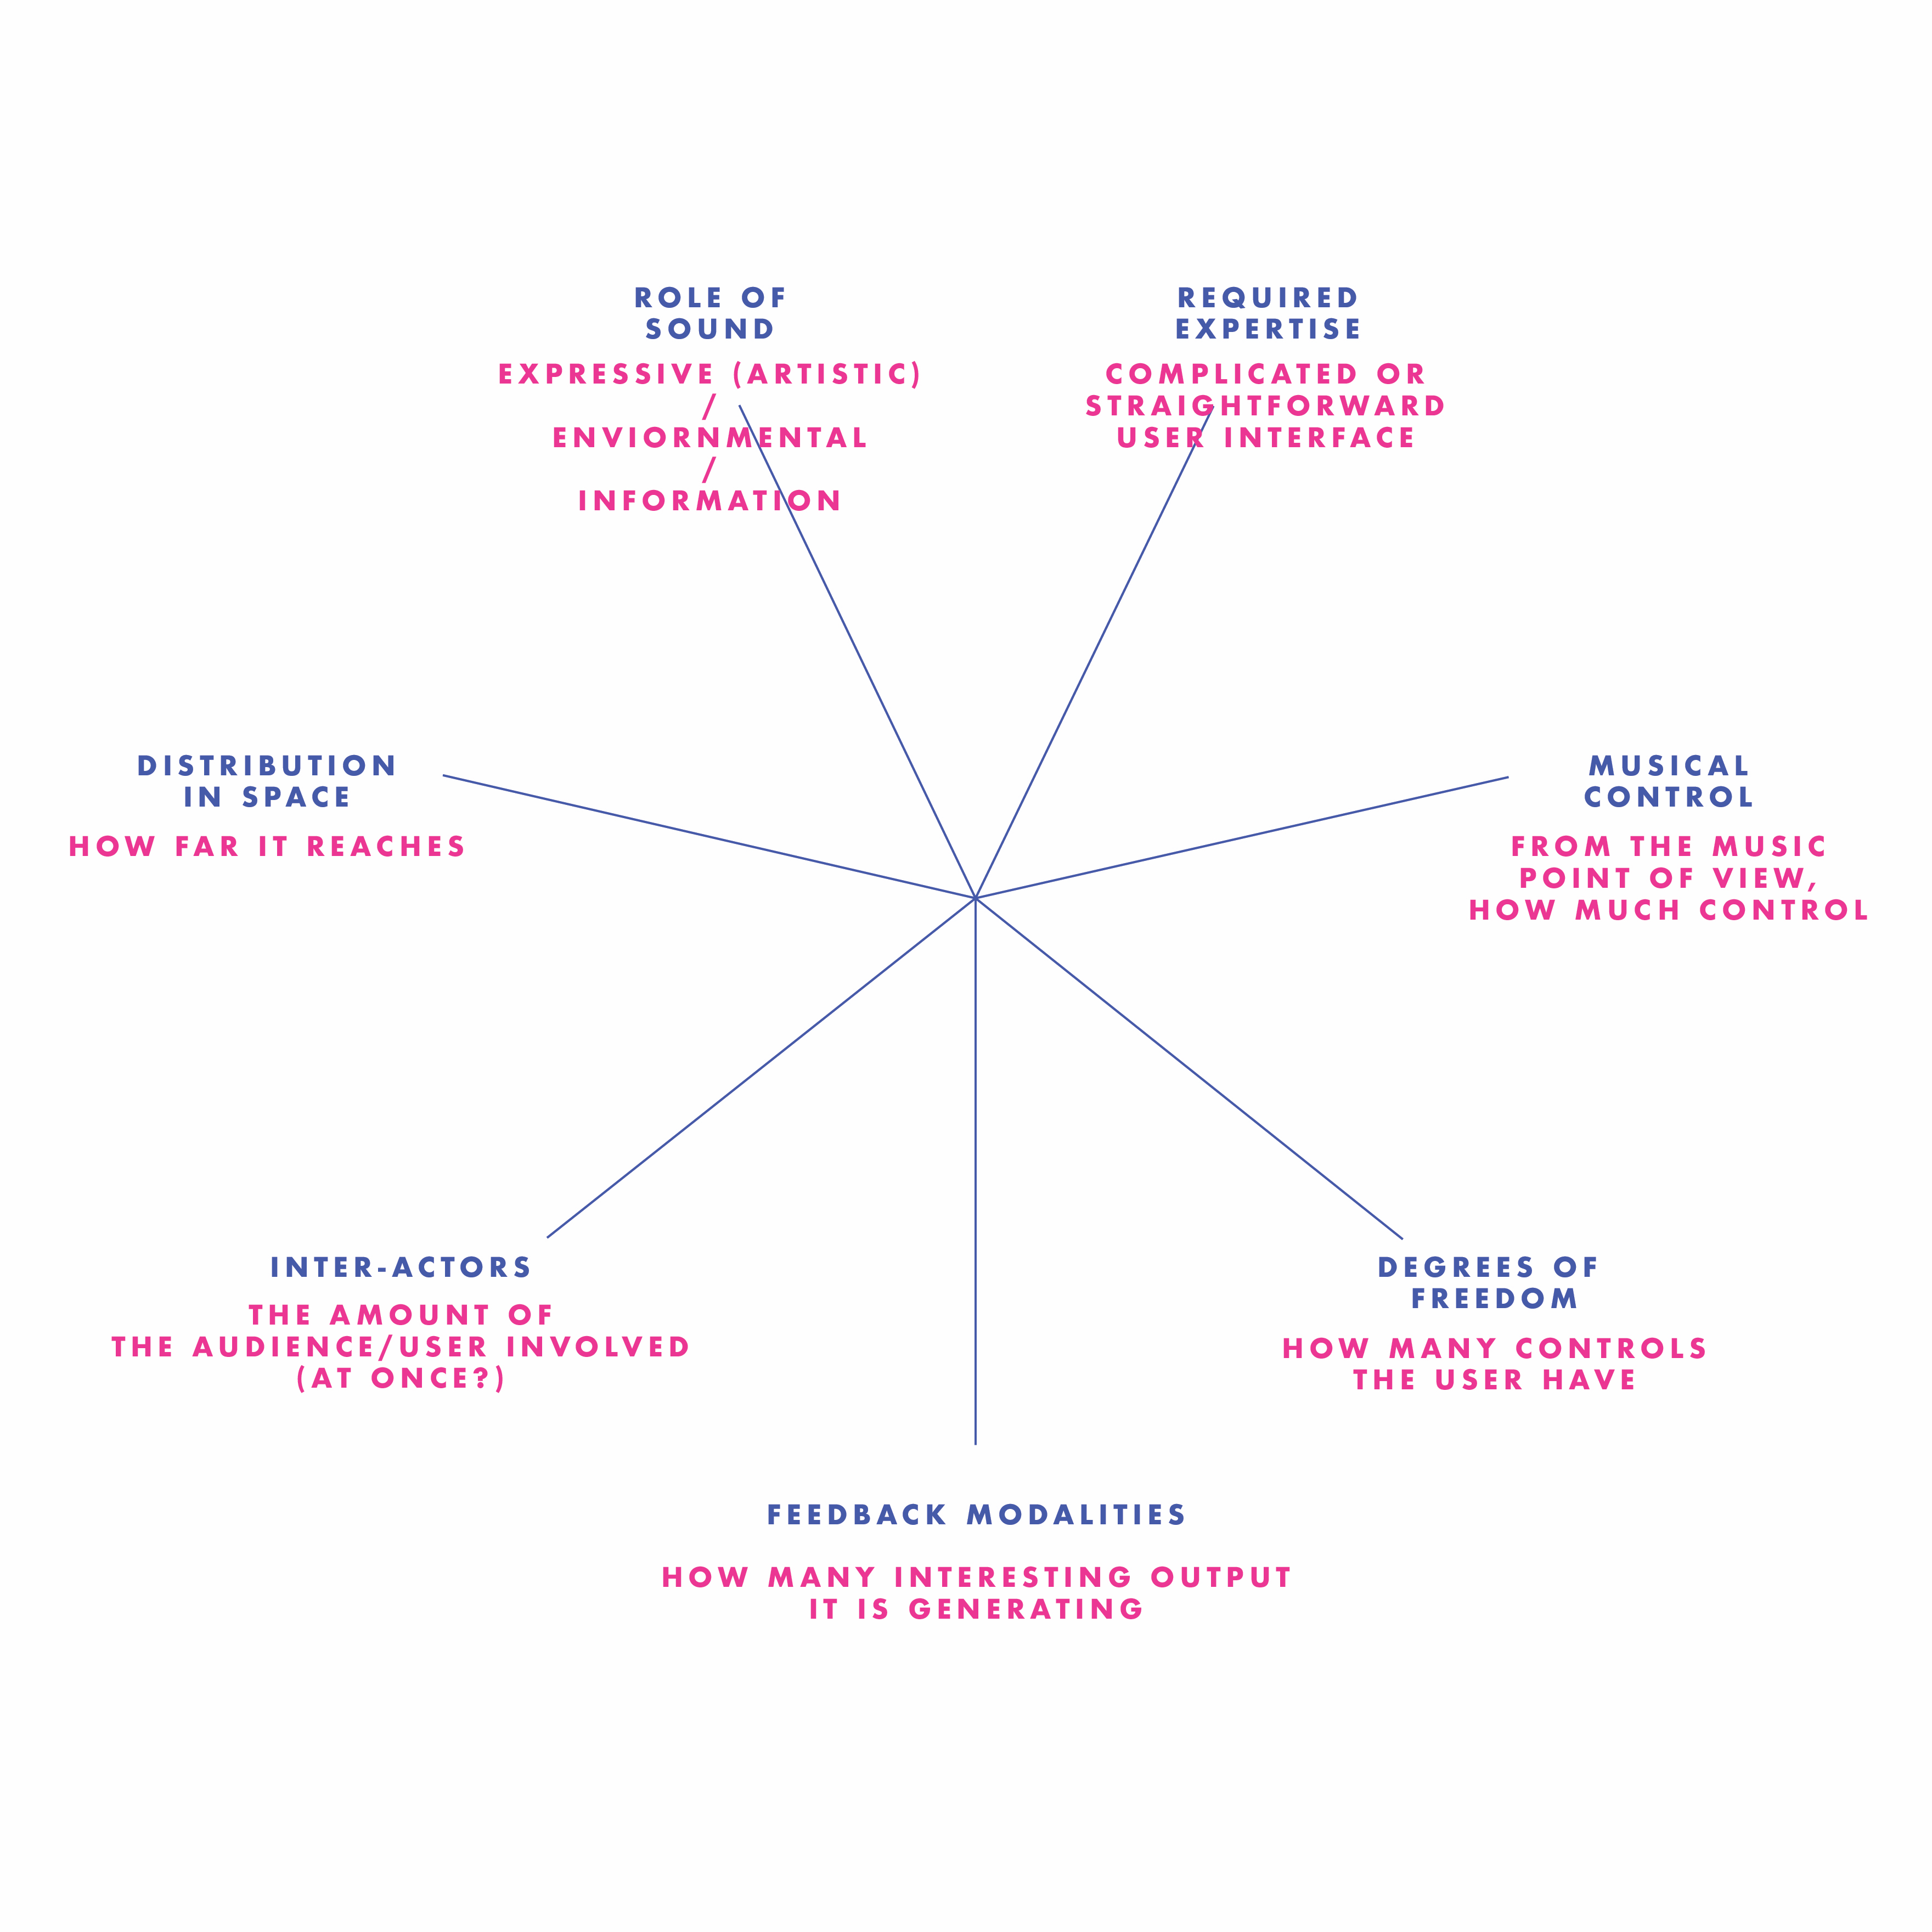
Everthing will be high in "Distribution in Space" since they are all web-based interactive interfaces.
1.Neural Drum Machine
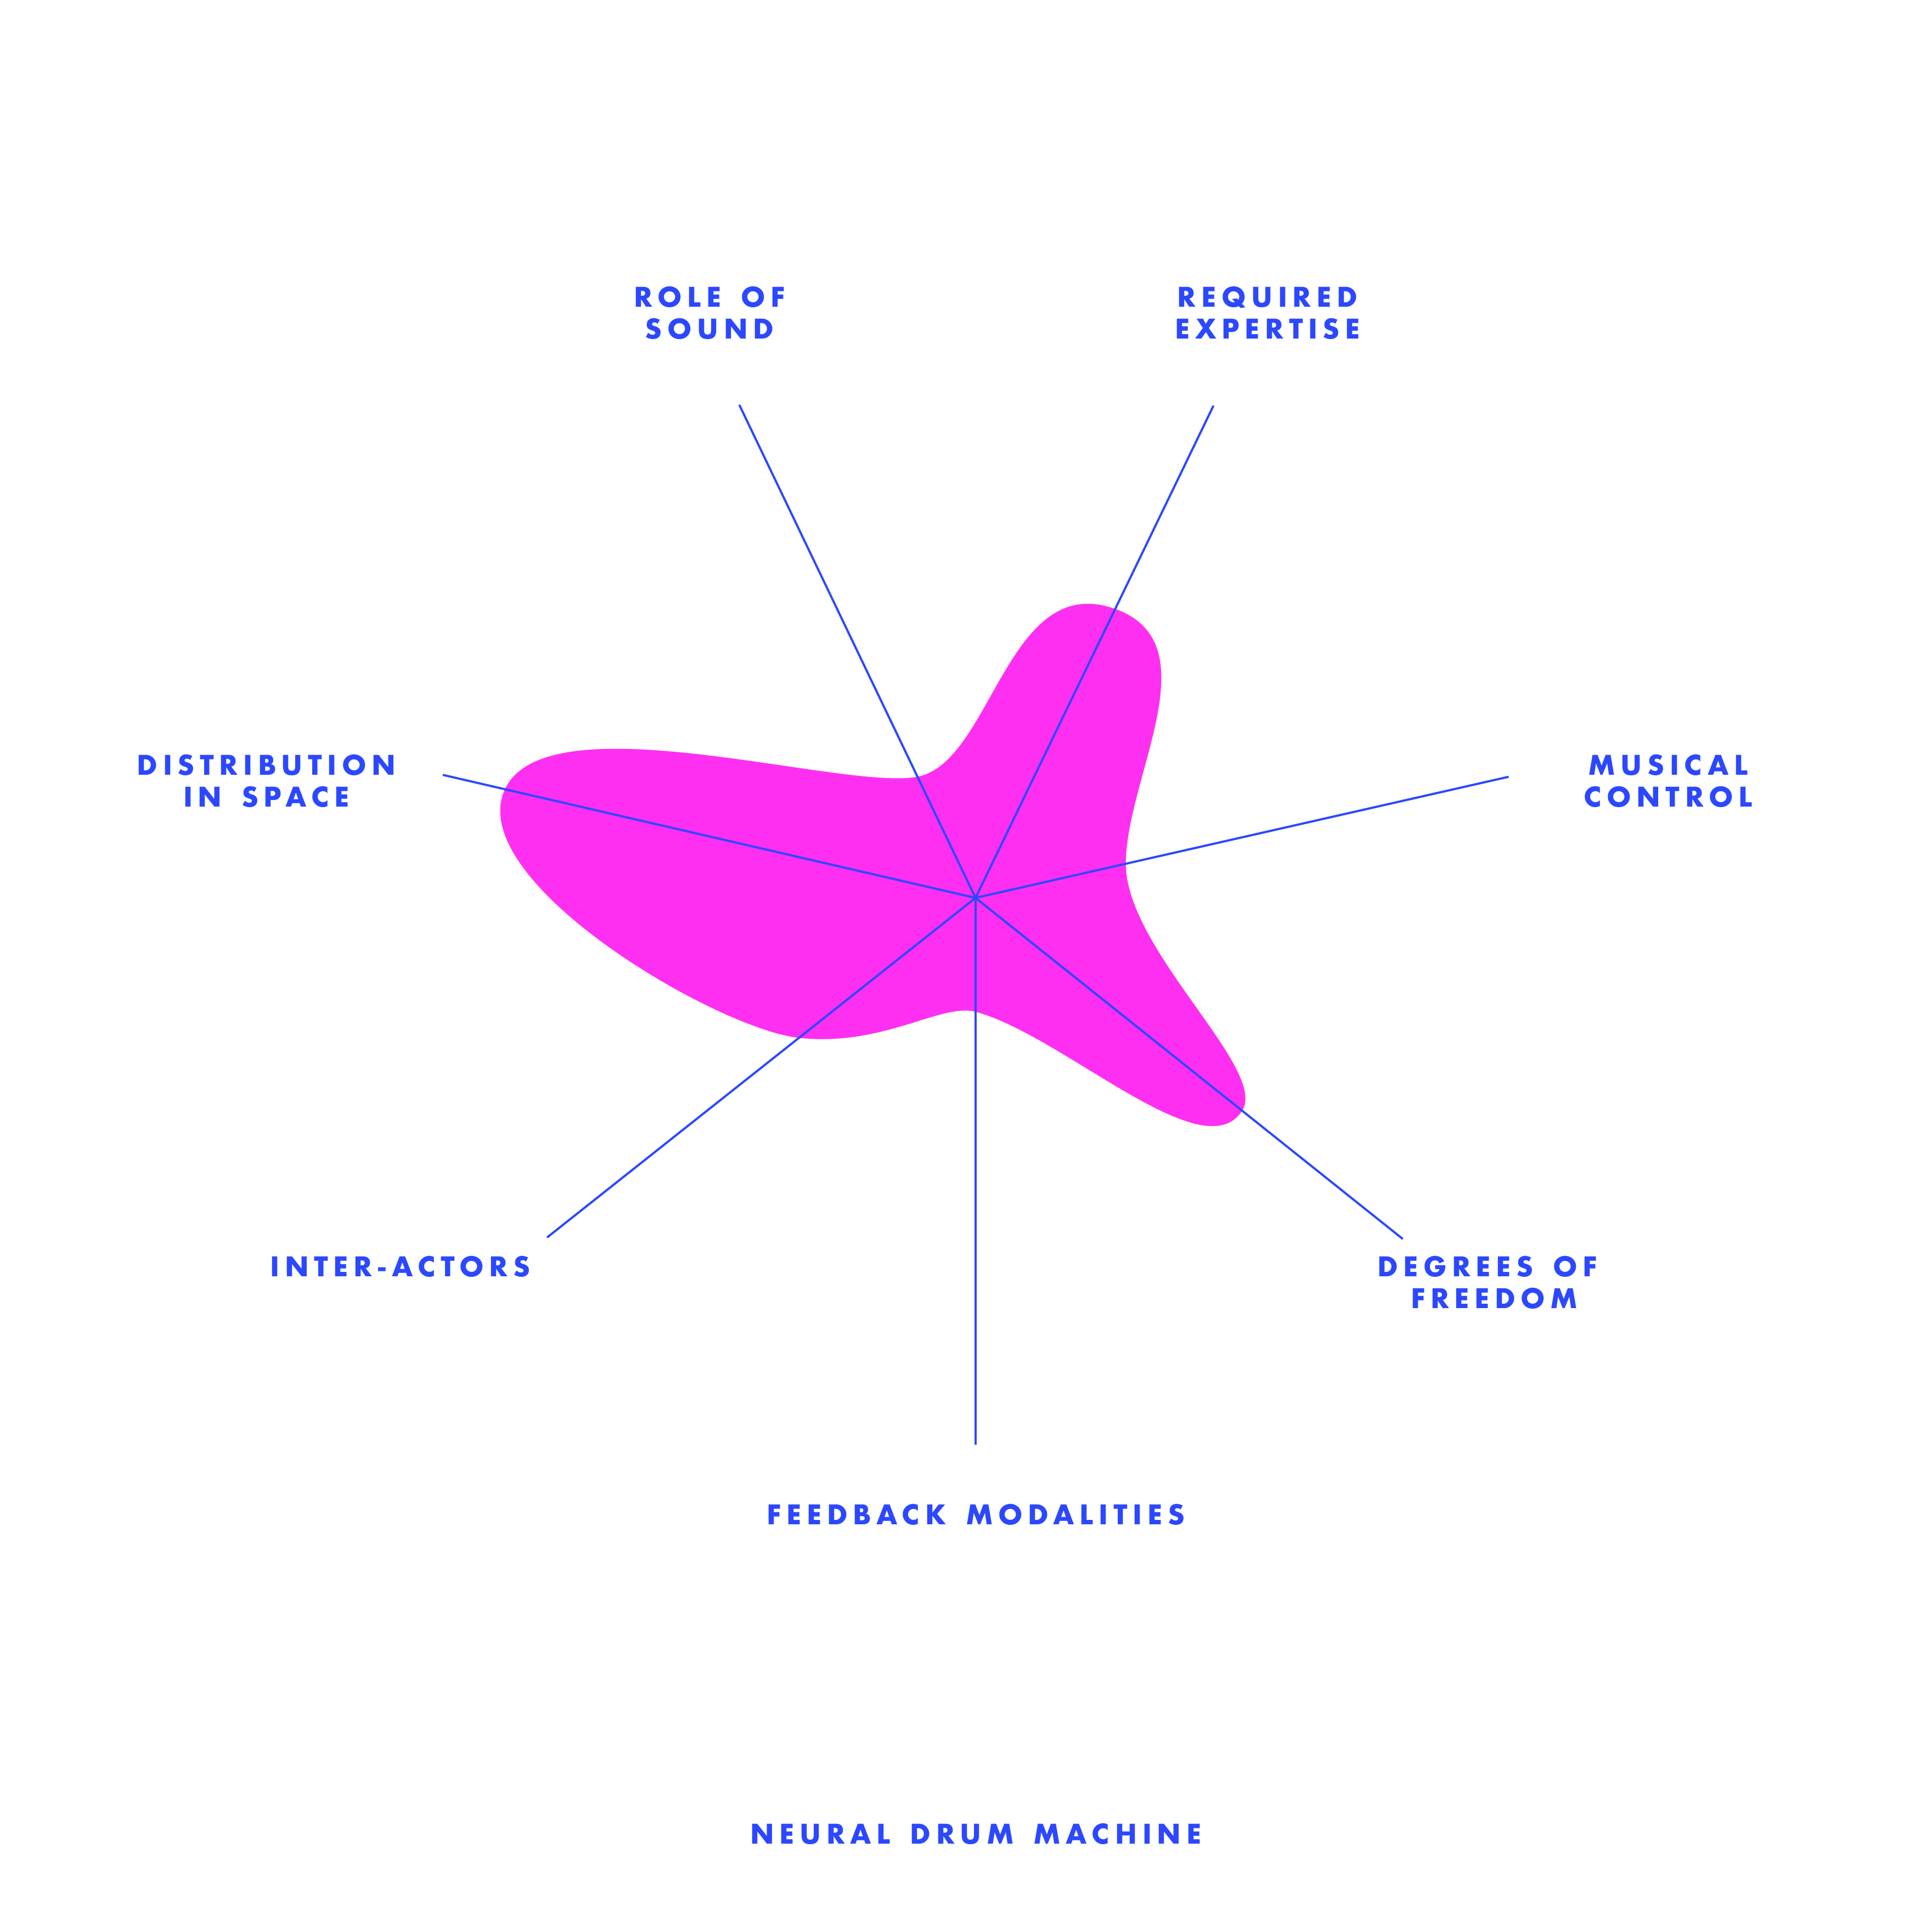
This is the first one that I interacted with. Personally, I like how simple and straight forward the interface is. The learning of this web was fast--only some simple clicking on the shapes, simple adjustment on each attributes, and clear looping animation. However, I do found the output is way too simple, which the only animation is sort of explanatory (showing you where the loop is going). You are only able to control one set of rhythm that goes in loop. I like the rhythm generated from this interface--it is clean, logical, easy to understand just like its interface, but lack of playfulness and diversity.
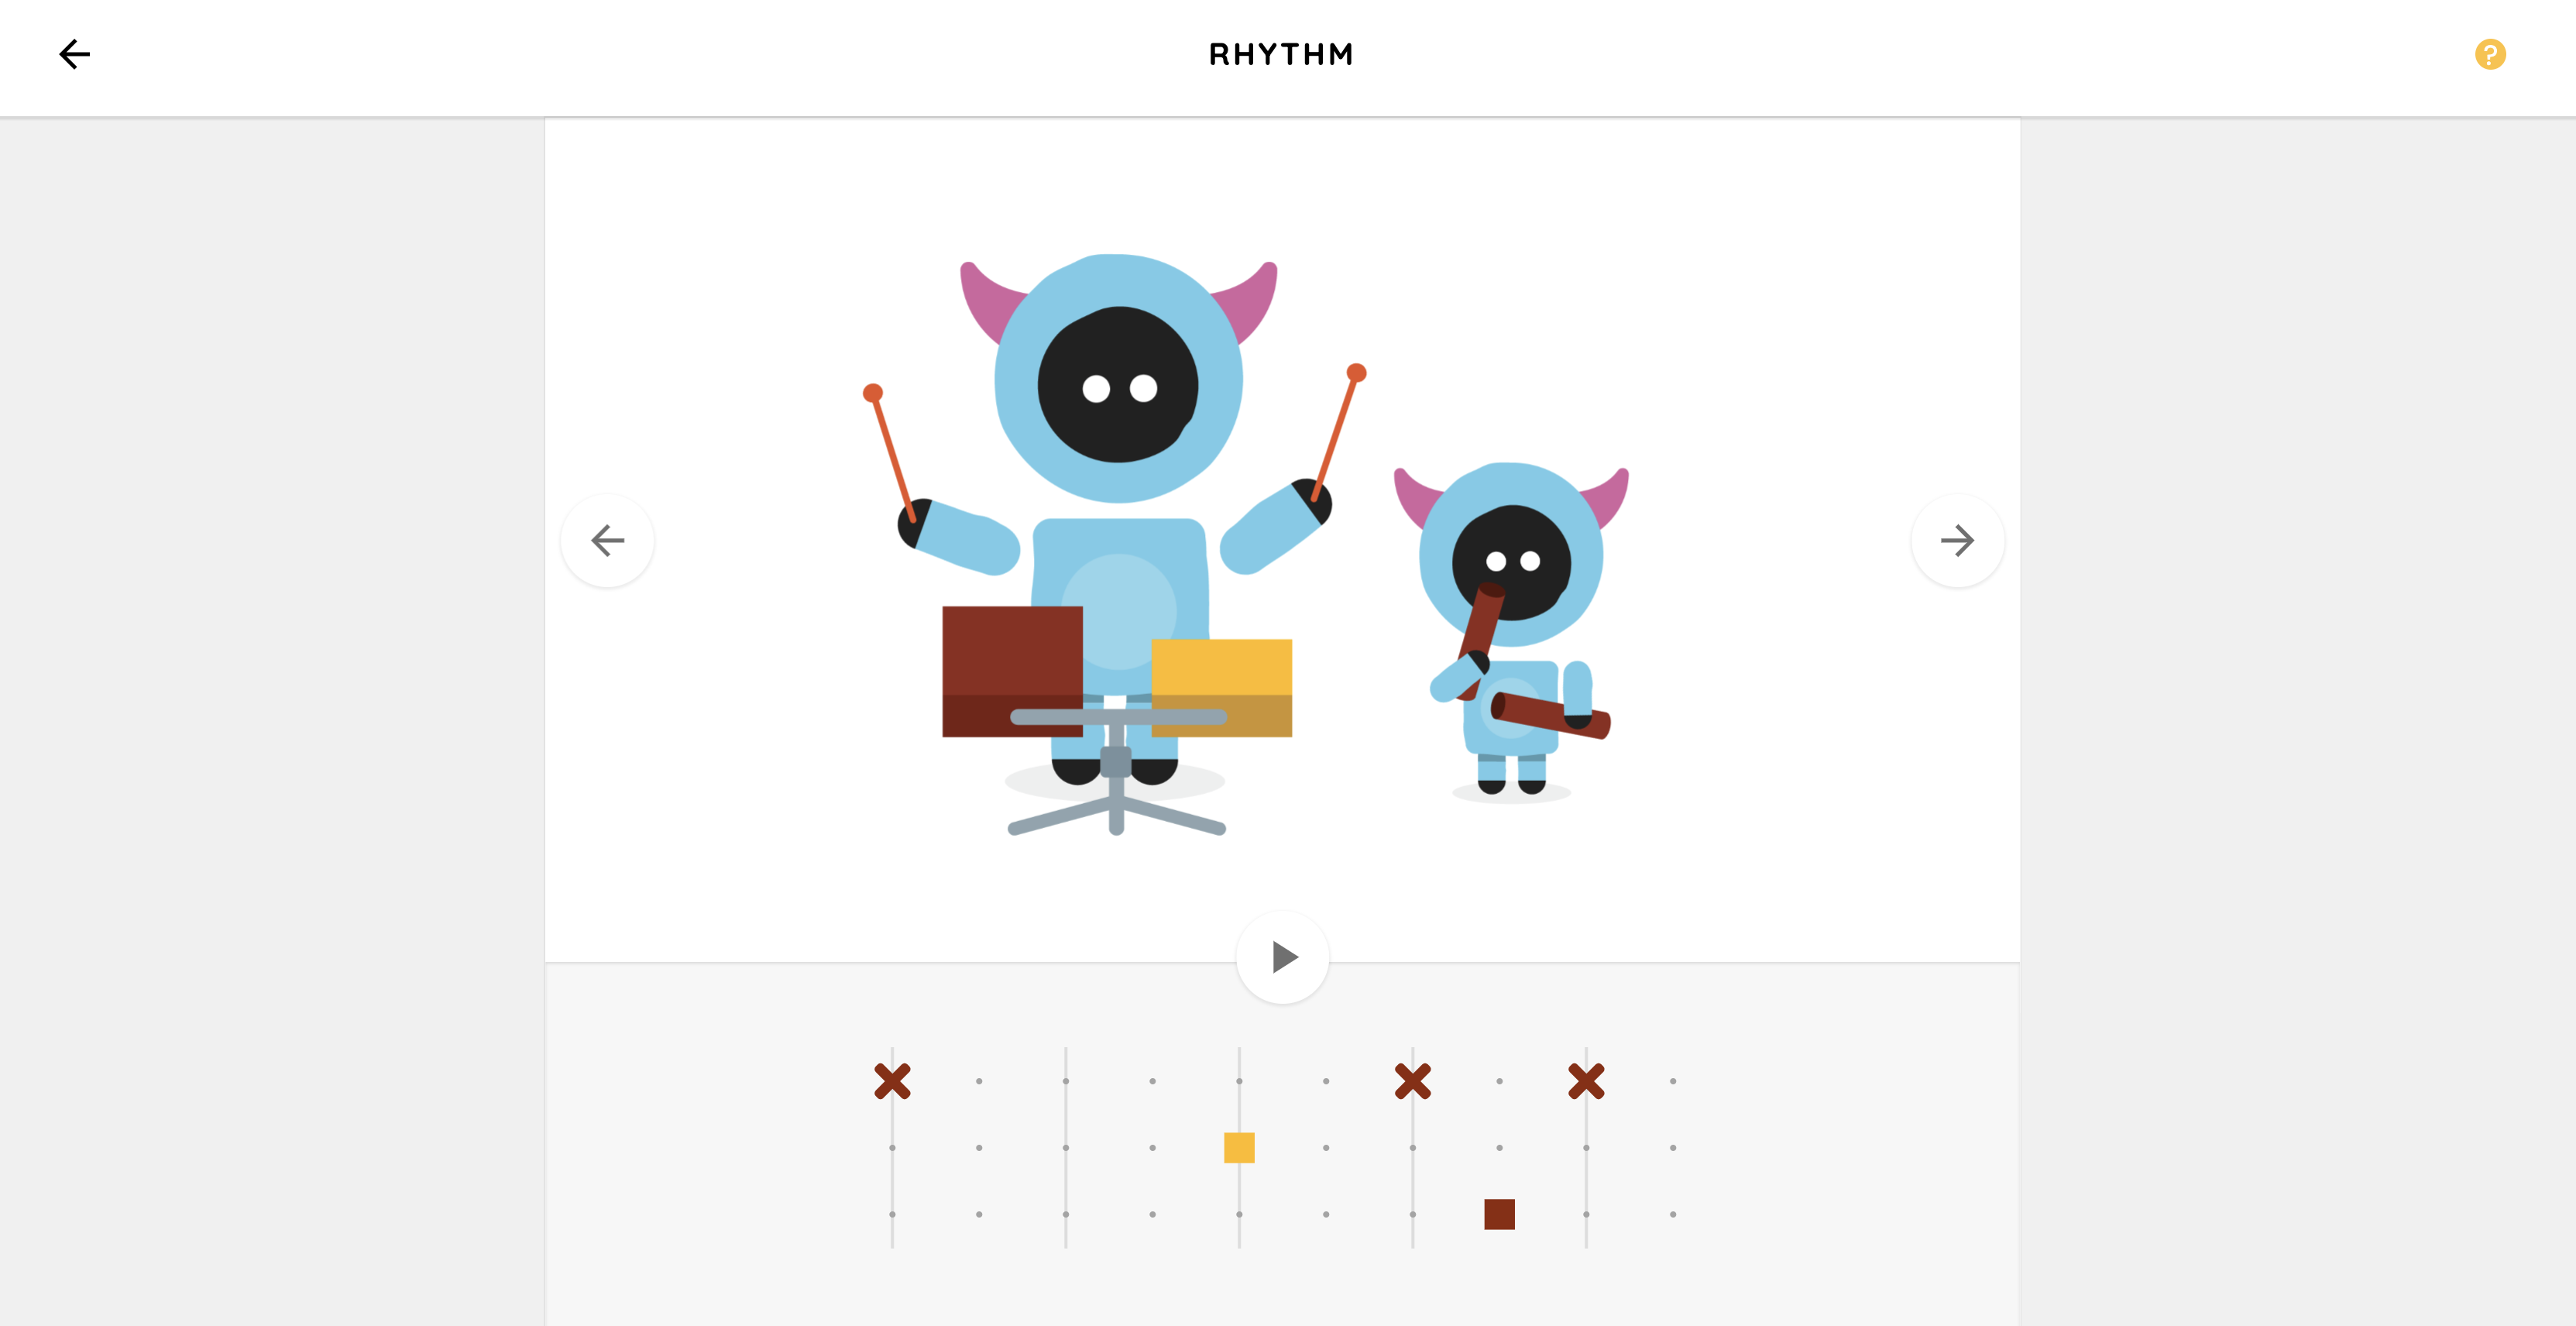
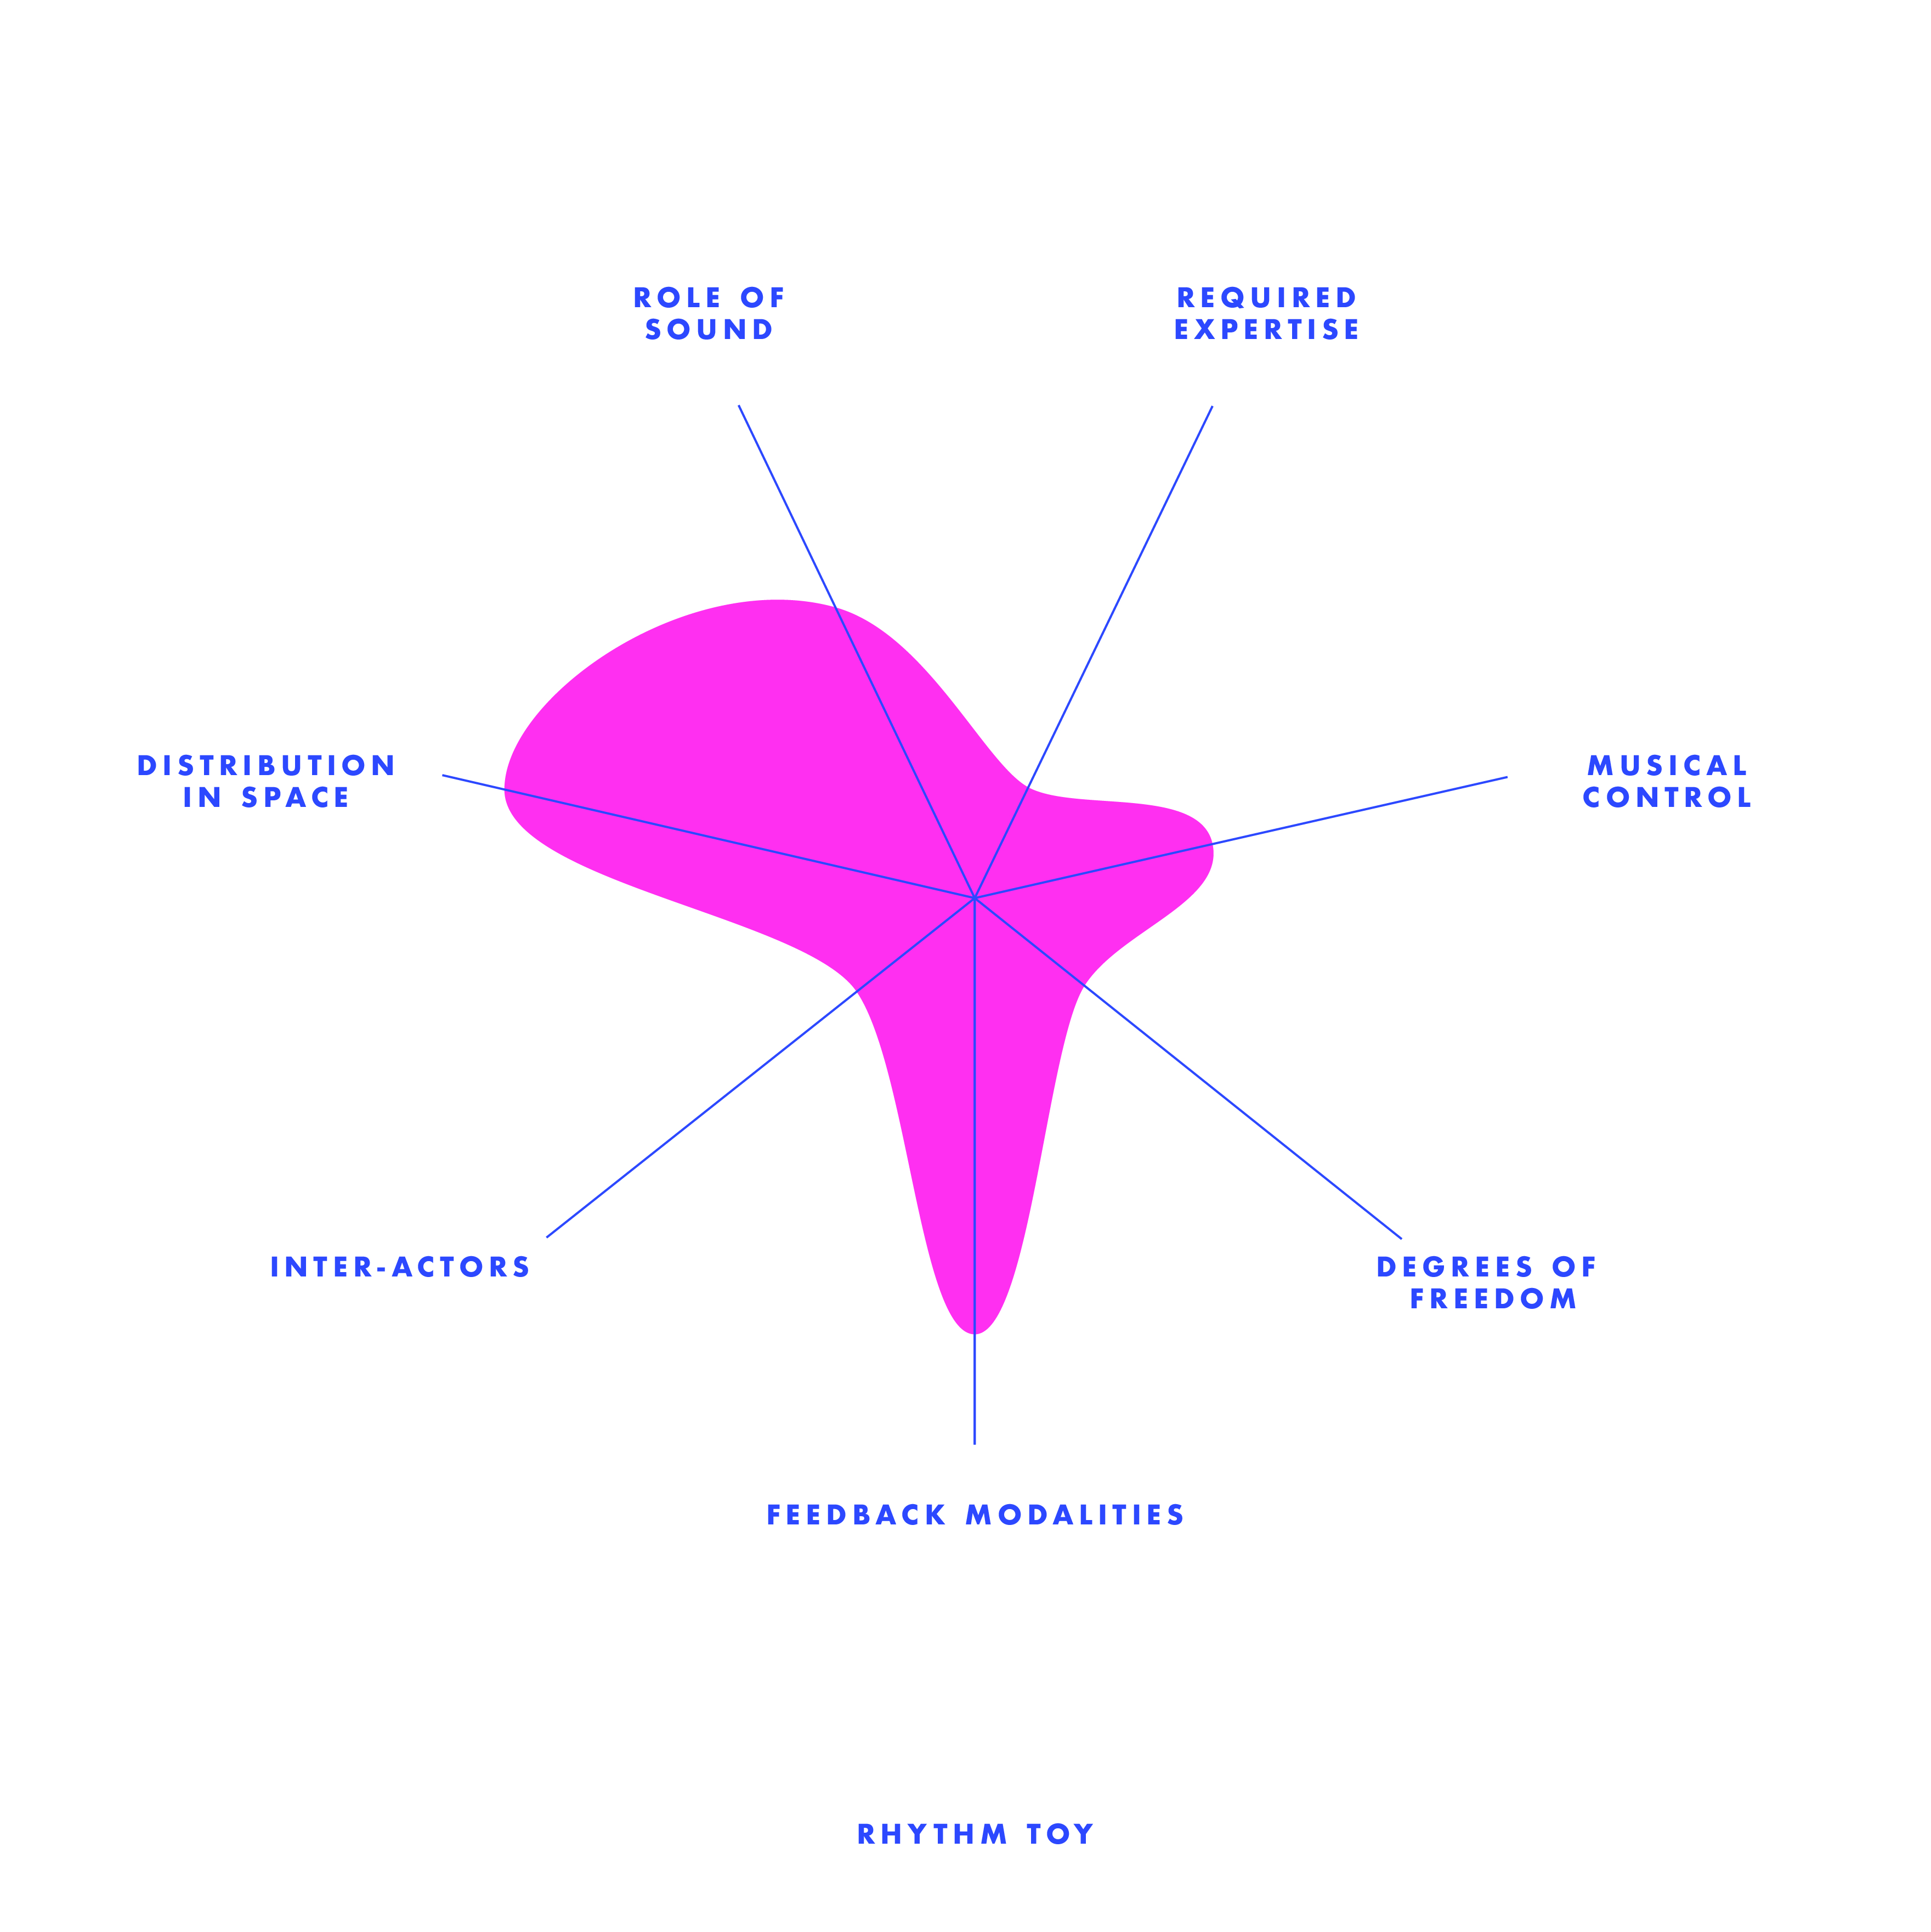
2.Rhythm Toy
I want to talk about this Rhythm Toy interface the next is because it also has a simple user controls, yet, lesser freedoms but higher output than the Neutral Drum Machine. The animation correspond with the beat you put in, which also provides a bit more diversity in timbral level (I'm not sure if it is corresponding with the diversity of instrument used), creates more fun than the previous one even though the music is still educational / a safe play.
3.Groove Pizza
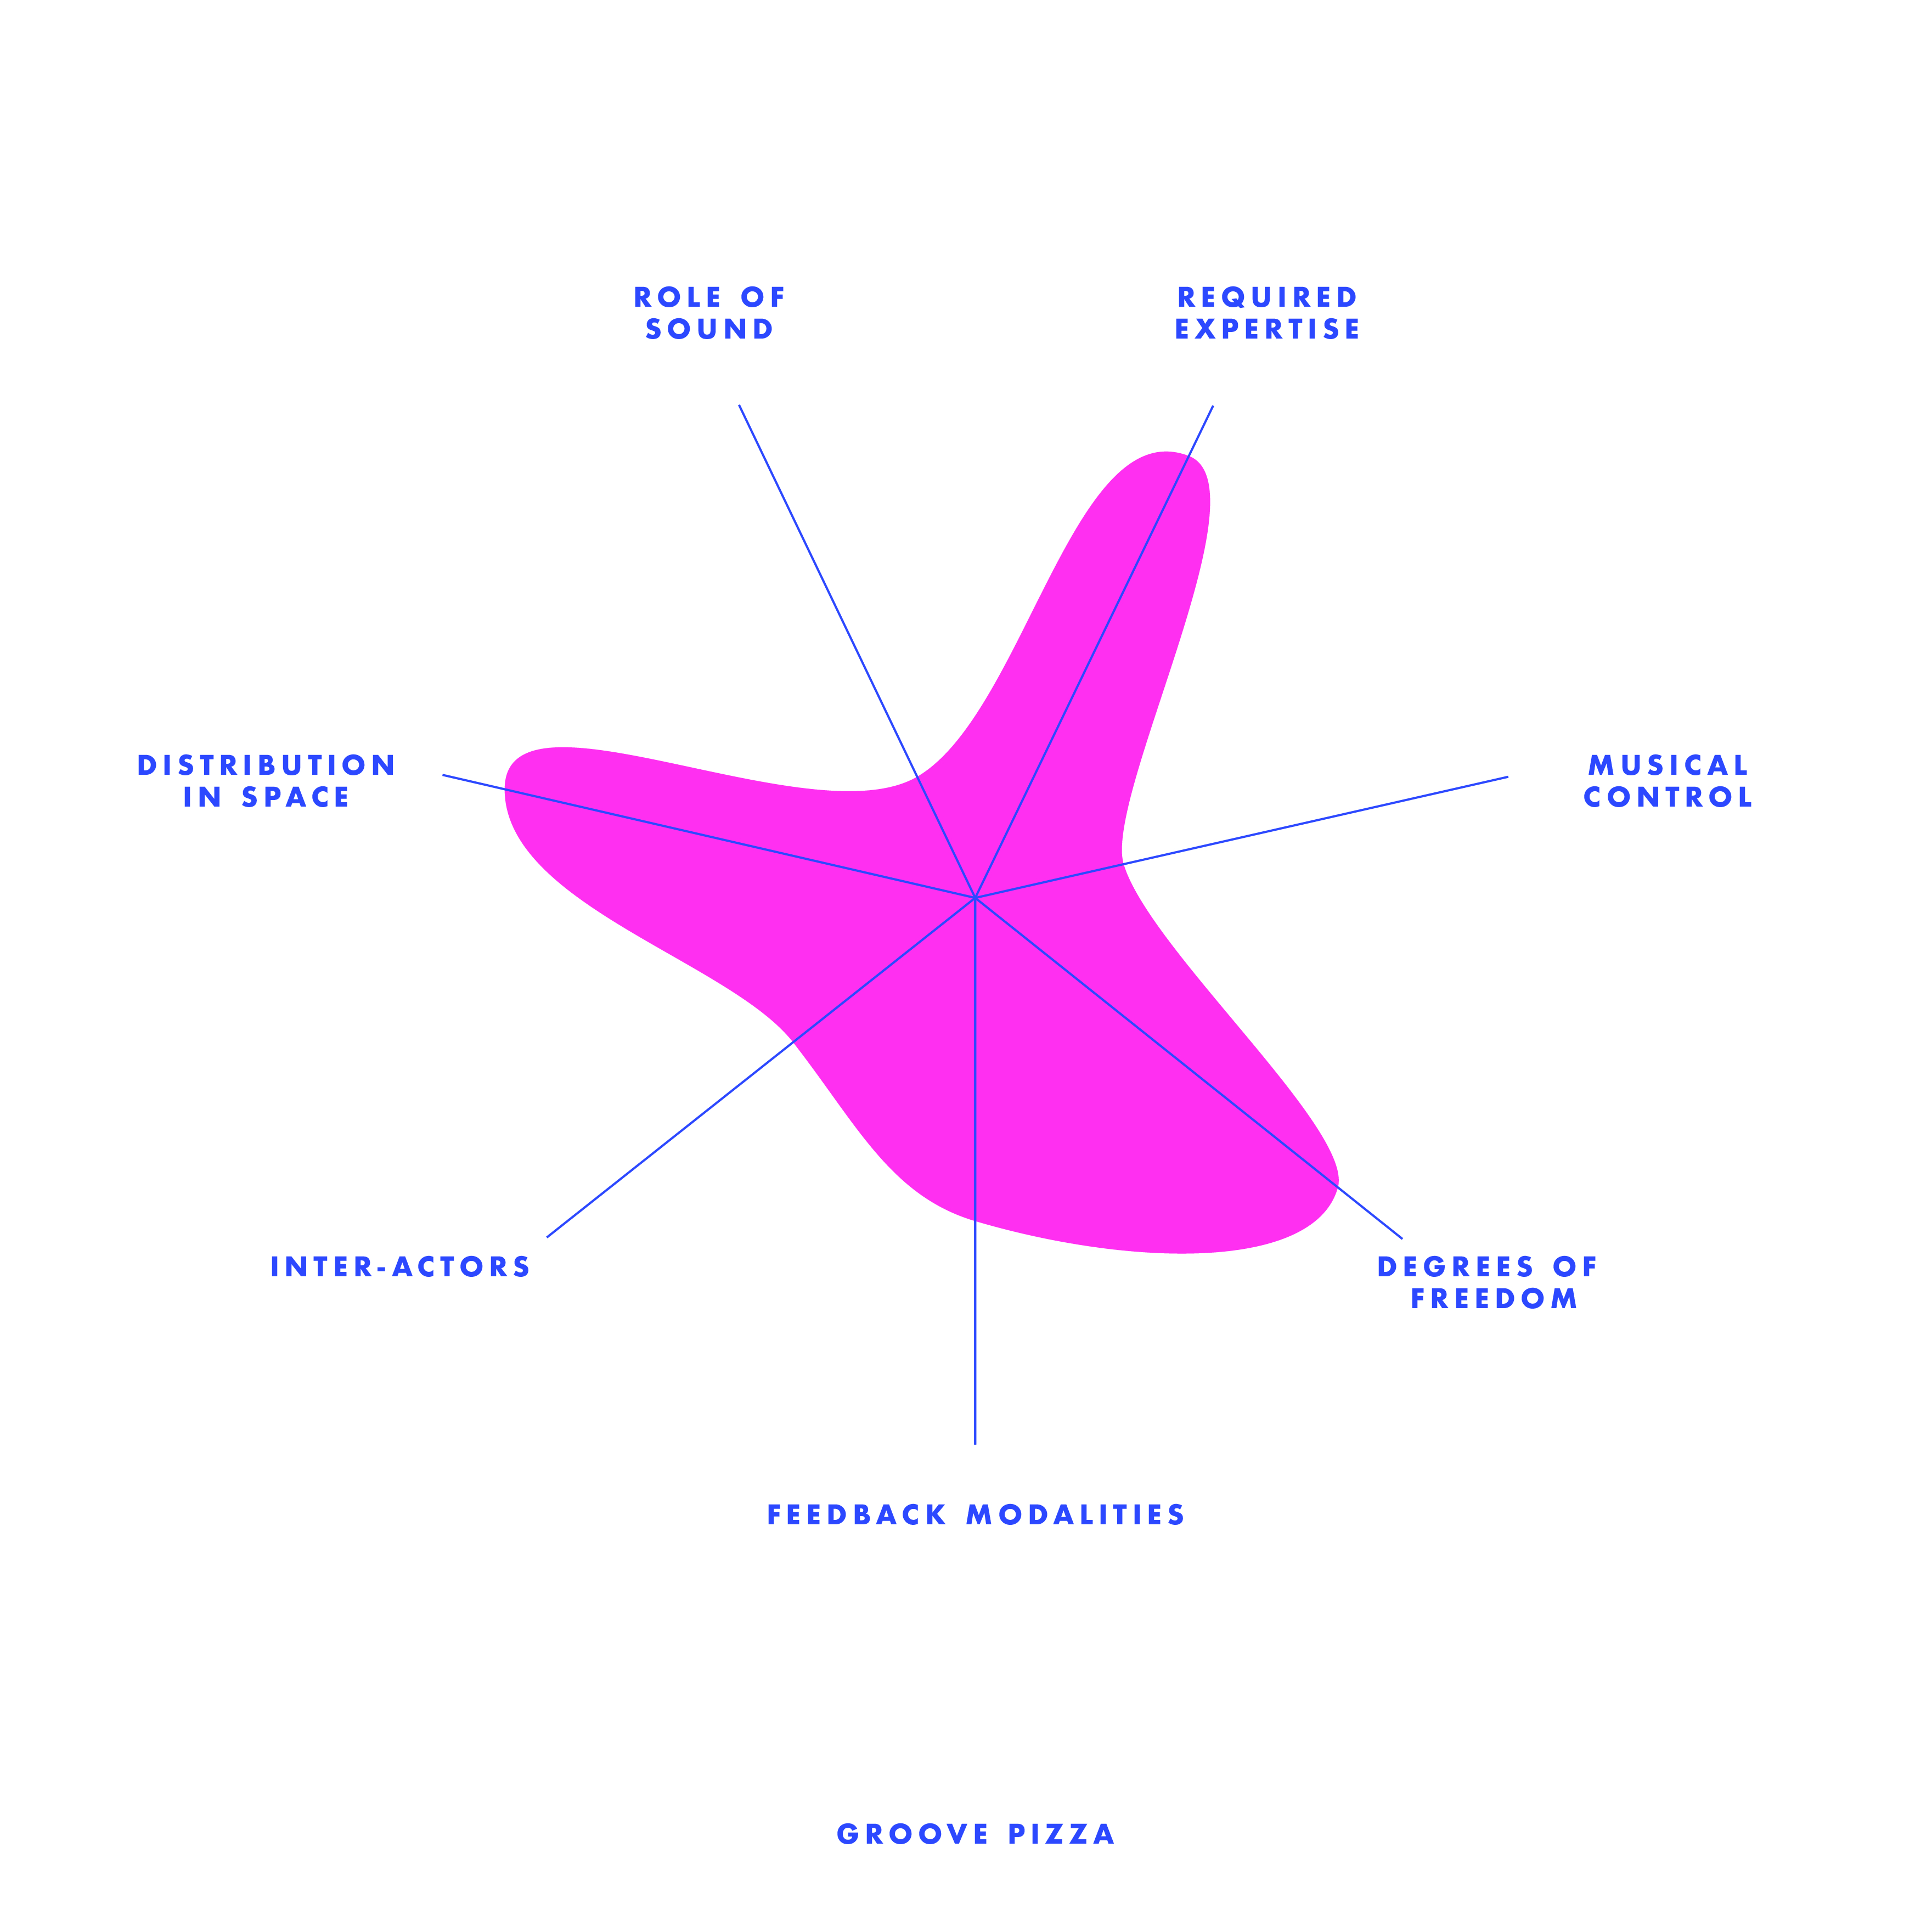
The third one, I anaylsed is this Groove Pizza. I was attractived by the visual of this interface--very logically distributed (the pie graph like system, corresponding with the 7 coloum beat adjustor) at the same time very abstractive (how it has shapes on the left hand side--instead of creating music by the sound, but also how it can be visually related). Even though the visual output seemed very interesting, I didn't put it as a high output because the visuals were there already as an input, and nothing more that it produced that expected. Also, I feel the default setting of the tempo was a little fast. I found it difficult to use when was trying to adjust the beats while playing. I think it is always good to have a rather slower default, have the user get familliar with the system first and then they can adjust it themselfs.
4.Beat Blender
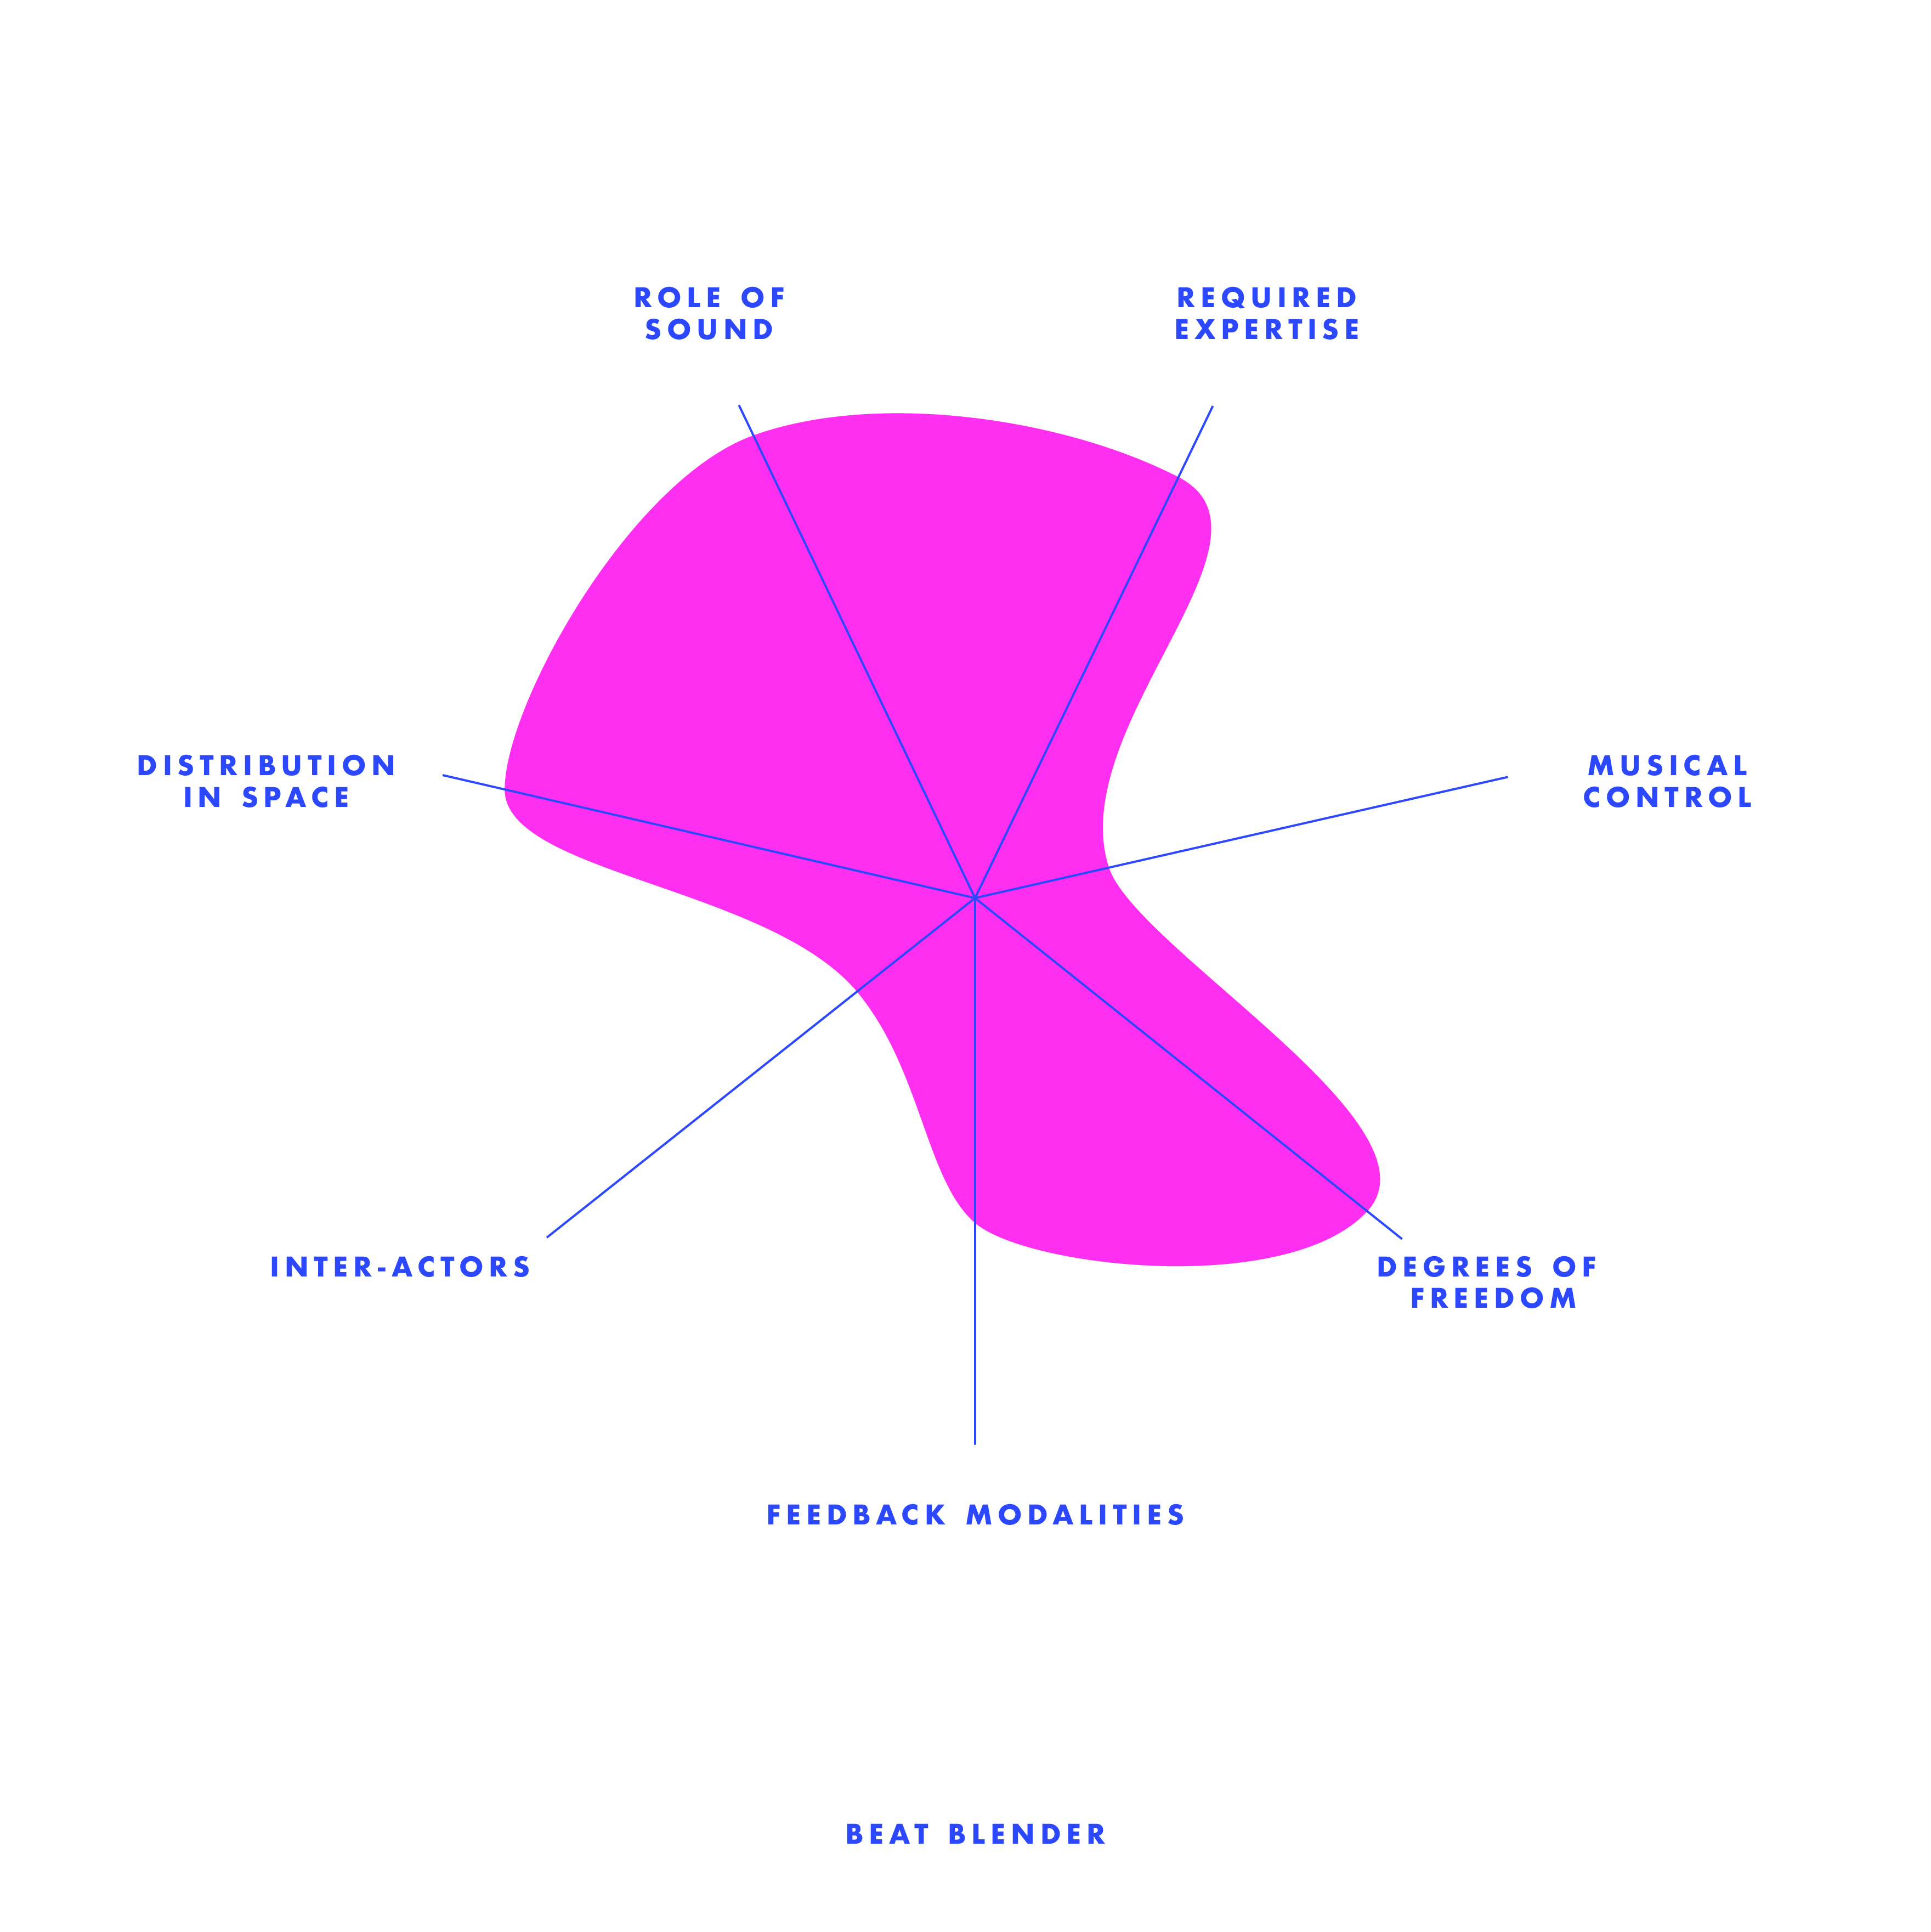
Last but not least, the Beat Blender. This is a very interesting interface than sort of hide the magic of music behind the four-color-gradient. Each corner has one loop of beat, and at the sections that the colors mixed together, the beat also sort of mixed--this compare to the rest of the interfaces is a more experimental project, specially from the music standards--when the user has been given more freedom. Eventhough I found it was pretty complicated when you try to adjust the beat of each corner (it gives a lot of default beat options), you don't need to adjust and you will still found intriguing beacuse of the "Drag / Draw" at the left bottom corner. It is definitly a very new way to combine loops together. it almost looks very random, but each loop are somehow related to each other because they are in 'gradient'.
Week 1 - Anxiety of Machination (Concept)
In a room of crowd, people stopped to see this—a transparent cube with a man inside, who is standing in the middle of running machines, trying to stop the noises that the machines create. Outside of the cube there’s typewriters; that connects to the AI system that has a voice liabrary of on each side of the cube facing towards the audience—The Anxiety Of Machination is an interactive installation piece and performance tool inspired by the track “Intro” by the experimental hiphop group clipping.
This piece aims to explore the relationship between human and machine; the anxiety produced by their interaction and the power dynamics between them.
Installation Overview
The installation features a small space, roughly 10’ by 10’ square in the center of the stage or a gallery space.
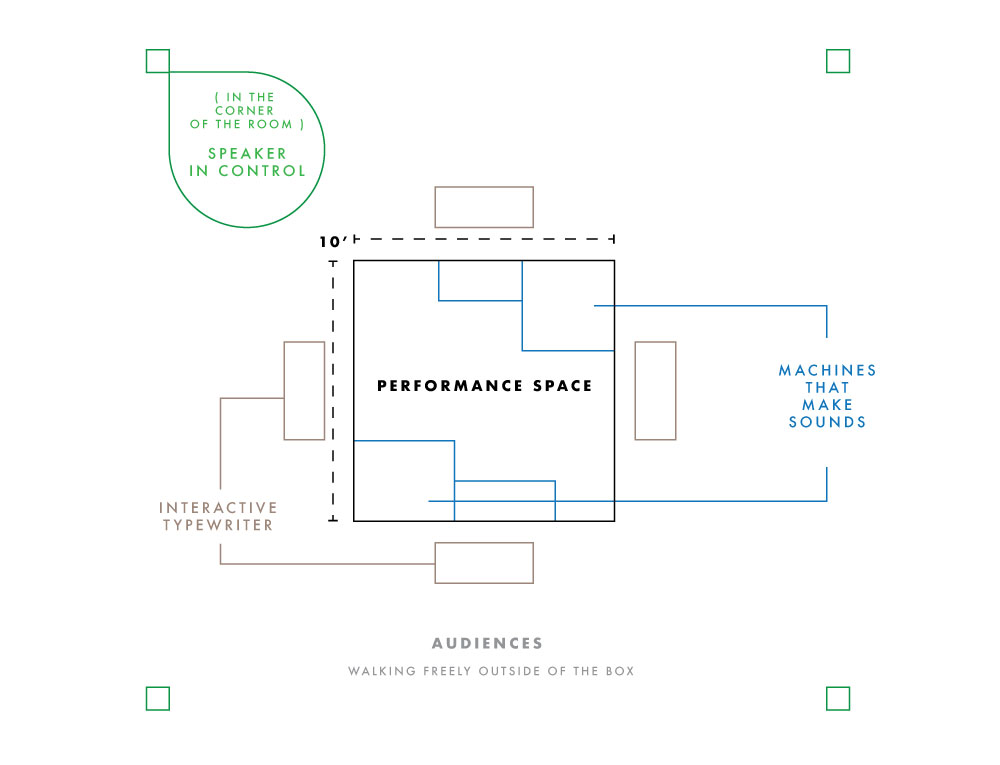
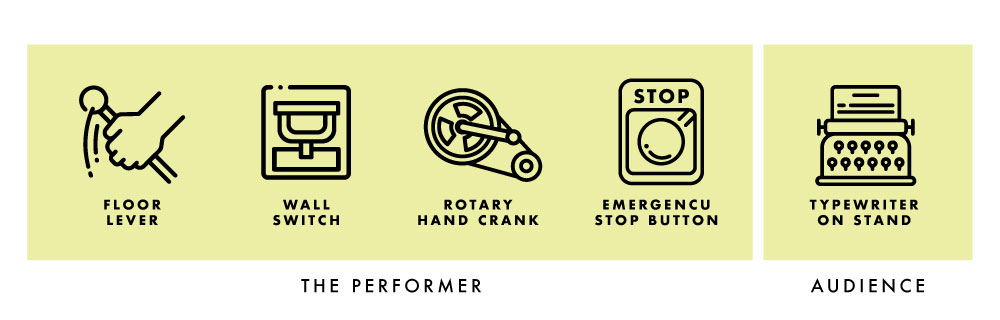
The space is delineated with glass walls and is filled with industrial machinery - gears, floor levers, steam pipes, etc. The participant enters and can freely play with the machinery, adjusting the levers, spinning gears, and so on. The different pieces of machinery control different elements of sound, some primarily through the physical vibrations created by the machine pieces rubbing or clanking, but others may trigger changes to audio being played by a computer-controlled speaker system. The participant can control the tempo, abrasiveness of the background instrumental, internal rhythm of the computer-generated hip-hop vocal part, and can also choose to trigger the breakdown/self-destruct sequence which will end the piece. However, aside from this self-destruct mechanism there is no way for the participant to actually calm or slow the musical tension being built; like a runaway train the participant’s choices are limited to various stylistic adjustments within the larger narrative arc of rising tension followed by (destructive) release.


Video on P5: Text and Emoji
The first thing came to my mind when I thought about pixels, were the 'text drawings' sometimes you can see on the twitter timeline that might look something like this:
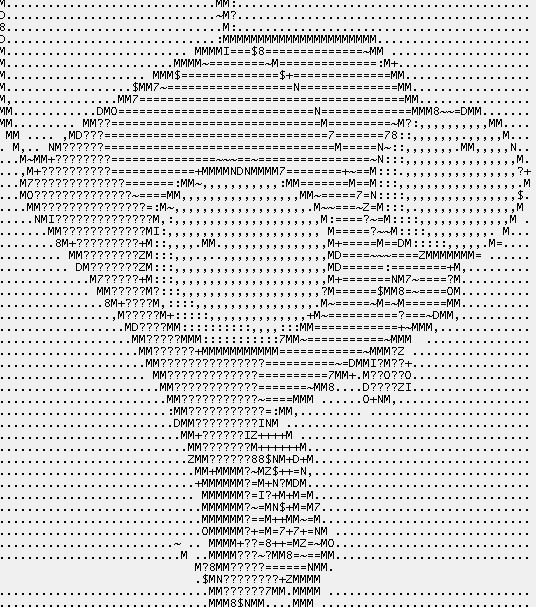
I want to play with the only the negative/positive space of each letter or symbol to create shape and line out of it without change the oppacity/brightness of the elements. To do this, I will need to get the brightness instead of the color for each pixel, and assign a certain range to different text by using if statement.
I made the negative space black, so that means the the darker pixels will be assigned to the symbols that has the least possitive spaces. And I have the following statement:
let brit = int(brightness(img.get(x, y)));
if (brit >= 0 && brit <= 10) {
updateText('.', x, y);
} else if (brit >= 11 && brit <= 20) {
updateText('*', x, y);
} else if (brit >= 21 && brit <= 30) {
updateText('!', x, y);
} else if (brit >= 31 && brit <= 40) {
updateText('/', x, y);
} else if (brit >= 41 && brit <= 50) {
updateText('+', x, y);
} else if (brit >= 51 && brit <= 60) {
updateText('=', x, y);
} else if (brit >= 61 && brit <= 70) {
updateText('o', x, y);
} else if (brit >= 71 && brit <= 90) {
updateText('O', x, y);
} else if (brit >= 91 && brit <= 100) {
updateText('@', x, y);
}
I'm pretty satisfied with the look already, but I still sort of wanted to play with color that is relevant to the color of the capture. I first tested out the range for red (it should be 255, 0, 0, 1 for rgba, but I know the lightness will affect the color). I called out the values of each pixel and give it the range of R > 200, G < 50, B < 50, A > 0. However, eventhough I was wearing a red hoodie, it still didn't get any red. So I made the range even wider:
let c = img.get(x, y);
if (c[0] >= 170 &&
c[1] <= 100 &&
c[2] <= 100 &&
c[3] >= 0) {
fill('red');
} else {
fill('white');
};
And this is what I got:
I love to zooming in to the symbol pixels to see them wiggling. Also like this visual esthic a lot and it's pretty accurate:
And I was having fun playing with this by creating a slider that you can change the colors: Code
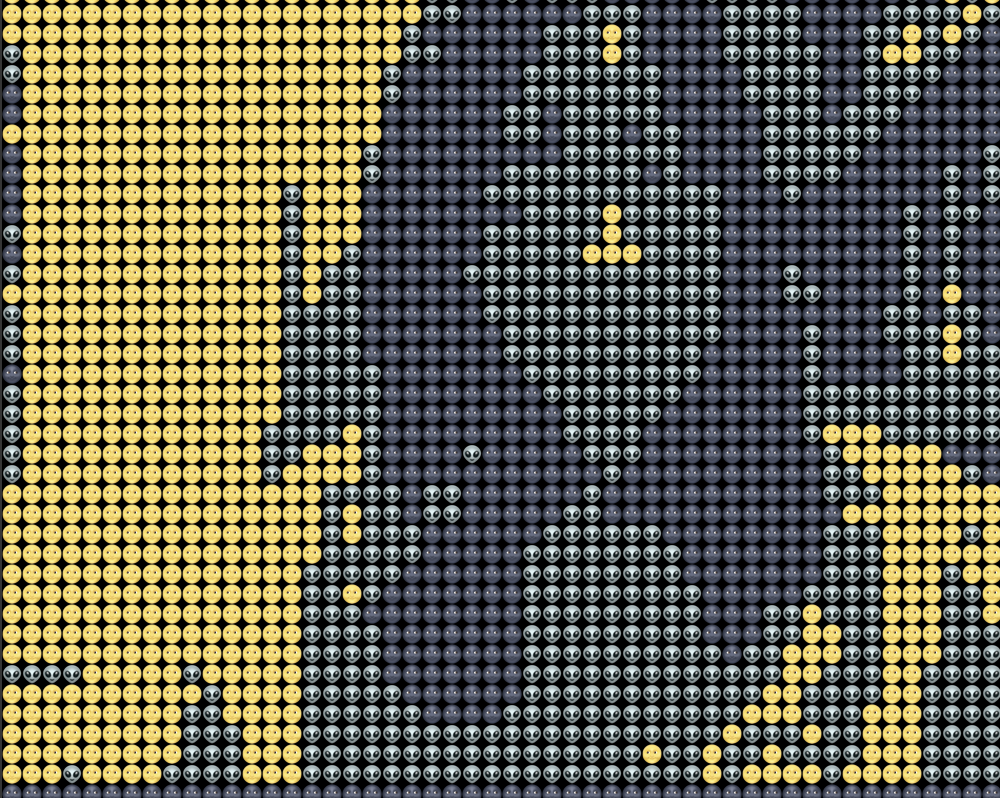
After played with pure text, talking about my initial insipiration--visuals done by text, recently, people were also using emojis as pixels.

Seeing the potential of this becoming a video filter, I chose the two emoji that came to my mind straight when I planned to make this: 🌚 and 🌝, which are perfect for bright and dark pixels. Then I tested out with some emojis that will give a good transition inbetween the two (that also carries a similar 'meme(?) vibe') and the alien work out the best! It is pretty interesting that from far the color scheme actually looks like a decent (well, it should be) color choice, but when zoomed in, you will see faces...
Proposal for Final: Planning, Diagram and Userflow
Links to
Inspiration /
Design /
P and Comp
^Top
Inspiration
The inspiration came from Carl Sagan, the astronomer's comment on a photo of the earth thats taken by the Voyager II. Link to the article
In this article, it talks about how from the other point our earth is just a tiny blue dot: countries, gender, politics, wars... everthing happens in this small star and that feels no longer matters that much for this scale.
We often forgot about the 'existance' of the earth that's below our feet dur to the scale. It is too big that it is almost 'transparent'.
This experience of "View the Earth from another perspective" is really special, and to me, very philpsophical. This experience also could be called the overview effect that I would want to share this experience.
^Top
Design
^Top
P and Comp
Midterm - "Pumpkin, UR BFF": Documentation and Code
Links to
Inspiration /
Design /
P and Comp /
Final Look
Inspiration
I remembered when I was young I often go trick or treating with my younger brother and my friends during halloweens. There was an unofficial rule for that day, which was the houses that will be offering treats will tied a ribbon to the door handle, so that other families who does want to get involved can avoid from this event. When I first moved there, I didn't know the 'rule' on that day, and remembering the 12-year-old Michelle Sun and 'her crew' being yelled by a young married couple after ringing the bell with a harmonized "Trick or Treat!"... We were so upset that we were planing for a water balloon trick, though we ended up forgetting the water ballwoon plan after the hyperness of received candies from other families, I still think a harmless but naughty trick is always what a kid wants during halloween.So what if, a water spraying candie bucket?
Design
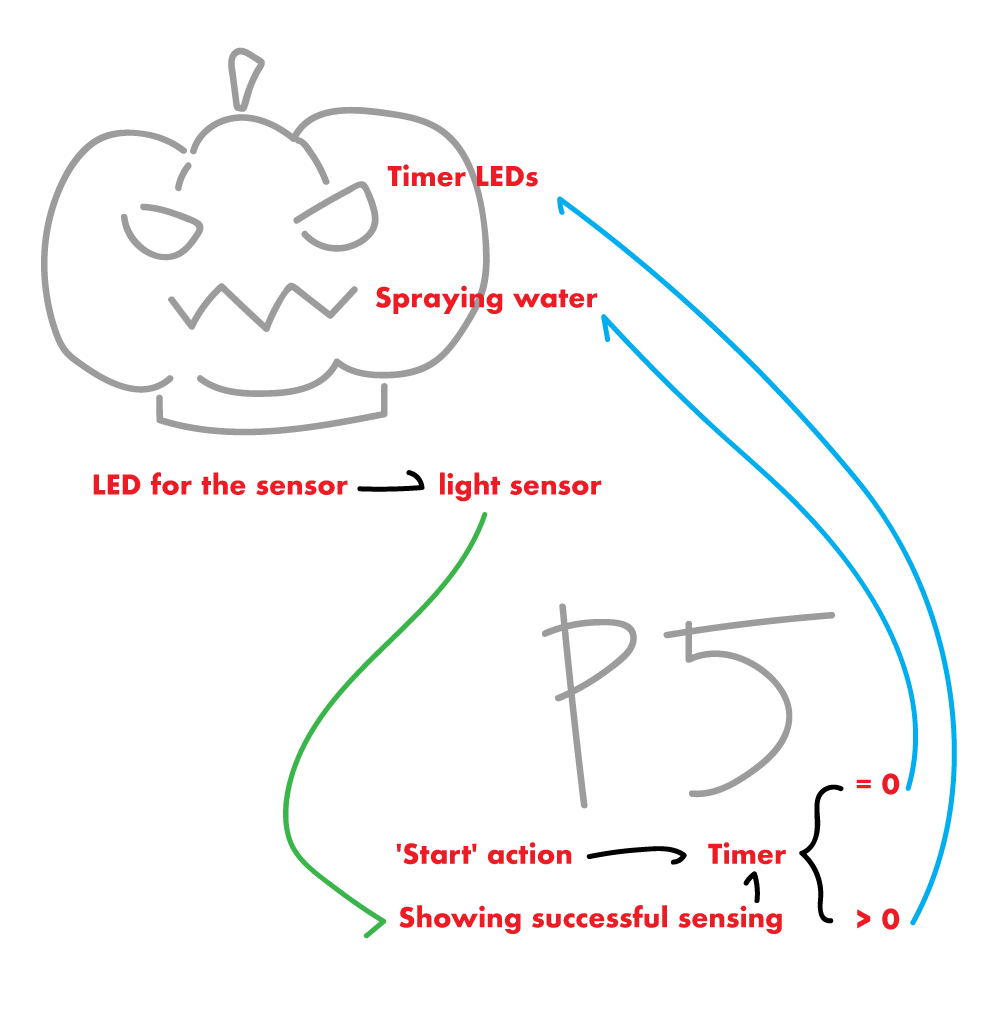
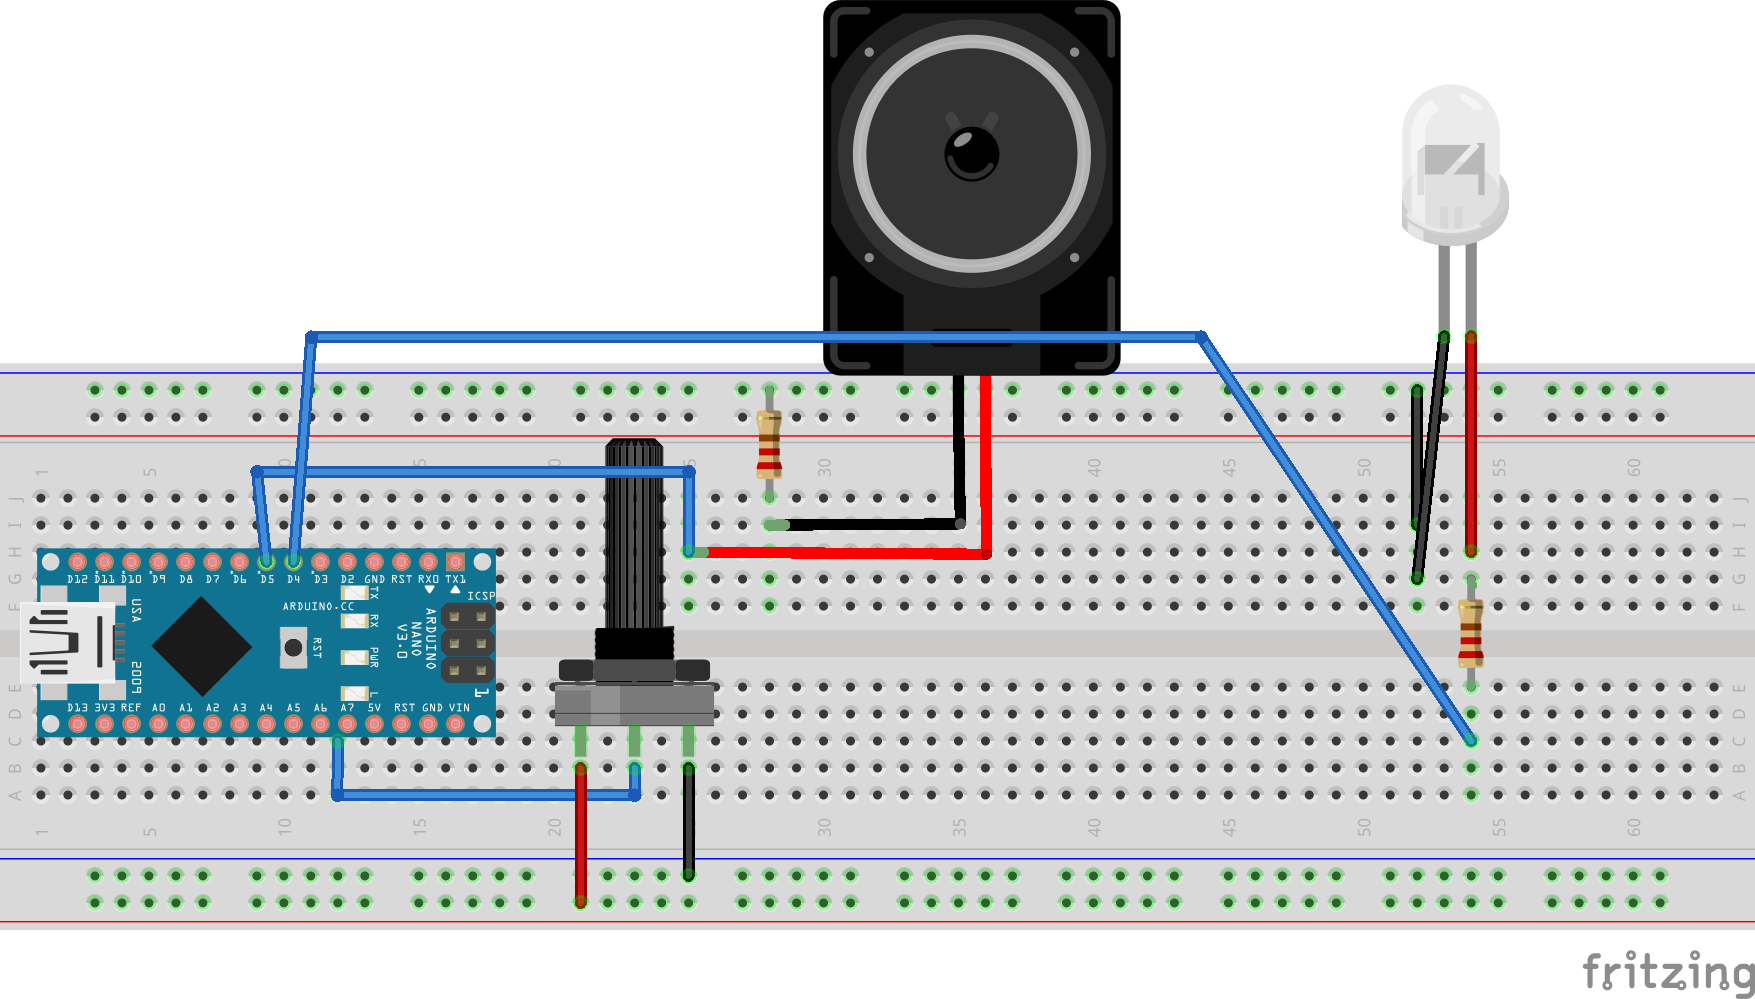
For this project, I want to connected to P5JS to play around with the serial communication between web and arduino. There are several parts that I think should be added for the interactive experience--Physical Parts:
1. Spraying water (the main output)
2. Sensor for the candie - light sensor (input)
3. LED for the sensor (the input data will be low since it will be dark in the bucket)
4. Alerting LEDs (output - blinking) 5. A box to hide the sensing part (to hide 2 and 3)
P5JS Parts:
1. A 'Start' action (input)
2. Timer (input/output?)
3. Showing successful sensing from light sensor (output)

P and Comp
At first, I wanted to 3D print a bucket that has customized following parts:1. two holes at the bottom for LED and Sensor.
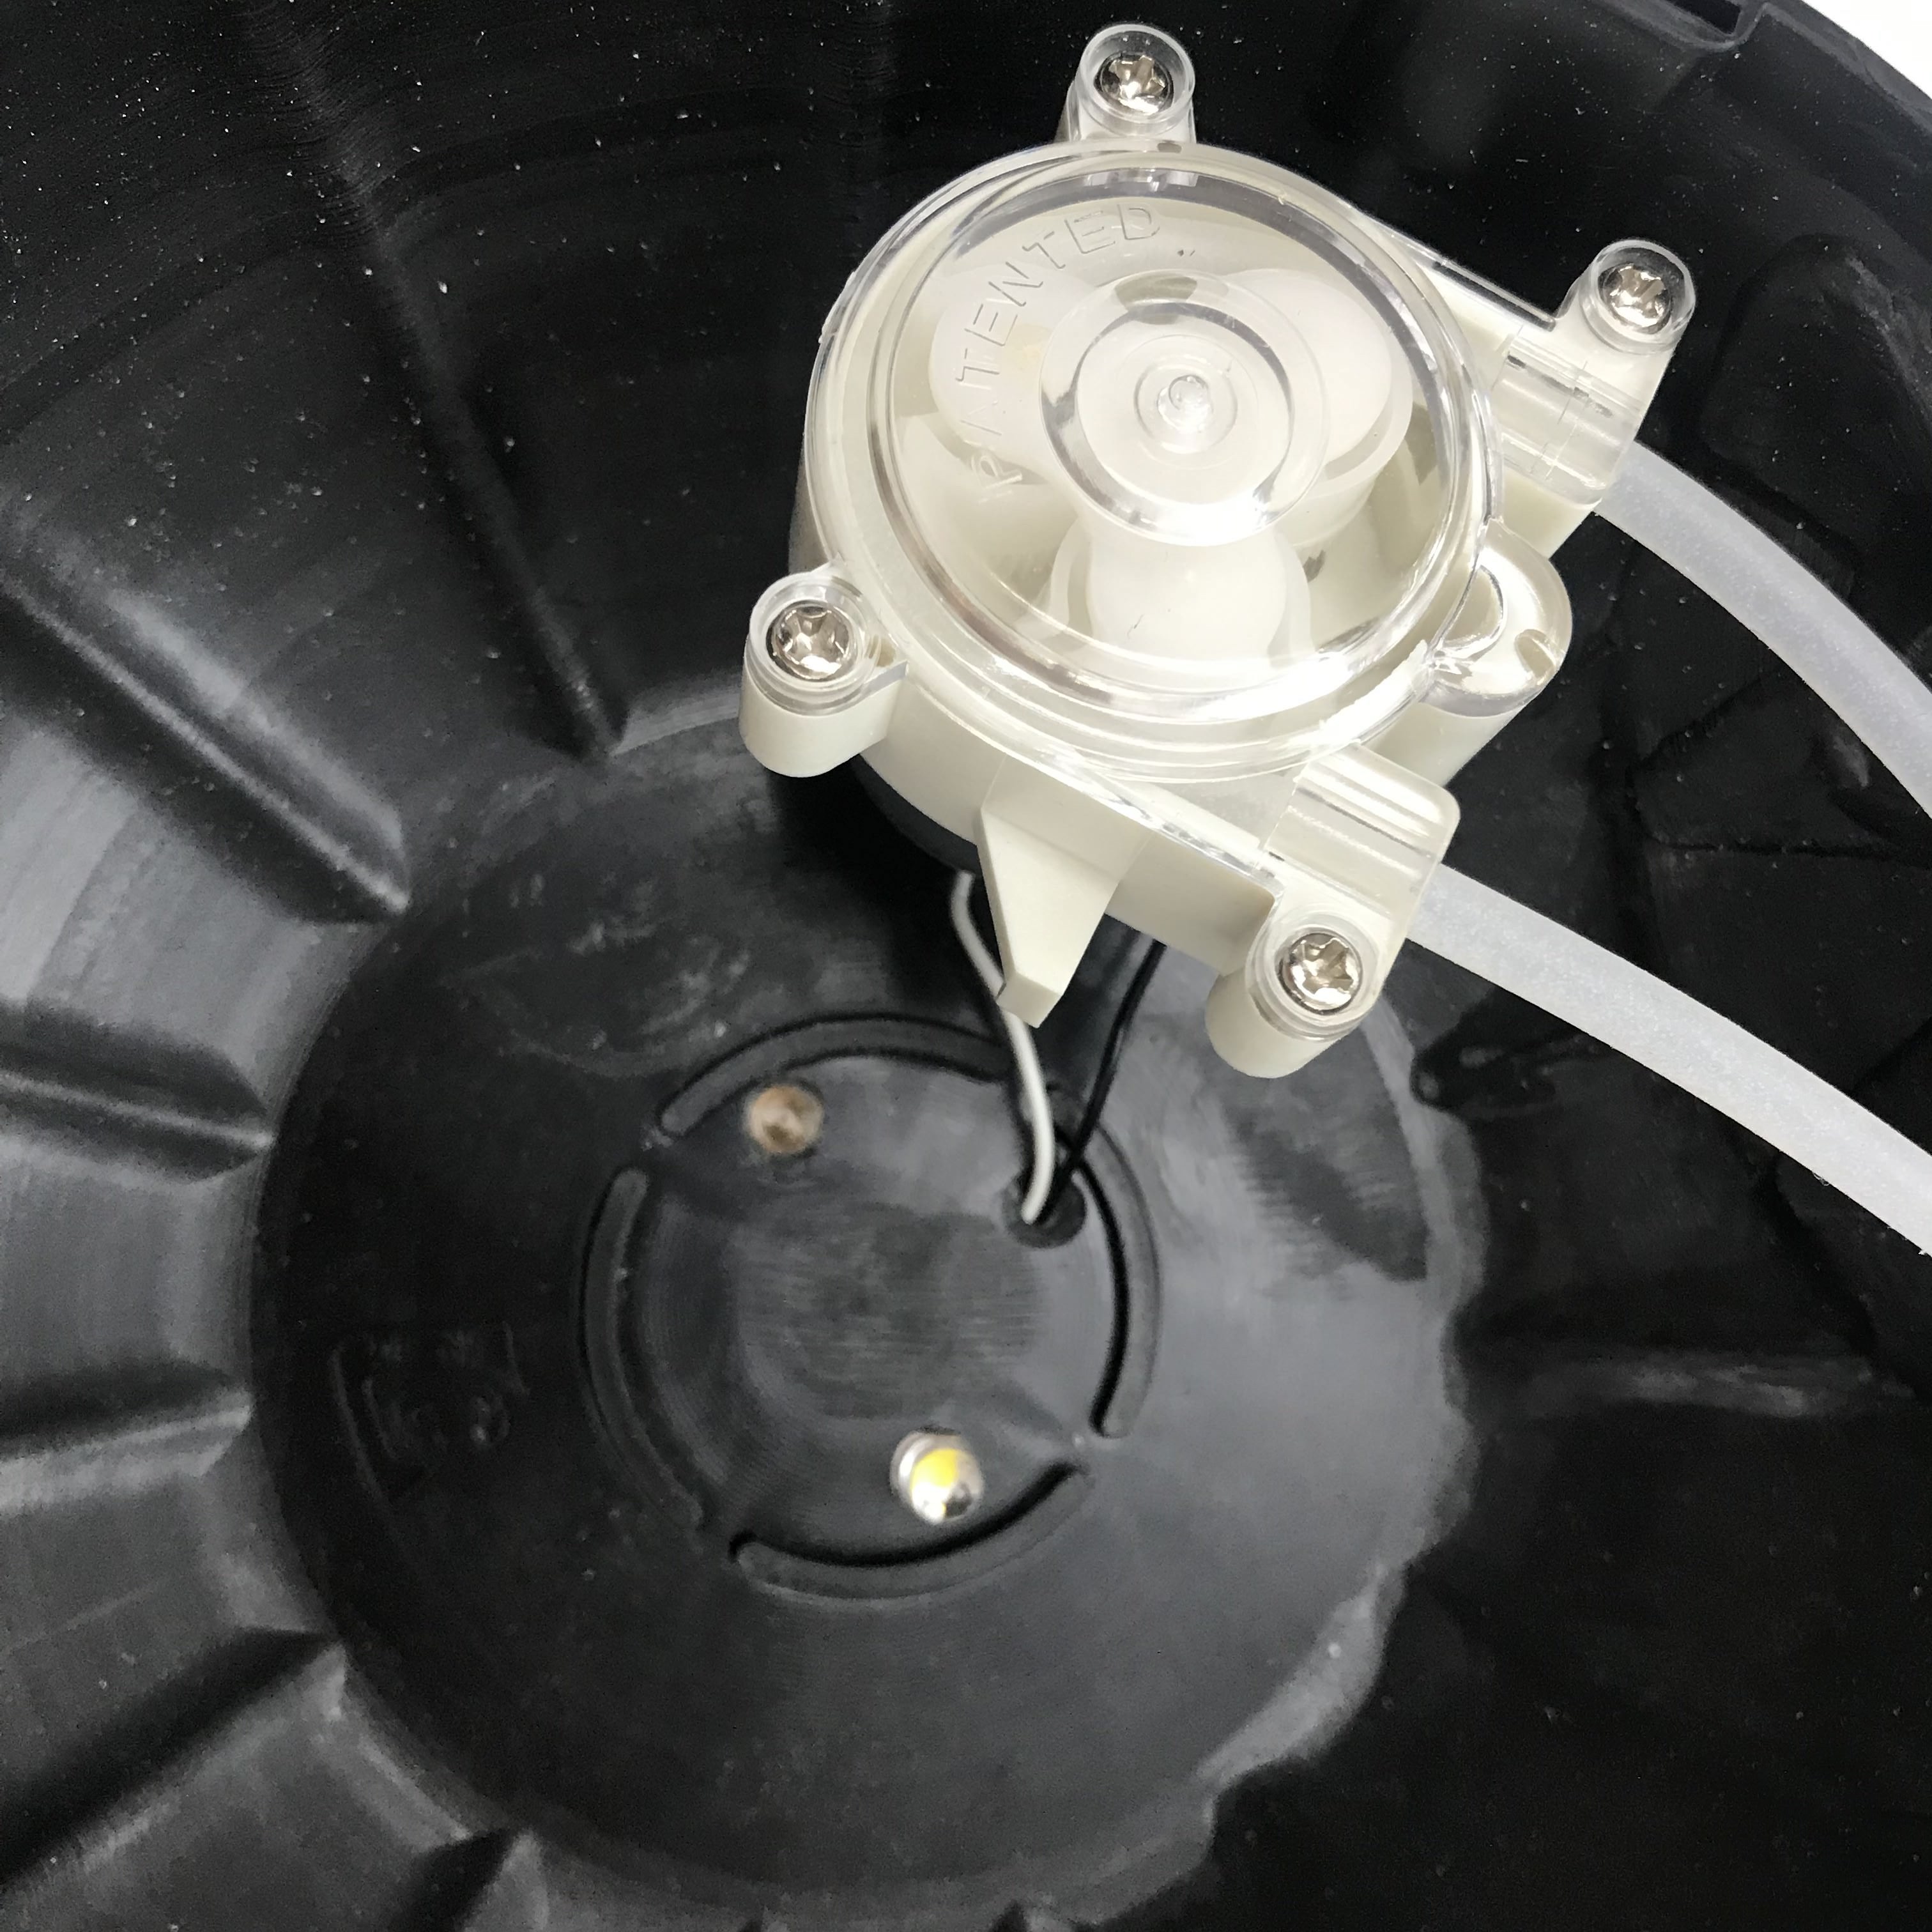
2. a mouth with a hole and mount for water pump.
3. a rather thin layer for the eyes and two holders for blinking LEDs.
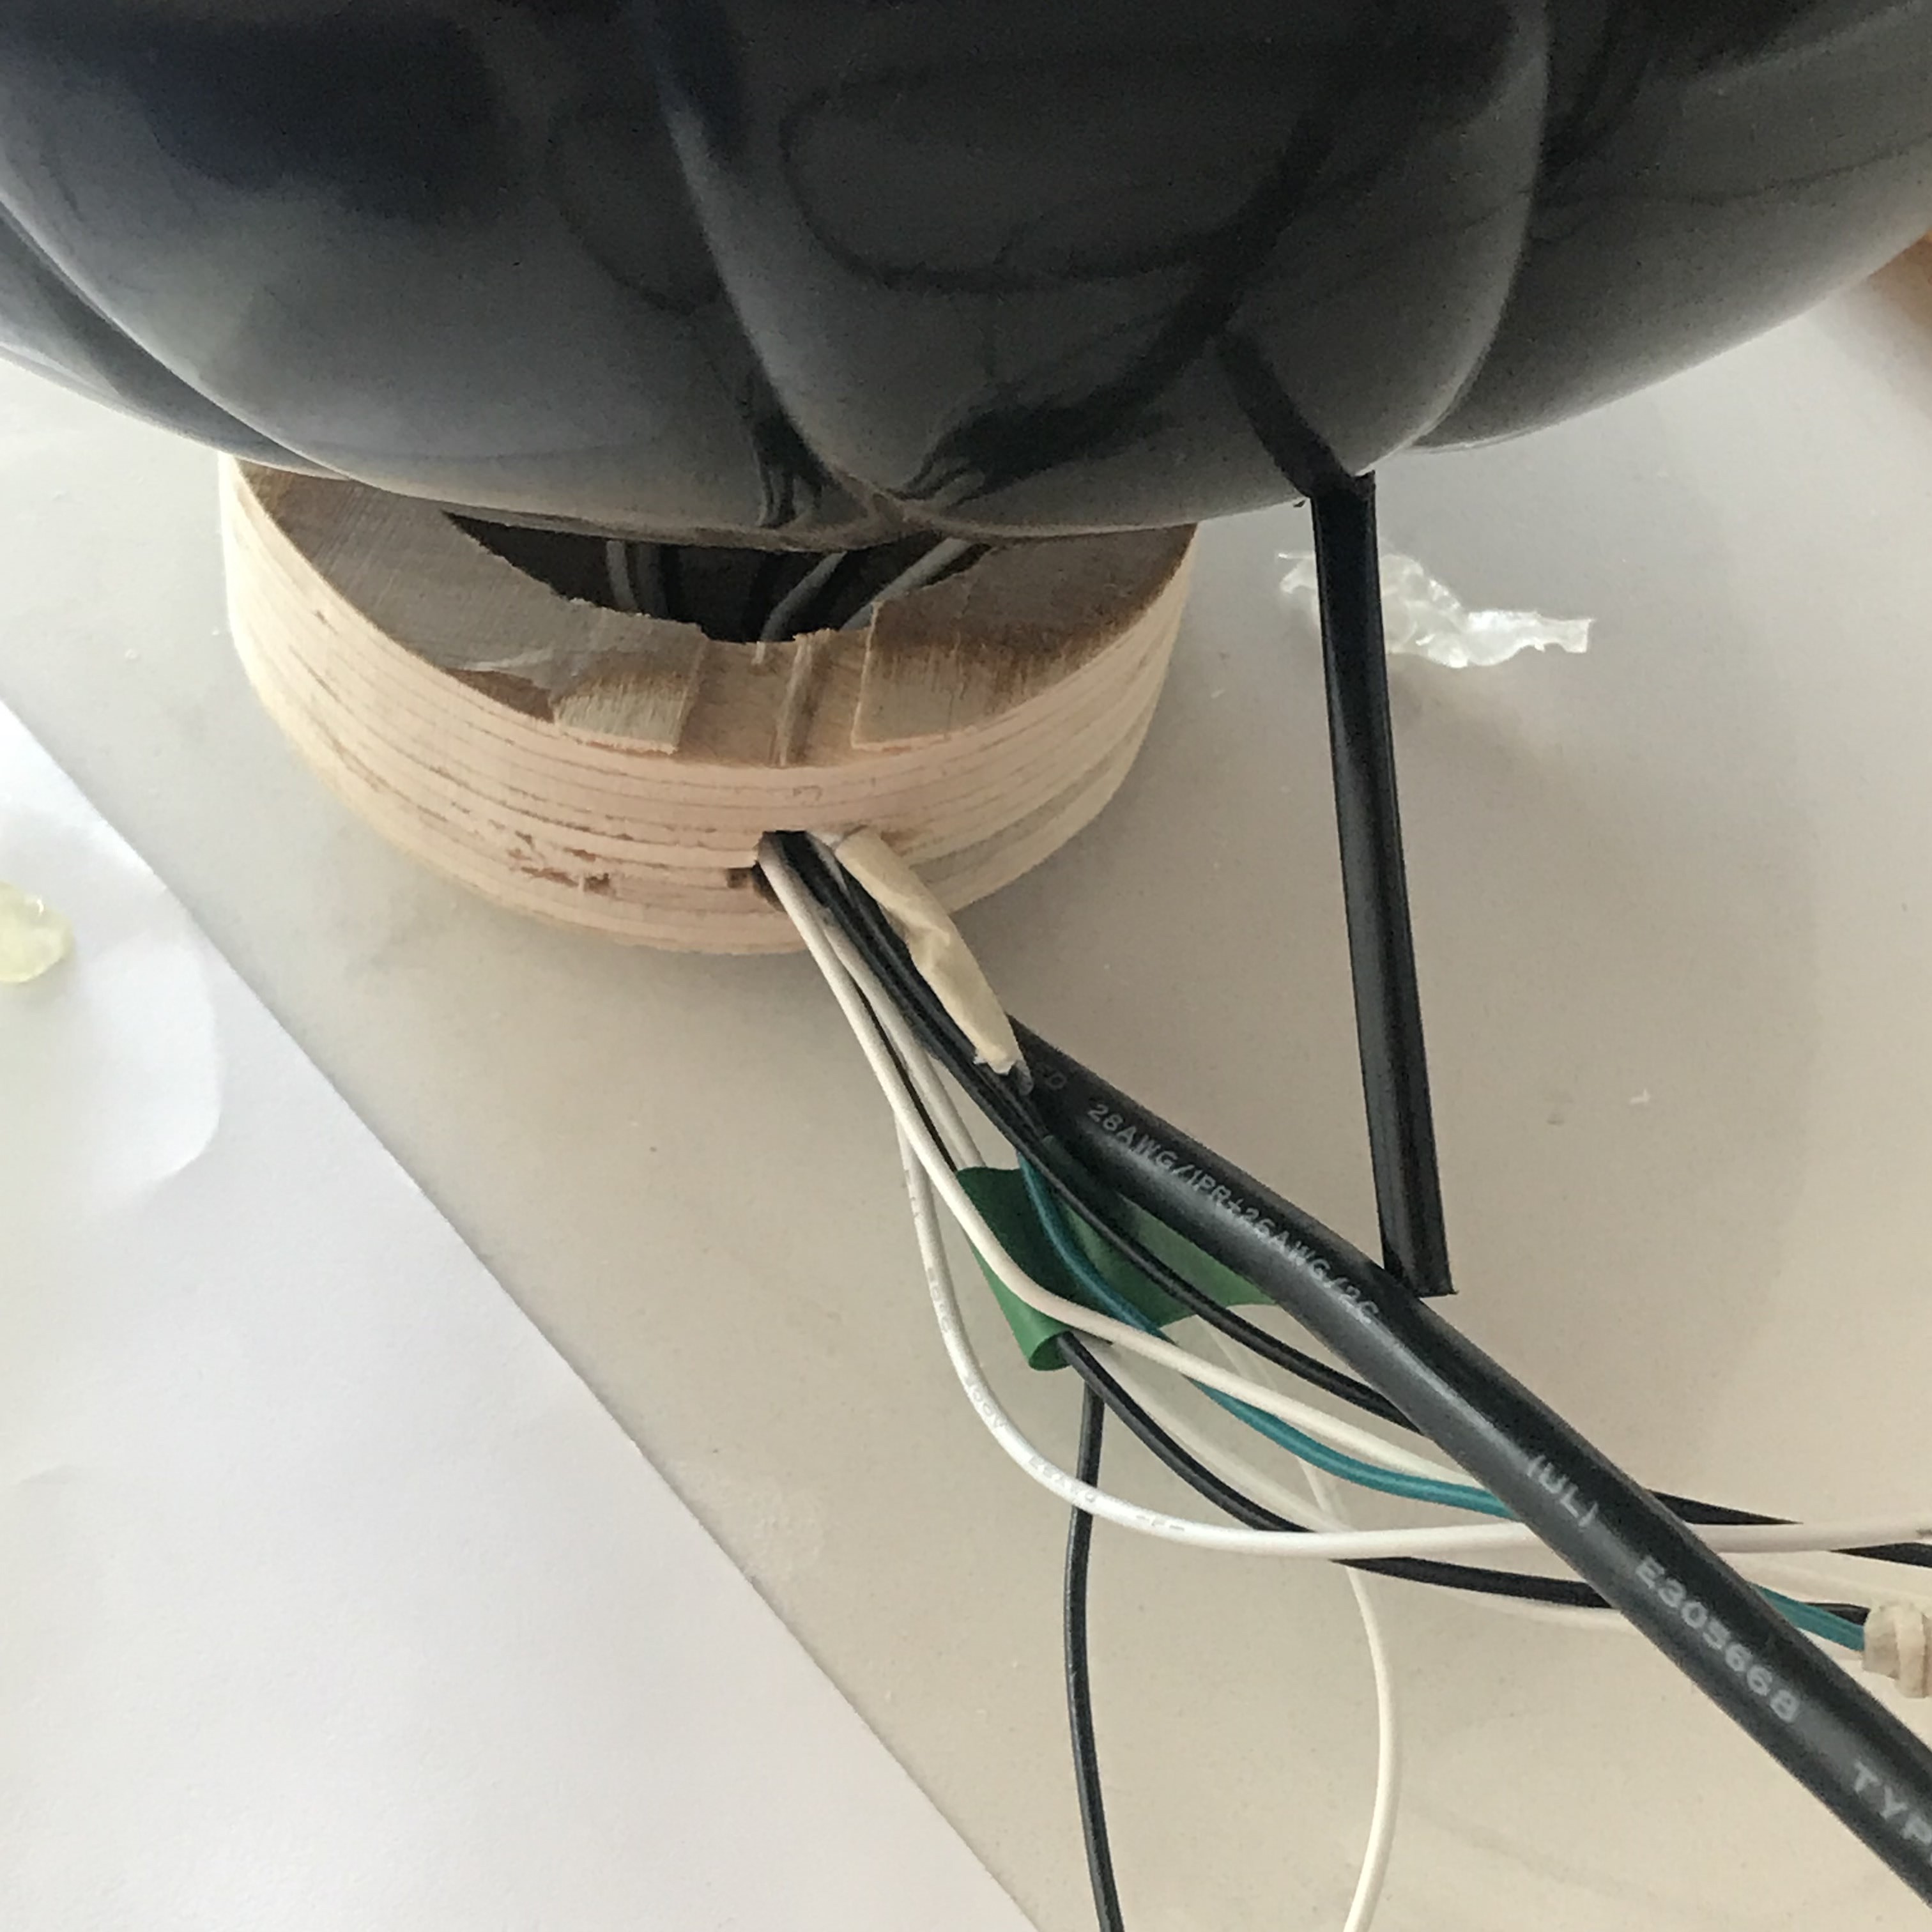
4. a thick layer at the bottom to hide and organize the wires.
However, as I asked for help on 3D printing, I noticed it will take almost a day to print a bucket and which might not even be working, also with a limited time on this project. So I decided to just save my time for the interactive part instead of the design for the bucket.
I made a wooden base at the bottom to hide all the wires, and drilled several holes inside that looks like this:
Before I mount everything, I need to make sure my 'comp' part works. I spent most of my time figuring out which data will be sent from p5 to Arduino and from Aruino to p5, and to make it clear I did this:
My story with water pump was sort of a nightmare... Not only because of I spent sometime setting up DC Motor driver and give up then go to the TIP120 transistor, but also playing with water wasn't a good choice...
However, here's my documentation of the treat:
And trick (the response takes 14s... but it is working):
Final Look
Last but not least, the code in my p5 page and arduino code could be find below or in the p5 page as well. And I will end here with some documentary photography. Thank you!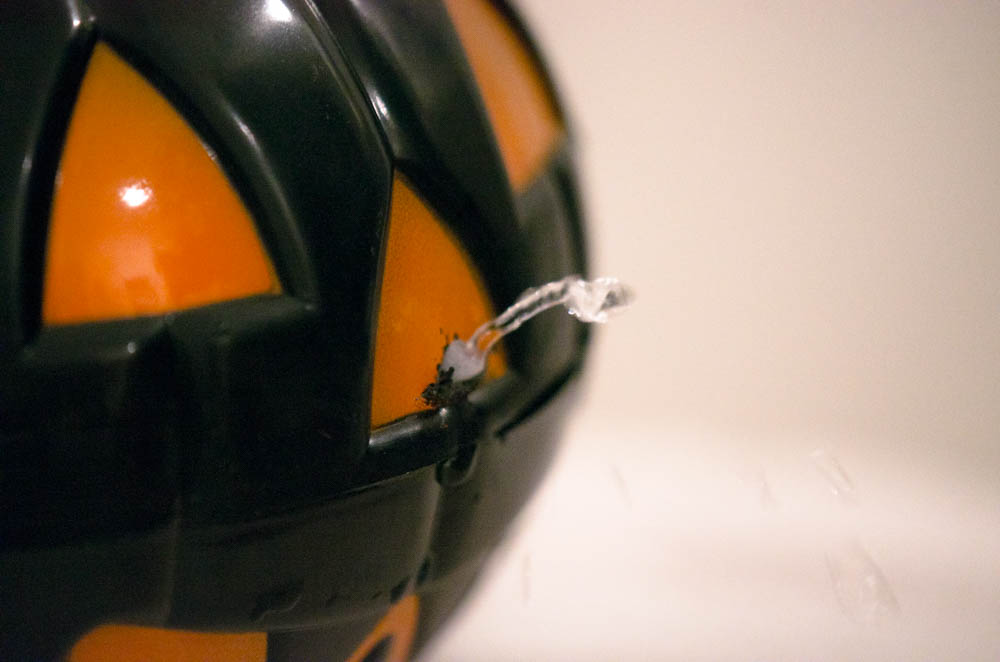

Arduino Code
#define lightSensor A0 #define sensorLED 2 #define waterPump 6 void setup() { Serial.begin(9600); pinMode(sensorLED, OUTPUT); pinMode(lightSensor, OUTPUT); pinMode(waterPump, OUTPUT); } void loop() { // analogWrite(waterPump, 0); if(Serial.available() > 0 ){ int byteFromSerial = Serial.read(); analogWrite(sensorLED, 255); if (byteFromSerial == 1){ analogWrite(waterPump, 255); delay(500); analogWrite(waterPump, 0); delay(5000000); } else if (byteFromSerial == 2){ analogWrite(waterPump, 0); } } int lightLevel = analogRead(lightSensor); Serial.println(lightLevel); delay(50); }
Week 5 - Phototransistor and CapacitiveSensor with Pencil and Coin
Light Sensor - The Phototransistor
I always wanted to try this light sensor when I see it in the kit. It is a little hard to control because the voltage is too low to have a larger range of data, but I created this little night light that will automatically turnon when the room is dark:After fullfilled my 'light sensor dream', which I want to continue work on my piano project, decide to use other input as the keyboard instead of light sensors.
CapacitiveSensor Library with Pencil
I somehow remembered from my middle school science class that the led in our pencil also is conductive for electricity. So I searched on it to see if it will also work for arduino and how can I use it. Then, this 'CapacitiveSensor' library grabbed my attention. With the example that the page gaves, I did a little try on it:This is how to include the library:
#include
WOohoo! It is so interesting! I'm gonna make a piano out of it..... WAIT! Someone on youtube already did it and it was super good looking... hmmmmm... maybe something else.
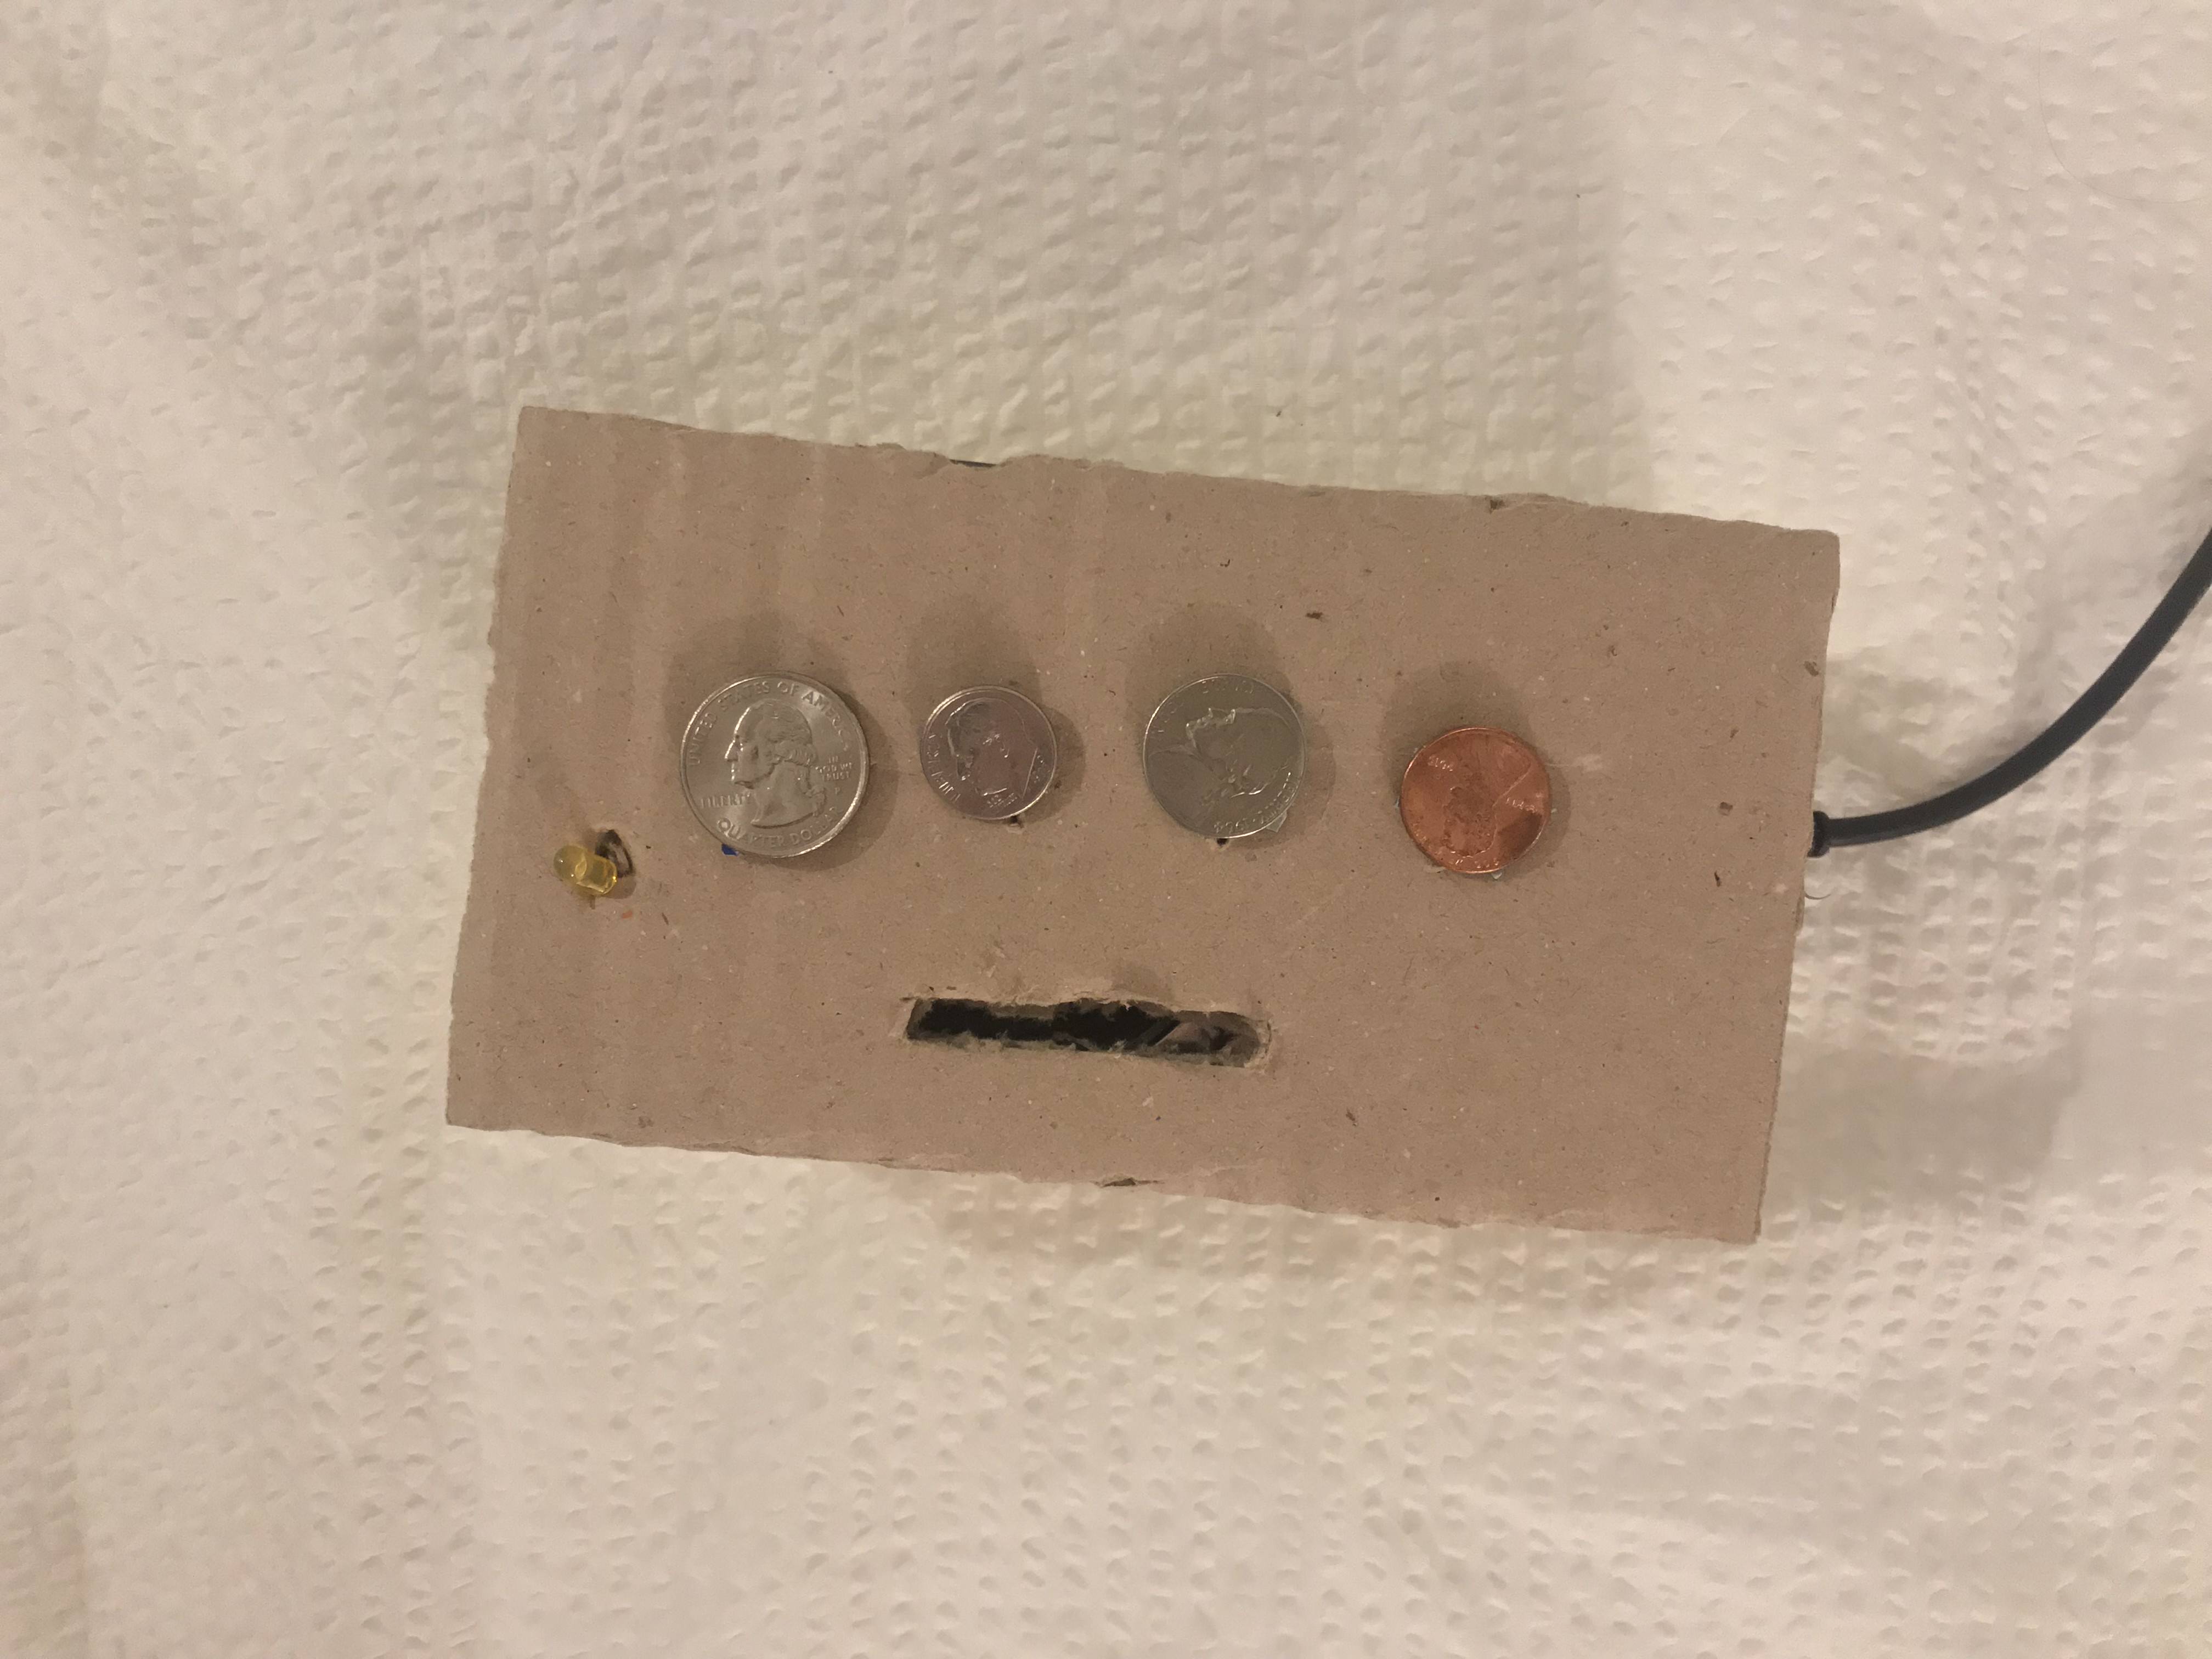
CapacitiveSensor Library with Coin
So, I looked around my room, and for someone like me who never carries around cash, has a lot of coins at home... Since they conduct electricity, I played around with them:Last week when I was trying to make a piano, the tone didn't play as expected. This time, I made each note into a void function with a delay and noTone in each:
#include
And then, this inspired me to make my "Where's My Dollar" Piano. The concept is, the coins on it is not even a dollar when it adds up...
The video:
Week 4 - Tone Output in a Box and Piano Wannabe
For this week's project, I combined with my fabrication box project!
And the code for this:
void setup() {
pinMode(5, OUTPUT);
Serial.begin(9600);
}
void loop() {
int potValue = analogRead(A7);
Serial.println(potValue);
int brightness = map(potValue, 0, 1023, 0, 255);
analogWrite(5, brightness);
int frequency = map(potValue, 0, 1023, 100, 4000);
tone(6, frequency);
delay(100);
}

And the code looked like this:
#define MI_PIN 4 #define RE_PIN 3 #define DO_PIN 2 #define soundPin 6 void setup() { pinMode(DO_PIN, INPUT); digitalWrite(DO_PIN, 0); pinMode(RE_PIN, INPUT); digitalWrite(RE_PIN, 0); pinMode(MI_PIN, INPUT); digitalWrite(MI_PIN, 0); Serial.begin(9600); } void loop() { Serial.println( digitalRead(DO_PIN) ); while(digitalRead(DO_PIN) ==1 ) { tone(soundPin, 262); } while(digitalRead(RE_PIN) ==1 ){ tone(soundPin, 294); } while(digitalRead(MI_PIN) ==1 ){ tone(soundPin, 330); } noTone(6); }
HOWEVER! It didn't work... The push button pins isn't even sending back 0 and 1s while another application with the same programming for the button pins works.
Week 3 - Digital and Analog Input, Servo and Observations
Digital Input
As I am playing with the LEDs, I feel anxious to see them being constantly lighted up so brightly--I want to make them dimmer--inspired me to look for a way to control the brightness level. I tried by playing with digitalWrite 0.5 and figured that this wont happen since it is still the digital signal (since there is no in between values, values under 0.5 will always be 0 and above will always be 1.) So to make it analog I watched a tutorial on generating analog signals and the solution is analogWrite! (yeah! changing the word from 'digital' to 'analog' took me so long!) But to make it loop in different brightness level, the code looks like this:#define whiteLEDPin 5 void setup() { pinMode(whiteLEDPin, OUTPUT); } void loop() { for(int value = 0; value<=255; value++){ analogWrite(whiteLEDPin, value); delay(30); } delay(50); for(int value = 255; value>=0; value--){ analogWrite(whiteLEDPin, value); delay(30); } delay(50); }
So first thing first, connect to the LED pin, always. In the loop section, I created a interger called value,
for(int value){
}
which the initial value of 'value' will be 0 (LED turned off)
for(int value = 0;){ }
and when value is smaller or equals to 255 (bits), the value increases:
for(int value = 0; value<==255; value++){
}
After that, use analogWrite to light up the LED:
for(int value = 0; value<=255; value++){ analogWrite(whiteLEDPin, value); delay(30); }
This will light up the LED with a smooth gradient in brightness, but to make it a loop back to off, we will need this:
for(int value = 255; value>=0; value--){ analogWrite(whiteLEDPin, value); delay(30); }
and now it is a smooth looping in brightness, yay!
Analog Input
The first try I had with analog input was the sensor. I saw it and always wanted to use it, but the connection wasn't challenging at all (cocky), I just connect the sensor to the board and it worked with the same code we did in class.And so my attention goes to the potentiometer instead--I want to create a LED party--being able to control more than one LED with the potentiometer. Knowing that LED has 255bits, to detect a analog signal, I will also need to set integer for the bits of a potentialmeter. But before that, define the pin of the LEDs: there are more than one LED, so set a integer that states the initial output pin as the first LED that you want to light up.In my case it is Pin 2:
void setup() { for(int i=2;){} }
Then, like the value integer from the previous application, we tell it to increase when it is smaller and equals to 7. And we have the LEDs connected:
void setup() { for(int i=2;i<=7;i++) { pinMode(i,OUTPUT);} }
Next, by knowing that the value for a potentiometer is 0-1023, we need some sort of 'translation' to make 0-1023 = 2-7. And this can be done by the map(). I set an ineger for this value:
void loop() { int pot = map(); }
Afterwards, we tell map about where to read, translate what 'low and max' value into what 'low and max' value.
void loop() { int pot = map(analogRead(A5), 0, 1023, 2, 7); }
Now, set integer i as off, and when i is increasing when it is smaller and equals to pot, i is HIGH (on). And then set the i as 'just bypassed' the LED to make a turning off loop.
void loop() { int pot = map(analogRead(A5), 0, 1023, 2, 7); for (int i=0;i<=pot;i++) { digitalWrite(i,HIGH); } for (int i=pot+1;i<=7;i++) { digitalWrite(i,LOW ); } }
So the entire code looks like this:
void setup() { for(int i=2;i<=7;i++) { pinMode(i,OUTPUT); }} void loop() { int pot = map(analogRead(A5), 0, 1023, 2, 7); for (int i=0;i<=pot;i++) { digitalWrite(i,HIGH); } for (int i=pot+1;i<=7;i++) { digitalWrite(i,LOW ); } }
And work like this:
In the cover video, I change the value of the initial LED pin to that is one before the initial LED, so that all lights can be off at the initial and when switched off.
Servo
Now, I know how to use a potentiometer, I know how to connect it to a servo! I THINK!First, I tell it the existence of my servo, name my servo as myservo, and have it setted up to pin 9:
#include
Then, like what I have did in the LED party application, translate the signals of servo and the potentiometer using the map() function. In this case, I heard that it is better to set the initial of servo as 4 and highest at 176 even though the value is 0-180, because servo kind of vibrates even when you turn the potentiometer to 0. But this value still didn't stop my servo from vibrating. However, this is how the code looks like:
#include
And here is my beautiful servo controlled by the potentiometer:
Observation - Lasercutter
Laser-cutter is the technology that I 'interacted' the most for the past week, and also the technology that I observed it 'interact' with people the most. The input will be from the computer, to the laser-cutter, just like any printer will work, the output is physical. The language you use to communicate with laser-cutter is to use Adobe Illustrator (vector files) with either a stroke of 0.001pt (for the itp one) and a power set to 85-100%, a speed of 15%-20% to cut through, or a fill with a power of 30-50% and a speed of 80-100% to engrave. This digital to physical transition seems really fascinating. However, these numbers and your vector files doesn't promise you the preciseness. The physics of how laser works and the material you use always creates uncertainties. Below are some stories happened with laser-cutter that I observed while I was suffering at the shop area:Scene: "It didn't cut through"
My classmate had been standing in front of the laser cutter for 20 mins with some acrylics in different colors that had been cut and engraved on the side, and he had been sending the same job three times already to same piece of acrylic. Finally, he can’t do it anymore on the piece that already had several same cuts that are all slightly off, he went to the shop staffs and asked for help. The power setting and everything else are all the same, the only difference is the color—which laser is basically a beam of light—will act differently when it shoots to different color or transparency.
Comment: The uncertainty always exist due to behavior of lights—when the beam hits the material, it will be reflect/bent due to PHYSICS (aka just-how-things-work-on-earth), however, this uncertainty was never really officially stated in the input system nor the on the machine itself. Also, even on the same piece in one round, the power will be different depending on how far the beam head need to travel from its initial position. So if the head need to travel to the opposite corner, it might not cut through while the one that is closer to its starting point successfully cut through. That is, a bad communication or we say, bad user experience. It is almost feels like a fraud when you submitted a perfect file and ended up with that. Next, talking about this happening mention previously, it is obvious to notice how different the machine will react when it is treating different materials, however, due to the special characteristic of light reacting to color, it is hard to calculate how you should put it the power, this without and explanation or educational support, assumed everyone being an expert in physics (at the same time fabrication and possibly design). This means, instead of parallel communication, it requires the user to be well educated to be able to interact with the technology, which is no-longer an efficient nor high interactivity. Also, another evidence of low interactivity is that the machine only considered one side of the input, which is the vector file and settings you sent from the computer, yet not the material been putted on the machine—I think this is a big drawback.
But, I still love it
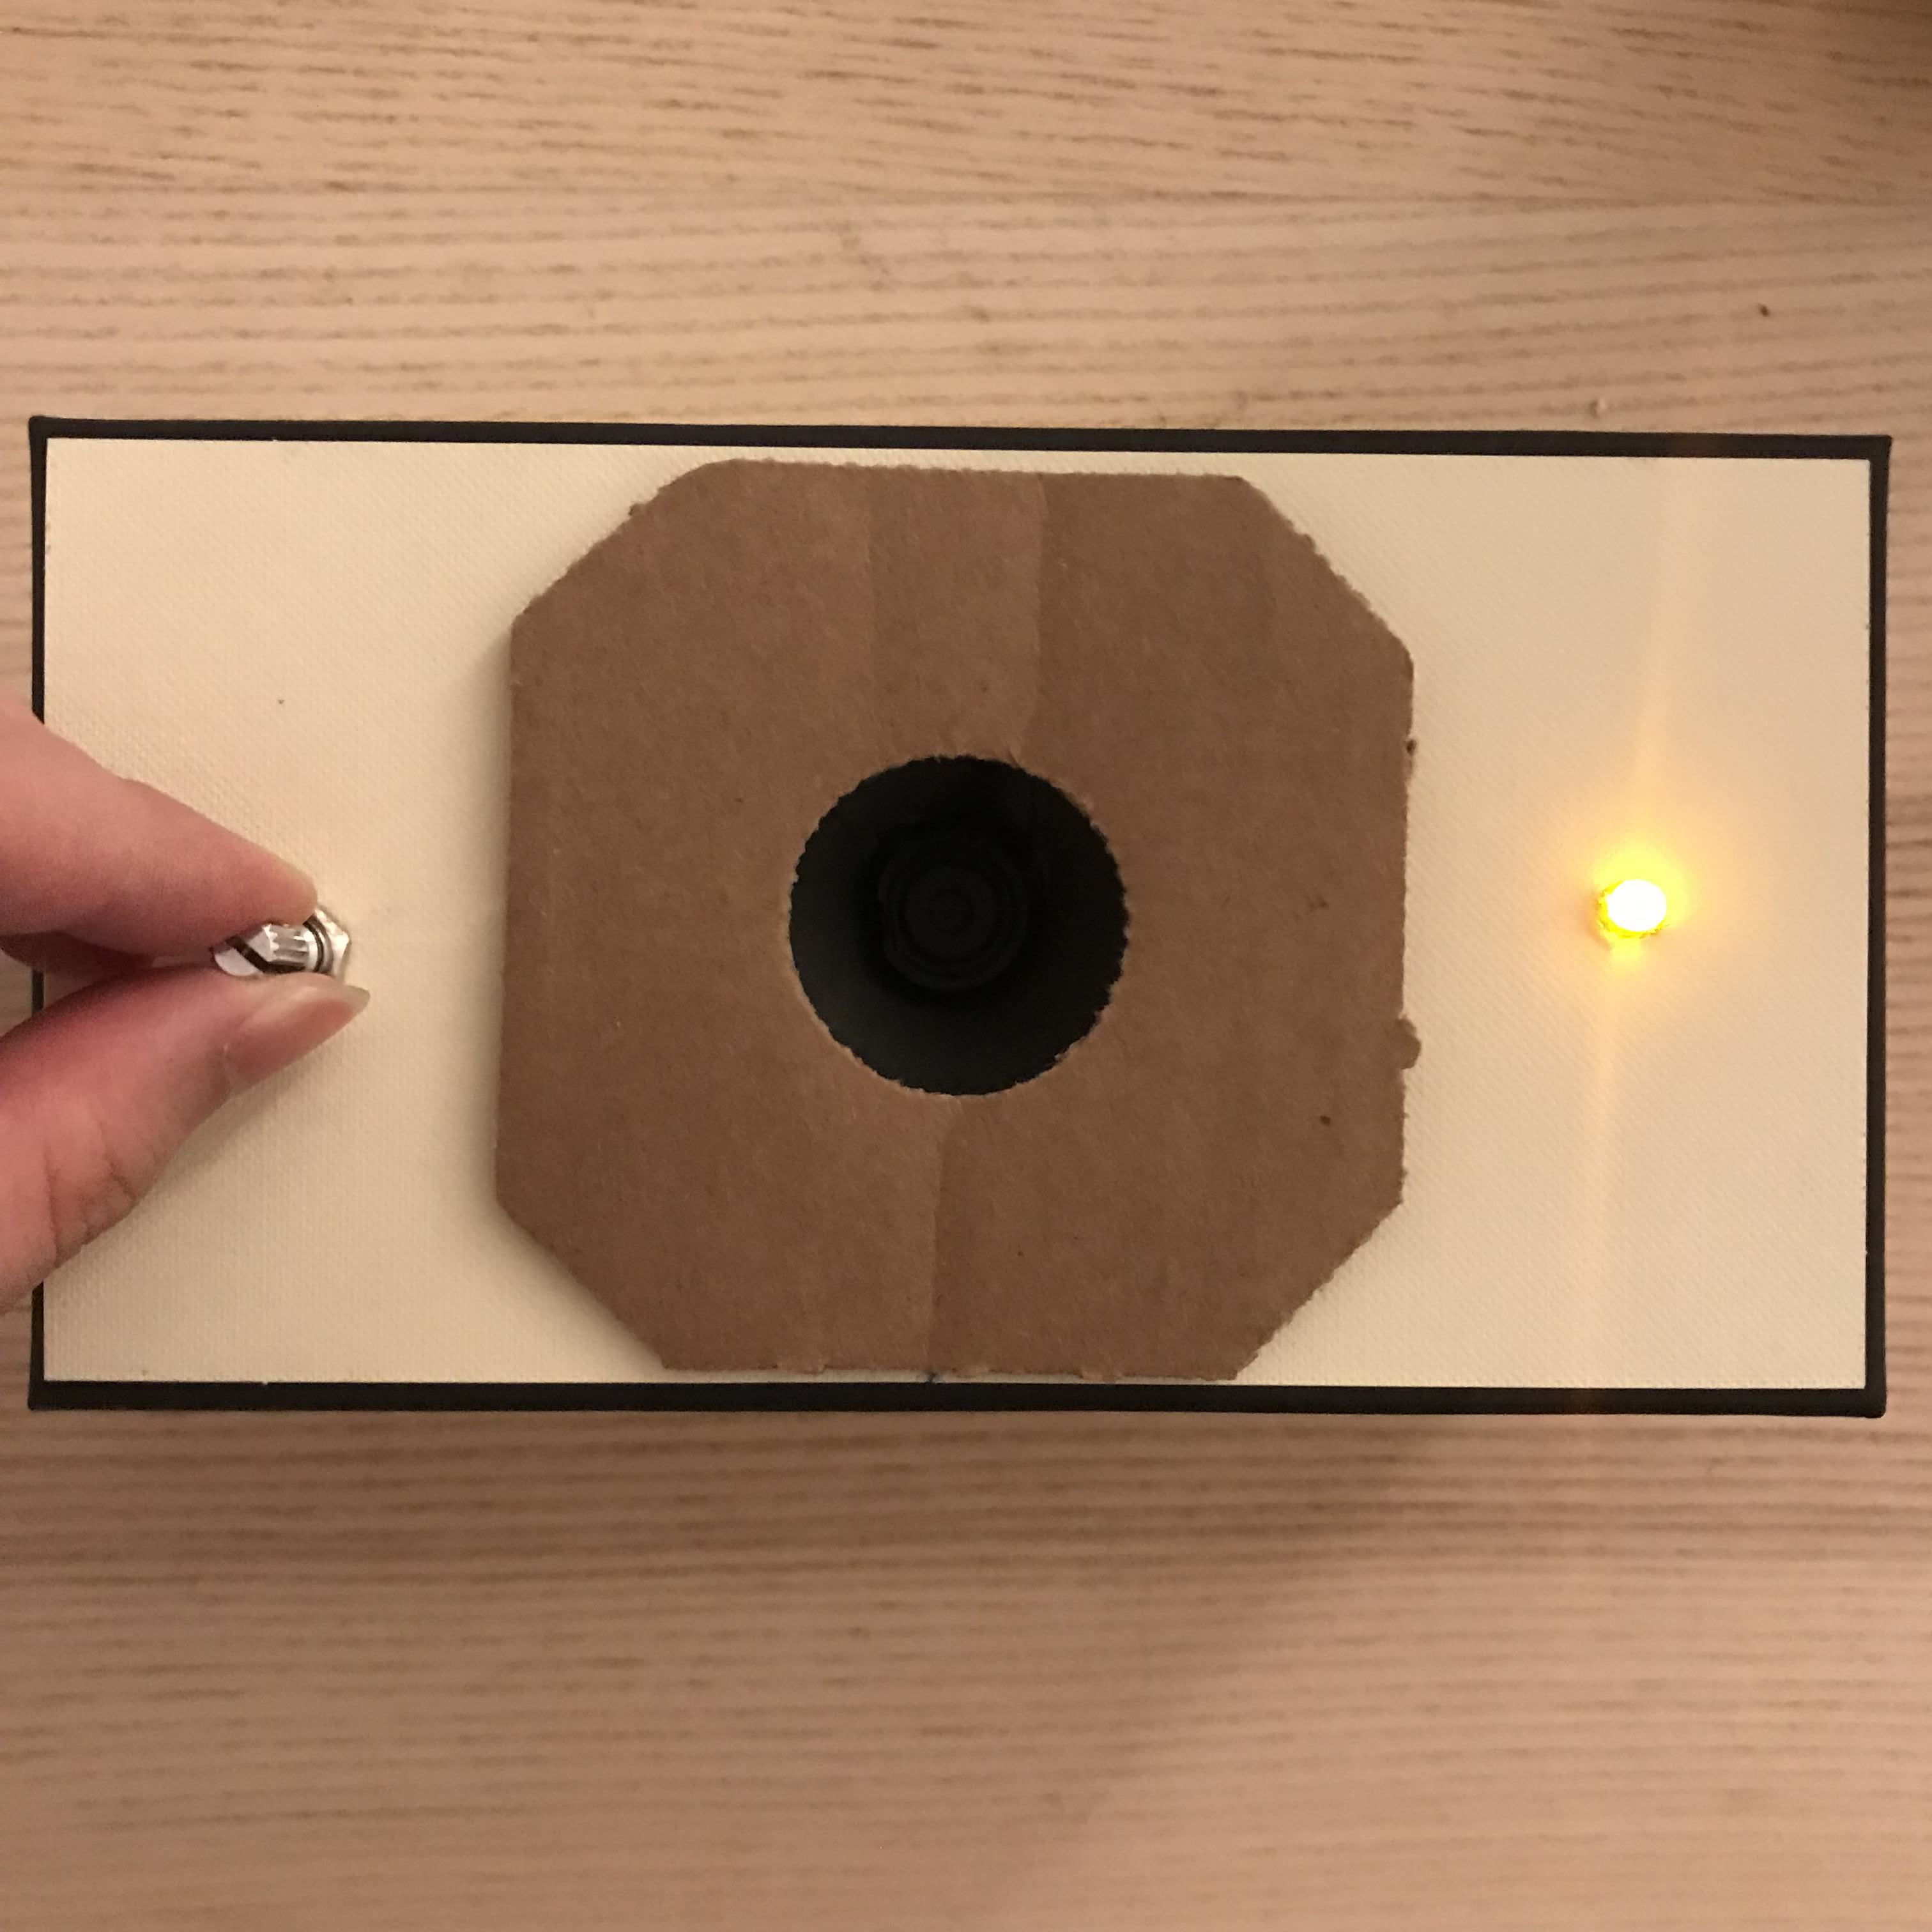
Week 2 - Lumos Maxima Switch
Led Light Switch on Arduino
It is all done by Magic.
Try:
Lumos Maxima...
Lumos MaxiMa...
Lumos MAXIMA!!
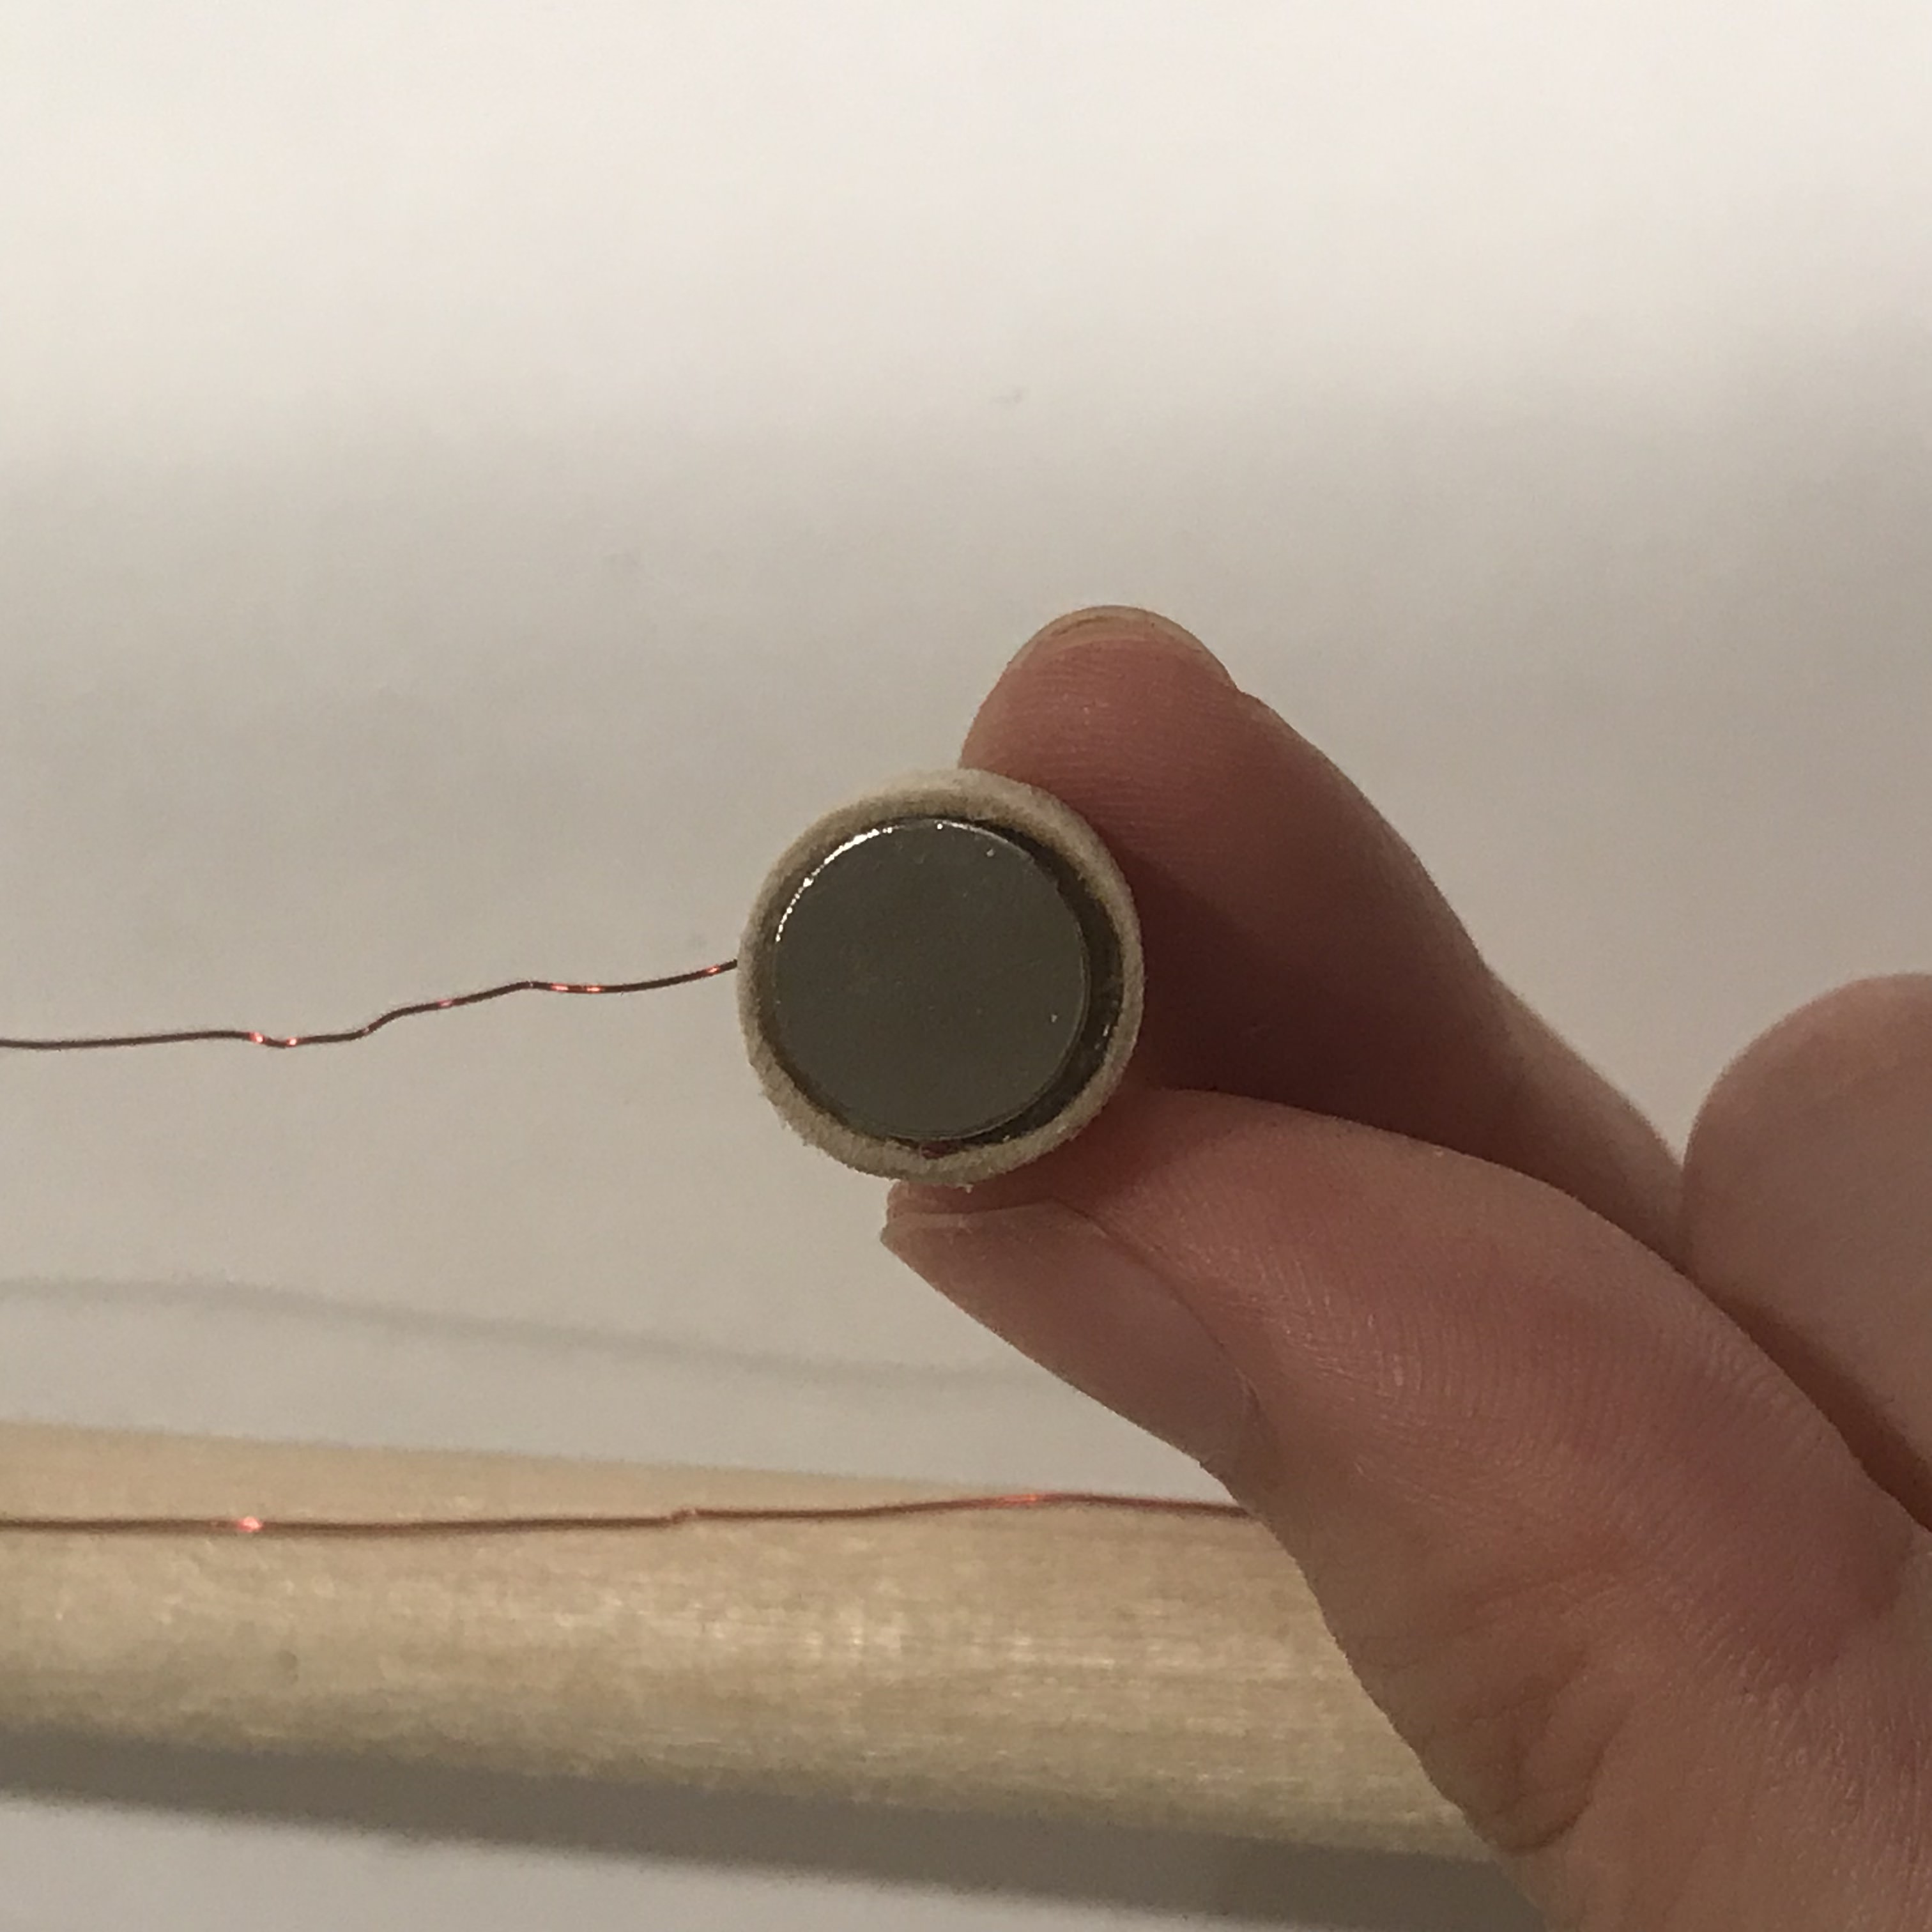
Hi... So the inspiration came from the material--magnet, which I intend to get it for another class, that also conduct electricity. I wanted to make a switch that happen to looks like:
Yet, when I was trying to connect the thin wire to the magnet, I figured that, unlike the on ein the image, every material need to be nude and touching each other inorder to have the current flow. However, when magnet are touching each other, their force are too big to have the circuit open again. Facing the truth of my lack of knowledge in this field (only for now), I need to think of another way since I do not want to give up on the material.
So, instead of having the magnet as one of the connections, I used the ability of magnet as the force to close the circuit. By using a material that can be attracted to magnet and one that only conduct electricity but not attracted to magnet. I had some help with google, and I had this
After the first try, I made a new, cleaner version of the system:

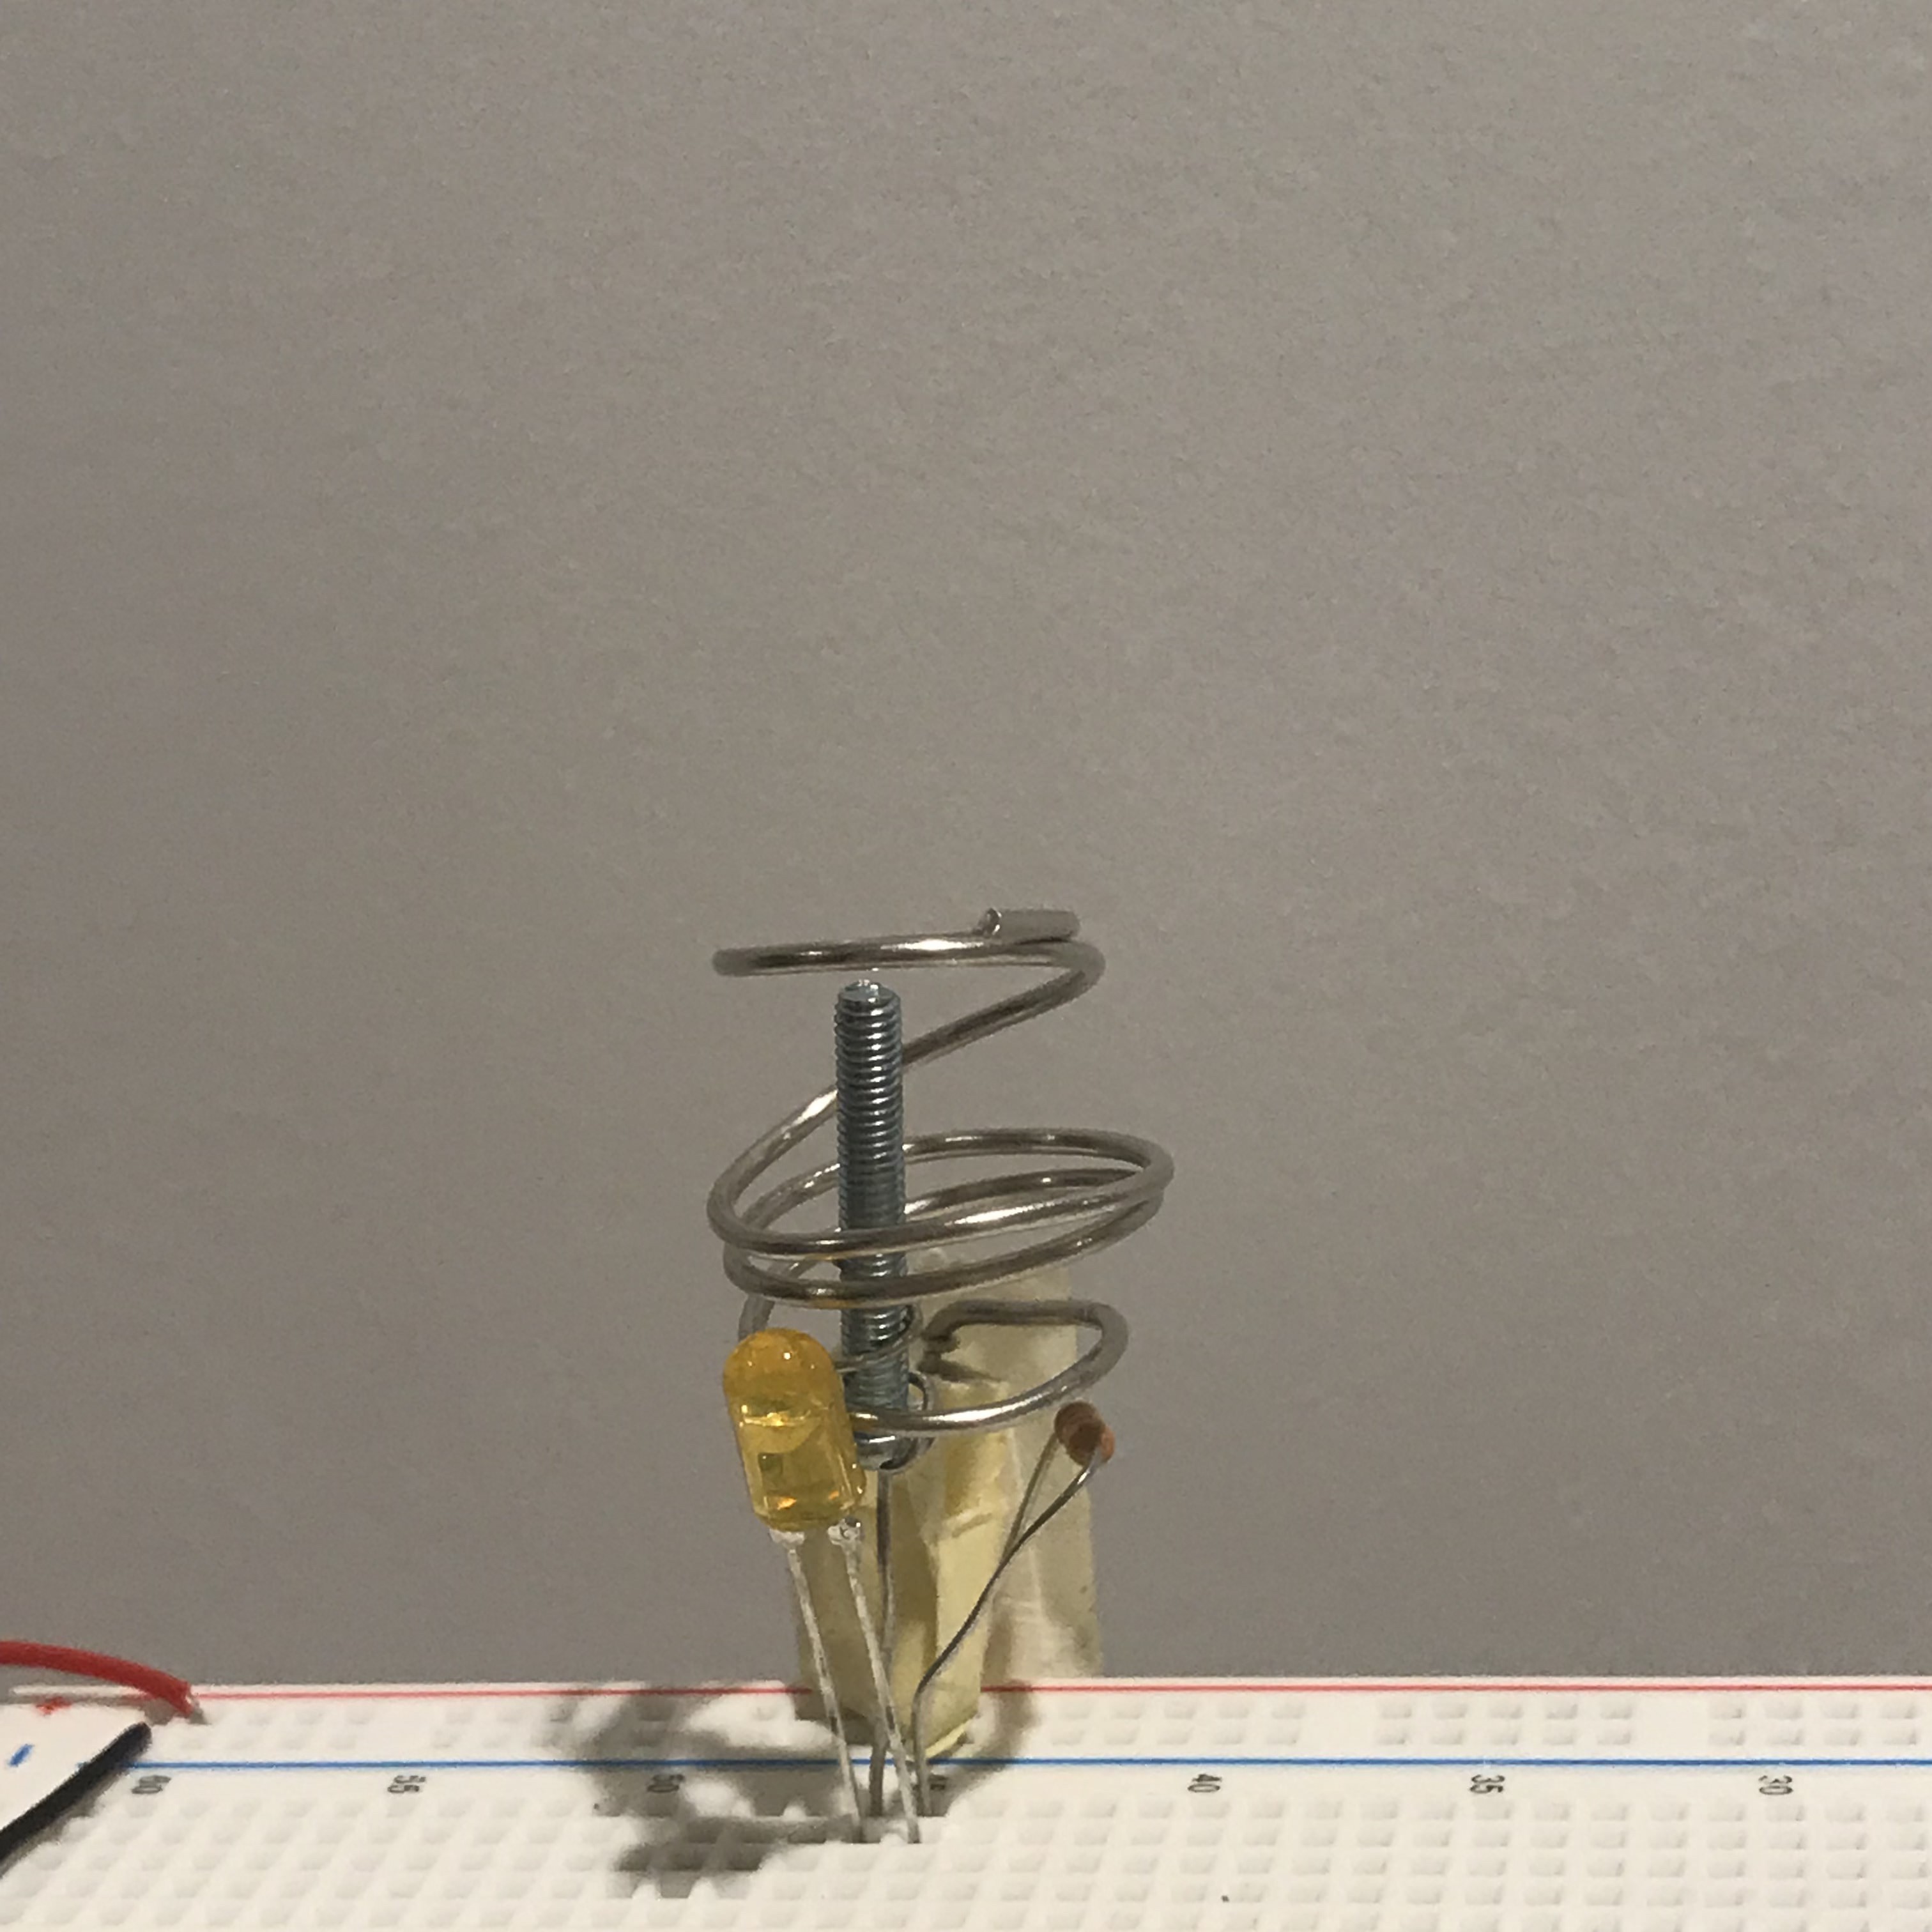
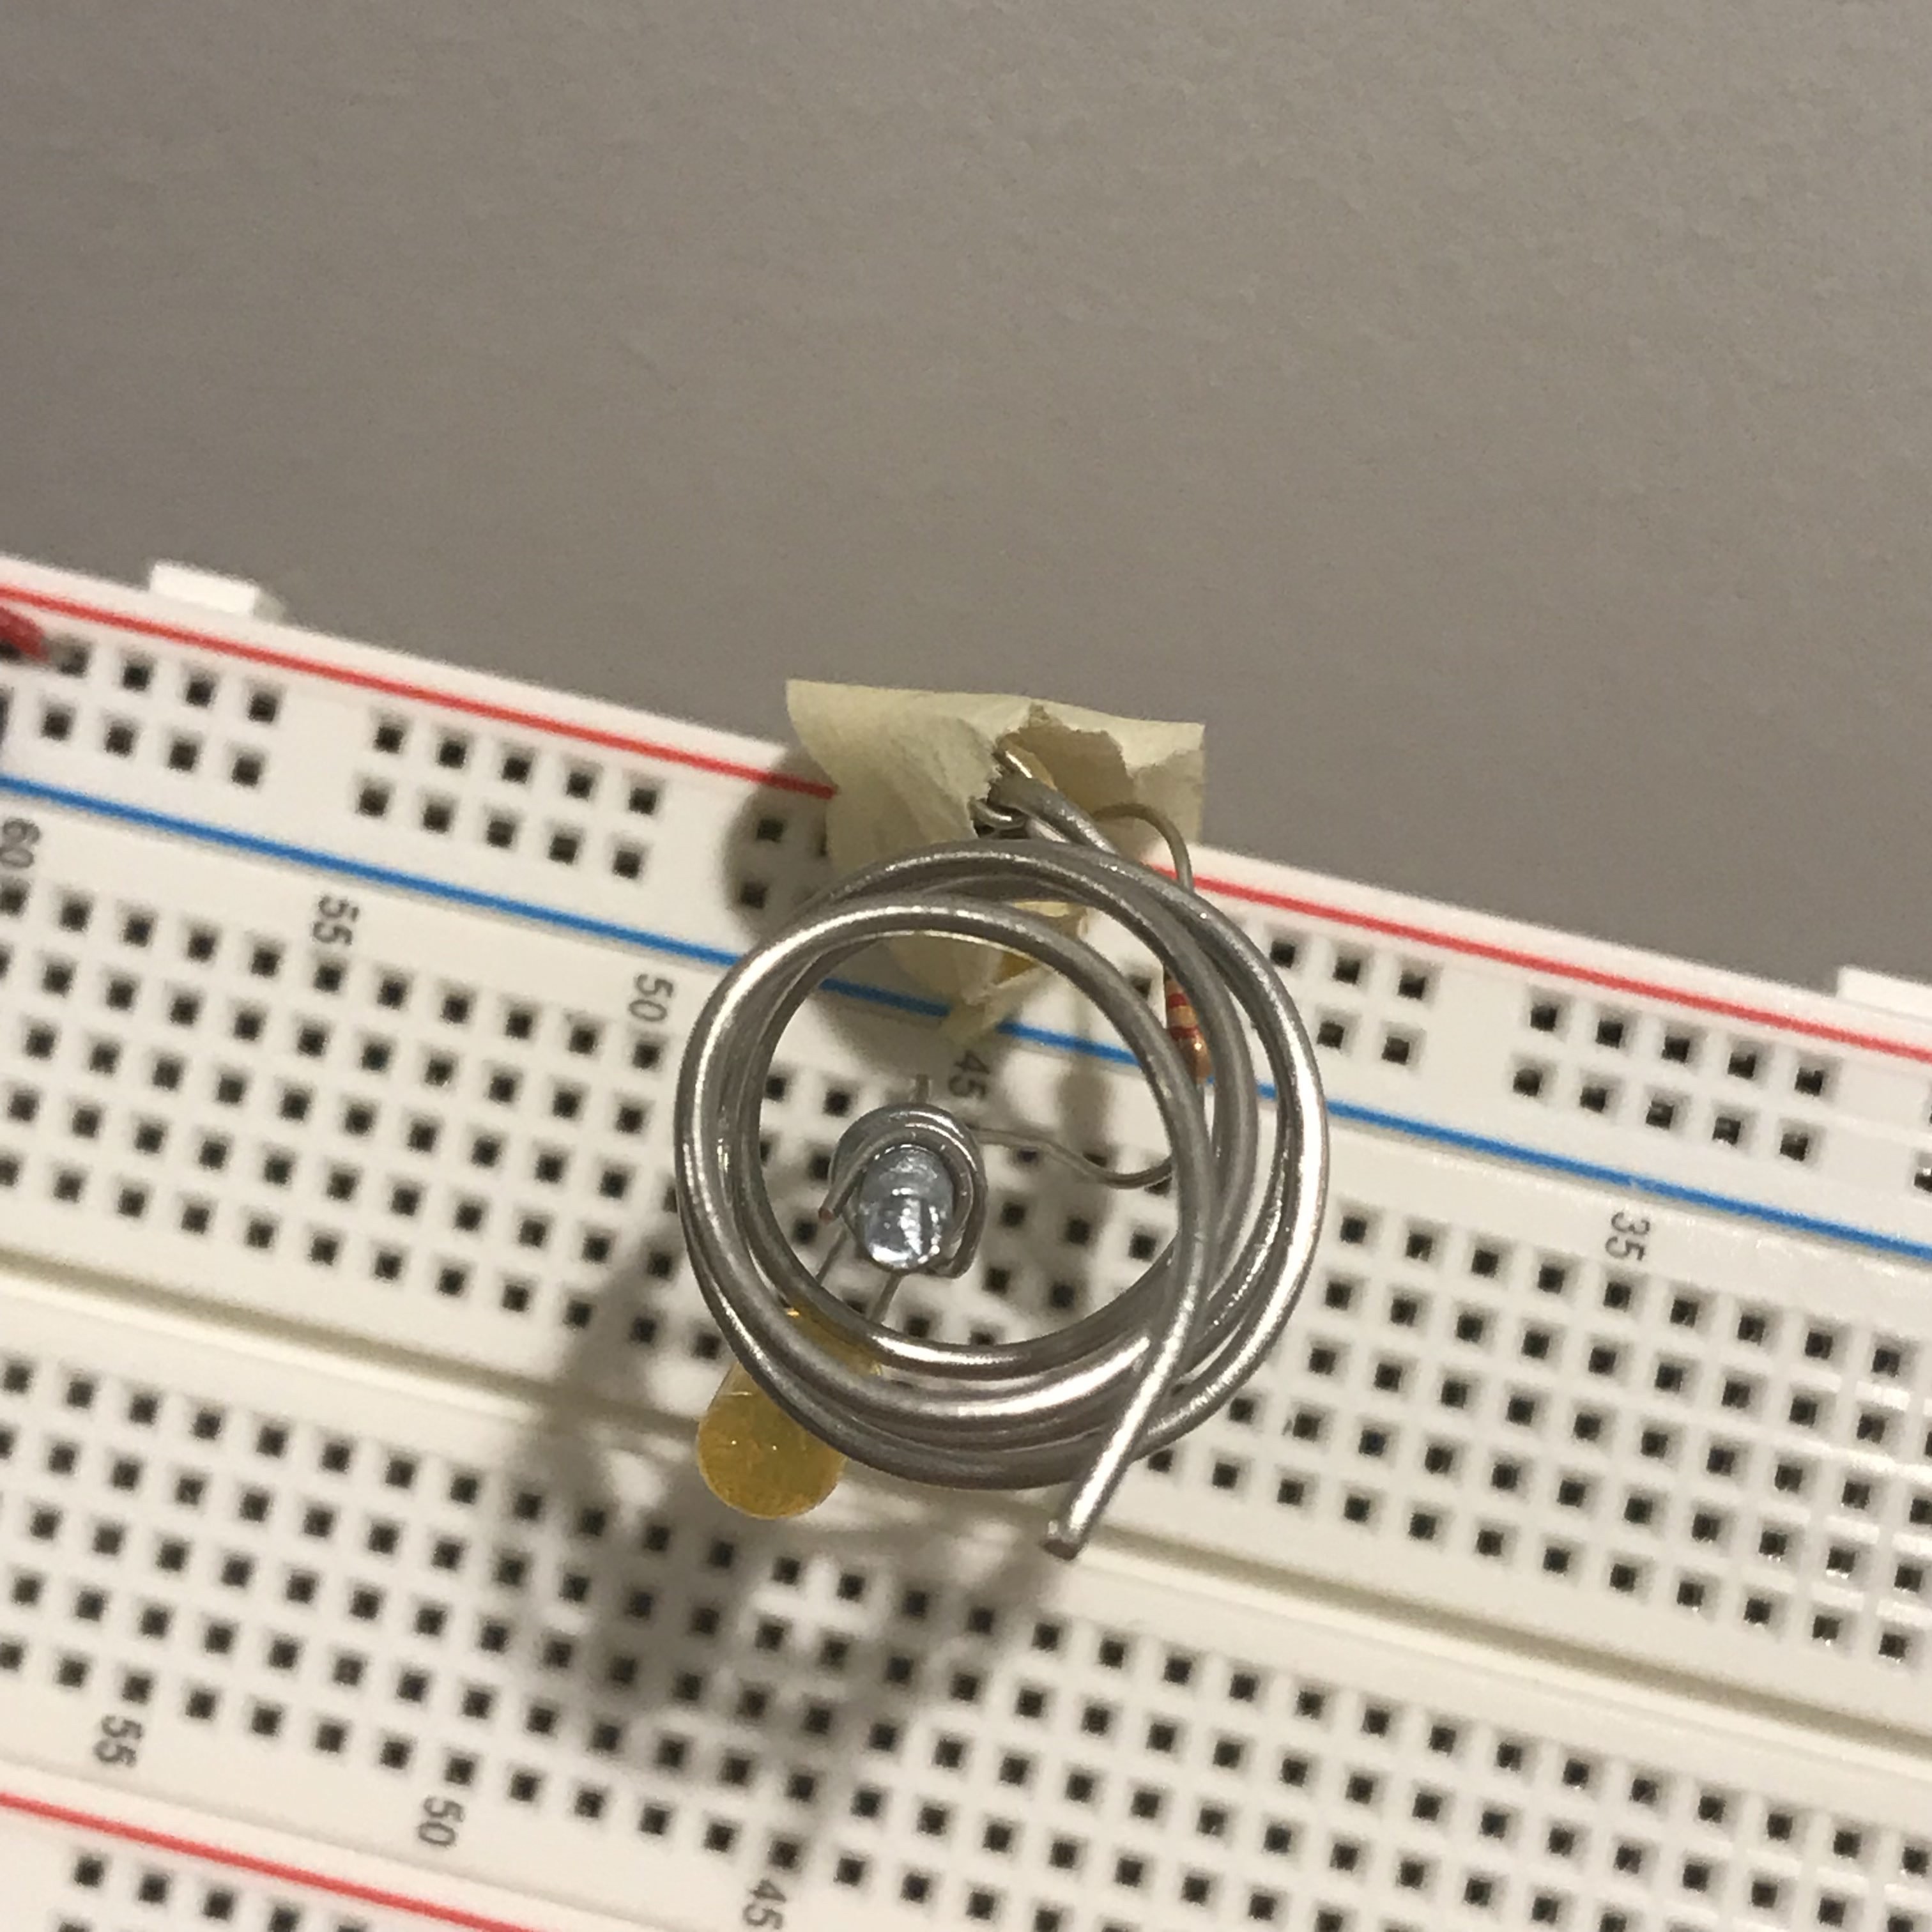
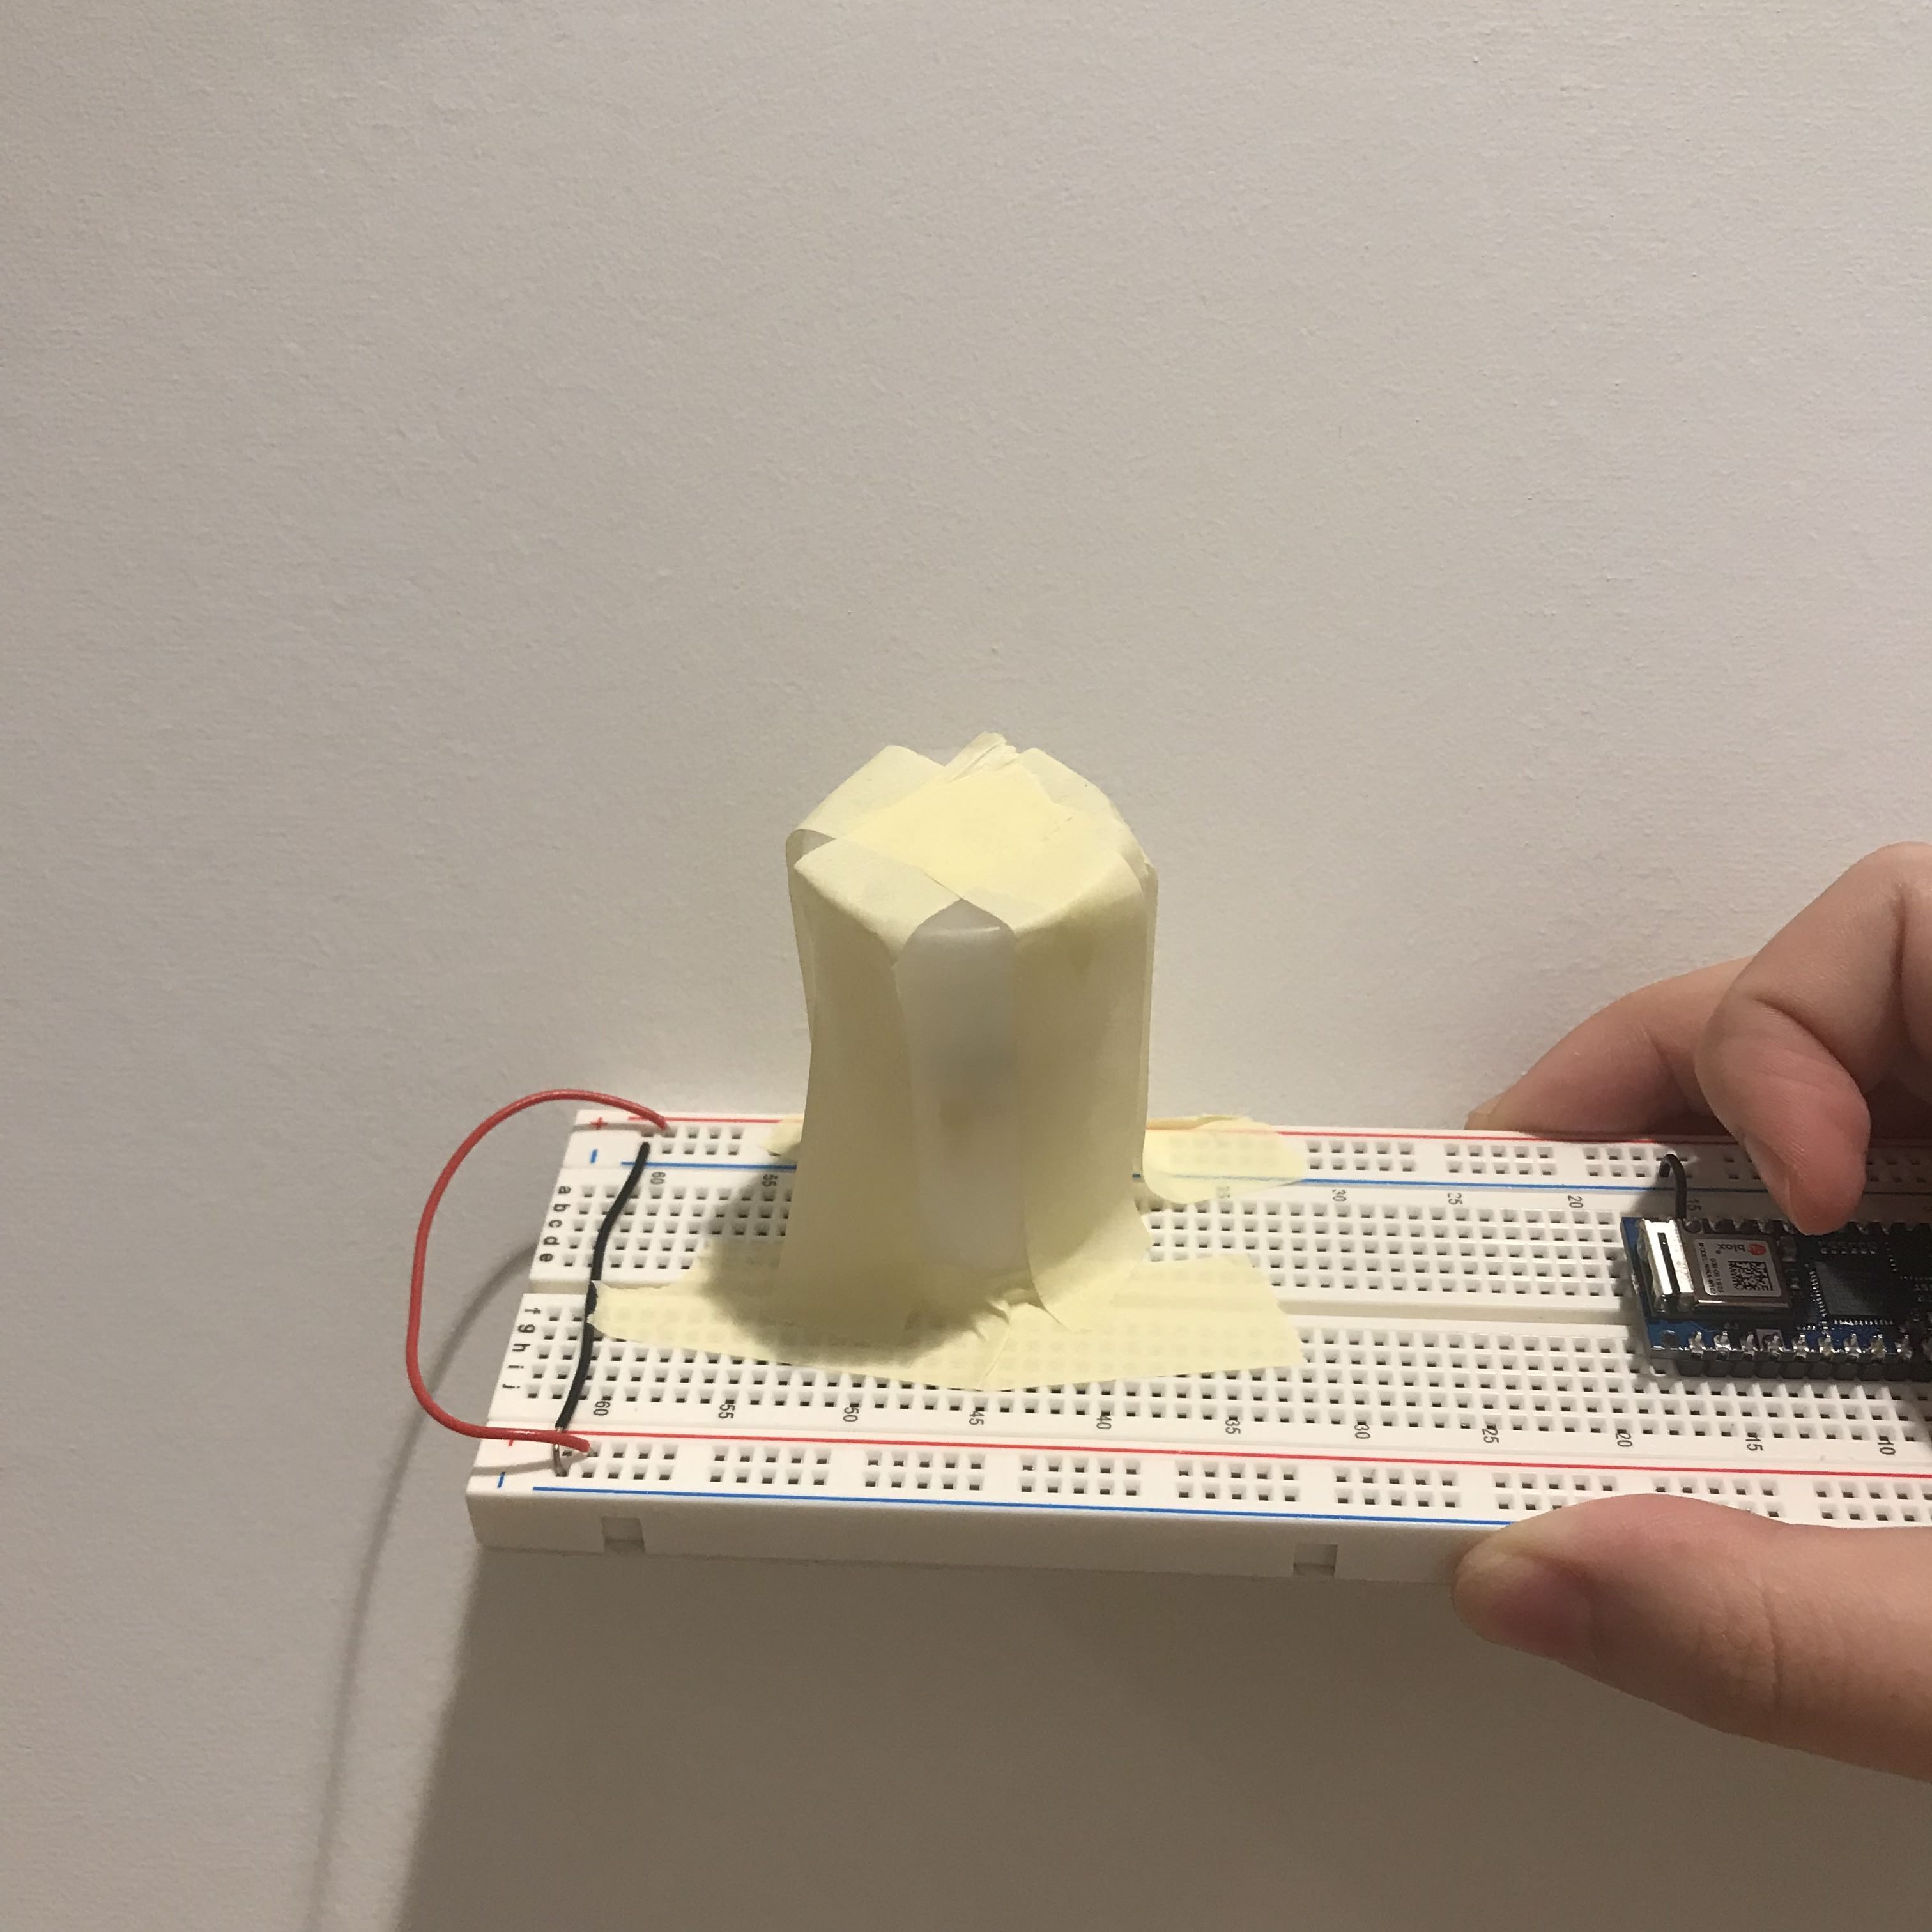
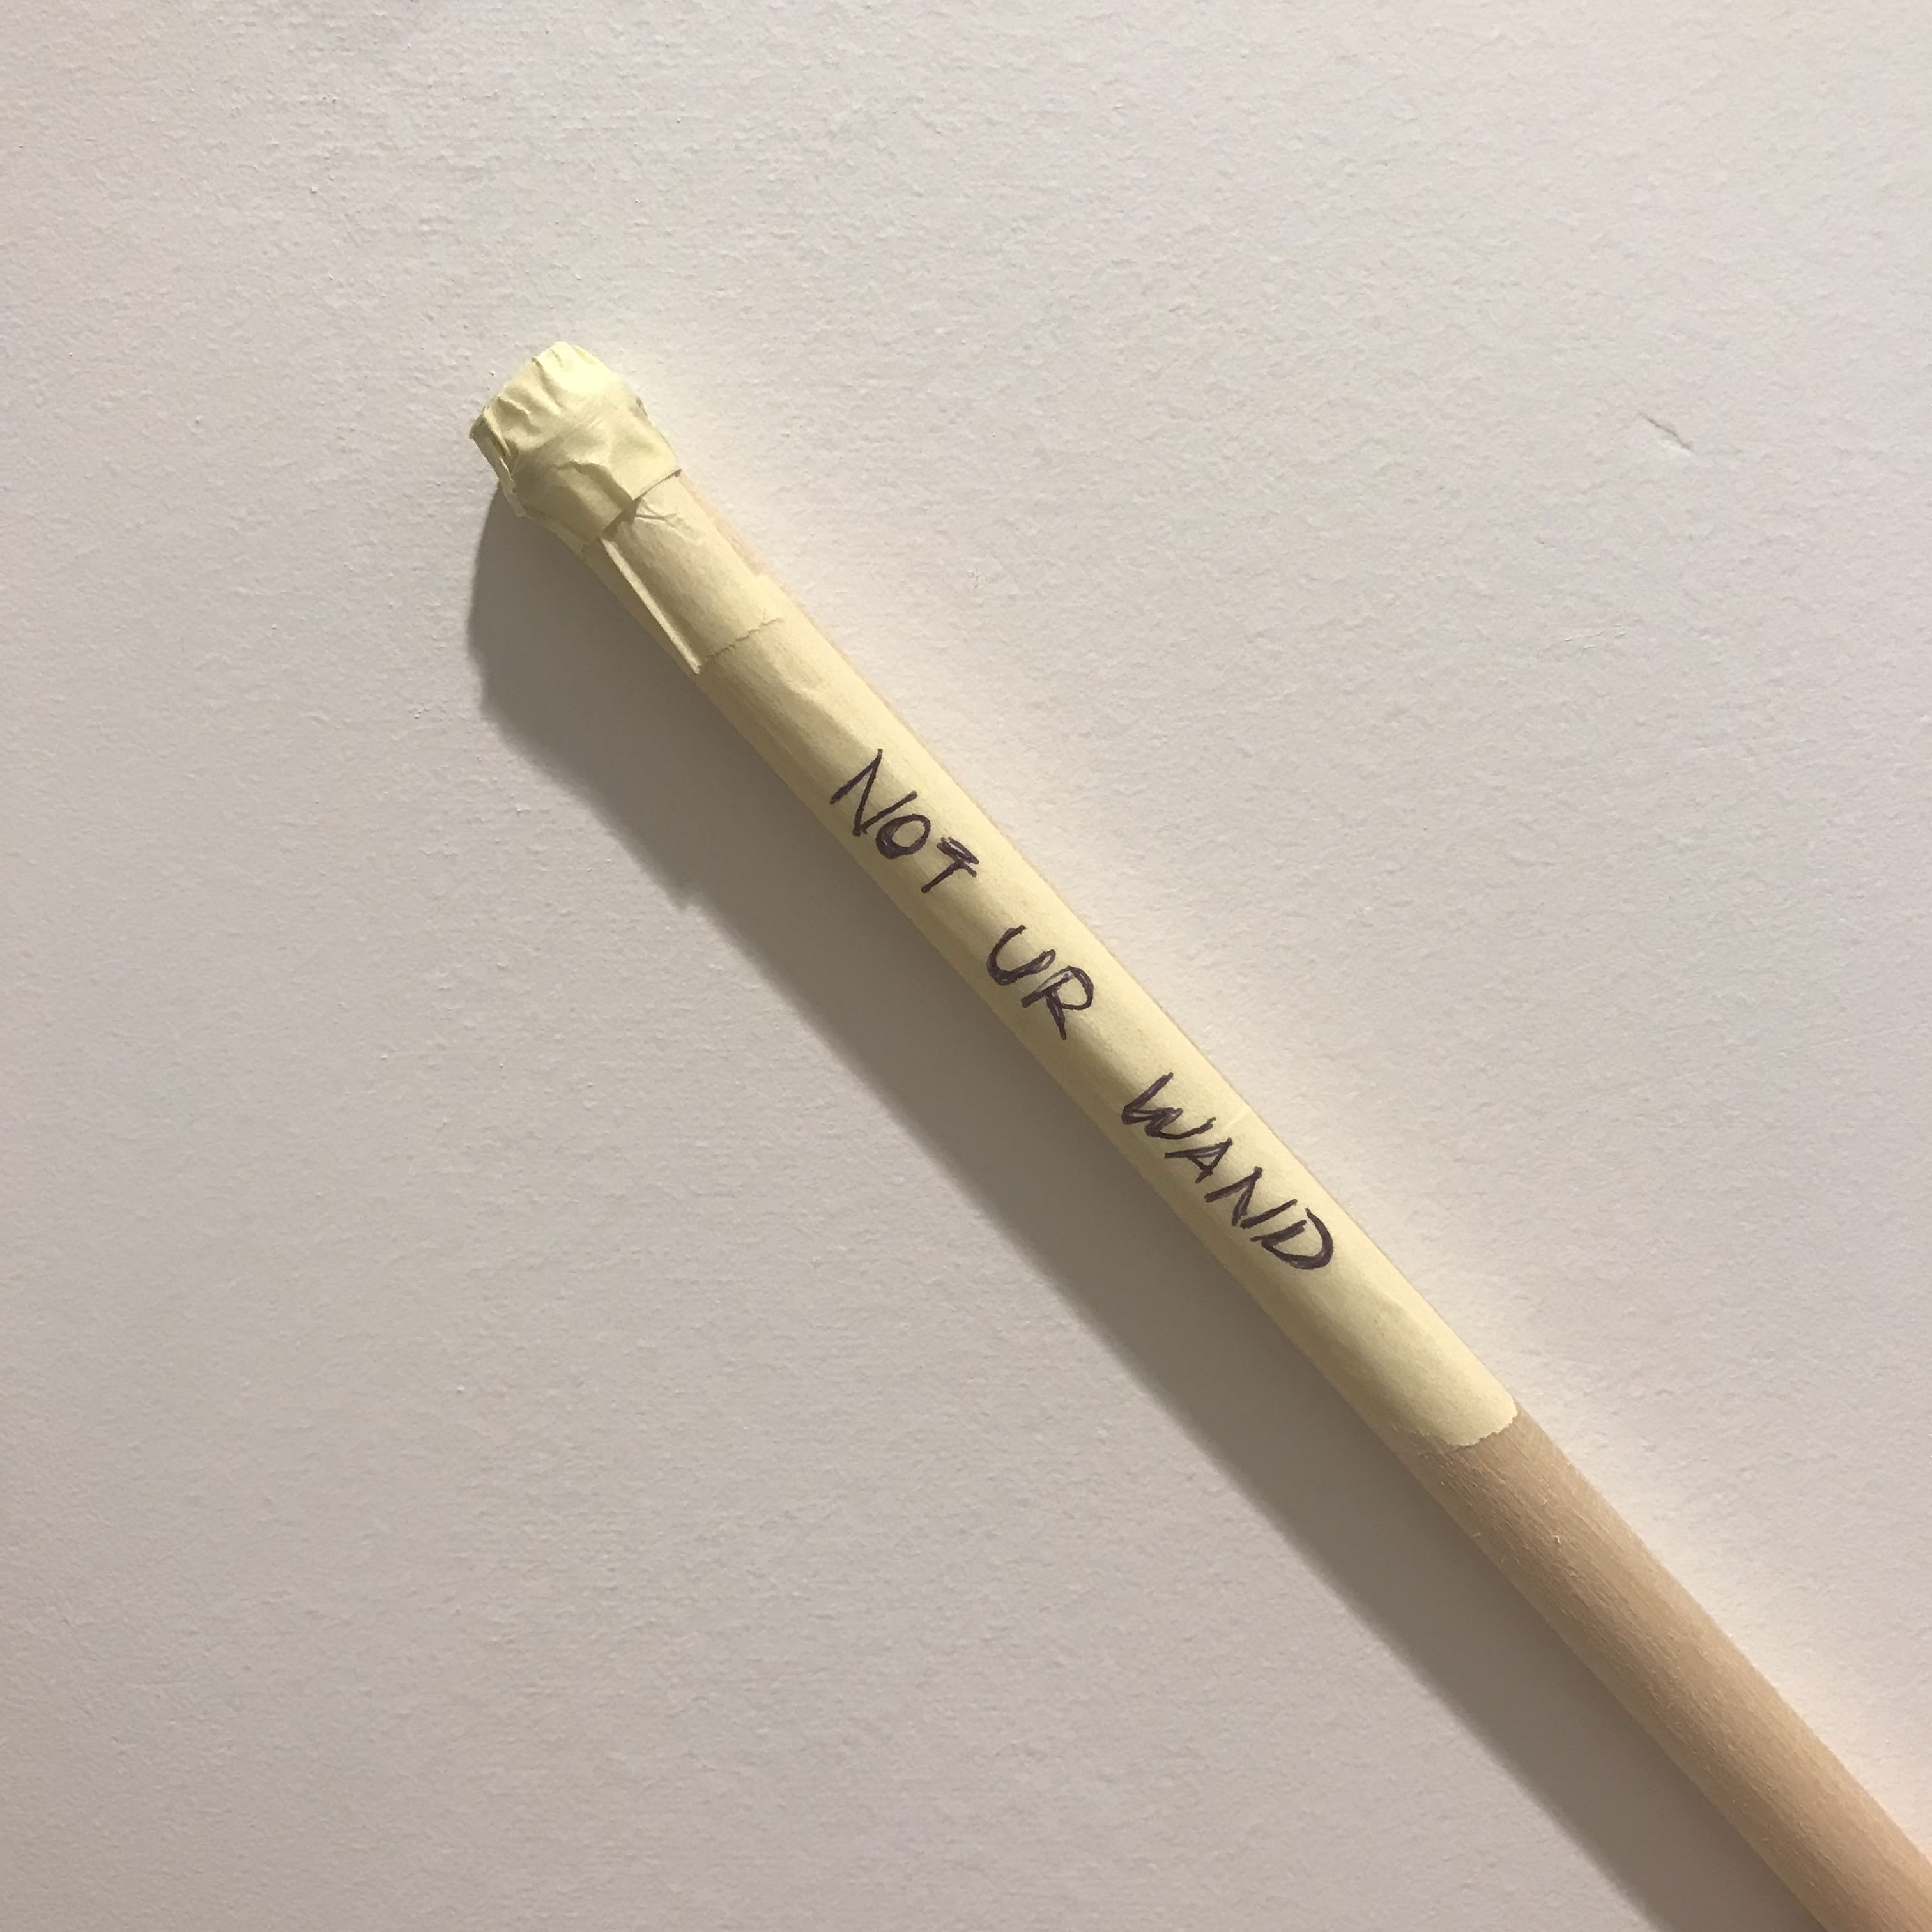
And then, I want to hide the magic so I covered up everything with a film case, with a wand that has hidden magnets at the tip of it:
Week 1 - art-of-interactive-design and the future of it
The Art of Interactive Design: A Euphonious and Illuminating Guide to Building Successful Software
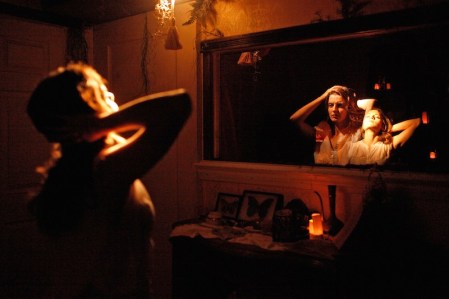
Chris gives his definition of interactivity, that is interactivity involves the an alternately process of listening, thinking and speaking of two actors. It’s very interesting how he deny the ‘activities’ (such as reading, dancing, watching movies and etc.) that people tend to mention as interactivity to be interactivity. Also, as an interaction (not interactivity) designer, how he differentiate Human-Factor Design, UI design and Interactivity Design really gives me an idea but I feel I still need to read more on this to learn his idea more solidly.After reading the first chapter made me tend to rethink about the immersive shows: Sleep No More and Then She Fell.
Whereas people mention them as the ineractive shows. Whether they are truly interactive or they are just an audience-participative show. My experience at Sleep No More is definitely a participation, never a interaction. Where you get to step into the performing area (since the entire building is their stage) and have little touches with the performers. Some lucky audience might be selected for 1 on 1 performances, but rather than “two actors alternatively listen, think and speak”, it’s more likely the performer do the speaking (only to you, with set lines), and the audience react. But my experience in Then She Fell could be in the degree of interactivity, a low to medium interactivity happened. The scale of the audience is way smaller than the one mentioned previously, that might also be what he mentioned in the first chapter “as audience size shrinks, the statistical factors become less adamant.” For every show there will only be 15 audience, with the similar (or maybe more) amount of performer. Most of the scenes I experienced in this show are 1 on 1 or two audiences with four of the performers. The most memorable part in the entire show, also, the part I considered as a medium interaction happening, is when I’m having a 1 on 1 scene with the heroine and we had a conversation about relationship. Her opening question might be a set line, but whatever comes after that involved both of our listening, thinking and speaking. Yet, I call it a low-to-medium interactivity is because we were strangers and it is hard to give good feedback for such personal topics, so it was not an useless (cliche) conversation (but it was still fun as it appeared in the show).
In the next chapter he mentioned the relationship of computer and interactivity, which he suggested that the main "selling point" of a computer is its interactivity, by giving the example of ViSiCalc--the very first spreadsheet software on personal computers that allows the user to see the result/output directly on screen. This high efficiency indicates a sucessful, productive interactivity that a computer can provide. Thus, interactivity surely is the competitive advantage for computers.
A Brief Rant on the Future of Interaction Design
Victor talked about how our activity had been limited down to Pictures Under Glass. He start by defining a good tool is designed to fit both sides (capability vs. need). Talking about human capability, the thing that we use to interact with future technologies will be our hands. Our hands receive feedbacks from almost everything in this world—we notice when we grabbed two pages at once when we are reading and trying to slip apart by rubbing them; we feel the change in weight of a glass of water when it’s getting lesser and lesser; we feel the different texture of tissue papers and select each for different usages. However, our technology devices nowadays, which we spend most of our tactile experience with, are all so-called the Pictures Under Glass. Victor deny the saying of touchscreen devices to be the future of interaction, instead, sort of a backward in interaction (I felt it actually sounded too esthetically when he mentioned black and white in photography. I like film and black and white <3 ).Now, almost every services had been shrinken down to the size of the “glass brick” we carry in hand. The “User-Friendly” we mentioned nowadays are also only up to the extend of how hands handle this glass, but not about our hands. After reading this, I really feel even though these digital products provide us conveniency to almost every service just by clicking on this glass, but it limits the potential interaction that our hand can have to things in the world. Also, this concept of smart device generation limits our capability as a designer. We thought that accessibility lives in that tiny glass brick, and ignored the subject that we are doing this for—us.